LOG IN
REGISTER
Forums
New Member Section
How to use this Site
Introduce yourself
New Member RX-7 Technical
Website-related Comments, Suggestions and Issues
Vendors Forums
Private Vendor Forums
Vendor Classifieds
Generation Specific
3rd Generation Specific (1993-2002)
2nd Generation Specific (1986-1992)
1st Generation Specific (1979-1985)
Old School and Other Rotary
Tech and Performance
General Rotary Tech Support
Race Car Tech
Single Turbo RX-7's
Rotary Car Performance
V-8 Powered RX-7's
Suspension/Wheels/Tires/Brakes
Engine Management Forum
Interior / Exterior / Audio
Classifieds
The NEW RX7 Marketplace
New/Old Products Review - Non Vendor parts
Regional Forums / Upcoming Events
Rotary Owner Events
NE RX-7 Forum
SE RX-7 Forum
Midwest RX-7 Forum
Mountain RX-7 Forum
South RX-7 Forum
NW RX-7 Forum
West RX-7 Forum
Canadian Forum
European Forum
Australia and New Zealand Forum
Far East Forum
Latin America Forum
General Topics
Racing Kills Lounge
RX-7 Audio/Visual Lounge
Test Area 51
Rotary Archives
Marketplace
Vendor Directory
Become a Vendor
Member Marketplace
Vendor Marketplace
New Posts
Tools
Car Payment Calculator
Tire Rim Calculator
Vin Decoder
Recalls
Technical Service Bulletins (TSBs)
Members List
Live Feed
Gallery
View Dark Mode
Please register or login to enable Dark Mode.
Log In
Register
Threads
Google
Threads
Posts
Advanced
Dark Mode
Please register or login to enable Dark Mode.
Log In
Forgot your Password?
By logging into your account, you agree to our
Terms of Use
and
Privacy Policy
, and to the use of cookies as described therein.
or
Login with Google
Login with Facebook
Recent
Commented
Albums
My Pictures
Pete_89T2's Photos
View Profile
Sort:
Most Recent
Most Recent
Most Comments
Albums
Photos
0
2026/06/09 07:00:49
Pete_89T2
0
2026/05/19 15:24:07
Pete_89T2
0
2026/05/16 10:58:13
Pete_89T2
0
2026/05/12 14:28:12
Pete_89T2
0
2026/04/07 12:18:45
Pete_89T2
0
2026/04/07 12:18:44
Pete_89T2
0
2026/04/07 12:18:43
Pete_89T2
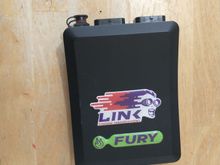
Photo of Link ECU serial number/bar code sticker. ECU is unlocked & registered for lifetime warranty coverage support
0
2026/04/06 12:43:59
Pete_89T2
Connector side view of the ECU; the round connector cover with the "T" marked on it is for the tuning cable connection (tuning cable included but not pictured)
0
2026/04/06 12:43:57
Pete_89T2
Mounting plate/bracket included
0
2026/04/06 12:43:55
Pete_89T2
Link G4+ Fury wire-in ECU photo
0
2026/04/06 12:43:52
Pete_89T2
0
2026/02/17 15:42:34
Pete_89T2
0
2026/01/12 09:08:26
Pete_89T2
0
2026/01/06 08:05:05
Pete_89T2
0
2026/01/06 07:49:01
Pete_89T2
Photo showing serial # and PC Board version
0
2026/01/04 07:21:24
Pete_89T2
Connector side, the "T" marking I added indicates which of those 2 round connectors is for the USB tuning cable, the other round one is for the 2nd CAN bus connector
0
2026/01/04 07:21:22
Pete_89T2
Photo of the ECU + mounting bracket
0
2026/01/04 07:21:20
Pete_89T2
Shot of the ECU
0
2026/01/04 07:21:18
Pete_89T2
0
2026/01/04 07:20:35
Pete_89T2
0
2026/01/04 07:16:38
Pete_89T2
0
2026/01/04 07:15:46
Pete_89T2
0
2026/01/04 07:12:08
Pete_89T2
0
2026/01/04 07:06:16
Pete_89T2
0
2026/01/03 15:51:09
Pete_89T2
0
2026/01/03 15:50:10
Pete_89T2
0
2026/01/03 09:45:23
Pete_89T2
0
2026/01/03 09:44:55
Pete_89T2
0
2026/01/03 06:54:41
Pete_89T2
0
2026/01/03 06:45:28
Pete_89T2
0
2026/01/03 06:36:04
Pete_89T2
0
2026/01/03 06:25:52
Pete_89T2
0
2026/01/03 06:24:07
Pete_89T2
0
2026/01/03 06:20:59
Pete_89T2
0
2026/01/03 06:20:15
Pete_89T2
0
2026/01/03 05:49:19
Pete_89T2
0
2025/12/31 07:29:15
Pete_89T2
0
2025/12/27 07:11:53
Pete_89T2
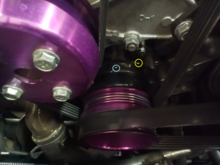
Here's a shot of the initial test fit of the G5 & MCE18 on its mounting plate.
0
2025/12/27 07:01:46
Pete_89T2
0
2025/12/27 07:01:44
Pete_89T2
First
Page
1 of 4
Last
Go To
Page
1
2
3
4
1 of 4
Go To
GO
Go to page
of 4
pages
1
2
3
4