LOG IN
REGISTER
Forums
New Member Section
How to use this Site
Introduce yourself
New Member RX-7 Technical
Website-related Comments, Suggestions and Issues
Vendors Forums
Private Vendor Forums
Vendor Classifieds
Generation Specific
3rd Generation Specific (1993-2002)
2nd Generation Specific (1986-1992)
1st Generation Specific (1979-1985)
Old School and Other Rotary
Tech and Performance
General Rotary Tech Support
Race Car Tech
Single Turbo RX-7's
Rotary Car Performance
V-8 Powered RX-7's
Suspension/Wheels/Tires/Brakes
Engine Management Forum
Interior / Exterior / Audio
Classifieds
The NEW RX7 Marketplace
New/Old Products Review - Non Vendor parts
Regional Forums / Upcoming Events
Rotary Owner Events
NE RX-7 Forum
SE RX-7 Forum
Midwest RX-7 Forum
Mountain RX-7 Forum
South RX-7 Forum
NW RX-7 Forum
West RX-7 Forum
Canadian Forum
European Forum
Australia and New Zealand Forum
Far East Forum
Latin America Forum
General Topics
Racing Kills Lounge
RX-7 Audio/Visual Lounge
Test Area 51
Rotary Archives
Marketplace
Vendor Directory
Become a Vendor
Member Marketplace
Vendor Marketplace
New Posts
Tools
Car Payment Calculator
Tire Rim Calculator
Vin Decoder
Recalls
Technical Service Bulletins (TSBs)
Members List
Live Feed
Gallery
View Dark Mode
Please register or login to enable Dark Mode.
Log In
Register
Threads
Google
Threads
Posts
Advanced
Dark Mode
Please register or login to enable Dark Mode.
Log In
Forgot your Password?
By logging into your account, you agree to our
Terms of Use
and
Privacy Policy
, and to the use of cookies as described therein.
or
Login with Google
Login with Facebook
Recent
Commented
Albums
My Pictures
My Post Pictures
Pete_89T2
February 7, 2019
689
1
Sort:
Default
Default
Most Recent
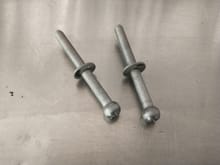
The new "fixed" screw just goes right thru the plastic retainer, so I didn't need to grind it. The spring tension is what keeps the retainer against the threaded screw.
0
2023/04/20 14:22:04
Pete_89T2
These are the OEM "fixed" screws; they bottom out in the bucket against the captive washer. So I replaced these with fully threaded pan head M5x0.8 Phillips screws that were slightly longer (60mm vs 50)
0
2023/04/20 14:22:08
Pete_89T2
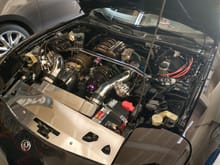
Ready to roll!
0
2023/04/21 08:13:10
Pete_89T2
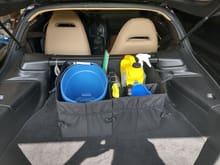
Tool bag in the passenger side bin, most of my cleaning gear & premix lube supplies in the hatch, driver's side bin still vacant. Now I just need to pack my clothes in a smallish duffel bag
0
2023/04/21 08:14:32
Pete_89T2
0
2023/05/02 09:27:32
Pete_89T2
0
2023/05/26 07:50:05
Pete_89T2
0
2023/06/02 12:32:28
Pete_89T2
0
2023/07/03 08:57:19
Pete_89T2
0
2023/07/08 04:42:05
Pete_89T2
0
2023/07/24 13:08:31
Pete_89T2
0
2023/07/29 08:41:39
Pete_89T2
This one is for the House
0
2023/08/16 11:24:15
Pete_89T2
And here's the stats for the Senate.
0
2023/08/16 11:24:16
Pete_89T2
0
2023/10/19 12:12:03
Pete_89T2
0
2023/10/19 12:39:17
Pete_89T2
0
2023/10/20 13:51:41
Pete_89T2
0
2023/10/20 13:51:43
Pete_89T2
0
2023/11/06 06:06:11
Pete_89T2
0
2023/11/06 06:22:28
Pete_89T2
0
2023/11/06 06:33:49
Pete_89T2
0
2023/11/22 09:03:39
Pete_89T2
0
2023/11/22 11:16:09
Pete_89T2
0
2023/11/22 15:33:11
Pete_89T2
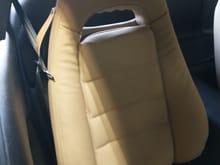
Passenger seat photo, 11/24/23
0
2023/11/24 15:29:28
Pete_89T2
Driver's seat photo, 11/24/23
0
2023/11/24 15:29:33
Pete_89T2
0
2023/12/06 17:53:07
Pete_89T2
0
2023/12/08 12:49:53
Pete_89T2
0
2023/12/15 09:26:15
Pete_89T2
0
2023/12/15 10:01:25
Pete_89T2
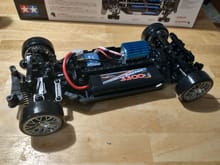
It's a Tamiya 1/10th scale FD radio control drift missile!
0
2023/12/27 14:51:59
Pete_89T2
Chassis is almost done. Need to buy a transmitter/receiver to finish it. Loving the all wheel drive & fully independent suspension. Actually had to assemble the oil filled shock dampers & coil overs myself
0
2023/12/27 15:04:30
Pete_89T2
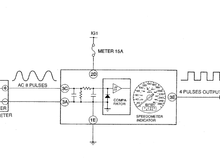
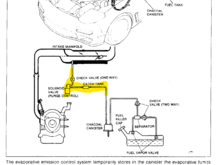
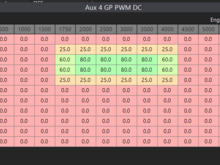
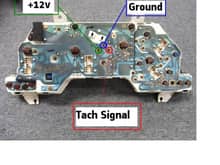
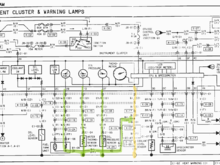
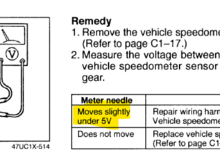
This is a block diagram of the speedometer circuit from the FD Service Highlights document
0
2024/01/04 12:48:04
Pete_89T2
0
2024/01/04 13:03:03
Pete_89T2
0
2024/01/04 13:25:24
Pete_89T2
0
2024/01/09 11:59:22
Pete_89T2
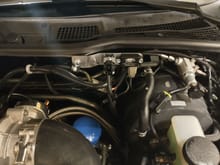
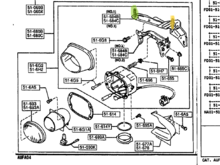
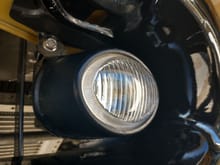
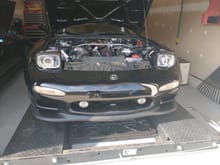
Here's the fogs installed on the bumper rebar - here you can figure out why the bumper needs to come off to thread the nuts on those 2 outboard fog bracket studs. This picture also shows the finished fog light sub-harness I had to fab up to connect to the OEM connector on the front (F) harness
0
2024/01/12 16:09:50
Pete_89T2
And here's the left fog installed showing the newly trimmed IC duct - everything fits & works now!
0
2024/01/12 16:09:55
Pete_89T2
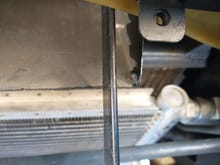
Here you can see the corner edge of my IC ducting that interfered with the left fog light housing.
0
2024/01/12 16:10:01
Pete_89T2
Finished fogs!
0
2024/01/12 16:10:54
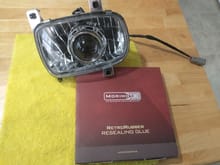
Pete_89T2
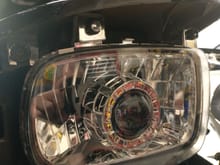
Since this is the 2nd time opening up these housings, I removed all the old sealant and replaced it with the pictured Morimoto butyl rubber sealant that I had left over from when I did my HID projector retrofit on my FC
0
2024/01/12 16:29:21
Pete_89T2
First
Page
14 of 18
Last
Go To
Page
1
...
12
13
14
15
16
17
18
14 of 18
Go To
GO
Go to page
of 18
pages
1
...
12
13
14
15
16
17
18