
Pics of my engine rebuild

Thread Starter
Place your ad here...
Joined: Apr 2002
Posts: 1,336
Likes: 2
From: Dayton, OH
Pics of my engine rebuild
I just finished a complete engine rebuild a few months ago, and figured I would post a pictorial write-up of my experience. I�ve been meaning to do this for a while now, but just recently got around to posting it. Any comments and questions are welcomed.
The car that this thread pertains to is my 93 Touring. I purchased it many years ago from the original owner. At the time of purchase, the car had less than 45k miles, and now has approximately 55k. Unfortunately, in 2003 a bad coolant seal on the front rotor put the engine in it�s grave. I was fighting the famous o-ring symptoms for quite some time, and I finally broke down and decided to rebuild it. Interestingly enough, previously to this, the car was never overheated, nor did it have any heat/coolant related issues.
In June 04, I finally came across the time and money to start the project. I do all my own work on my car, and this situation is no different. I�ve done a few engine pulls/rebuilds before, but this was my first rotary experience. Since I was going through the effort to remove and rebuild the engine, I decided that I might as well build it up slightly (this included a nice street port from Steve Kan, removing all the emissions equipment, new turbos, intercooler, etc). The focus on the buildup of this car was for street and occasional road-course use.
Here�s a quick snap of the car taken about a year ago:
Thread Starter
Place your ad here...
Joined: Apr 2002
Posts: 1,336
Likes: 2
From: Dayton, OH
When I started the project (last June) my dad stopped by for the weekend to help me pull the motor out of the car. We started with prepping the engine to be pulled (draining fluids, disconnecting pipes and wire, etc). We took our time (not to mention plenty of beer-breaks).
For the most part, everything came apart relatively easily. No major problems, other than snapping the PS pulley in half... (bought a new one in the FS section for about $5).
For the most part, everything came apart relatively easily. No major problems, other than snapping the PS pulley in half... (bought a new one in the FS section for about $5).
Thread Starter
Place your ad here...
Joined: Apr 2002
Posts: 1,336
Likes: 2
From: Dayton, OH
Sometime Saturday afternoon (after another beer/pizza break), we got around to hooking up the hoist. I didn�t have a load/leveler, nor was I able to really jack the car up high enough. So, I just decided to yank the engine with the tranny still in the car. This decision really came back to bite me in the *** during the re-install process (I knew it would). Next time, I�ll definitely be pulling the tranny with the engine. I removed the motor mounts to give me a little wiggle room, and then unbolted the bellhousing (14mm, U-joint, 24� extension, 2ft breaker bar, and it was still a pain in the ***).
The last picture is just for reference to show my workspace: 2 single-car garages. One for the car, and one to build the engine (and store the left-over parts)
The last picture is just for reference to show my workspace: 2 single-car garages. One for the car, and one to build the engine (and store the left-over parts)
Thread Starter
Place your ad here...
Joined: Apr 2002
Posts: 1,336
Likes: 2
From: Dayton, OH
Time to bust loose that fly-nut. I didn�t have any air tools at the time (do now). So I used a crap-load of PB-Blaster, a 2ft breaker bar, and a 4ft cheater pipe slipped over the end of that. I took a piece of angle iron, drilled a couple holes in it, and bolted it to the fly to keep it stationary. The fly-nut popped off without a problem. Same with the 19mm front hub bolt.
Thread Starter
Place your ad here...
Joined: Apr 2002
Posts: 1,336
Likes: 2
From: Dayton, OH
Here�s a few more pics of some of the parts after disassembly. The last two pictures show exactly what caused the motor to be torn down in the first place: approximately 1/2" worth of missing/damaged inner O-ring�.
Trending Topics
Thread Starter
Place your ad here...
Joined: Apr 2002
Posts: 1,336
Likes: 2
From: Dayton, OH
While the engine was apart, and I was busy cleaning/spec�ing pieces, I decided to have a few of the parts coated. I found a local powder/ceramic coater and went to town.
The LIM and UIM were coated in 1300deg �chrome� ceramic. The exhaust manifold, and downpipe were coated in their 2000deg black. Most of the rest of the engine parts were powdercoated in either red, or chrome&clear.
The LIM and UIM were coated in 1300deg �chrome� ceramic. The exhaust manifold, and downpipe were coated in their 2000deg black. Most of the rest of the engine parts were powdercoated in either red, or chrome&clear.

Thread Starter
Place your ad here...
Joined: Apr 2002
Posts: 1,336
Likes: 2
From: Dayton, OH
All the parts spec�ed out fine, so I decided to reuse many of them. The housings actually looked really good (just a small bit of chrome flaking on the edges). I did, however, use completely new seals all around. Most of them were Mazda parts, but I did try the Rotary Aviation apex seals to see how they work (of course, there�s lots of controversy on this now� we�ll see how long they last).
Housings were sent down to Gotham to be ported by Steve Kan. He gave both the intake and exhaust a nice smooth street port.
Housings were sent down to Gotham to be ported by Steve Kan. He gave both the intake and exhaust a nice smooth street port.
Thread Starter
Place your ad here...
Joined: Apr 2002
Posts: 1,336
Likes: 2
From: Dayton, OH
I built my own motor mounts using 80-shore-A urethane. I think they�ll work out pretty well. Also note the new 99-spec turbos. I was planning on just sticking with the stockers, but I got an absolutely killer deal on these that I just couldn�t refuse. I�m not interested in a single turbo, nor am I interested in running these non-seq. So I just decided to simplify the sequential system while I had everything in pieces. Unfortunately, it�s still not quite as clean as I would like, so I decided recently to custom build a new vacuum manifold system with aftermarket solenoids. Until then, I just slapped the stock solenoids in there (not very organized). I�ll post a thread on the custom solenoid system soon (I�m very close to completion).
Thread Starter
Place your ad here...
Joined: Apr 2002
Posts: 1,336
Likes: 2
From: Dayton, OH
Re-install process. Man what a pain in the *** it was to line up the tranny and engine. Actually, the biggest pain wasn�t lining up the input shaft, it was getting the bellhousing close enough to start threading the bolts into the rear housing.
Thread Starter
Place your ad here...
Joined: Apr 2002
Posts: 1,336
Likes: 2
From: Dayton, OH
After I reinstalled everything, it was time to fire her up. I checked and double-checked everything to make sure that there was nothing that I forgot. That was when I noticed the waterpump was leaking at the seephole. I waited a few days for my new one to arrive from Malloy. After installing the new pump and triple-checking everything one more time, I got in and cranked� nothing� just the constant �whir� of the starter. Good ol� Murphy was at it again. About 2 seconds later it dawned on me that I forgot to attach the spark plug wires to the plugs. Oops. After that, the car instantly fired up.
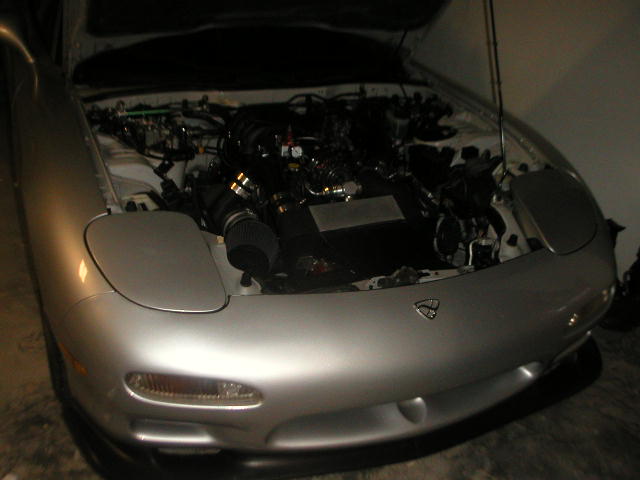
And this is what it looks like now. ASP Medium IC, turbojeff 51R battery tray, new intake pipes, etc, etc, etc.
The car currently has about 1100 miles since the rebuild, and it�s going strong. At idle and partial-throttle, it purrs like new. Very smooth and relatively quiet. At WOT, it just plain screams. I�m only running at 10psi right now (actually, slightly less) because I really haven�t gotten it tuned for higher boost. But even at that level it pulls harder than it ever did before. I�m quite happy with it!
Thread Starter
Place your ad here...
Joined: Apr 2002
Posts: 1,336
Likes: 2
From: Dayton, OH
Originally Posted by broken93
Very, very nice. Clean and thorough work. I am quite impressed.
Who is your coater, and if you don't mind me asking, what did the coating cost you?
Who is your coater, and if you don't mind me asking, what did the coating cost you?

I had the parts coated at a place called Aesthetic Finishers (www.afipowder.com), located just north of Dayton, OH. Unfortunately, its hard to remember the exact prices (I had them done back in July). But as I recall, the ceramic coating cost me $300. That was for 2 intake pieces coated with 1300deg, and the 2 exhaust pieces coated with 2000deg (keep in mind that the 2000deg is generally more expensive). The total for powder coating came to just under $300 (I think it was about 280). This included: the irons, rotor housings, front cover, water pump housing, alternator covers, ac/ps bracket, and a few more miscellaneous brackets and pieces (I think there was 13 pieces in all). Hope that helps
development
Joined: Aug 2002
Posts: 5,714
Likes: 7
From: Lafayette, LA
Great job! Looks new, I think anyone who has built an engine has the same exact photo's...just in their garage, haha!
I did the same, refinished everything...except in black and went single with accompaning mods.
^sorry, not trying to steal your thunder, just happy I know how proud you are!
Tell me that's not a sleeper in the shadows!?!?!?!
I did the same, refinished everything...except in black and went single with accompaning mods.
^sorry, not trying to steal your thunder, just happy I know how proud you are!
Tell me that's not a sleeper in the shadows!?!?!?!

apex seal BBQ
Joined: Sep 2002
Posts: 867
Likes: 1
From: AL
Originally Posted by saxyman990
Thanks!
I had the parts coated at a place called Aesthetic Finishers (www.afipowder.com), located just north of Dayton, OH. Unfortunately, its hard to remember the exact prices (I had them done back in July). But as I recall, the ceramic coating cost me $300. That was for 2 intake pieces coated with 1300deg, and the 2 exhaust pieces coated with 2000deg (keep in mind that the 2000deg is generally more expensive). The total for powder coating came to just under $300 (I think it was about 280). This included: the irons, rotor housings, front cover, water pump housing, alternator covers, ac/ps bracket, and a few more miscellaneous brackets and pieces (I think there was 13 pieces in all). Hope that helps
I had the parts coated at a place called Aesthetic Finishers (www.afipowder.com), located just north of Dayton, OH. Unfortunately, its hard to remember the exact prices (I had them done back in July). But as I recall, the ceramic coating cost me $300. That was for 2 intake pieces coated with 1300deg, and the 2 exhaust pieces coated with 2000deg (keep in mind that the 2000deg is generally more expensive). The total for powder coating came to just under $300 (I think it was about 280). This included: the irons, rotor housings, front cover, water pump housing, alternator covers, ac/ps bracket, and a few more miscellaneous brackets and pieces (I think there was 13 pieces in all). Hope that helps
