
How to Test your solenoids, actuators, and other turbo stuff


How to Test your solenoids, actuators, and other turbo stuff
This thread is to compile the testing information for stock turbo control parts.
I firmly believe that anyone can make their stock turbos run well if they thoroughly test everything under the hood and get it up to spec. The trouble is most people don't know how to properly test each component. It doesn't help that the Mazda FSM test procedures are incomplete or insufficient. (I can't imagine how many thousand$$ would have been saved in dealer bills if the FSM had more detail on this).
My approach to the so-called "vacuum hose job" is to invest $100 in these tools, another $50 in spare solenoids. Then test everything and reassemble with new vacuum hoses and only the solenoids that work perfectly. You can find links about the hose job in the FAQ.
Please give me the weekend to finish most of this thread before adding questions and stuff.
Last edited by dgeesaman; Nov 22, 2008 at 03:29 PM.

Popular Reply
Jan 31, 2025, 02:58 PM

First off, let me apologize for the 9 year comeback for this thread, but it's got lots of good info and seemed like the best place for this. I'm currently going thru an FD and started testing the solenoids. I had 1 solenoid that was DOA; there was no continuity on the coil so I thought it would be fun to see what's inside so people can see how they work and what the failure points really are. So this is the insides of the solenoid:

The bullet looking guy with the black tip is the only moving part. The black tip is actually a rubber seal that seals up against another cone inside the solenoid.

When the coil is not energized that little spring pushes the tip of the plunger into the housing sealing the "A" to "B" path and leaving the "B" to "C" path open. Then the coil energizes it pulls the plunger back into the right most port housing. There's an oring seal on the backside of the plunger that seals against the housing opening the "A" to "B" path and closing the "B" to "C" path. This solenoid likely would have leaked out port "C" due to the corrosion on the right port housing.

Interestingly enough all that debris on the plunger seal was inside the solenoid already which made me think that some of the failed solenoids might just need a good cleaning if the plunger is still moving fine. I had a few solenoids that leaked a tiny bit so I thought i'd try giving them the old razzle dazzle and see if they came back. I popped the whole solenoid into an ultrisonic cleaner with a little simple green and warm water in it. During the cleaning I did actuate the solenoid for a bit, and after the bath I immediate flushed them with WD40 to remove any remaining water and cycled the solenoid several times. To my enjoyment, every single solenoid that I cleaned is holding pressure and vac now. Your results may vary, but it worked really well for me and is certainly worth a try if you have access to an ultrasonic cleaner.
The bullet looking guy with the black tip is the only moving part. The black tip is actually a rubber seal that seals up against another cone inside the solenoid.
When the coil is not energized that little spring pushes the tip of the plunger into the housing sealing the "A" to "B" path and leaving the "B" to "C" path open. Then the coil energizes it pulls the plunger back into the right most port housing. There's an oring seal on the backside of the plunger that seals against the housing opening the "A" to "B" path and closing the "B" to "C" path. This solenoid likely would have leaked out port "C" due to the corrosion on the right port housing.
Interestingly enough all that debris on the plunger seal was inside the solenoid already which made me think that some of the failed solenoids might just need a good cleaning if the plunger is still moving fine. I had a few solenoids that leaked a tiny bit so I thought i'd try giving them the old razzle dazzle and see if they came back. I popped the whole solenoid into an ultrisonic cleaner with a little simple green and warm water in it. During the cleaning I did actuate the solenoid for a bit, and after the bath I immediate flushed them with WD40 to remove any remaining water and cycled the solenoid several times. To my enjoyment, every single solenoid that I cleaned is holding pressure and vac now. Your results may vary, but it worked really well for me and is certainly worth a try if you have access to an ultrasonic cleaner.

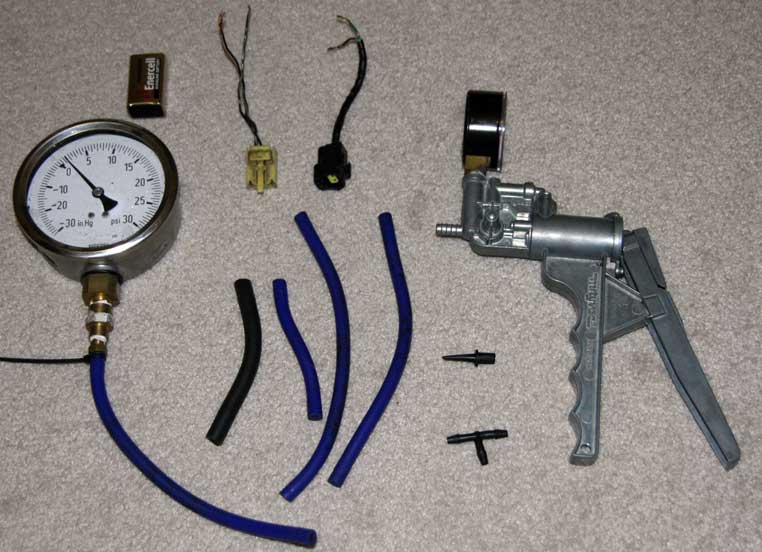
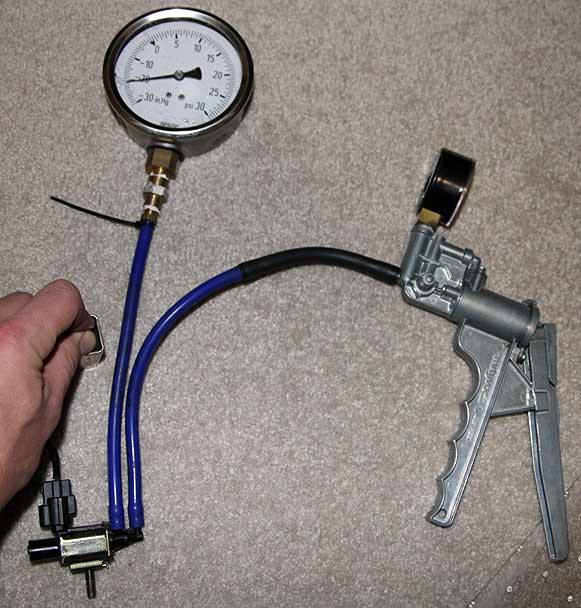
Tools
First, the tools I use for testing.
1) Mityvac vacuum pump kit. Get the Silverline Plus version because it has both pressure and vacuum readouts on the dial.
2) Extra vacuum hose. I prefer silicone because it's extra stretchy and it seals really well.
3) Tee fittings. McMaster-Carr has these under "tube fittings"
4) A 9V battery. The solenoids usually work pretty well at 9v versus the normal 12v, and I figure it's a more conservative test if the solenoid coils aren't energized to their full potential.
5) Connector pigtails I got off of a trashed wiring harness. This makes the electrical tests a lot easier. Not necessary but very handy.
6) A multimeter (not pictured)
7) An extra boost gauge can come in handy. Just don't bang it around like I did or else it won't zero out anymore. It will still work well if you compensate the readings by that amount.
1) Mityvac vacuum pump kit. Get the Silverline Plus version because it has both pressure and vacuum readouts on the dial.
2) Extra vacuum hose. I prefer silicone because it's extra stretchy and it seals really well.
3) Tee fittings. McMaster-Carr has these under "tube fittings"
4) A 9V battery. The solenoids usually work pretty well at 9v versus the normal 12v, and I figure it's a more conservative test if the solenoid coils aren't energized to their full potential.
5) Connector pigtails I got off of a trashed wiring harness. This makes the electrical tests a lot easier. Not necessary but very handy.
6) A multimeter (not pictured)
7) An extra boost gauge can come in handy. Just don't bang it around like I did or else it won't zero out anymore.
It will still work well if you compensate the readings by that amount.
Last edited by dgeesaman; Nov 23, 2008 at 07:54 AM.
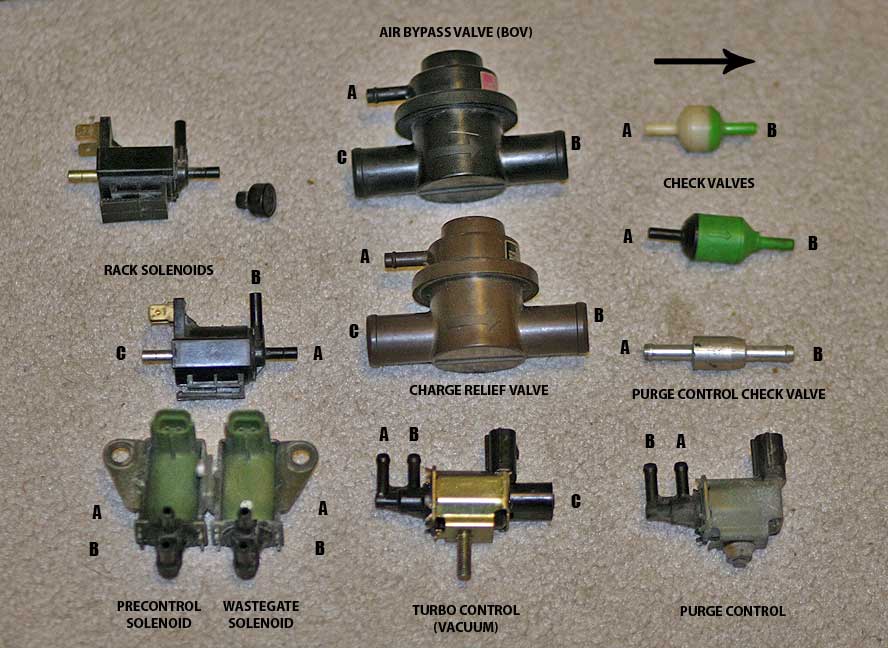
First, I'll test the basic rack solenoid.
In case you're not aware of it, a rack solenoid is a 3-way valve controlled by an electromagnetic coil. With no voltage, there is a spring inside that pushes the plunger into contact with one port of the solenoid and seals it off. When the coil is energized with 12v, the plunger gets drawn in the other direction, opening that port and sealing the other port.
Said another way, each solenoid has a source port ("A"), a dump port ("C"), and an output port ("B"). When not energized, the solenoid shuts off A and sends C to B. When energized, the solenoid shuts off port C and directs port A (usually connected to vacuum or pressure source) through port B. The output B is usually sent toward an actuator, the source is either the pressure or vacuum tank, and the dump port is usually sent to atmosphere. In a few cases when a normally open logic is required, C is used as the source and A is dump.
I lump all of the rack solenoids together because they are the same thing. The difference between them is only markings and the position of a filter if it has one. The filter is the black plastic thing with the polyester wool inside. You can pop them off and move them around depending whether the vacuum diagram calls out for one on that solenoid. My approach is to label each one and make up a chart noting the test results. I find that if I buy a full spare rats nest worth of solenoids, I have no trouble getting one full rack worth that pass the tests.
Most of the rack solenoids switch between full engine vacuum (about 20-25in"Hg) and atmospheric (zero) pressure. The turbo control pressure solenoid operates between pressure and atmospheric.
The most common failures are leakage of the plunger at one or both positions, a bad coil, and simply getting stuck. Some of these will happen only when the solenoid is hot, so I do each test cold and then repeat them with the solenoids hot. I do this carefully by heating the oven to 250F with the solenoids on one of those insulated cookie pans and covering them all with foil. About 10min in a warm oven gets everything nice and hot. I only take them out a couple at a time for hot tests because they cool off quickly.
You can find info in the FSM about testing this type of solenoid on page F-177. Basically it says to check for continuity over the electrical coil, and to use 12v to ensure the plunger moves inside the solenoid.
First, the resistance test:
Use your multimeter and test the resistance across the terminals. It should be about 40ohms, or a little more if the solenoid is hot. If it shows a resistance above 60 or below 30ohms, junk it.
Second, the basic leak test:
Apply full vacuum (25") and full pressure (15psi) to port A. If it leaks (slow leaks are not acceptable to me), junk it. If it passes the vacuum test but not the pressure test, you can still use it anywhere except the turbo control solenoid.
Third, the energized leak test:
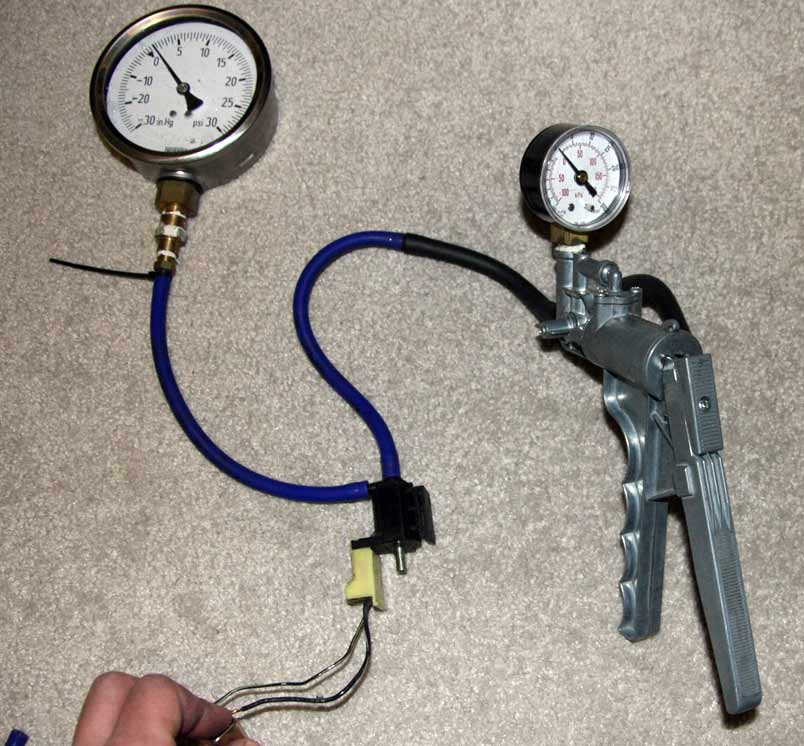
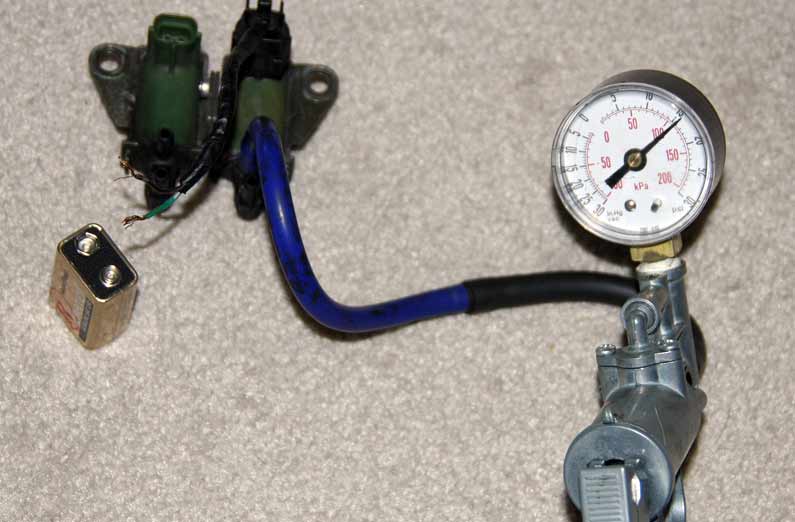
Set up like this, using your spare boost gauge or some other way to close off the output port B of the solenoid. Just a section of hose with a golf tee in the end will work if you don't have a spare gauge.
Connect the power source to the solenoid. It should click open immediately, and release immediately when the power is removed. I find that sometimes a solenoid that's been sitting on the shelf can stick, so you can give it a good rap and see if that gets it moving again. If a few taps doesn't get it moving freely, junk it. If you think you freed up a solenoid like that, let it sit and try it again tomorrow to be sure.
This time keep the solenoid energized and apply full vacuum with the pump. If you have a boost gauge on the output end you should see it clearly. Now let it sit for a moment and see if it leaks. Junk it if it leaks. Now disconnect the power and see that the vacuum immediately vents through port C, and the vacuum isn't leaking at A. Junk it if it leaks (becoming a theme here?)
Repeat the energized test again, using pressure. I start with 12psi. Pay close attention this time to whether it releases immediately after disconnecting the power. If it hisses for a bit before snapping open, it's not a good thing. If it sticks and won't release, it's not good either. This means the spring is too weak or the plunger assembly is too gunked up to push the port open against the pressure. I like to repeat the test a few times at increasing pressure until I figure out how of a pressure the solenoid can handle. If many of your solenoids don't pass this test but they pass the vacuum version of the tests, just be sure to only use them in a position where they will see only vacuum. I pick the solenoid that handles the highest pressure without sticking and use it as the turbo control solenoid. (Bonus tip: if you install a pressure regulator on the pressure tank, you're basically preventing this solenoid from getting stuck by excess pressure)
In case you're not aware of it, a rack solenoid is a 3-way valve controlled by an electromagnetic coil. With no voltage, there is a spring inside that pushes the plunger into contact with one port of the solenoid and seals it off. When the coil is energized with 12v, the plunger gets drawn in the other direction, opening that port and sealing the other port.
Said another way, each solenoid has a source port ("A"), a dump port ("C"), and an output port ("B"). When not energized, the solenoid shuts off A and sends C to B. When energized, the solenoid shuts off port C and directs port A (usually connected to vacuum or pressure source) through port B. The output B is usually sent toward an actuator, the source is either the pressure or vacuum tank, and the dump port is usually sent to atmosphere. In a few cases when a normally open logic is required, C is used as the source and A is dump.
I lump all of the rack solenoids together because they are the same thing. The difference between them is only markings and the position of a filter if it has one. The filter is the black plastic thing with the polyester wool inside. You can pop them off and move them around depending whether the vacuum diagram calls out for one on that solenoid. My approach is to label each one and make up a chart noting the test results. I find that if I buy a full spare rats nest worth of solenoids, I have no trouble getting one full rack worth that pass the tests.
Most of the rack solenoids switch between full engine vacuum (about 20-25in"Hg) and atmospheric (zero) pressure. The turbo control pressure solenoid operates between pressure and atmospheric.
The most common failures are leakage of the plunger at one or both positions, a bad coil, and simply getting stuck. Some of these will happen only when the solenoid is hot, so I do each test cold and then repeat them with the solenoids hot. I do this carefully by heating the oven to 250F with the solenoids on one of those insulated cookie pans and covering them all with foil. About 10min in a warm oven gets everything nice and hot. I only take them out a couple at a time for hot tests because they cool off quickly.
You can find info in the FSM about testing this type of solenoid on page F-177. Basically it says to check for continuity over the electrical coil, and to use 12v to ensure the plunger moves inside the solenoid.
First, the resistance test:
Use your multimeter and test the resistance across the terminals. It should be about 40ohms, or a little more if the solenoid is hot. If it shows a resistance above 60 or below 30ohms, junk it.
Second, the basic leak test:
Apply full vacuum (25") and full pressure (15psi) to port A. If it leaks (slow leaks are not acceptable to me), junk it. If it passes the vacuum test but not the pressure test, you can still use it anywhere except the turbo control solenoid.
Third, the energized leak test:
Set up like this, using your spare boost gauge or some other way to close off the output port B of the solenoid. Just a section of hose with a golf tee in the end will work if you don't have a spare gauge.
Connect the power source to the solenoid. It should click open immediately, and release immediately when the power is removed. I find that sometimes a solenoid that's been sitting on the shelf can stick, so you can give it a good rap and see if that gets it moving again. If a few taps doesn't get it moving freely, junk it. If you think you freed up a solenoid like that, let it sit and try it again tomorrow to be sure.
This time keep the solenoid energized and apply full vacuum with the pump. If you have a boost gauge on the output end you should see it clearly. Now let it sit for a moment and see if it leaks. Junk it if it leaks. Now disconnect the power and see that the vacuum immediately vents through port C, and the vacuum isn't leaking at A. Junk it if it leaks (becoming a theme here?)
Repeat the energized test again, using pressure. I start with 12psi. Pay close attention this time to whether it releases immediately after disconnecting the power. If it hisses for a bit before snapping open, it's not a good thing. If it sticks and won't release, it's not good either. This means the spring is too weak or the plunger assembly is too gunked up to push the port open against the pressure. I like to repeat the test a few times at increasing pressure until I figure out how of a pressure the solenoid can handle. If many of your solenoids don't pass this test but they pass the vacuum version of the tests, just be sure to only use them in a position where they will see only vacuum. I pick the solenoid that handles the highest pressure without sticking and use it as the turbo control solenoid. (Bonus tip: if you install a pressure regulator on the pressure tank, you're basically preventing this solenoid from getting stuck by excess pressure)
Last edited by dgeesaman; Mar 9, 2014 at 05:28 PM. Reason: Fixed errors
Trending Topics
Do you feel the need to heat up these pieces in a toaster oven prior to testing? We have been doing that at our garage for some time now, to get them to an "operating temperature" such that they would see inside the engine bay.
Check valve
Check valves are easy. You hook up the mityvac to the "back" of the valve (noting the arrow pointing "forward") and apply at least 25in vacuum. If it leaks, junk it. Then switch your pump and make sure it takes less than 1psi to slowly draw air through. If it takes more than 1psi to crack open, junk it.
Or hook up the mityvac to the "front" and apply 15psi pressure. Max cracking pressure should then be about 2" vacuum.
FSM covers this on page F-90.
Or hook up the mityvac to the "front" and apply 15psi pressure. Max cracking pressure should then be about 2" vacuum.
FSM covers this on page F-90.
Last edited by dgeesaman; Nov 23, 2008 at 07:18 AM.
Wastegate and Precontrol Solenoids
These are on/off solenoids, mounted as a pair. If one fails you pretty much have to junk them both. Fortunately they tend to last longer than some other solenoids.
They act as a boost control solenoid, with pressure from the wastegate or precontrol actuator always on port A. The ECU rapidly pulses 12v to the coil and causes it to open and close rapidly, keeping the pressure in the actuator about 4psi less than what is coming in from the turbos.
The FSM covers this on page F-93.
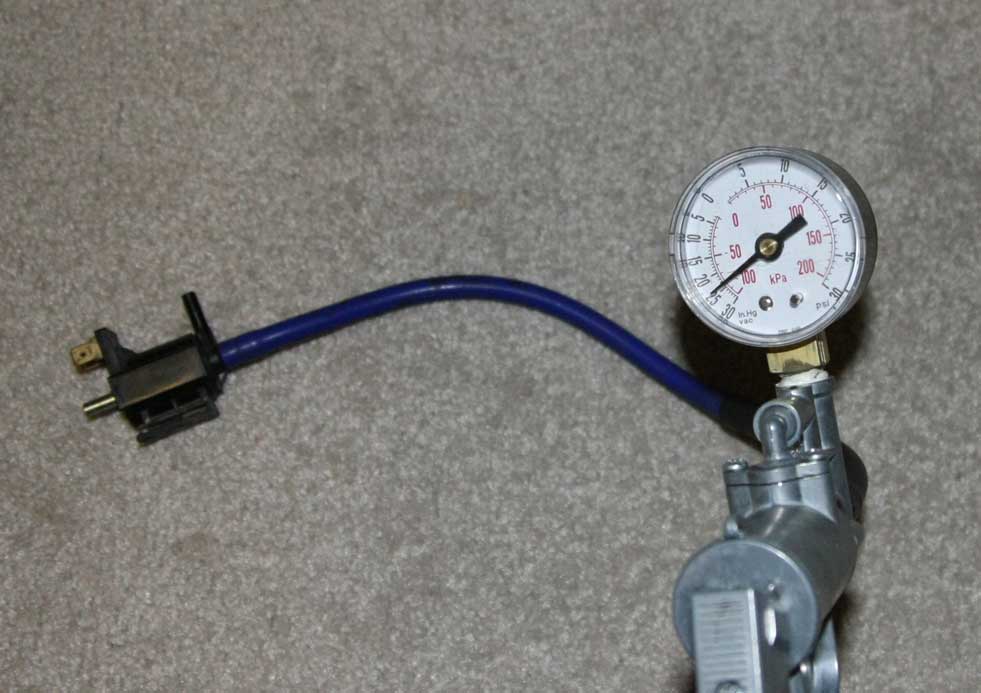
Set up with your vacuum pump on port A:
So start by applying 12psi pressure to port A. Junk it if it leaks. Then use the 9v battery to test that it opens under 12psi pressure. It should open immediately.
Last, check the resistance across the coil. It should be about 30 Ohms.
They act as a boost control solenoid, with pressure from the wastegate or precontrol actuator always on port A. The ECU rapidly pulses 12v to the coil and causes it to open and close rapidly, keeping the pressure in the actuator about 4psi less than what is coming in from the turbos.
The FSM covers this on page F-93.
Set up with your vacuum pump on port A:
So start by applying 12psi pressure to port A. Junk it if it leaks. Then use the 9v battery to test that it opens under 12psi pressure. It should open immediately.
Last, check the resistance across the coil. It should be about 30 Ohms.
Purge control solenoid
The purge control solenoid is an emissions thing. If you are having turbo control problems you might choose to skip this solenoid.
It operates just like the wastegate and precontrol solenoids except that it's under vacuum.
Hook up your vacuum pump to port B and apply 25" vacuum. It should not leak and it should open when you apply voltage.
It operates just like the wastegate and precontrol solenoids except that it's under vacuum.
Hook up your vacuum pump to port B and apply 25" vacuum. It should not leak and it should open when you apply voltage.
Turbo Control Vacuum Solenoid
This is the solenoid that mounts onto the ACV.
It looks like a purge control solenoid but it's not the same thing. That plastic cap on the end actually covers the dump port (pull it off if you're curious), at which point you can clearly see this is a 3-way valve.
It operates by switching vacuum. It opens and closes exactly with the turbo control (pressure) solenoid in the rack, in fact the wiring joins within the harness and is controlled by one pin on the ECU. One applies pressure to one side of the actuator, the other applies vacuum to the opposite side. I suspect this is because the spring in the actuator is much stiffer than the others.
Set up like this, with a dead-end on port B and your vacuum pump on port A.
Just like a rack solenoid, test to see that it does not leak with 25" vacuum. Then energize it and see that it opens cleanly and again the vacuum does not leak.
Coil resistance should be about 37 Ohms.
There is no coverage for this solenoid in the FSM. I believe Mazda added it at the last minute to improve the response of the turbo control actuator.
Air Bypass Valve and Charge Relief Valve
Enough solenoid stuff.
The ABV and CRV work like blowoff valves. The ABV is a true blowoff valve, opening only when there is vacuum at the intake plenum. This way when you let off the throttle under boost, the butterflies close and you have vacuum on the engine side and full boost still being produced on the intake side. That's like slamming your spinning turbo into a brick wall; so by opening the ABV that boost vents off into the airbox and allows the turbos to spin down gracefully. The FSM covers ABV testing on F-77.
The CRV is a little different. It operates by giving boost somewhere to go (the airbox) when the secondary turbo is in the pre-spool state. It closes when the secondary goes online at 4500rpm. If the CRV does not close fully you can see loss of boost above 4500rpm. The FSM covers the CRV testing on F-88.
Testing is pretty simple: hook up your vacuum pump to port A. Apply a small amount of vacuum (7 to 9 inHg) and you should hear a gentle pop as the valve opens. Junk it if it doesn't open and close crisply.
Ideally you should also hook up the vacuum pump to port C and apply 15psi of pressure with a check valve in line. Junk it if it leaks. Then you can disconnect the pump at the check valve, leaving 15psi still applied to port C. Now apply 7-9inHg at port A, and it should snap open and vent the pressure. Unfortunately I haven't put together fittings that will adapt from that large opening on port C to my vacuum pump.
Last edited by dgeesaman; Nov 23, 2008 at 07:59 AM.
Other Actuators
Other actuators:
The other actuators are pretty well covered by the FSM. I basically use the vacuum pump to apply whatever amount the FSM says it take to open the actuator. If it leaks I junk it. If it doesn't move smoothly I junk it. No pics because I don't have spare actuators laying around.
The actuators have bigger vacuum lines than the solenoids. I have an adapter fitting that jumps from the small vacuum hose to the larger size and this helps me get a good leak-free test setup.
Turbo Control Actuator: F-86
(Note, you don't have to do both a vacuum and pressure test on this one, just one or the other).
Charge Control Actuator: F-87
Wastegate actuator: F-90
Precontrol Actuator: F-89
Last edited by dgeesaman; Nov 23, 2008 at 08:00 AM.
I use a regular oven and one of those "air bake" cookie pans. I don't trust a toaster oven.
Ha, not quite. I'm limited to just a couple of attachments per post, which is why it has to be a thread.
Last edited by dgeesaman; Nov 23, 2008 at 07:59 AM.

Senior Member
Joined: Oct 2002
Posts: 526
Likes: 5
From: Atlanta
Ideally you should also hook up the vacuum pump to port C and apply 15psi of pressure with a check valve in line. Junk it if it leaks. Then you can disconnect the pump at the check valve, leaving 15psi still applied to port C. Now apply 7-9inHg at port A, and it should snap open and vent the pressure. Unfortunately I haven't put together fittings that will adapt from that large opening on port C to my vacuum pump.
PS. Great idea to put this all in one thread as you usually need to test all this together to really trouble-shoot boost problems!
Last edited by jmadams74; Dec 2, 2008 at 10:46 PM.
R1derful
Joined: Feb 2004
Posts: 702
Likes: 0
From: N Cali
Nice writeup. Another good power source for testing solenoids is an old PC power supply. Turn on the switch and you've got an instant +12v (and +5v) on any of the connectors for powering the hard drives.
Sonny
Sonny

Thanks for the great writeup!
Last edited by squealy; Dec 3, 2008 at 09:58 AM.
