
Making a cold/ram air intake for my ITBs


Thread Starter
Banned. I got OWNED!!!
iTrader: (2)
Joined: Oct 2004
Posts: 6,122
Likes: 1
From: London, Ontario
Making a cold/ram air intake for my ITBs
Well its about time that I got started on this
As the title states, its a cold/ram air box for my ITB's. Since is a DCOE type manifold that it sits on, its getting all the air from ontop of the engine bay right now which is pretty hot.
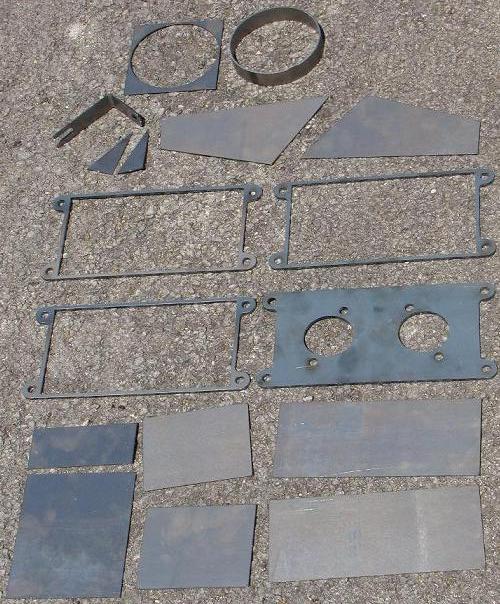
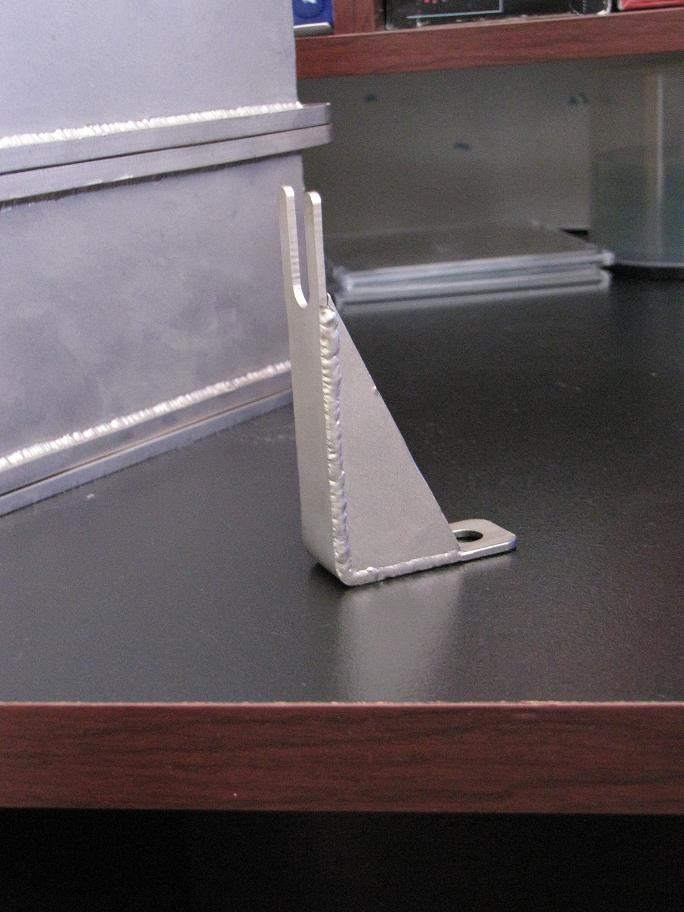
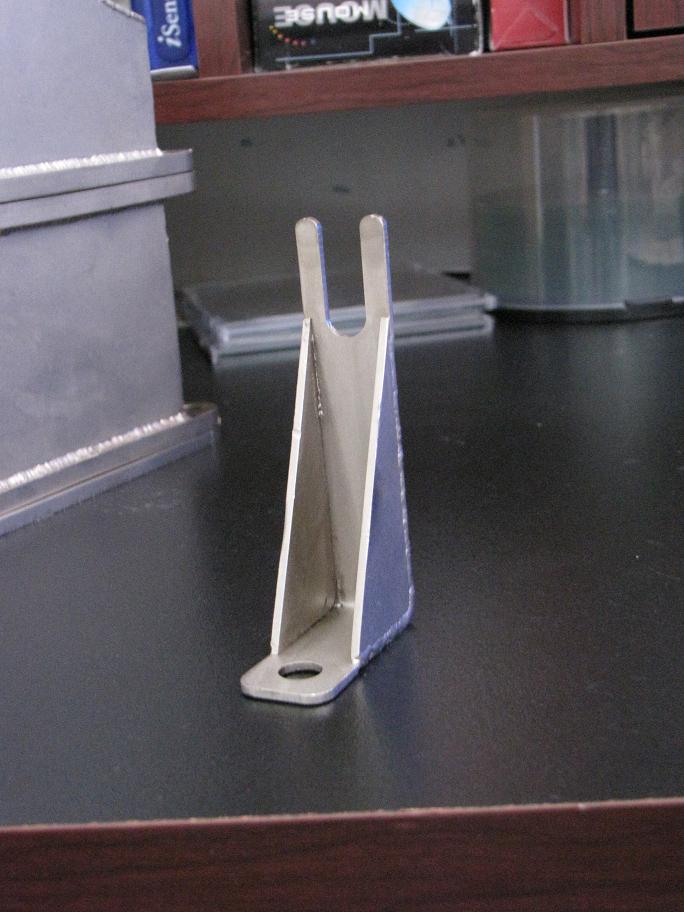
All the white parts are what's going to get bolted hence the 1/8" thickness for a bit more beefed up part that won't flex as easily. All the red parts are what make up all the sheet metal that is the main contrustion of the box. The green part is just a new throttle cable holder as oppose to the mickey mouse one that I made a while back but just doesn't look good. (All parts will be laser cut for best accuracy)
The whole intake will be 3 pieces once all welded up:
1) The plate that bolts inbetween the ITB, and the air horns,
2) The center section that covers pretty much just the air horns,
3) The end section where the 4" cold/ram air tube will be bolted up to.
Now I could of made the whole thing out of only 2 pieces, but I wanted to be able to play around with different plenum volumes so I figured this is going to most likely be the easiest way to do it.
On the end section there, there will be about a 1" long 4" wide tube welded on there to bolt on flexible tubing. Also the angle that the opening is set at is a bit more biased to the rear rotor (due to the fact that the front will already have the shortest distance and this should balance it out a bit.)
Once I have all the pieces welded up, they will be sent out to get nickel coated. I was going to do zinc at first but after talking with the owner of the plating place, its not going to with stand too much abuse (bolting and unbolting) and will rust easier than nickel. I might also get them to polish up the whole piece but we'll see about that because I might just buy of DEI's reflect-a-gold tape and put it on there to provide better heat reflection.

I was hoping to skip all those step and just do it out of stainless, but after finding out its going to cost me about 200$ more for the stainless, I figured I'd look at other options. The plating will only be about 40-50$ (including polishing). The laser cut parts will be about 150$, plus another 50$ or so for the tape. About a 250$ manifold. Not the cheapest, but should be effective.
As the title states, its a cold/ram air box for my ITB's. Since is a DCOE type manifold that it sits on, its getting all the air from ontop of the engine bay right now which is pretty hot.
All the white parts are what's going to get bolted hence the 1/8" thickness for a bit more beefed up part that won't flex as easily. All the red parts are what make up all the sheet metal that is the main contrustion of the box. The green part is just a new throttle cable holder as oppose to the mickey mouse one that I made a while back but just doesn't look good. (All parts will be laser cut for best accuracy)
The whole intake will be 3 pieces once all welded up:
1) The plate that bolts inbetween the ITB, and the air horns,
2) The center section that covers pretty much just the air horns,
3) The end section where the 4" cold/ram air tube will be bolted up to.
Now I could of made the whole thing out of only 2 pieces, but I wanted to be able to play around with different plenum volumes so I figured this is going to most likely be the easiest way to do it.
On the end section there, there will be about a 1" long 4" wide tube welded on there to bolt on flexible tubing. Also the angle that the opening is set at is a bit more biased to the rear rotor (due to the fact that the front will already have the shortest distance and this should balance it out a bit.)
Once I have all the pieces welded up, they will be sent out to get nickel coated. I was going to do zinc at first but after talking with the owner of the plating place, its not going to with stand too much abuse (bolting and unbolting) and will rust easier than nickel. I might also get them to polish up the whole piece but we'll see about that because I might just buy of DEI's reflect-a-gold tape and put it on there to provide better heat reflection.
I was hoping to skip all those step and just do it out of stainless, but after finding out its going to cost me about 200$ more for the stainless, I figured I'd look at other options. The plating will only be about 40-50$ (including polishing). The laser cut parts will be about 150$, plus another 50$ or so for the tape. About a 250$ manifold. Not the cheapest, but should be effective.
Thread Starter
Banned. I got OWNED!!!
iTrader: (2)
Joined: Oct 2004
Posts: 6,122
Likes: 1
From: London, Ontario
well here's the laser cut pieces. Also the first laser cut quote was not right, they did it using inches and not cm so the actual price is closer to 60$US. Also I ordered up some of that reflect a gold (1.5"x15'). Should have the box welded up tomorrow.
Thread Starter
Banned. I got OWNED!!!
iTrader: (2)
Joined: Oct 2004
Posts: 6,122
Likes: 1
From: London, Ontario
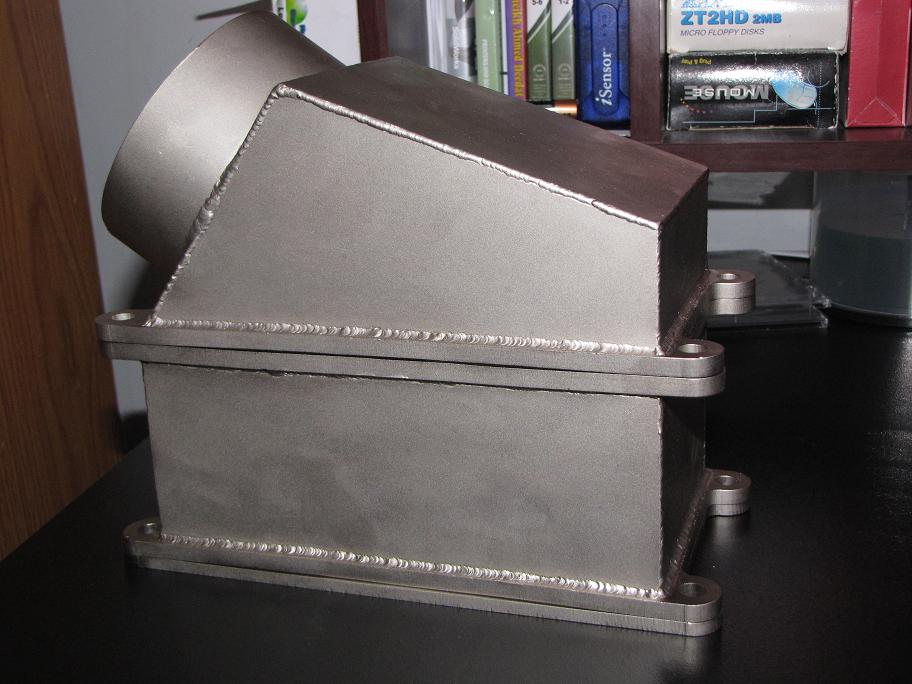
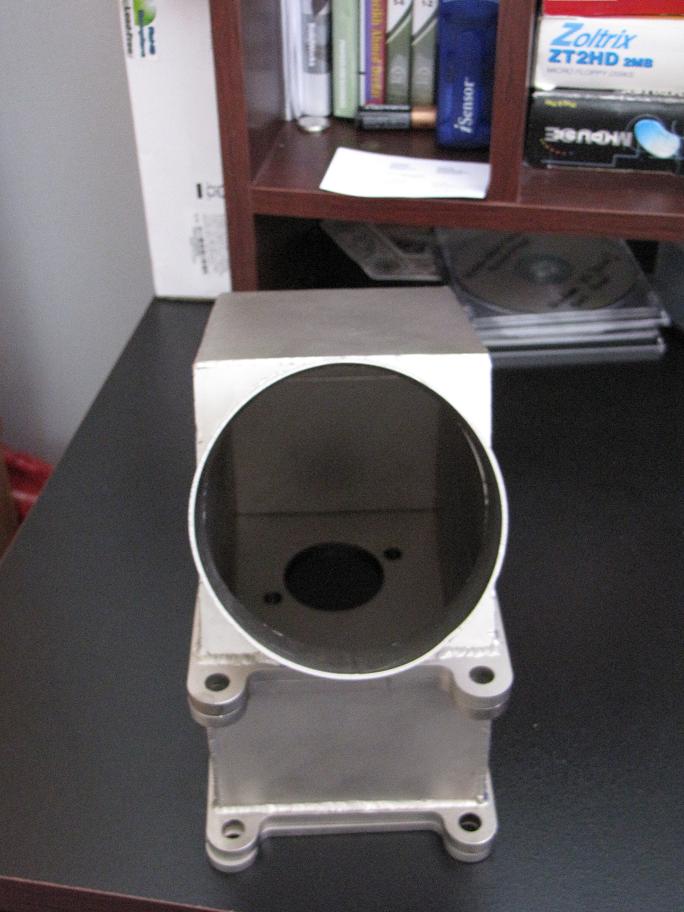
not really finished ... just all welded up, had a bit of an issue fitting it on, stupid aluminum chunk sticking out of the housings hits it. stupid chunks sitting there for nothing anyways 
but here's the pictures:
but here's the pictures:

Thread Starter
Banned. I got OWNED!!!
iTrader: (2)
Joined: Oct 2004
Posts: 6,122
Likes: 1
From: London, Ontario
was going to just use a 4" aluminum drier vent hose, and was going to hook it up at the front bumper. But look like I have to perhaps make 2 x 4" inlets and make the volume of the whole thing bigger.
Trending Topics
Thread Starter
Banned. I got OWNED!!!
iTrader: (2)
Joined: Oct 2004
Posts: 6,122
Likes: 1
From: London, Ontario
well its an NA car, so the more volume the less it has to work hard on sucking the air in through a long hose. So easier access for the engine and would breathe easier. When Paul Yaw did this setup:
http://www.yawpower.com/dec2004.html
He gained 22hp from the previous intake style switching to this. Quite a big gain i'd say. I might do a dyno comparison of one versus 2 later on but we'll get to that later.
http://www.yawpower.com/dec2004.html
He gained 22hp from the previous intake style switching to this. Quite a big gain i'd say. I might do a dyno comparison of one versus 2 later on but we'll get to that later.
Thread Starter
Banned. I got OWNED!!!
iTrader: (2)
Joined: Oct 2004
Posts: 6,122
Likes: 1
From: London, Ontario
Well a few updates:
I decided to make a new one, because the other one I think I made a bit too thin and deformed the metal a bit for the gasket to sit on. But either way this one is already all welded up, and I have also sent it out for electroless nickel plating. Let me know how you like it!
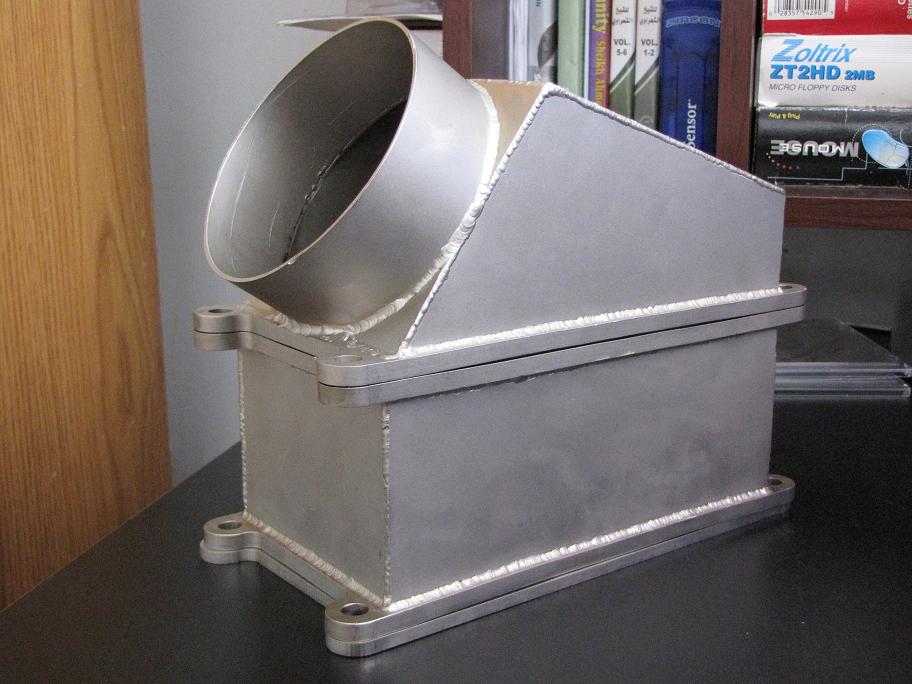
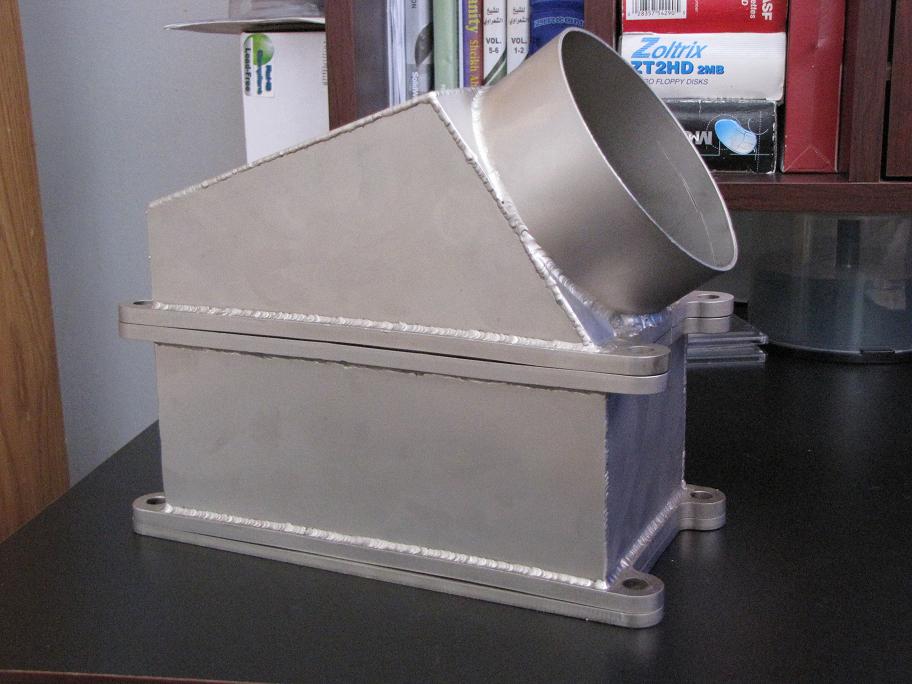
I decided to make a new one, because the other one I think I made a bit too thin and deformed the metal a bit for the gasket to sit on. But either way this one is already all welded up, and I have also sent it out for electroless nickel plating. Let me know how you like it!


Thread Starter
Banned. I got OWNED!!!
iTrader: (2)
Joined: Oct 2004
Posts: 6,122
Likes: 1
From: London, Ontario
UWO's welder lol. I asked nicely and they said yes. My times and your times just kept on conflicting too much. I have the first muffler almost done, I'll get it done today and hopefully get started on the second one.
Here's me welding there chassis:
http://www.youtube.com/watch?v=5QLnIzakFXQ
Got there whole chassis welded up in about 48 working hours. I spanned it over 5 work nights. I love how I can work that pedal with my knee, and my elbow. The elbow isn't on that video, but trying to press down with your elbow, and trying to keep a steady hand welding all in one arm, not the easiest thing I tell you.
I built two chassis for the lotus super seven replicas. Instead of using my elbow or knee to start the arc, i used a scratch start TIG. comes in handy wehn its hard to use a pedal... you shoudl try it out...
nice air box, but what doies it weigh? why not aluminum?
nice air box, but what doies it weigh? why not aluminum?
Thread Starter
Banned. I got OWNED!!!
iTrader: (2)
Joined: Oct 2004
Posts: 6,122
Likes: 1
From: London, Ontario
About doing it out of aluminum, I would of had to make it a bit bigger and I'm already tight enough on space right now.
Joined: Feb 2001
Posts: 29,798
Likes: 128
From: London, Ontario, Canada
What kind of welder does UWO have. Looks like a Syncrowave?
Got there whole chassis welded up in about 48 working hours. I spanned it over 5 work nights. I love how I can work that pedal with my knee, and my elbow. The elbow isn't on that video, but trying to press down with your elbow, and trying to keep a steady hand welding all in one arm, not the easiest thing I tell you.

Scratch start or lift arc? I quite like lift-arc and wish my welder supported it.


Thread
Thread Starter
Forum
Replies
Last Post