
Rebuild Project Pictures

Thread Starter
OBEY YOUR MAZDA
Joined: Oct 2002
Posts: 3,060
Likes: 2
From: Denmark
Rebuild Project Pictures
Im not gonna hijack Multiplex�s thread again, so here are some pics from the rebuild to come.
I might start taking the motor apart next week.
As the rebuild goes on, all screws are getting replaced by proper sizes like 13 mm. instead of 12mm and so on. Ofcourse all SS bolts and nuts. O-rings will be replaced and gaskets will be made from gasketpaper.
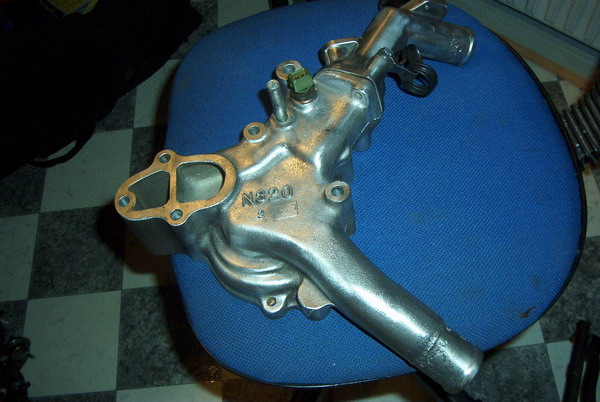
Wirewheeled waterpump housing and filler neck.
I might start taking the motor apart next week.
As the rebuild goes on, all screws are getting replaced by proper sizes like 13 mm. instead of 12mm and so on. Ofcourse all SS bolts and nuts. O-rings will be replaced and gaskets will be made from gasketpaper.
Wirewheeled waterpump housing and filler neck.
Last edited by Kim; Jan 7, 2004 at 07:17 PM.
Thread Starter
OBEY YOUR MAZDA
Joined: Oct 2002
Posts: 3,060
Likes: 2
From: Denmark
I will smoothport the airflowmeter later in the project.
Im trying to obtain as smooth as possible airpath
Wirewheeled and resealed AirFlowMeter.
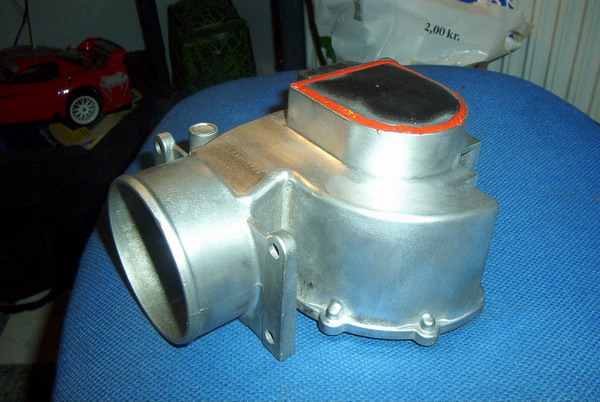
Im trying to obtain as smooth as possible airpath
Wirewheeled and resealed AirFlowMeter.
Last edited by Kim; Jan 7, 2004 at 07:05 PM.
 It was a bitch
HEAVY METAL THUNDER
Joined: Oct 2002
Posts: 3,864
Likes: 0
From: Elsenborn, Belgian Eifel
You are doing a good job there!
However, replacing the bolts and nuts with what you call "proper sized" ones isn't really something I'd do. I really like the fact that most work on the cars can be done with minimal amount of wrenches, so swapping bolt sizes isn't something I like, as it can get confusing.
Also, if I'd replace them, I'd go for SS allen head bolts. These are much stronger (ever seen a ripped head on those?) and look the part. But of course, special tools are needed. Not that allen keys are that special, but still...
Thread Starter
OBEY YOUR MAZDA
Joined: Oct 2002
Posts: 3,060
Likes: 2
From: Denmark
Bart....Go to bed
Im replacing M8 bolts that has 12mm heads with 13mm ones and M10/14mm with 17 or is it 15mm, i cant remember.
Goodnight
Ohhh BTW we dont have SS allenheads at work
Im replacing M8 bolts that has 12mm heads with 13mm ones and M10/14mm with 17 or is it 15mm, i cant remember.
Goodnight
Ohhh BTW we dont have SS allenheads at work
Last edited by Kim; Jan 7, 2004 at 08:19 PM.
Rotary Fool
Joined: Aug 2001
Posts: 1,099
Likes: 1
From: Netherlands
Kim,
Great work man! Damn I'm really getting behind on work Wont be till next weekend that I will have time, this weekend we are going to look at ferrets, yups theres gonne be more pets in the house
Do you have the wire wheel mounted on something? Thats something I still have a problem with, mine is on an angle grinder and another on a drill, but its a bitch to work on parts that way.
Great work man! Damn I'm really getting behind on work
Wont be till next weekend that I will have time, this weekend we are going to look at ferrets, yups theres gonne be more pets in the houseDo you have the wire wheel mounted on something? Thats something I still have a problem with, mine is on an angle grinder and another on a drill, but its a bitch to work on parts that way.
HEAVY METAL THUNDER
Joined: Oct 2002
Posts: 3,864
Likes: 0
From: Elsenborn, Belgian Eifel
Originally posted by Kim
Bart....Go to bed
Im replacing M8 bolts that has 12mm heads with 13mm ones and M10/14mm with 17 or is it 15mm, i cant remember.
Goodnight
Ohhh BTW we dont have SS allenheads at work
Bart....Go to bed
Im replacing M8 bolts that has 12mm heads with 13mm ones and M10/14mm with 17 or is it 15mm, i cant remember.
Goodnight
Ohhh BTW we dont have SS allenheads at work
Go to bed? Sure... I just got up when I wrote that! Had to start at 3.30am! What a lovely job I have...
And, ok, I accept you are using non-allens now I hear you don't have allens at work

Trending Topics
'Last Minute' Rallying
Joined: May 2002
Posts: 1,193
Likes: 0
From: Lincoln, England
oooh looking shiney
be carefull swapping out with stainless on anything that needs torquing down ... most ss fastners are made of poor grade stainless that has a much lower tensile strength that the orignals = sheared bolt.
Stainless steels can also gall (the threads weld together !) in certain materials
Mike
be carefull swapping out with stainless on anything that needs torquing down ... most ss fastners are made of poor grade stainless that has a much lower tensile strength that the orignals = sheared bolt.
Stainless steels can also gall (the threads weld together !) in certain materials
Mike
 Looks nice!
Thread Starter
OBEY YOUR MAZDA
Joined: Oct 2002
Posts: 3,060
Likes: 2
From: Denmark
Thanks for the advise Mike, I will reconsider a few bolts.
Sure Oliver I will come around hopefully tommorow.
I got my injectors cleaned and tested today, they are perfect
And ofcourse had them cleaned with my new favorite tool, the wirewheel

Damn that is one bad picture, but I had to give it some brightness
Sure Oliver I will come around hopefully tommorow.
I got my injectors cleaned and tested today, they are perfect
And ofcourse had them cleaned with my new favorite tool, the wirewheel
Damn that is one bad picture, but I had to give it some brightness
Last edited by Kim; Jan 8, 2004 at 05:13 PM.
Thread Starter
OBEY YOUR MAZDA
Joined: Oct 2002
Posts: 3,060
Likes: 2
From: Denmark
Today I cleaned the alternator.
Guess what tool I used
Look at that nice dual belt pulley. Isnt that a work of art.:suckup:
It would be nice if I had the matching main and waterpump pulley. hIGGI
hIGGI
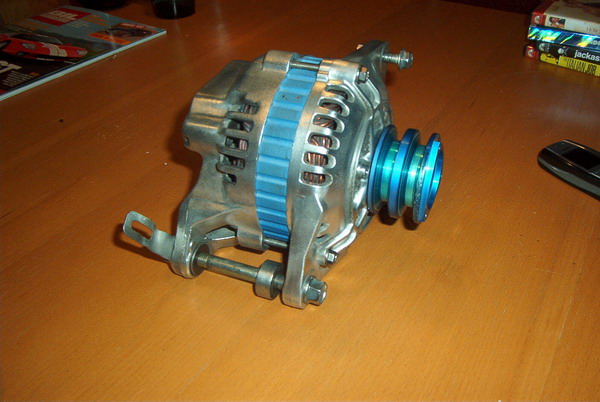
Guess what tool I used
Look at that nice dual belt pulley. Isnt that a work of art.:suckup:
It would be nice if I had the matching main and waterpump pulley.
hIGGILast edited by Kim; Jan 9, 2004 at 05:23 PM.
HEAVY METAL THUNDER
Joined: Oct 2002
Posts: 3,864
Likes: 0
From: Elsenborn, Belgian Eifel
Nice work!
And Kim, it seems we are on the same line once again. Yesterday I was just thinking "hey, when the engine goes out next month or so, to clean everything, I'd really need matching pulleys"
So Higgi: you already have two potential customers!
Oh, and Kim, no I'm not going to bed: I start at 5.00 today
And Kim, it seems we are on the same line once again. Yesterday I was just thinking "hey, when the engine goes out next month or so, to clean everything, I'd really need matching pulleys"
So Higgi: you already have two potential customers!
Oh, and Kim, no I'm not going to bed: I start at 5.00 today
Rotary Fool
Joined: Aug 2001
Posts: 1,099
Likes: 1
From: Netherlands
Damn kim, you stole my idea there making the middle part the same as the pulley
DNS entry for my site seems to be screwed again (happens twice a month it seems) so no picture yet, I did this a while back, first thing I did with wire brush, have to remember to swap DNS entries soon
DNS entry for my site seems to be screwed again (happens twice a month it seems) so no picture yet, I did this a while back, first thing I did with wire brush
, have to remember to swap DNS entries soon
Thread Starter
OBEY YOUR MAZDA
Joined: Oct 2002
Posts: 3,060
Likes: 2
From: Denmark
I smoothported the throttlebody/intake elbow and gave it a coat of plastic paint.
All the sharp edges are removed, using my Proxxon "dremel" tool with a rotating sandpaper thing.

All the sharp edges are removed, using my Proxxon "dremel" tool with a rotating sandpaper thing.
Last edited by Kim; Jan 11, 2004 at 09:49 AM.
Thread Starter
OBEY YOUR MAZDA
Joined: Oct 2002
Posts: 3,060
Likes: 2
From: Denmark
Elbow and primary injector rail, waiting for me to get off my *** and start the actual rebuild
Notice that the engine fire hazard AKA fuel pulsation dampner has been eliminated and replaced with a homemade Banjo bolt.
And no it aint leaky, tested it with 7bars of water
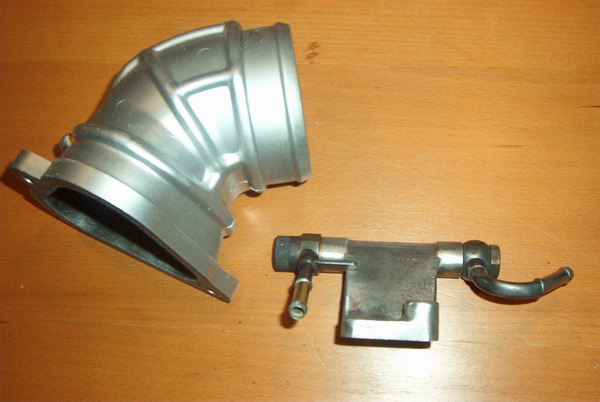
Notice that the engine fire hazard AKA fuel pulsation dampner has been eliminated and replaced with a homemade Banjo bolt.
And no it aint leaky, tested it with 7bars of water
Last edited by Kim; Jan 11, 2004 at 09:58 AM.
Thread Starter
OBEY YOUR MAZDA
Joined: Oct 2002
Posts: 3,060
Likes: 2
From: Denmark
Nahh I dont think so, I havent polished it, its just been cleaned. I hate working with dirty stuff....But I love watching it
I painted my car half a year ago and only washed it three times since then.
I painted my car half a year ago and only washed it three times since then.

Thread Starter
OBEY YOUR MAZDA
Joined: Oct 2002
Posts: 3,060
Likes: 2
From: Denmark
I took my motor apart yesterday, eventhough I have never tried it before it only took me a few hours including cleaning.
The housings seems to be reusable, the int.iron and one endplate needs a resurfacing.
No cracked water seal grooves, but it looked lie a blown waterseal and it had two broken apexseals.
Here is a shot of the rotorhousing and intermidiate iron.
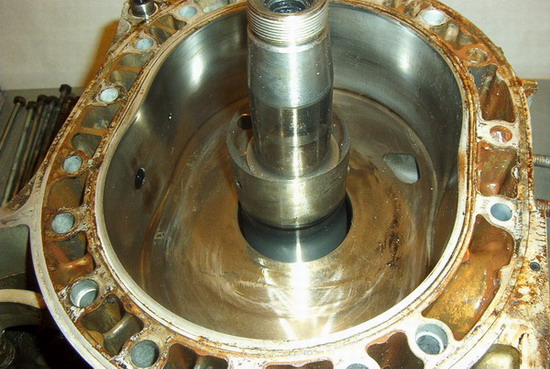
The housings seems to be reusable, the int.iron and one endplate needs a resurfacing.
No cracked water seal grooves, but it looked lie a blown waterseal and it had two broken apexseals.
Here is a shot of the rotorhousing and intermidiate iron.
Last edited by Kim; Jan 14, 2004 at 01:14 AM.