george's FC drift build. blowing upbody kits


Trash Talk
Joined: May 2011
Posts: 83
Likes: 0
From: Phoenix
you're looking at it LOL
please send to az with <3 (not very homo)
please send to az with <3 (not very homo)

Power, Beauty, Rotary
Joined: Nov 2011
Posts: 15
Likes: 0
From: Walnut & Yorba Linda Ca
[QUOTE=sil8ty;10849946]I've been lurking on this forum for a long time but decided to finally start posting. I already know a few guys in the community but I typically have stayed to smaller forums. So here goes.
2nd, test fit S14 dash(stock FC one looks like it came from an IROC camaro).

Great idea Im interested in doing this myself But dont know how especially with the differences between the two clusters and the fit itself, so if you can send me helpful info and key points in this switch that would be helpful thanks
2nd, test fit S14 dash(stock FC one looks like it came from an IROC camaro).
Great idea

Thread Starter
Full Member
Joined: Mar 2007
Posts: 104
Likes: 1
From: AZ
Sorry for the lack of updates guys. I've been hammering away at the car nonstop for 2 weeks straight. Haven't been to bed earlier than 2am yet.
JTP; Buckey and a local dude got me some uprights.
S14 dash won't be going back in. FD rules say I can't do it.
So now onto the updates. The fabbing stage feels like everything moves so slow because everything takes forever to make. But once all the fab is done the rest of the build should go a lot faster.
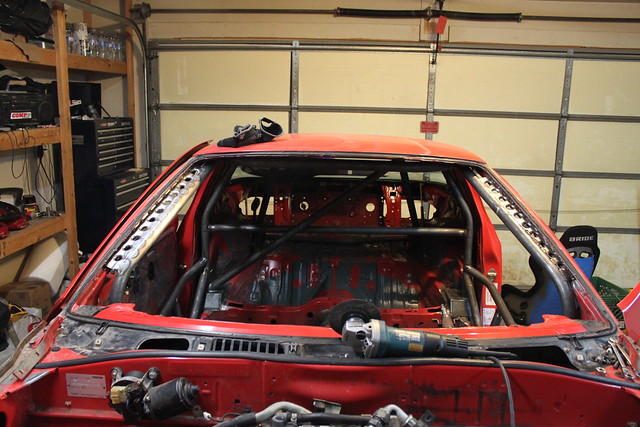
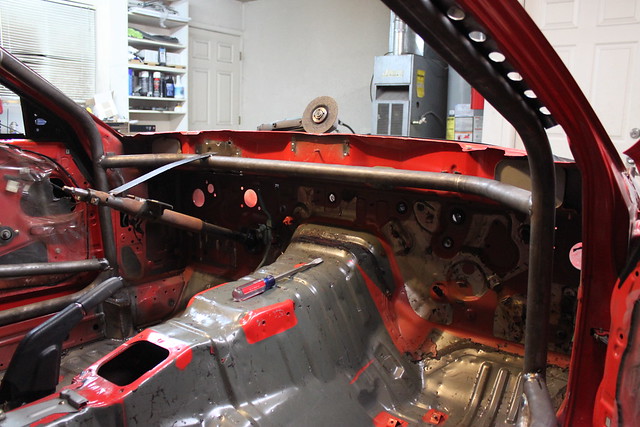
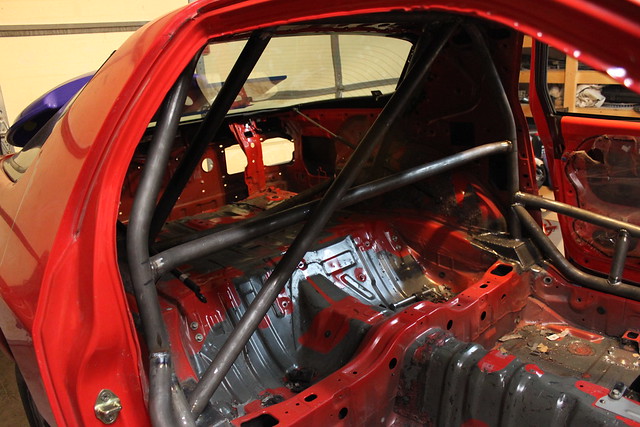
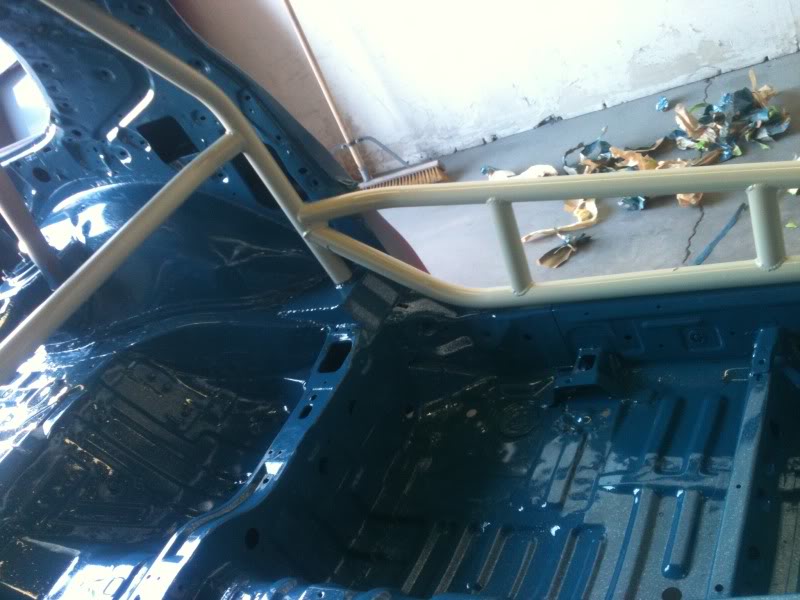
The car first went down to my buddy Joes house where we spent our new year weekend putting the cage in.
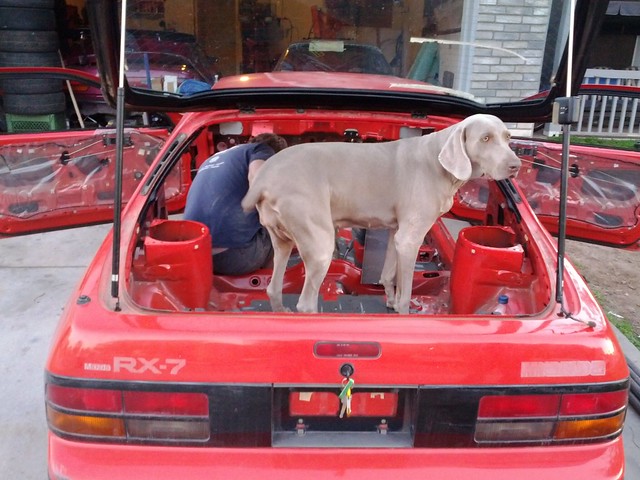
Sam says deal with not having pictures of the cage progress.
But here are some finished shots. It's 99% done. I'm going to put in a "strut bar" after I do some work on the rear and I'll add a few more gussets to look cool.


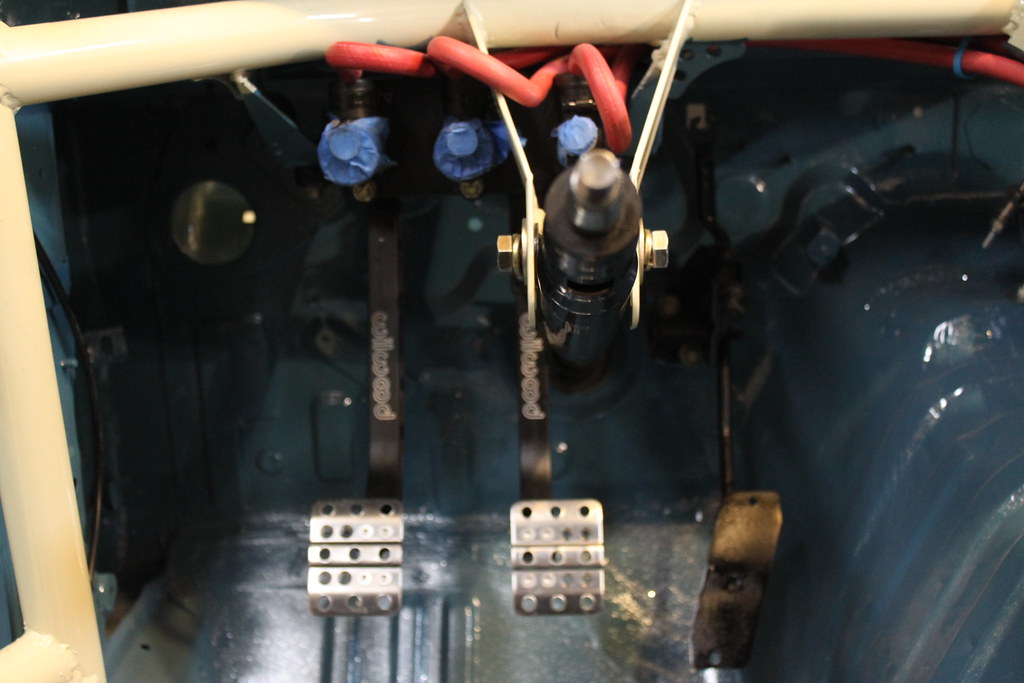
After the cage work was done I moved onto mounting my Wilwood pedal setup.
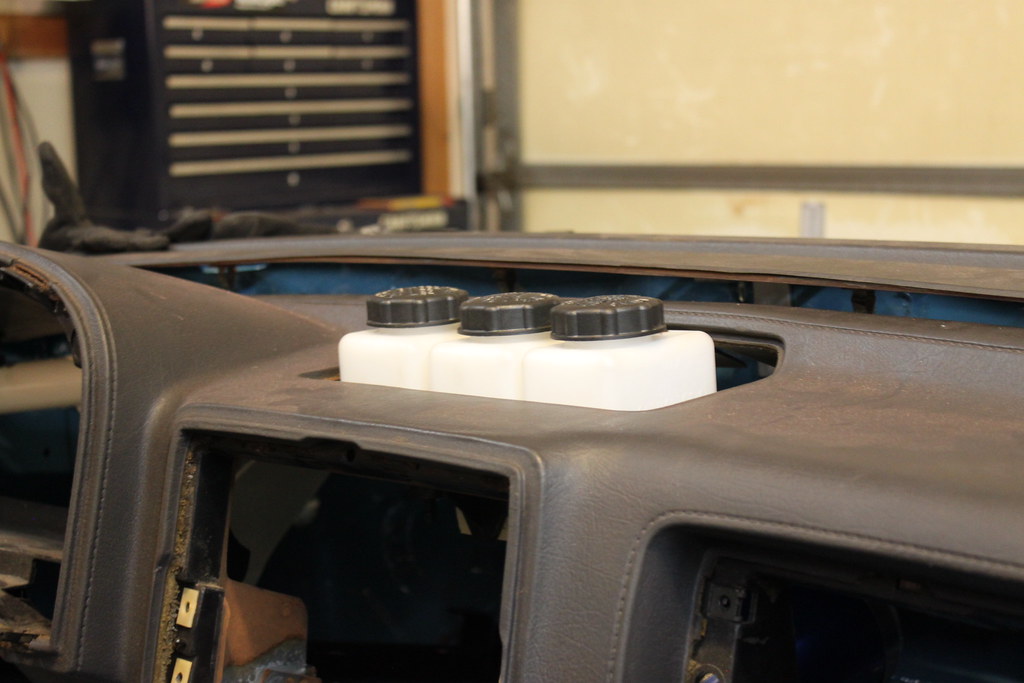
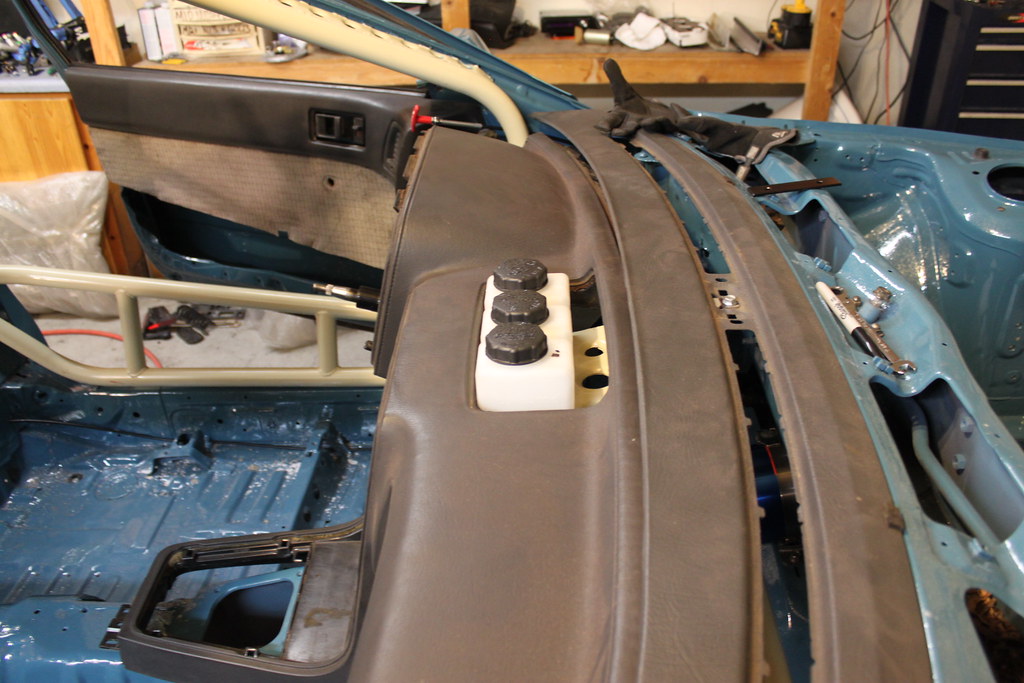
It's a 2 pedal, 3 cylinder setup. I talked to wilwood on M/C sizing for the Brembos and we came up with a great setup. All reservoirs will be remote mounted and there will be no ugly brake booster or M/C in the engine bay! More room and nicer look.

And the brackets to mount them.
I welded nuts to the backside.

Completed and smoothened out.
The pedal setup will have some really short flex lines going to bulkheads on the firewall. That way I can drop the pedal assembly quickly if I need to do some adjustments. But once the pedals are dialed in I don't anticipate ever having to play with the.
JTP; Buckey and a local dude got me some uprights.
S14 dash won't be going back in. FD rules say I can't do it.
So now onto the updates. The fabbing stage feels like everything moves so slow because everything takes forever to make. But once all the fab is done the rest of the build should go a lot faster.
The car first went down to my buddy Joes house where we spent our new year weekend putting the cage in.
Sam says deal with not having pictures of the cage progress.
But here are some finished shots. It's 99% done. I'm going to put in a "strut bar" after I do some work on the rear and I'll add a few more gussets to look cool.
After the cage work was done I moved onto mounting my Wilwood pedal setup.
It's a 2 pedal, 3 cylinder setup. I talked to wilwood on M/C sizing for the Brembos and we came up with a great setup. All reservoirs will be remote mounted and there will be no ugly brake booster or M/C in the engine bay! More room and nicer look.
And the brackets to mount them.
I welded nuts to the backside.
Completed and smoothened out.
The pedal setup will have some really short flex lines going to bulkheads on the firewall. That way I can drop the pedal assembly quickly if I need to do some adjustments. But once the pedals are dialed in I don't anticipate ever having to play with the.
Thread Starter
Full Member
Joined: Mar 2007
Posts: 104
Likes: 1
From: AZ
And finally brings me to mounting the seat. I like sitting as low as possible and slightly reclined so I had to make my own mounts.
Start with drilling out some OEM holes just a bit bigger.
Then make more plates with nuts welded to them

Drop it in the hole.

And weld.

Tonight's job will be to figure out the steering column mount. It's an N/A(?) column that doesn't have tilt so I'm going to build in 5-10� on tilt adjustment. It won't be much and I've modified the rest of the linkage to work with it. It will be lighter than the OEM tilt column and a lot more slim. I'm thinking some slotted holes and some clever mounting should do it.
Till next time!
Start with drilling out some OEM holes just a bit bigger.
Then make more plates with nuts welded to them
Drop it in the hole.
And weld.
Tonight's job will be to figure out the steering column mount. It's an N/A(?) column that doesn't have tilt so I'm going to build in 5-10� on tilt adjustment. It won't be much and I've modified the rest of the linkage to work with it. It will be lighter than the OEM tilt column and a lot more slim. I'm thinking some slotted holes and some clever mounting should do it.
Till next time!

Thread Starter
Full Member
Joined: Mar 2007
Posts: 104
Likes: 1
From: AZ
I should update this again.
Finally done with the fab and it was off to Elevens to get painted. Here are some pics of stuff.
First up is the radiator mount. Cut out oem thing and welded in this bar. I'm not gonna do a tube front end cause it seems like those cause a ton of damage if people dont put them in correctly. I'd rather my stock **** crumple and absorb the impact rather than have something super strong push the forces into the frame.
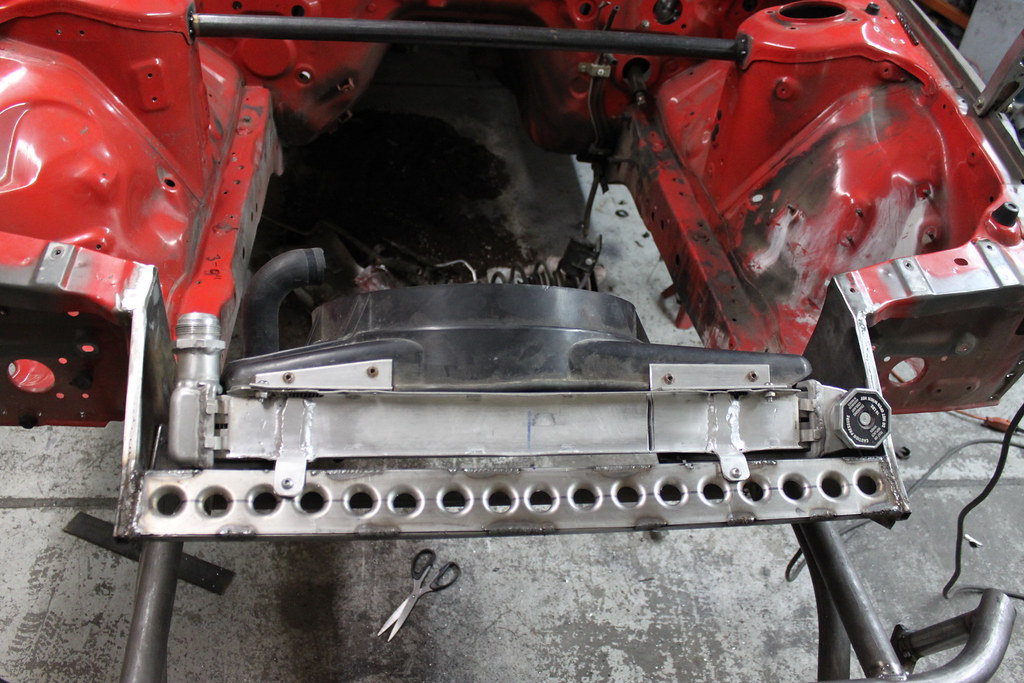
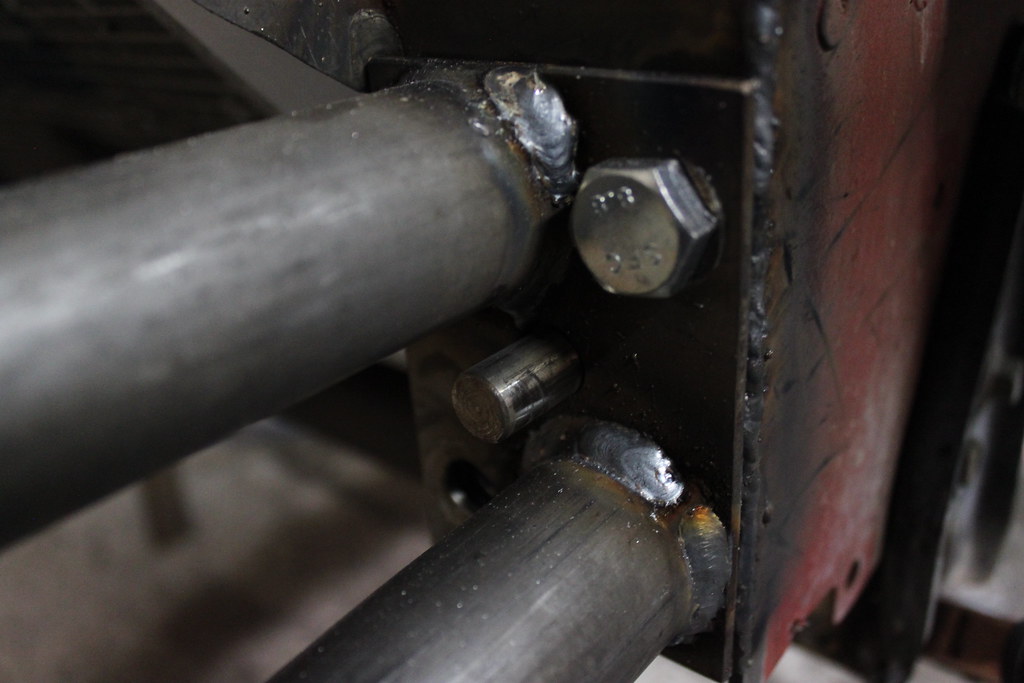
Then I made a bash bar and mounted it all weak. Its good enough for love taps and holding the bumper up but if the hit goes hard it'll probably just fold up and absorb the energy. Dowel pins on the mounting plates to line everything up. One handed install.

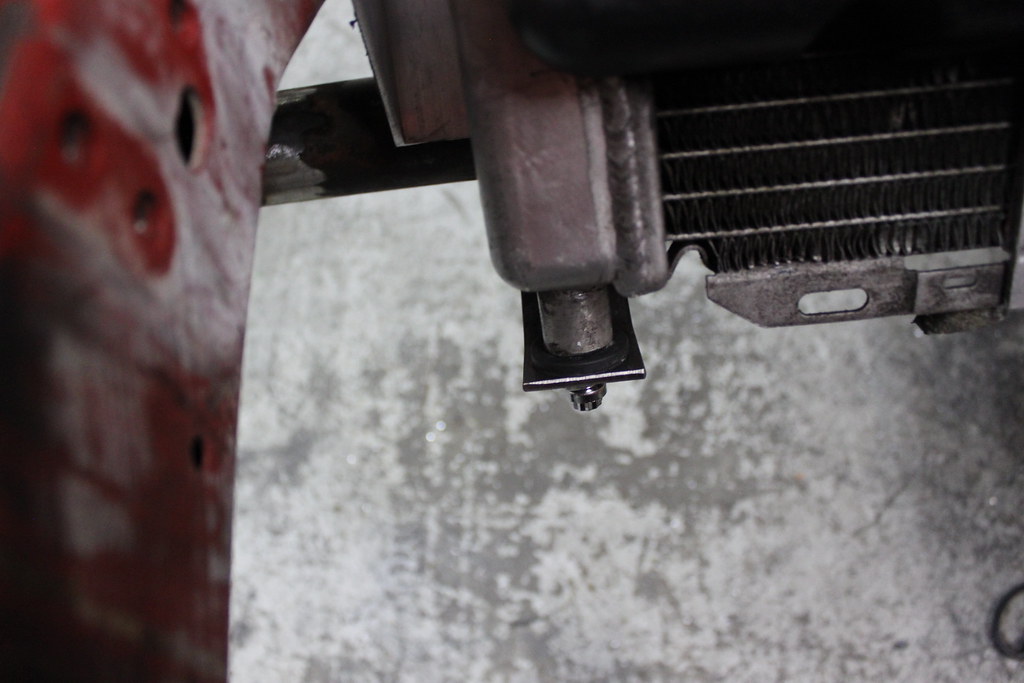
Radiator lower mounts and these cool little expansion nuts. They are rubber and when you tighten down the bolt they expand and grab on the tube welded to the radiator. Lets it flex around a bit and is super easy to install/take out.
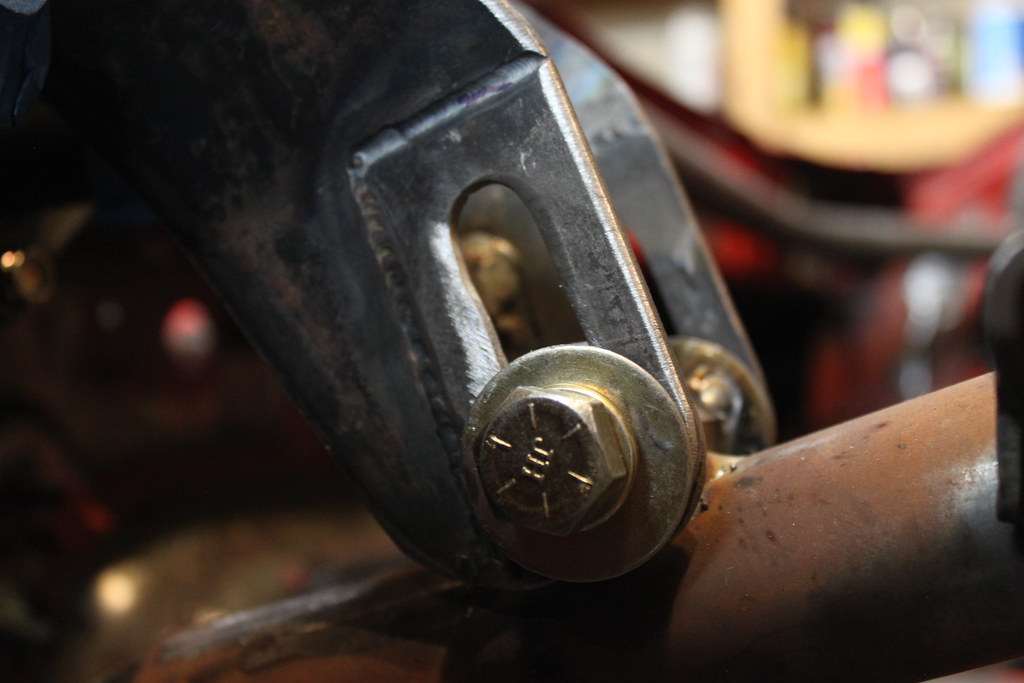
Next up I moved to the interior and finished up the steering mount. Base model had no height adjustment. Instead of getting the crazy heavy OEM adjustable unit, I went simple and clean. Slotted bolt holes work awesome! The fit with the Wilwood pedals is SOOOO close. But it's rad and works great.

Last year I had a ton of angle and this year I am revising the knuckles for even more. Probably close to 70� for this year. With that I needed to make room.
Rough cut.


Plate welded in.

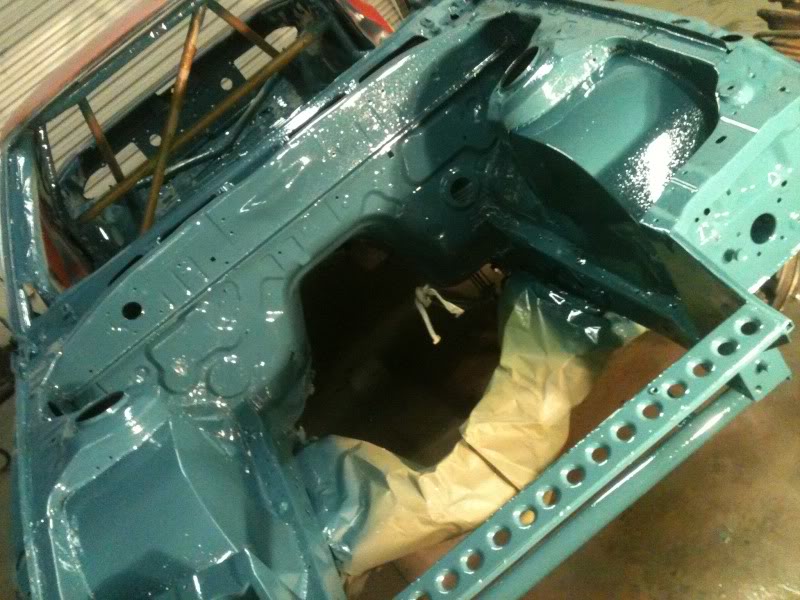
I didn't get pics of the tubs. But they are pretty standard looking tubs. Apart from the crazy bump i had to make to clear the frame cutout.
Finally done with the fab and it was off to Elevens to get painted. Here are some pics of stuff.
First up is the radiator mount. Cut out oem thing and welded in this bar. I'm not gonna do a tube front end cause it seems like those cause a ton of damage if people dont put them in correctly. I'd rather my stock **** crumple and absorb the impact rather than have something super strong push the forces into the frame.
Then I made a bash bar and mounted it all weak. Its good enough for love taps and holding the bumper up but if the hit goes hard it'll probably just fold up and absorb the energy. Dowel pins on the mounting plates to line everything up. One handed install.
Radiator lower mounts and these cool little expansion nuts. They are rubber and when you tighten down the bolt they expand and grab on the tube welded to the radiator. Lets it flex around a bit and is super easy to install/take out.
Next up I moved to the interior and finished up the steering mount. Base model had no height adjustment. Instead of getting the crazy heavy OEM adjustable unit, I went simple and clean. Slotted bolt holes work awesome! The fit with the Wilwood pedals is SOOOO close. But it's rad and works great.
Last year I had a ton of angle and this year I am revising the knuckles for even more. Probably close to 70� for this year. With that I needed to make room.
Rough cut.
Plate welded in.
I didn't get pics of the tubs. But they are pretty standard looking tubs. Apart from the crazy bump i had to make to clear the frame cutout.
Thread Starter
Full Member
Joined: Mar 2007
Posts: 104
Likes: 1
From: AZ
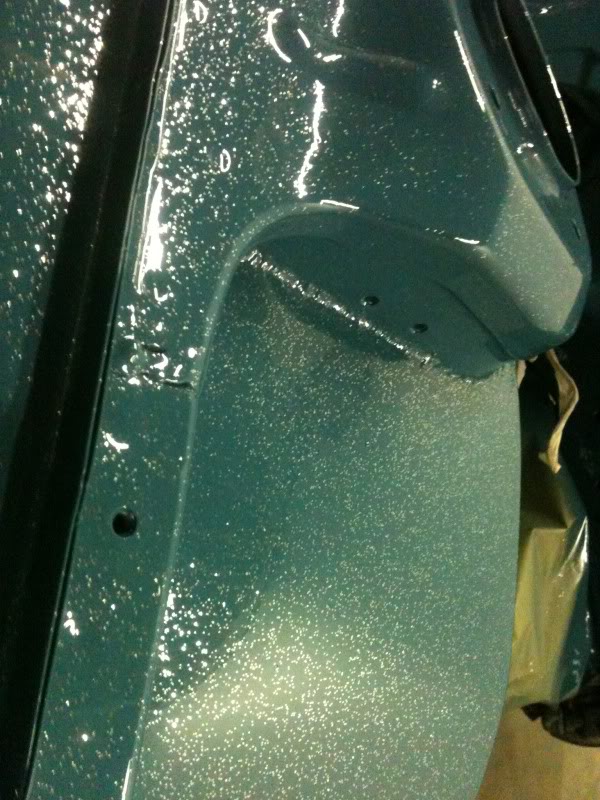
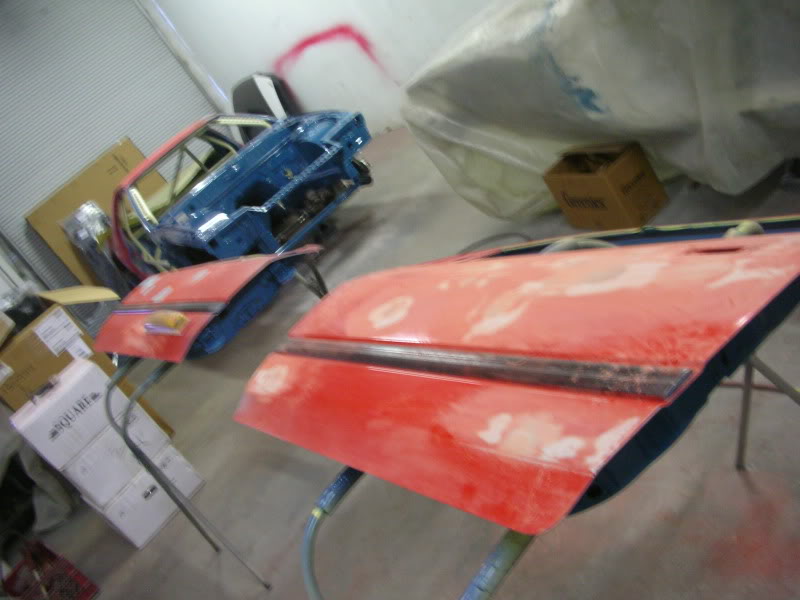
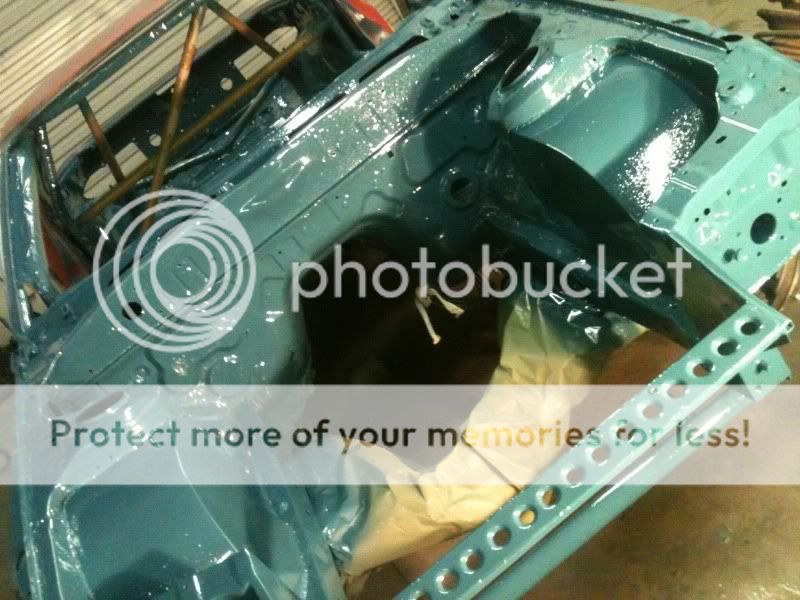
Oh yeah, it's painted.

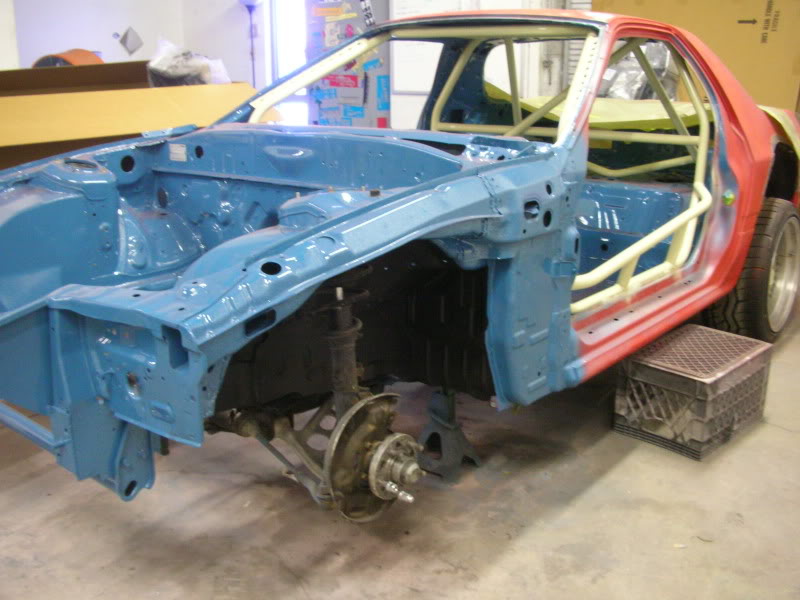

Extreme Dimensions came through with a body kit(s) for this year. BN and Msport. I'll change them out depending on the track and the downforce I need in the front.............JJFU.
The color is the same base color as last year. We went cheap/easy with the paint in 2011 because drift chariots have a hard life with body stuff. This year we did the interior and engine bay with the teal but added a bunch of silver flake. Looks super awesome and the almond cage really sets it off.
The exterior is the same base but will have a hint of _______ ____. Won't give that out just yet.
And lastly the engine build. I blew my old motor up in TX so this time I wanted to get it right. We looked it over and found out that the oil temps went through the roof. It probably happened 2 weeks earlier in Vegas where it was stupid hot. TX just sealed the deal.
BC 4" stroker crank
Carrillo H-Beam rods + Carr 3/8" rod bolts
CP Bullet series pistons with valve reliefs
LS6 243 heads
PRC dual spring + titanium retainers
Improved Racing Oil baffle plate with trap doors
Improved Racing Oil adapter
Accusump
Setrab oil cooler
I listed a ton of oil stuff because that's what killed the old motor. We want to keep oil temps down so I'm running anything I can short of a dry$ump.
The car is coming back on Saturday and we'll bust *** to get it done.

8.3.1 Basic Chassis Design
The vehicle chassis, frame and / or unibody must remain unmodified
between the vertical planes created by the original forward most and
rearward most suspension mounting points unless otherwise specified
in these rules. Uni-body or chassis may be seam welded.
70* is reeee-dick. I love it.
Thread Starter
Full Member
Joined: Mar 2007
Posts: 104
Likes: 1
From: AZ
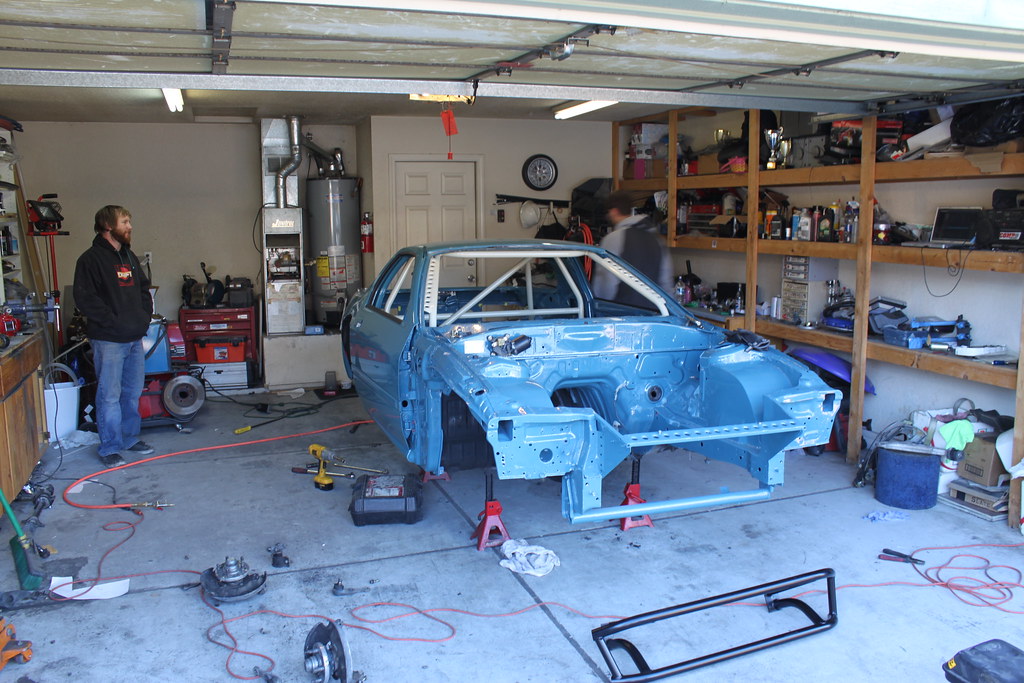
Formula D tech day is in 18 days. Round 1 is April 7th. No sweat.
The car came back from Elevens' Paint and Fiber and we got to work.


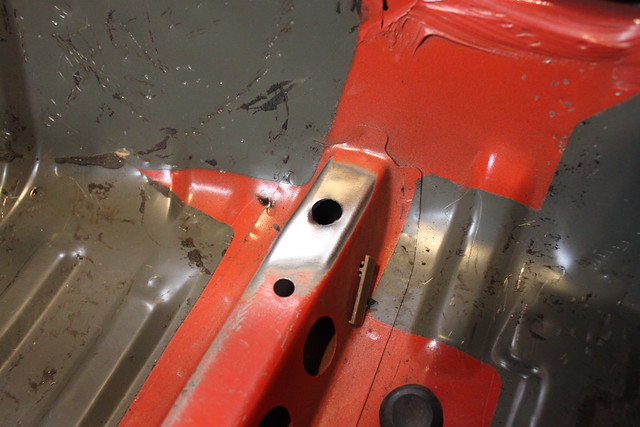
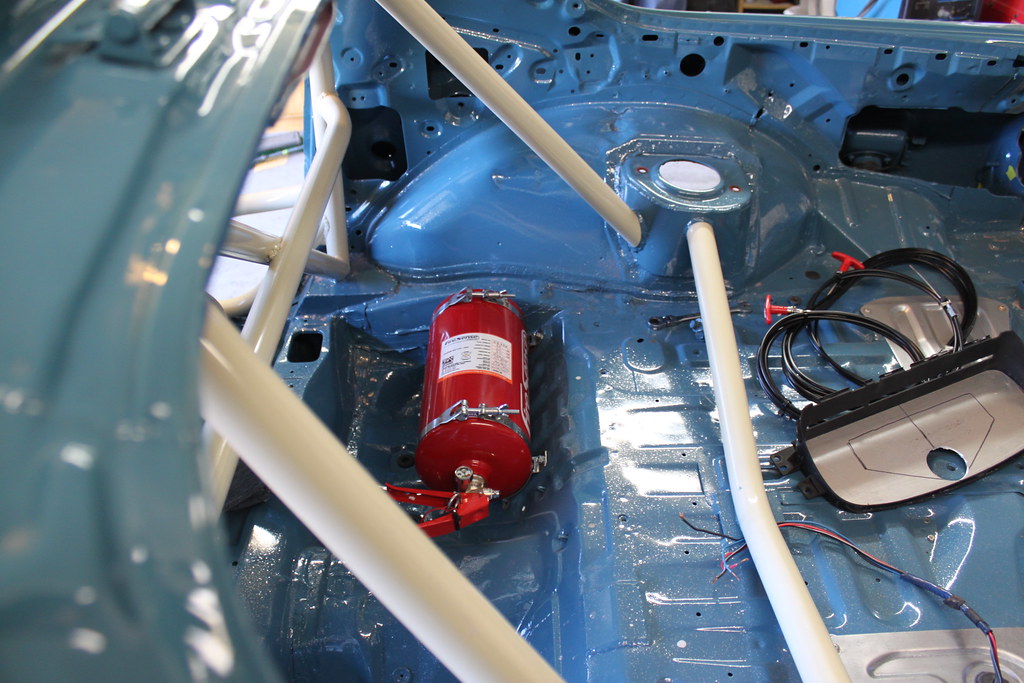
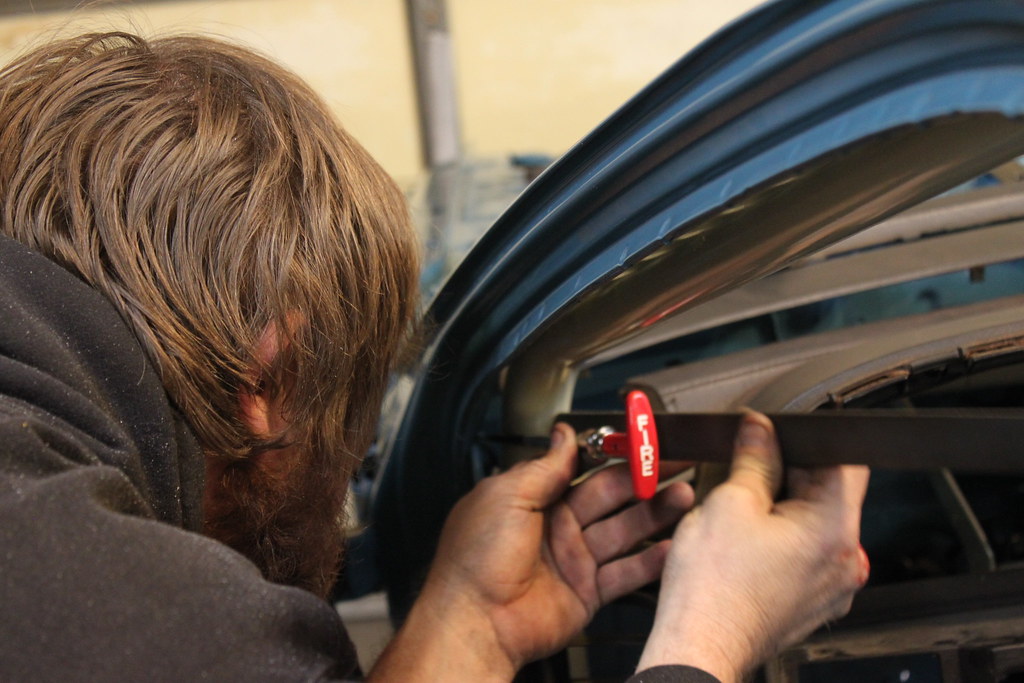
First order of business was to install the fire suppression system. I got the SPA system that has 6 nozzles, 2 pull cables, and 4L capacity. It's also FIA certified so it passes FD tech.
I decided to mount it in the pass side rear "bin" that FC's have. More weight on the pass side is good because it'll even out the weight distribution. My v8 is messing up my vehicular dynamics!

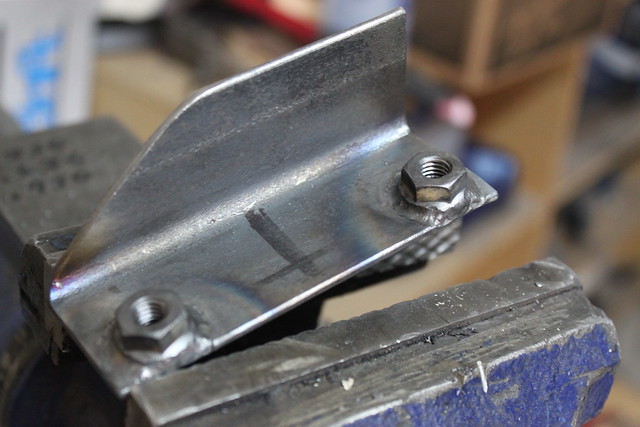
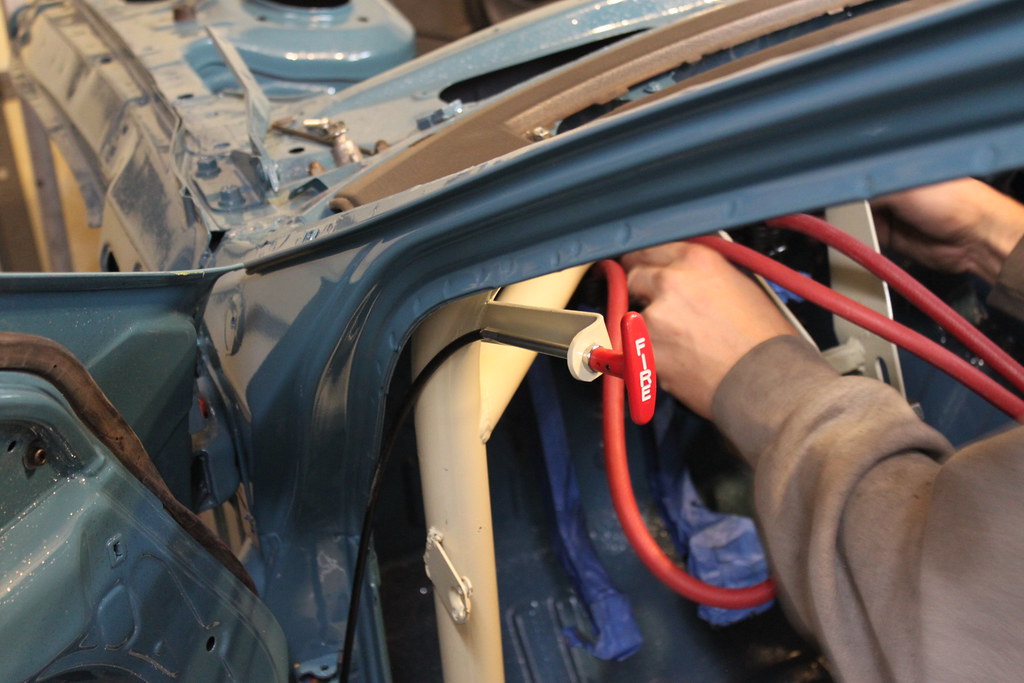
Then we moved onto doing the pull cable. Here is Joe making a bracket.
All done and painted!
The pull lever is perfectly positioned. I can easily reach it with either hand while strapped in regardless of where the seat is positioned.
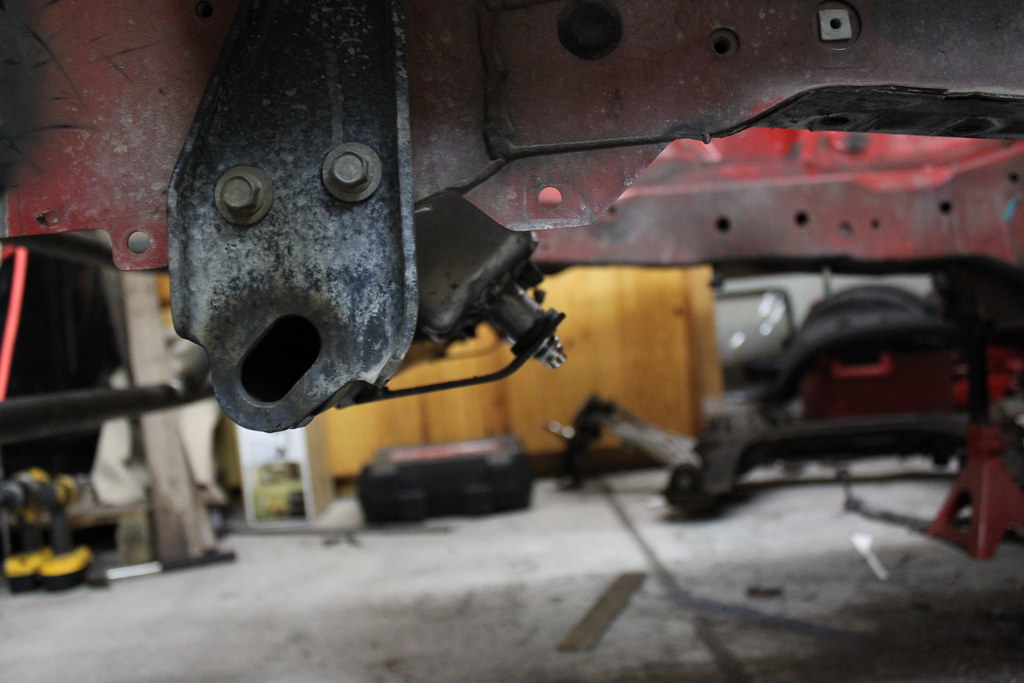
We also worked on the brakes a little bit. Still waiting on my fitting order to come in so we can finish the plumbing.

Peek-a-boo!
The car came back from Elevens' Paint and Fiber and we got to work.
First order of business was to install the fire suppression system. I got the SPA system that has 6 nozzles, 2 pull cables, and 4L capacity. It's also FIA certified so it passes FD tech.
I decided to mount it in the pass side rear "bin" that FC's have. More weight on the pass side is good because it'll even out the weight distribution. My v8 is messing up my vehicular dynamics!
Then we moved onto doing the pull cable. Here is Joe making a bracket.
All done and painted!
The pull lever is perfectly positioned. I can easily reach it with either hand while strapped in regardless of where the seat is positioned.
We also worked on the brakes a little bit. Still waiting on my fitting order to come in so we can finish the plumbing.
Peek-a-boo!
Thread Starter
Full Member
Joined: Mar 2007
Posts: 104
Likes: 1
From: AZ
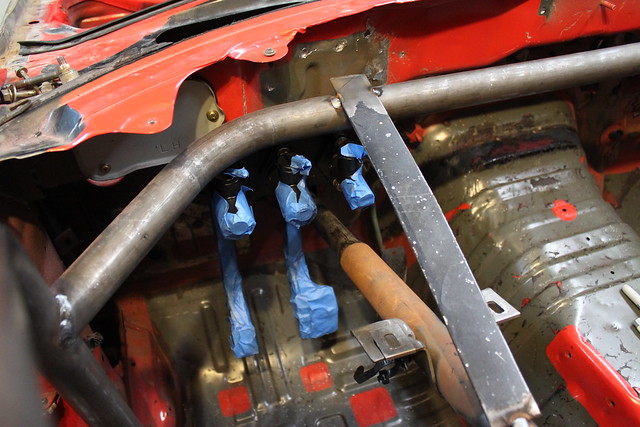
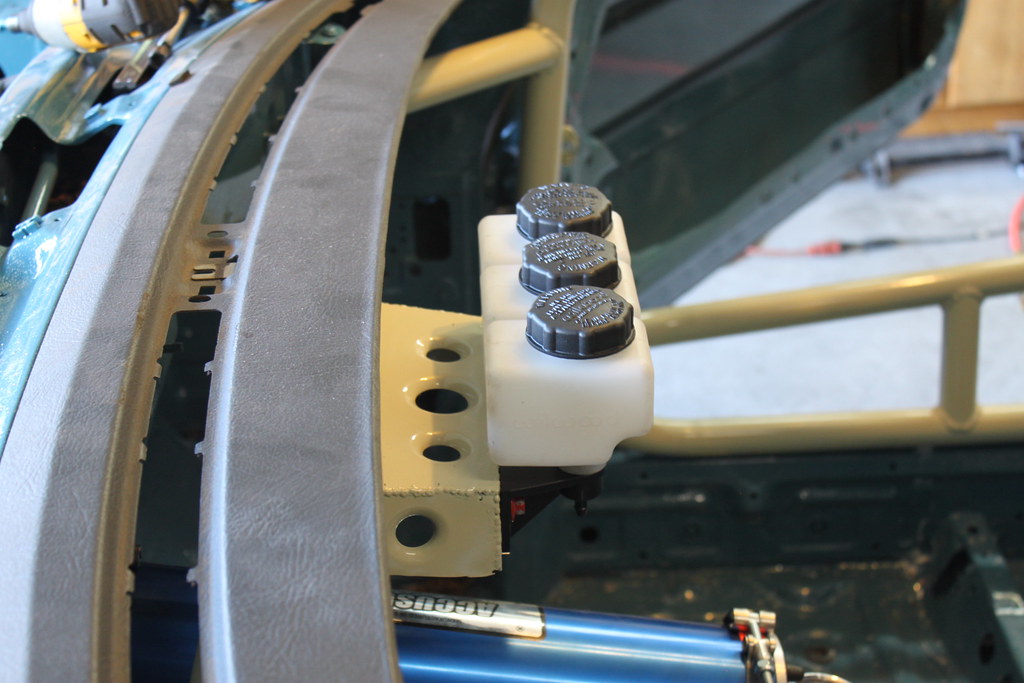
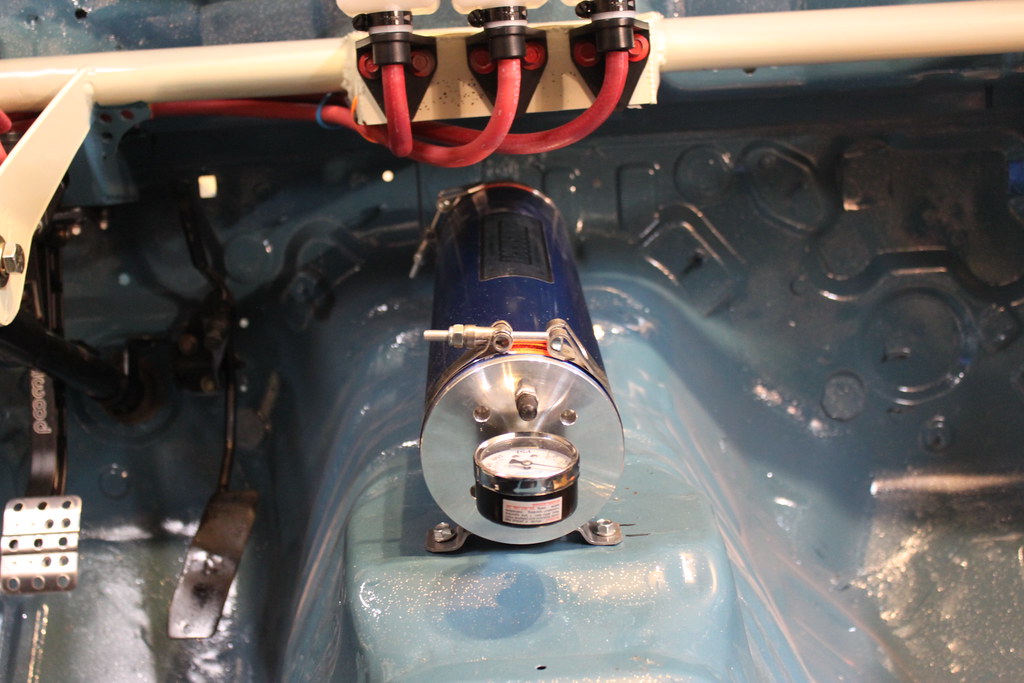
Then we figured out where the Accusump will go. I put it here so it would have a short run of line and the gauge would be easy to check while seated. I still need to build a bomb proof shelter around it.

Also painted a ton of stuff. Meet Pat. He paints random parts and spots for my skid chariot.

And then we put it together.
The rear susp uses all spherical in the rear along with custom toe rods. The center link has been shortened to take out some camber when the car is LOW LOW. The camber links take care of the individual camber adjustment. All solid bushings ensure that nothing will move around or flex.
We also played with the dual rear caliper setup. The FC rear spindle is tough to get the EVO brembos bolted on. Other calipers would probably be easier to adapter with a bolt on kit. But since the pedal setup is sized for these calipers and I already have the front EVO's I decided to make it work. Joe spent a good chunk of time on these and made them awesome!


Test fit looks awesome. It uses the OEM evo rear rotor along with evo rear calipers. No clearance issues with the trailing arm. All that's left is to get it welded on and finish up the other side.
And lastly, Corey spent some time doing a really neat project for me. I've always loved the way the Sexy Knights FC had LED tails so he went to town on them.
Running lights.

Brake lights.

All on at once.

He designed it to where it would be easy to take out and put the LED parts into new tails. My guess is that these will meet a premature death via a wall.
The fuel pump also got installed but we didn't grab pics of that. It's all in the details!
We can never seem to get away from hurting ourselves while working on cars.

I'm currently doing the wiring from scratch with deutsch connectors, tefzel wire, and rocker switches. Hoping to have that all done by this weekend. I'm waiting on some subframe and dtss bushings to come in to be able to set the car on the ground.
Huge thanks to Joe, Pat, and Drew for coming up and helping out all weekend.
Also painted a ton of stuff. Meet Pat. He paints random parts and spots for my skid chariot.
And then we put it together.
The rear susp uses all spherical in the rear along with custom toe rods. The center link has been shortened to take out some camber when the car is LOW LOW. The camber links take care of the individual camber adjustment. All solid bushings ensure that nothing will move around or flex.
We also played with the dual rear caliper setup. The FC rear spindle is tough to get the EVO brembos bolted on. Other calipers would probably be easier to adapter with a bolt on kit. But since the pedal setup is sized for these calipers and I already have the front EVO's I decided to make it work. Joe spent a good chunk of time on these and made them awesome!
Test fit looks awesome. It uses the OEM evo rear rotor along with evo rear calipers. No clearance issues with the trailing arm. All that's left is to get it welded on and finish up the other side.
And lastly, Corey spent some time doing a really neat project for me. I've always loved the way the Sexy Knights FC had LED tails so he went to town on them.
Running lights.
Brake lights.
All on at once.
He designed it to where it would be easy to take out and put the LED parts into new tails. My guess is that these will meet a premature death via a wall.
The fuel pump also got installed but we didn't grab pics of that. It's all in the details!
We can never seem to get away from hurting ourselves while working on cars.
I'm currently doing the wiring from scratch with deutsch connectors, tefzel wire, and rocker switches. Hoping to have that all done by this weekend. I'm waiting on some subframe and dtss bushings to come in to be able to set the car on the ground.
Huge thanks to Joe, Pat, and Drew for coming up and helping out all weekend.
Thread Starter
Full Member
Joined: Mar 2007
Posts: 104
Likes: 1
From: AZ
FD ATL was a blast.
Our weekend started on tuesday night right after work. I met up with my spotter and crew chief and we got on the road. 30 hours lay before us and we weren't stopping. We wanted to make Thursday practice to test some new alignment on the car and to also get a feel for ATL. So we rolled into ATL at 6am and got any sleep we could. Practice was starting at noon.
Road Atlanta is a truly amazing facility. It's very picturesque and the elevation changes at the track look so fun.
Thursday practice went pretty bad. I was again finding myself fighting the car and sleep deprivation wasn't helping. We didn't get a chance to really set it up much. With only 4 runs in we felt defeated.
I made sure to get enough sleep for Friday. We were all so exhausted from the drive that it was mentally draining everyone.
We got to the track early and immediately went to work on the car.


We checked every last nut and bolt in the susp and found a few that weren't as tight as they needed to be. I also decided to change the toe settings in the front just a bit since the car seemed really unstable and snappy.
Whatever we did worked and it worked awesome!

The car felt great and really predictable. I went from not being able to link the course on Thursday to linking the course first lap on Friday. The car felt night and day. I also felt a ton better with some rest and a clear head.
The rest of practice was unremarkable. My spotter Pat was slowly showing me where I needed to improve. The toughest part for me was the outer clip on the uphill. It's really deceiving in the car. Maybe it's because my car is low and I sit pretty much on the floor, but coming up the hill felt like I couldn't see where the turn was. It was my crew chief who actually gave me his only piece of advice ever and it worked. "floor it longer". That's all he ever says. But it worked and I actually overshot the clip! Good, now I know where the limit is and where my timing should be.
Qualifying. Since I qualified and finished decent in LBC I got to qualify later in the pack. It's good not being one of the first cars out.
My first run was a total disaster. I entered the 1st turn like normal and got to angle quick. All weekend I had been entering in 4th gear and downshifting to 3rd. Well, I own a T56 and shifting is not something that transmission does. So by the 2nd corner I was losing speed while trying to find a gear. I'll take any gear at this point. So I just rammed it into 2nd and floored it up the hill. I basically did a straightline burnout because my wheel speed was nothing. I also overshoot the outer zone just a tad since I went into that corner faster than anyone else. Oops. I get a 71.
Qual #2 went better. I felt like I drove a ton better and got a lot more angle everywhere. I shifted a lot sooner which helped a ton. Right about my run was when the speed gun broke/malfunctioned/whatever. What's strange is that everyone posted a speed in qualifying with a "broken" gun. I had 7th fastest speed from the recorded data so my 2nd run might have scored a lot higher if everyone didn't get the 10 speed points automatically. I can at least say that my low car can perform while being low which I'm happy with.
http://www.twitch.tv/driftstream/b/317885391
Qual #1: 51:12
Qual #2: 2:18:00
My top 32 match up would be Matt Powers. Old low low vs new low low? Hahaha.
He went first and I followed. I got a little too aggressive and spun at the top of the keyhole! GRRRRRRR.
On my way back to the start my spotter says "Uhm, just go 100mph and do a reverse entry!" Those were literally his words. Apparently many of the other spotters thought this was bad advice. You decide.
http://www.twitch.tv/driftstream/b/317996929


I lead and pretty much did a run that felt like my best one ever of the weekend. But it wasn't enough and the spin cost me.
After the battle Matt said I should raise my car. HAHAHA.
And that was our weekend. We spent the rest of the night watching the battles, yelling for our friends, and having a blast.
I'll be skipping FL and NJ cause I'm poor. But I'll be back for seattle, vegas, and irwindale so that should be fun. I like tracks with walls.
Our weekend started on tuesday night right after work. I met up with my spotter and crew chief and we got on the road. 30 hours lay before us and we weren't stopping. We wanted to make Thursday practice to test some new alignment on the car and to also get a feel for ATL. So we rolled into ATL at 6am and got any sleep we could. Practice was starting at noon.
Road Atlanta is a truly amazing facility. It's very picturesque and the elevation changes at the track look so fun.
Thursday practice went pretty bad. I was again finding myself fighting the car and sleep deprivation wasn't helping. We didn't get a chance to really set it up much. With only 4 runs in we felt defeated.
I made sure to get enough sleep for Friday. We were all so exhausted from the drive that it was mentally draining everyone.
We got to the track early and immediately went to work on the car.
We checked every last nut and bolt in the susp and found a few that weren't as tight as they needed to be. I also decided to change the toe settings in the front just a bit since the car seemed really unstable and snappy.
Whatever we did worked and it worked awesome!
The car felt great and really predictable. I went from not being able to link the course on Thursday to linking the course first lap on Friday. The car felt night and day. I also felt a ton better with some rest and a clear head.
The rest of practice was unremarkable. My spotter Pat was slowly showing me where I needed to improve. The toughest part for me was the outer clip on the uphill. It's really deceiving in the car. Maybe it's because my car is low and I sit pretty much on the floor, but coming up the hill felt like I couldn't see where the turn was. It was my crew chief who actually gave me his only piece of advice ever and it worked. "floor it longer". That's all he ever says. But it worked and I actually overshot the clip! Good, now I know where the limit is and where my timing should be.
Qualifying. Since I qualified and finished decent in LBC I got to qualify later in the pack. It's good not being one of the first cars out.
My first run was a total disaster. I entered the 1st turn like normal and got to angle quick. All weekend I had been entering in 4th gear and downshifting to 3rd. Well, I own a T56 and shifting is not something that transmission does. So by the 2nd corner I was losing speed while trying to find a gear. I'll take any gear at this point. So I just rammed it into 2nd and floored it up the hill. I basically did a straightline burnout because my wheel speed was nothing. I also overshoot the outer zone just a tad since I went into that corner faster than anyone else. Oops. I get a 71.
Qual #2 went better. I felt like I drove a ton better and got a lot more angle everywhere. I shifted a lot sooner which helped a ton. Right about my run was when the speed gun broke/malfunctioned/whatever. What's strange is that everyone posted a speed in qualifying with a "broken" gun. I had 7th fastest speed from the recorded data so my 2nd run might have scored a lot higher if everyone didn't get the 10 speed points automatically. I can at least say that my low car can perform while being low which I'm happy with.
http://www.twitch.tv/driftstream/b/317885391
Qual #1: 51:12
Qual #2: 2:18:00
My top 32 match up would be Matt Powers. Old low low vs new low low? Hahaha.
He went first and I followed. I got a little too aggressive and spun at the top of the keyhole! GRRRRRRR.
On my way back to the start my spotter says "Uhm, just go 100mph and do a reverse entry!" Those were literally his words. Apparently many of the other spotters thought this was bad advice. You decide.
http://www.twitch.tv/driftstream/b/317996929
I lead and pretty much did a run that felt like my best one ever of the weekend. But it wasn't enough and the spin cost me.
After the battle Matt said I should raise my car. HAHAHA.
And that was our weekend. We spent the rest of the night watching the battles, yelling for our friends, and having a blast.
I'll be skipping FL and NJ cause I'm poor. But I'll be back for seattle, vegas, and irwindale so that should be fun. I like tracks with walls.

Senior Member
Joined: Jan 2011
Posts: 338
Likes: 0
From: houston, tx
dude love your car...and that lead run was awesome. also please do not raise your car its freaking sexy and that's how a drift car should be. super low and blowing up body kits! keep up the good work and keep up updated dude.