
Polishing my S5 NA manifold (pics)


Polishing my S5 NA manifold (pics)
wow, i MUST be bored to post this...
okay, so i'm not even close to being done but i've decided to just post some pics of what i've done so far on my S5 manifold that i am polishing. all i have done is 2 sanding steps consisting of 80 and 120 on my dynamic chamber. i did it all by hand and used also a drum on a drill, but that was useless for the most part. taken me probably about 8 hours so far. this is in a garage i only get access to it every 2 weeks or so. and yes, it is like -40 outside...i still have 220, 3xx, 400, 600 grits to go through on the dynamic chamber, not to mention the actualy polishing...but those may take less time...in any case at the rate this is going i think i will just do the dynamic chamber and throttle body, and then powdercoat the rest...anyway, here are pics:
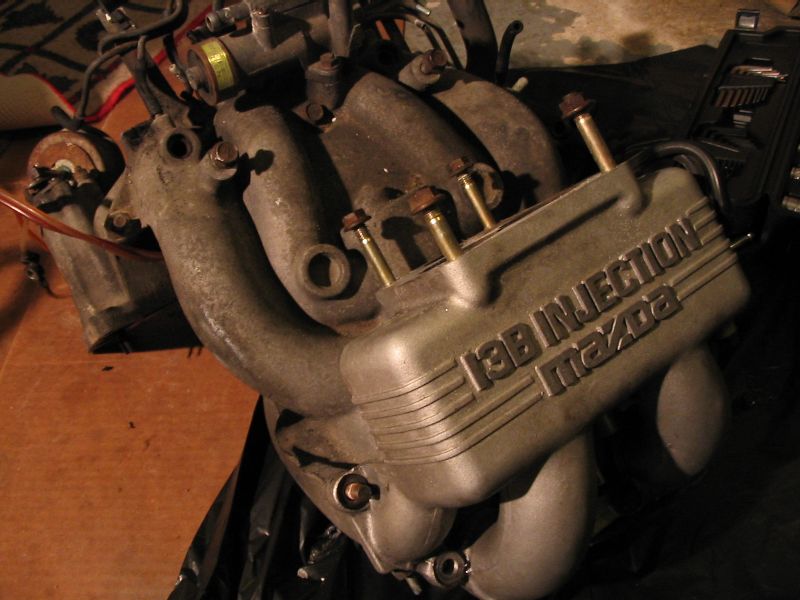
this is what i am starting with:
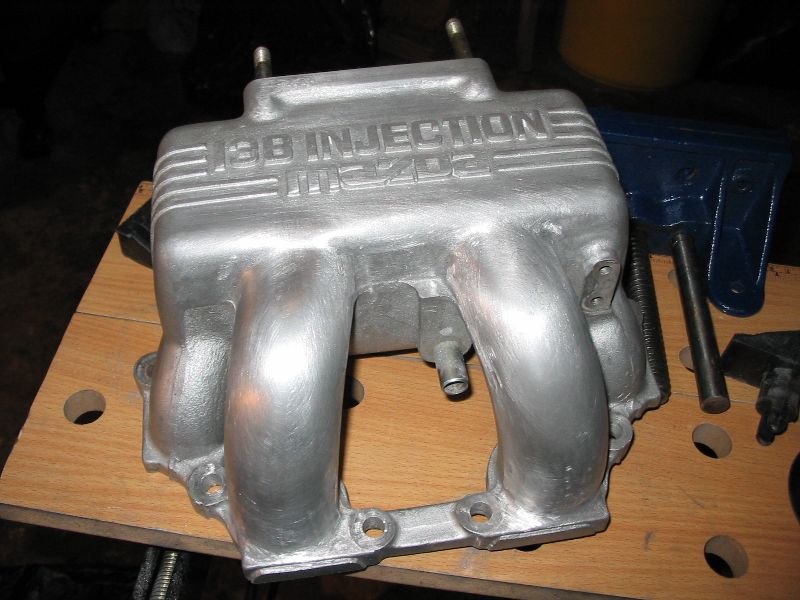
dynamic chamber after 80 and 120 grit sanding (actually this was taken about half way through 80 and 120 sanding):
it's a little bit smoother and shinier now, but still lots to go, and i hardly ever get to work on it...
i'd also like to port the manifold before putting it on, but i'd prefer doing that with a flowbench handy...
okay, so i'm not even close to being done but i've decided to just post some pics of what i've done so far on my S5 manifold that i am polishing. all i have done is 2 sanding steps consisting of 80 and 120 on my dynamic chamber. i did it all by hand and used also a drum on a drill, but that was useless for the most part. taken me probably about 8 hours so far. this is in a garage i only get access to it every 2 weeks or so. and yes, it is like -40 outside...i still have 220, 3xx, 400, 600 grits to go through on the dynamic chamber, not to mention the actualy polishing...but those may take less time...in any case at the rate this is going i think i will just do the dynamic chamber and throttle body, and then powdercoat the rest...anyway, here are pics:
this is what i am starting with:
dynamic chamber after 80 and 120 grit sanding (actually this was taken about half way through 80 and 120 sanding):
it's a little bit smoother and shinier now, but still lots to go, and i hardly ever get to work on it...
i'd also like to port the manifold before putting it on, but i'd prefer doing that with a flowbench handy...
skip the 240, 320 and 600 grit steps, go right from 120 to 400 to polishing
trust me. metal (unlike paint/primer/bodyfiller) can only be scratched so deeply by sand paper...the 80 will take down the casting pits quickly, the 120 will lightly smooth the 80 scratches and the 400 is rough enough to take out the 120 scratches. BTW using a DA (an orbital sander)on all the upper facing surfaces you can reach will save LOADS of time not to mention finger skin - lol
Then polish, if you use a mini polisher, like a 3" astro buffer or something along those lines - you can actually see 400 grit scratches being worn away, the more you polish the finer they become, thats why the 600 grit step is really useless unless you are unable to use any kind of machine to polish it.
But it looks like its coming nicely - good luck
PS - post pics of you black hands next time too - LOL
Originally Posted by IAN
Nice. Keep up the good work.


skip the 240, 320 and 600 grit steps, go right from 120 to 400 to polishing
trust me. metal (unlike paint/primer/bodyfiller) can only be scratched so deeply by sand paper...the 80 will take down the casting pits quickly, the 120 will lightly smooth the 80 scratches and the 400 is rough enough to take out the 120 scratches. BTW using a DA (an orbital sander)on all the upper facing surfaces you can reach will save LOADS of time not to mention finger skin - lol
Then polish, if you use a mini polisher, like a 3" astro buffer or something along those lines - you can actually see 400 grit scratches being worn away, the more you polish the finer they become, thats why the 600 grit step is really useless unless you are unable to use any kind of machine to polish it.
But it looks like its coming nicely - good luck
PS - post pics of you black hands next time too - LOL
trust me. metal (unlike paint/primer/bodyfiller) can only be scratched so deeply by sand paper...the 80 will take down the casting pits quickly, the 120 will lightly smooth the 80 scratches and the 400 is rough enough to take out the 120 scratches. BTW using a DA (an orbital sander)on all the upper facing surfaces you can reach will save LOADS of time not to mention finger skin - lol
Then polish, if you use a mini polisher, like a 3" astro buffer or something along those lines - you can actually see 400 grit scratches being worn away, the more you polish the finer they become, thats why the 600 grit step is really useless unless you are unable to use any kind of machine to polish it.
But it looks like its coming nicely - good luck
PS - post pics of you black hands next time too - LOL
thanks for the tips. i may skip some of the sanding steps. but from what i have been reading a smooth 600 finish is where you want to be before actual polishing. i don't really have any tools right now for polishing, maybe i can pick up something that will help me along. i'm trying not to spend too much money though. any suggestions on some cost effective polishing tools/accessories?
i acutally DO have a detail sander. i guess that should help me out a bunch on the flater, more accesible surfaces.
oh, and as for my hands, i use a good pair of mechanix gloves, so my hands stay clean for the most part hehe
but that dust seems to get everywhere...good thing i have a nice mask too. otherwise i wouldn't be quite comprehending some of my university math courses, lol

Originally Posted by 1sicsol
It looks much better already. I want to do mine, but I dont see how that took you 8 hours just to do that! I'm not saying it didn't, but it seems easier to sand it than it looks.
Trending Topics
Originally Posted by FC3S.USD
Good work, Now I never understood why people spend so much time polishing stuff.
well, here's just an update. i've finished up to 600 grit sanding. well, at least as much time as i want to spend sanding...up next is polishing, which i really have no clue about.
here is a picture:
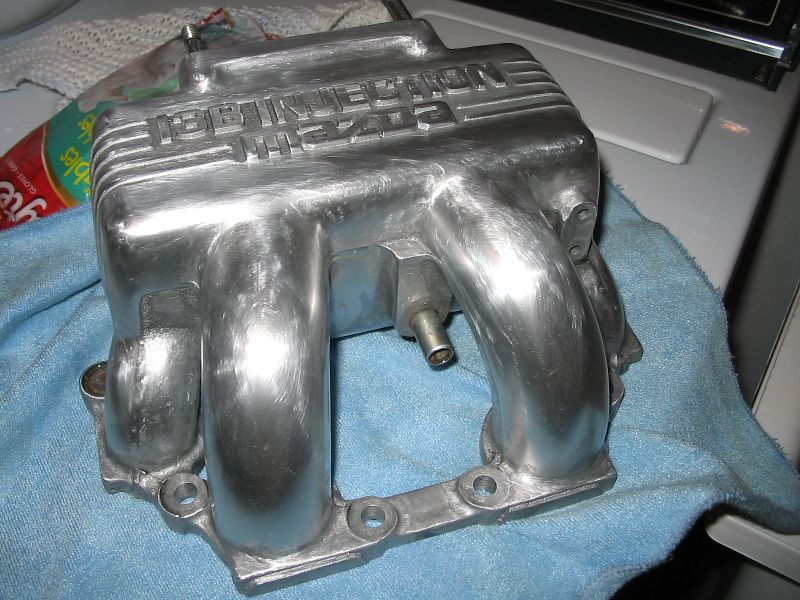
so far about 10-12 hours of work...but just because i am slow and had to do it ALL by hand...
oh well, hopefully polishing doesn't take as long...as soon as i figure it out.
here is a picture:
so far about 10-12 hours of work...but just because i am slow and had to do it ALL by hand...
oh well, hopefully polishing doesn't take as long...as soon as i figure it out.
What about Sand Blasting it? I know that doesnt polish it, but would that help in aiding the process? I have an S4 UIM that I'd really like to polish up and possibly paint the letters or something.
thanks. well for cleaning i just sprayed it down with brake cleaner to get any grease off. the initial 80 grit will get off most of the imperfections.
and as for sand blasting, that would definetly initially clean the metal up a lot and aid you in getting it smooth. and this would then cut down on time spent...i'd like to have access to an air compressor and sand blast attachment, but i don't unfortunately. this is a very low budget project so far.
and as for sand blasting, that would definetly initially clean the metal up a lot and aid you in getting it smooth. and this would then cut down on time spent...i'd like to have access to an air compressor and sand blast attachment, but i don't unfortunately. this is a very low budget project so far.
Originally Posted by eViLRotor
So, are you going to spend all that time polishing it, only for me to bring it to the powdercoater? 
sorry if that was confusing, i have been working with fumes all day trying to get an engine rotor clean.
well, this is the finished product:
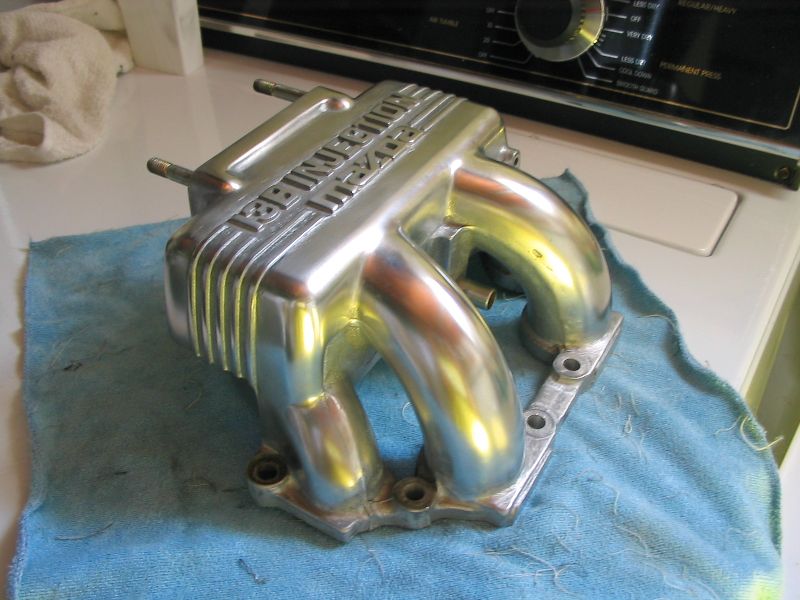
i found that the polishing step didn't really make it that much more shiny, but it looks smoother now and is more reflective (as you can tell by my yellow shirt reflecting of it).
i just used some polishing compound from CT, and used my crappy electric drill with a buffing pad...i think i could have done a better if i had something a little faster.
oh well...i may decide to paint the wording on it black, and also spray the whole thing with clear coat engine enamel, so that it will stay clean...don't know if that stuff will make it less shiny though
Pictures lie, but that almost looks better than the powdercoat. Just because it is smoother. The beadblasting they do on the manifolds just doesn't make them smooth enough for a mirror shine.
The PC turned out pretty well though. I'm happy with it, because I knew I was never going to polish crazy like Ian.
The PC turned out pretty well though. I'm happy with it, because I knew I was never going to polish crazy like Ian.
Originally Posted by eViLRotor
Pictures lie, but that almost looks better than the powdercoat. Just because it is smoother. The beadblasting they do on the manifolds just doesn't make them smooth enough for a mirror shine.
The PC turned out pretty well though. I'm happy with it, because I knew I was never going to polish crazy like Ian.
The PC turned out pretty well though. I'm happy with it, because I knew I was never going to polish crazy like Ian.
actually i wasn't expecting the powdercoating to be shinier or a more mirror like finish. it's just that the S5 NA manifold is impossible to polish, and i didn't want it getting dull, so PC makes sense.
besides, i don't want the PCd stuff to out bling my polish job


That looks great - I'm almost inspired to follow in your footsteps - almost. Maybe if I have reason to have the DC off at some point. In any case, clearcoating it should help prevent it oxidizing back to grey - did something very similar with the aluminum valve cover of a Nissan I used to have - held up for years. I think I used Tremclad clearcoat at that time - it was the only one I found that could be used without a basecoat of some sort.

keep going.... use a aluminum polish compound and you can get a mirror.... then clear coat.
personally I'd grind off all the lines and writing and it would look amazing.... I did the same on mine aswell as a set of valve covers for a supra and it looks great.
Port match your manifolds aswell
personally I'd grind off all the lines and writing and it would look amazing.... I did the same on mine aswell as a set of valve covers for a supra and it looks great.
Port match your manifolds aswell
hey bud take it from me , when using your buffer , you need to use a light grit compound with the buffing wheel , it makes all the difference . I have a buffer in my garage , and the buffing compound is cheap , but it make a world of difference
Pm me if you need any other help
Pm me if you need any other help