
Project OldTree: The 12 Days of Rotormas

Thread Starter
Joined: Dec 2007
Posts: 2,067
Likes: 309
From: St Louis, MO
Just had a DUH moment and pulled the battery out of the Mirage. After sitting for quite awhile unplugged, it still read 11.85 volts. After getting refreshed on the charger at 2 amps, it's now reading a healthy 12.7 volts. It's just a Duralast Gold Size 51, which just happens to coincidentally have the same CCA and CA has the FC's el-cheapo battery and 5 minutes more reserve too. Should fill in just peachy till I can get a proper replacement.
And on that interesting note came a downright AWESOME IDEA
We've all had a dead battery before. It sucks. What sucks worse is if it won't take a charge. And if the warranty is up, you've officially hit (in Psy-Crow's voice) Maximum Suckage.
To keep the car tidy, most people use the passenger side storage bin to house the battery. After reading all the threads about battery relocation, it got me thinking...
Look carefully at this picture of Clokker's relocation using a Size 35 Optima. Picture is his, not mine.
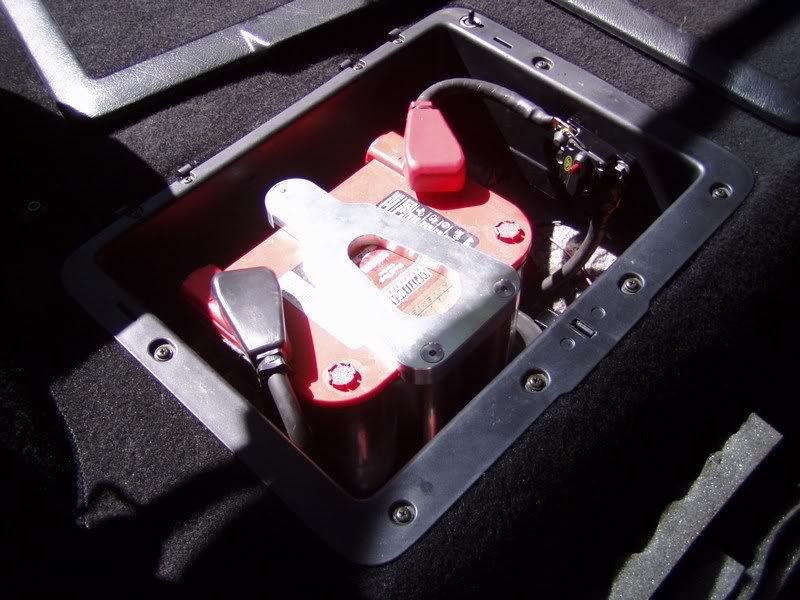
Look again at the picture. I see a bunch of wasted space and it got me wondering about dropping in this behemoth that makes even Nikola Tesla drool:
http://www.autozone.com/autozone/acc...w&viewAll=true
That's a Group 27 Deep Cycle Marine Battery, meant for primary power and starting purposes. It's the same width and height as our stock Size 35's, but 3" longer. Dunno about everyone else, but I can see 3" of unused space between the battery and breaker in Clokker's install.
It's got the same CCA and Cranking Amps that an Optima does, so it'll crank the engine no matter what. But what sets it apart is its Reserve Capacity...
180 minutes. Overkill? Nah
In plain english...
It'll turn over the engine just as well as an Optima will, has the same length of warranty, will take Yellow-top draining just the same, recharge on a common battery charger, and will STILL turn over the engine after a yellow-top can't even tickle the starter from the fans being on...
And it's half the price of an Optima. Pretty sure I won't notice the extra 20lbs with a 20B in the car. So the car's first upgrade is a new battery box. Will be building it similar to Aaron Cake's box, but with six mounting points to handle the extra weight. Add on a heavy duty hasp-style closure on top, secured with a nut & bolt and it'll be downright stupidly strong.
And since I'm lazy, maybe I'll put an airbag underneath the battery so I never have to lift it...
And on that interesting note came a downright AWESOME IDEA
We've all had a dead battery before. It sucks. What sucks worse is if it won't take a charge. And if the warranty is up, you've officially hit (in Psy-Crow's voice) Maximum Suckage.
To keep the car tidy, most people use the passenger side storage bin to house the battery. After reading all the threads about battery relocation, it got me thinking...
Look carefully at this picture of Clokker's relocation using a Size 35 Optima. Picture is his, not mine.
Look again at the picture. I see a bunch of wasted space and it got me wondering about dropping in this behemoth that makes even Nikola Tesla drool:
http://www.autozone.com/autozone/acc...w&viewAll=true
That's a Group 27 Deep Cycle Marine Battery, meant for primary power and starting purposes. It's the same width and height as our stock Size 35's, but 3" longer. Dunno about everyone else, but I can see 3" of unused space between the battery and breaker in Clokker's install.
It's got the same CCA and Cranking Amps that an Optima does, so it'll crank the engine no matter what. But what sets it apart is its Reserve Capacity...
180 minutes. Overkill? Nah
In plain english...
It'll turn over the engine just as well as an Optima will, has the same length of warranty, will take Yellow-top draining just the same, recharge on a common battery charger, and will STILL turn over the engine after a yellow-top can't even tickle the starter from the fans being on...
And it's half the price of an Optima. Pretty sure I won't notice the extra 20lbs with a 20B in the car. So the car's first upgrade is a new battery box. Will be building it similar to Aaron Cake's box, but with six mounting points to handle the extra weight. Add on a heavy duty hasp-style closure on top, secured with a nut & bolt and it'll be downright stupidly strong.
And since I'm lazy, maybe I'll put an airbag underneath the battery so I never have to lift it...
Joined: Sep 2005
Posts: 25,581
Likes: 136
From: Smiths Falls.(near Ottawa!.Mapquest IT!)
Just had a DUH moment and pulled the battery out of the Mirage. After sitting for quite awhile unplugged, it still read 11.85 volts. After getting refreshed on the charger at 2 amps, it's now reading a healthy 12.7 volts. It's just a Duralast Gold Size 51, which just happens to coincidentally have the same CCA and CA has the FC's el-cheapo battery and 5 minutes more reserve too. Should fill in just peachy till I can get a proper replacement.
And on that interesting note came a downright AWESOME IDEA
We've all had a dead battery before. It sucks. What sucks worse is if it won't take a charge. And if the warranty is up, you've officially hit (in Psy-Crow's voice) Maximum Suckage.
To keep the car tidy, most people use the passenger side storage bin to house the battery. After reading all the threads about battery relocation, it got me thinking...
Look carefully at this picture of Clokker's relocation using a Size 35 Optima. Picture is his, not mine.
Look again at the picture. I see a bunch of wasted space and it got me wondering about dropping in this behemoth that makes even Nikola Tesla drool:
http://www.autozone.com/autozone/acc...w&viewAll=true
That's a Group 27 Deep Cycle Marine Battery, meant for primary power and starting purposes. It's the same width and height as our stock Size 35's, but 3" longer. Dunno about everyone else, but I can see 3" of unused space between the battery and breaker in Clokker's install.
It's got the same CCA and Cranking Amps that an Optima does, so it'll crank the engine no matter what. But what sets it apart is its Reserve Capacity...
180 minutes. Overkill? Nah
In plain english...
It'll turn over the engine just as well as an Optima will, has the same length of warranty, will take Yellow-top draining just the same, recharge on a common battery charger, and will STILL turn over the engine after a yellow-top can't even tickle the starter from the fans being on...
And it's half the price of an Optima. Pretty sure I won't notice the extra 20lbs with a 20B in the car. So the car's first upgrade is a new battery box. Will be building it similar to Aaron Cake's box, but with six mounting points to handle the extra weight. Add on a heavy duty hasp-style closure on top, secured with a nut & bolt and it'll be downright stupidly strong.
And since I'm lazy, maybe I'll put an airbag underneath the battery so I never have to lift it...
that battery that you posted a link to is NOT,so it will emit Fumes.(not recommended for Inside the car).
Thread Starter
Joined: Dec 2007
Posts: 2,067
Likes: 309
From: St Louis, MO
Okay, let's have a small recap on batteries and charging them:
The fumes you are referring to are a result of boiling electrolyte inside the battery. Electrolyte is a mixture of Sulfuric Acid and Water and boiling it is due to attempting to charge the battery at too high of a rate. This warning is included with every battery and charger you could find in the United States now. It essentially says "If you hear bubbling, unplug the charger or you will hurt yourself."
In any car, the alternator is what charges the battery. What prevents overcharging is the Voltage Regulator. With a properly functioning electrical system, the alternator can't overcharge the battery because the voltage regulator will adjust the output accordingly to maintain a full charge, based on the reading from the Sensor Wire. So based on the reasoning that your car has a properly working alternator and voltage regulator, the necessity of a sealed battery such as an Optima one becomes moot. The only logical reason for it in this case is so the electrolyte doesn't slosh around or slosh out when one drives like a jackass in a civic
Our N/A FC's have this handy little voltmeter in the dashboard just for this reason and is why I'll be staying with the N/A cluster. Common sense would dictate that if the regulator took a dive or was not connected correctly, you would see the voltmeter spike to the top first before noticing any fumes.
And by my own admission of an incorrectly wired Taurus Alternator last year (corrected now), I found out that the Main Fuse will blow as well, shutting off everything in the car. Not instantly, but as a secondary safety measure if you don't pay attention to the gauges. I was using a 120A FD main fuse and it took maybe 60 seconds to blow with a maxed-out taurus alternator.
Plus, one other thing I'd like to point out is that a sealed battery is exactly that: sealed. It has no way to vent pressure in case of unintentional overcharging other than exploding...
Aaron Cake uses a sealed Deka Intimidator deep cycle battery in his FC, so I may consider their offerings as well. My main criteria is that if the CCAs are sufficient, there has to be a significant increase in reserve capacity to warrant the extra cost. More lead in the battery means more AHs and more capacity. So by that reason, courtesy of Aaron Cake, it all comes down to packing as much lead in the space available as possible.
Sorry, I'm just a big believer in using conventional reasoning and logic based on facts to disprove magic doodads in the same manner that Aaron Cake does.
All this logic and reasoning being applied to a theory with a faulty premise...sheesh.
I can't remember the last time I had a dead battery.
If you treat the battery as a consumable (i.e., you don;t expect it to last forever), have a good charging system and drive on a semi-regular basis, there's absolutely no reason the battery shouldn't last for five years or so and perform well for that period.
Then you replace it.
Seems to me that you're adding a bunch of weight (power output be damned, a pound is a pound and if it's not necessary, why have it?) to solve a problem that shouldn't exist in the first place.
We've all had a dead battery before. It sucks. What sucks worse is if it won't take a charge. And if the warranty is up, you've officially hit (in Psy-Crow's voice) Maximum Suckage.
If you treat the battery as a consumable (i.e., you don;t expect it to last forever), have a good charging system and drive on a semi-regular basis, there's absolutely no reason the battery shouldn't last for five years or so and perform well for that period.
Then you replace it.
Seems to me that you're adding a bunch of weight (power output be damned, a pound is a pound and if it's not necessary, why have it?) to solve a problem that shouldn't exist in the first place.

All this logic and reasoning being applied to a theory with a faulty premise...sheesh.
I can't remember the last time I had a dead battery.
If you treat the battery as a consumable (i.e., you don;t expect it to last forever), have a good charging system and drive on a semi-regular basis, there's absolutely no reason the battery shouldn't last for five years or so and perform well for that period.
Then you replace it.
Seems to me that you're adding a bunch of weight (power output be damned, a pound is a pound and if it's not necessary, why have it?) to solve a problem that shouldn't exist in the first place.
Hey these things happen. You can take care of it all you want, it just may quit you!
So 5 years my ***! Honda replaced it for free and a few years later it's 100%.
Ever hear of a lemon? Of course not... you drive an RX-7!! And we all know you are perfect and wonderful and never had car trouble. My oh my. A POUND OF WEIGHT extra for a good battery.
What a tool OP! An extra pound!? **** ME TOO. I've been filling my tank full this whole time. I'm so dumb... take off that last 1/4 gallon and I WILL improve performance. Oh and it will make my battery last!
**** on me. I've been doing wrong the past 8 years!
Last edited by beefhole; Dec 28, 2011 at 09:03 PM.
Im confused to all the thought being put into the battery???? I have used all kinds of batteries, never a new one, and never had a dead battery. Im not trying to say Im some kind of battery guru, Im saying I never cared at all because I never had a problem.
Seems to me like you are trying to gain 10% to lose 20%, figuratively.
Seems to me like you are trying to gain 10% to lose 20%, figuratively.


Joined: Mar 2001
Posts: 31,853
Likes: 3,242
From: https://www2.mazda.com/en/100th/

Thread Starter
Joined: Dec 2007
Posts: 2,067
Likes: 309
From: St Louis, MO
198713bt, I'm disappointed and pissed as well.
Wiring checks out fine, fuses are all fine too, everything is to the letter of the 20B with LS1 Coils diagram in the Haltech section. It's seeing Trigger and Home signals from the CAS (3 quick flashes on status LED) All remaining sensors check out fine as well.
Oil is regular 10w-30, Coolant is fine as well.
Battery won't spin the starter quicker than 150rpm according to the Haltech. According to the powers that be, 250-300rpm is proper cranking speed as I thought. Haltech was set up for max cranking speed of 400rpm last year.
The Size 51 falls flat after 15 minutes of being connected and cranking for less than 10 seconds with 30 seconds of cooldown between attempts. Seeing as how this is the case on both a Size 35 stock FC battery and a Size 51 FD battery (sourced from the Mirage), my diagnosis is that both batteries are just too wimpy in CCA/CA to actually start the engine, and their reserve capacity is so pathetic that it keels over with barely a breeze coming from the 20B's exhaust ports. Of course, this was 'to save weight' from the factory, just like every other electrical part on our cars.
If 500 CCA is sufficient to turn over a 13B to start it, a 20B would logically need at least 750 CCA as it has 50% more rotating mass to turn over. Not accounting for other factors, trying to start a 20B with only 500 CCA would only get the engine to turn over at about 2/3 of what it should be. That puts it around 167rpm, of which I subtract 10% of that to account for cabling losses because of the relocation. So we're at 150rpm and still no start.
This is what led me to the idea of UPSIZING the battery, so it'll actually have enough muscle to start with and enough reserve to do the job right even when the stock battery is long dead. Once again, conventional wisdom wins the day
How is the starter itself on the 20B though? Perhaps it's time to refurbish it. When I changed mine out to a fresh rebuilt one, it cranked much faster and started easier. When I pulled my old one off, I notice how corroded the connections were too.
Just to get it to run in the meantime, you could push start it. Or you could even jump it (?)
Just to get it to run in the meantime, you could push start it. Or you could even jump it (?)
Thread Starter
Joined: Dec 2007
Posts: 2,067
Likes: 309
From: St Louis, MO
A lesson about Battery CCA, CA, AH and Reserve Capacity
I just found the conversion equation from Battery Ampere-Hours to Reserve Capacity here: http://www.chem.hawaii.edu/uham/bat.html
Amp/Hours = (Reserve Capacity / 2) plus 16
A normal FC battery has approximately 80 minutes of reserve capacity. (80/2)+16=56AH. The JC Cosmo owner's manual calls for a 55AH battery in the 13B-REW model, so there isn't too big of a difference here.
On the other hand, the 20B Cosmo's battery is rated at 95AH. 2(95-16)=158 Reserve Capacity in minutes. I'm gonna take a wild guess and say that my car would probably require the same to handle the 20B correctly.
Adding in the Reserve to CCA equation (CCA ~ 5xRC). By this reasoning, 800 CCA appears to be the correct amount of starting power needed here.
What I've learned is that if there isn't enough CCA/CA to turn over the engine quick enough, the current draw eats the battery's Reserve Capacity like a fat kid on cake. As referenced with E-fans thanks to Aaron Cake, a motor draws its greatest current when stalled or starting up. Lead-Acid batteries handle this just fine and have a rating specifically for this, commonly called Cranking Amps. If there isn't enough, it can't get up to speed and one ends up with only 150rpm when trying to start the engine.
Starter seems healthy, it was pretty much new. From past experience, I've had nearly-dead starters still crank a 13B engine quick enough the start it. As for the Mirage, it's a 1995 LS coupe which shares everything with the Evo 3.
Yes, I've thought about trying to push start it before. When ObliqueFD and I brought the car home, it was a bear to get moving since one caliper is apparently sticking. Torque (or Inrush Current with electricity) is what gets something moving, Horsepower (or Steady Current) is what keeps it going. It took us both pushing the car using the wall as a brace to get it to move from a stop. Trying to push start it would require at least 4 guys to generate enough torque to get the car moving and turn the engine over too. 3 to comfortably get the car moving and one more to keep enough torque to turn the engine over. It took 4 to push start my niece's friend's F-150, so that sounds about right.
In the morning, I'm gonna hook up both batteries in parallel and give it one more go. Mirage's battery in the hatch and the FC battery at the front jump point on jumper cables. In theory, that would provide close to 1000 CCA.
A seized wheel will make trouble as you know. However, to even push a car, a 90lb girl can do it. It's all in the legs, and how you attack the car. Put your feet under the rear bumper, bend and press your legs against it. Then as you "un-bend", lean forward. I believe Archimedes knew something like this 
Of course, don't do this in gear. You have to push start by putting it in gear and dumping the clutch.
Of course, don't do this in gear. You have to push start by putting it in gear and dumping the clutch.
Thread Starter
Joined: Dec 2007
Posts: 2,067
Likes: 309
From: St Louis, MO
New year's update:
Doublechecked all haltech wiring, it is dead-on accurate. Coil wiring is correct, so there should be no more issues...
Except for the bastard connectors FEM-01 and FEM-02. After an hour of chiropractic torture involving scraped up hands, squeezing myself in the passenger side footwell, and trying to find these two demons that belong in the Seventh Level of Hell, I'm asking for help.
Tried pushing the wires up from the inside, no luck
Tried pulling from the outside, they still get stuck
How do you get these bastards back on? Any hints, tips or tricks? I'm at the end of my rope on this
Joined: Mar 2001
Posts: 31,853
Likes: 3,242
From: https://www2.mazda.com/en/100th/
New year's update:
Doublechecked all haltech wiring, it is dead-on accurate. Coil wiring is correct, so there should be no more issues...
Except for the bastard connectors FEM-01 and FEM-02. After an hour of chiropractic torture involving scraped up hands, squeezing myself in the passenger side footwell, and trying to find these two demons that belong in the Seventh Level of Hell, I'm asking for help.
Tried pushing the wires up from the inside, no luck
Tried pulling from the outside, they still get stuck
How do you get these bastards back on? Any hints, tips or tricks? I'm at the end of my rope on this
Thread Starter
Joined: Dec 2007
Posts: 2,067
Likes: 309
From: St Louis, MO
Just tried that, it won't budge either. Someone who had the car before I did left the top nut off of the blower motor, but I can't get the slotted hole to let go of the stud. Seems pretty solidly held in place and the plastic brackets on the blower motor would probably snap with little provocation too.
The front passenger side speaker/amp's connector is stuck in place as well.
The front passenger side speaker/amp's connector is stuck in place as well.
Thread Starter
Joined: Dec 2007
Posts: 2,067
Likes: 309
From: St Louis, MO
UPDATE
Wiring is finished and here's the magic trick for S4 connectors FEM-01 & FEM-02 and S5 connector X-10 & X-11. Both are secured to the body with a M6x1.0 nut each (10mm socket). The angle is a bitch to get to, but I did it with a 1/4" drive socket, 10" long extension, spinner handle and ratchet. Put the socket on the extension, then get that on the nut, add the handle and ratchet.
Product Bump:
Popular Mechanics PM6-38564 20 piece Metric 1/4" Drive Socket Set
This set is a livesaver on a RX-7. It has 4-13mm sockets, 6-12mm deepwell sockets, a 2" extension, ratcher and spinner handle.
UPC# is 6-05388-63856-4 and should be available at Walmart. That's where my dad got it for me years ago.
This is the tool set that stays in my car at all times. What makes it a livesaver is that the spinner handle has a 1/4" female square drive machined into the top. This makes it the PERFECT TOOL for areas that you need to put downforce on while loosening, or at difficult angles. Combine it with a 100 piece screwdriver bit set from Harbor Freight and you'll have the perfect setup to get even the most stubborn stuff loose on the road. The only stuff it can't handle is bigger than M8 and those are items that you shouldn't be driving around with in need of repair anyway. Pretty sure you can find that bit set at Walmart too.
One success story I have is the fuel pump flange screws. This setup was how I was able to extract ALL EIGHT SCREWS COMPLETELY INTACT. Soaked them down 2-3 times in PB Blaster over a couple days, put the #2 phillips bit & square drive adapter on the spinner handle with ratchet on top, then put all your weight on top with your left hand while turning using your right hand.
Un-clip the FEM-01 & FEM-02 connectors from their plastic carriers as soon as you get them off of their studs. This frees them from the rest of the Front Harness so you'll have enough wiggle room to disconnect them.
I did this for the vertical one last year and have no idea how ObliqueFD & I did the other one. It's not proper, but I'm leaving both nuts off and FEM-01 & FEM-02 off of their carriers so they're accessible. Plus I lost the nuts
Also, I just found out that the Geo Tracker radio connector is NOT a perfect fit for FEM-01 to wire in the Coolant Gauge Sender. It's the correct pins, spacing, but the keys separating the middle pin on the car's connector are too long to fit the Geo connector. Solution: Modify the car's connector by cutting the keys at their base near the release tab, then twist them out with needle nose pliers. As long as you're semi-careful about not bending the nearby pins, there's no drama.
To keep yourself steady when accessing these connectors, plant your feet on the B-pillar with your head in the footwell. This is quite a contortion act if you're taller than 5'5. I'm nearly 6ft and it was NOT FUN AT ALL. Am I pleased with the result? Very, because I can get to these connectors. Would I do this again? I'd rather watch Justin Bieber eat the rotten ******* of a roadkill skunk and down it with POR-15.
Next time, the key shall turn...
One success story I have is the fuel pump flange screws. This setup was how I was able to extract ALL EIGHT SCREWS COMPLETELY INTACT. Soaked them down 2-3 times in PB Blaster over a couple days, put the #2 phillips bit & square drive adapter on the spinner handle with ratchet on top, then put all your weight on top with your left hand while turning using your right hand.
If I had to guess, this sounds like the 20b has too much rotating resistance. I would try to put a standard breaker bar on the front pulley and rotate by hand in neutral. It should not be very difficult to move, if you have to put all your weight into it there is a problem.
I have been using a odyssey PC 980 for years to start my personal 20b, and even in 20 degree weather it starts up without any dead batteries. CCA on that battery is only 380, and I use a 4 gauge wire for ground and positive directly to the block/starter which is over 4 feet long.
I have been using a odyssey PC 980 for years to start my personal 20b, and even in 20 degree weather it starts up without any dead batteries. CCA on that battery is only 380, and I use a 4 gauge wire for ground and positive directly to the block/starter which is over 4 feet long.
I would say the starter itself is shot then. Have had a few old ones crank slow as hell even with tons of voltage on tap. Travis PM'd me about the starter, so he probably is already in route to replace it.
Thread Starter
Joined: Dec 2007
Posts: 2,067
Likes: 309
From: St Louis, MO
If a 20B can be cranked up with 380CCA, then it's either the cabling or starter. Since I'm using 3AWG copper THHN cable rated for up to 158 amps, pretty sure it's not that. So the starter is kaput.
It was free on trade for a spare N326 ECU and supposedly just rebuilt when I got it a year ago. As for the quality of the rebuild, its probably Autozone. So on payday, starter is getting rebuilt with new brushes from the dealer for $10. All FC & manual FD starters use the same N318 brush set.
Really looking forward to payday. 18 hours of overtime this week, and shitloads more for the next 2-3 weeks thanks to tax document mailings. Time to book a dyno day.
Once the car is tuned, the interior is getting some long-overdue attention and an electrical upgrade. It needs a bin swap really bad, a proper battery box and a new stereo trim. If you have or know someone with a blue bin setup that you'd like to offload, please let me know. That's correct, I said I want a BLUE BIN SET. Not black or gray, but BLUE. Black is the normal desirable color and shows every imperfection, gray is the standard interior color for every new car and just lacks any character. Red turns to pink with age, or puke green if stained. We learned that from Aaron Cake's carpet replacement on Project Tina. On the other hand, blue is the original interior color, ages very gracefully to a somewhat lighter hue, and that shade is Mazda's trademark color.
I've got a blue cloth rear seat that's only been used once since I got the car. One tiny hole in the seat back's upper edge about 1/8" in diameter, but otherwise flawless. Will trade even up for a bin setup in good usable shape.
As for the electrical upgrade, the haltech harness is getting cleaned up, all the unused wires removed and all the splices taken out. Every single ground for everything in the EMS is getting its own bus bar connected to the main ground for the engine. All the orange 5V wires are getting thrown in the garbage in favor of a single 12awg one from the haltech, split to everything else on its own bus bar.
The harness's wiring appears to be 16awg, so combining redundant wires into 12awg should be overkill. Since what I have right now is 12awg in red and black, that's what the car will get and can tag it with the label maker to eliminate confusion. My general rule for anything regarding wire is that if you don't know, start with 12awg.
As for all of the ignition-switched 12 volt stuff, one more bus bar will be used for it, wired to the green connector behind the driver's side headlight. Haltech fuse panel and relays will be relocated to behind the driver's side headlight, eliminating a lot of the flying lead harness's excess bulk.
Doing all this should eliminate a lot of the flying lead harness's excess bulk. then tidy it up in split loom covered with heat-reflective loom over it. And just for that added touch, a new grommet for the firewall hole directly from the manufacturer whom I found less than a block from where I work.
It def is a more thought involved process but with a solid work scope and definitive goal, its really a pleasurable swap. The first start of mine will always be imprinted in my memory.