Getting her back on the road again (and sitting pretty..)

 02-05-14, 10:17 AM
#403
It's way simpler than you'd think...more awkward than difficult.
Working alone with two floor jacks, I did it in under a half hour.
And let's keep in mind that I'm old, physically enfeebled and (usually) drug addled.
I was working in a normal Earth atmosphere however, so we'll balance that against the fact that you are apparently on an asteroid (or Chicago...same thing) and wracked with disease.
My calculations say you should be able to do it in 5 minutes.
With a +/- variable of two days.
02-05-14, 04:24 PM
#404
troubleshooting sucks
Thread Starter
It's way simpler than you'd think...more awkward than difficult.
Working alone with two floor jacks, I did it in under a half hour.
And let's keep in mind that I'm old, physically enfeebled and (usually) drug addled.
I was working in a normal Earth atmosphere however, so we'll balance that against the fact that you are apparently on an asteroid (or Chicago...same thing) and wracked with disease.
My calculations say you should be able to do it in 5 minutes.
With a +/- variable of two days.
Working alone with two floor jacks, I did it in under a half hour.
And let's keep in mind that I'm old, physically enfeebled and (usually) drug addled.
I was working in a normal Earth atmosphere however, so we'll balance that against the fact that you are apparently on an asteroid (or Chicago...same thing) and wracked with disease.
My calculations say you should be able to do it in 5 minutes.
With a +/- variable of two days.

your calculations were spot on! it only took me 11 hours. most of this time was filled with thinking, swearing, gazing confoundedly and running next door (in tears) for advice. one thing was for certain. there was no way i was going home without at least removing the rear suspension.
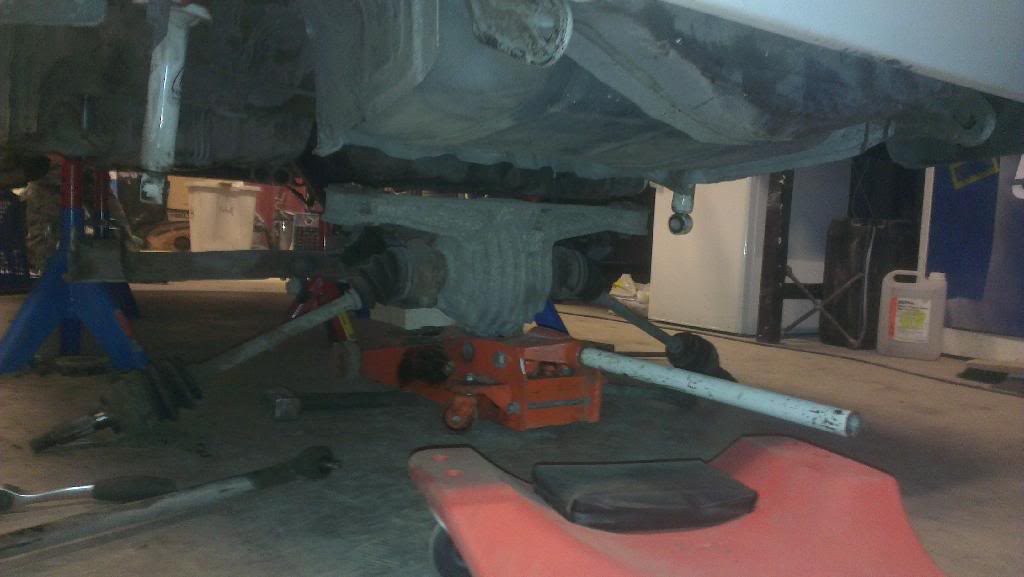
all day whilst doing this, i sat and considered whether or not i should try and make it all look a bit nicer down there. especially considering its all on the floor at the mo. by the end of the day i had come to a decision. tomorrow will be spent cleaning up and spraying up the diff, subframe and suspension. maybe nobody will ever see it, (my reason for NOT doing it) but ill know that its there and thats reason enough for me to do it.
roger, (richards dad) came by towards the evening and cast his eye over the seven. he asked me about the split air pipe and i explained, he then asked me about the o2 sensor that was sitting next to it with the wire not connected to anything.
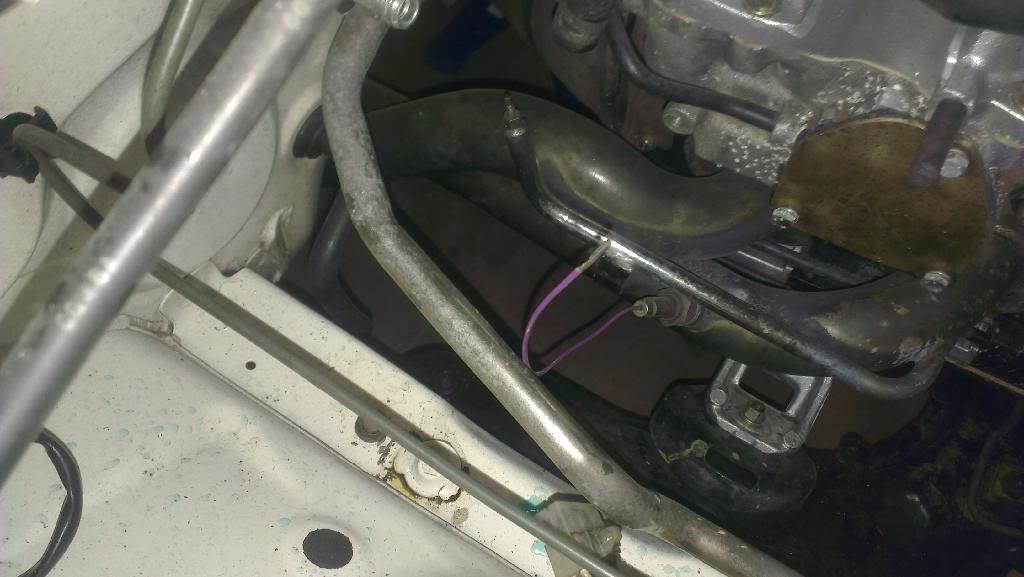 its so shocking sometimes how you can look at something a thousand times and not even notice anything so obvious and then someone comes along and points it out straight way. talk about selective blindness. this made me think straight away about the problems i have been having with the engine. mainly the idle and it going like crap when i try to drive it. ill have to work out where i connect it. thing is i dont remember taking one off of the old system, and i had driven it around without it connected during the time the seven worked and it seemed to go well then. thoughts on this?
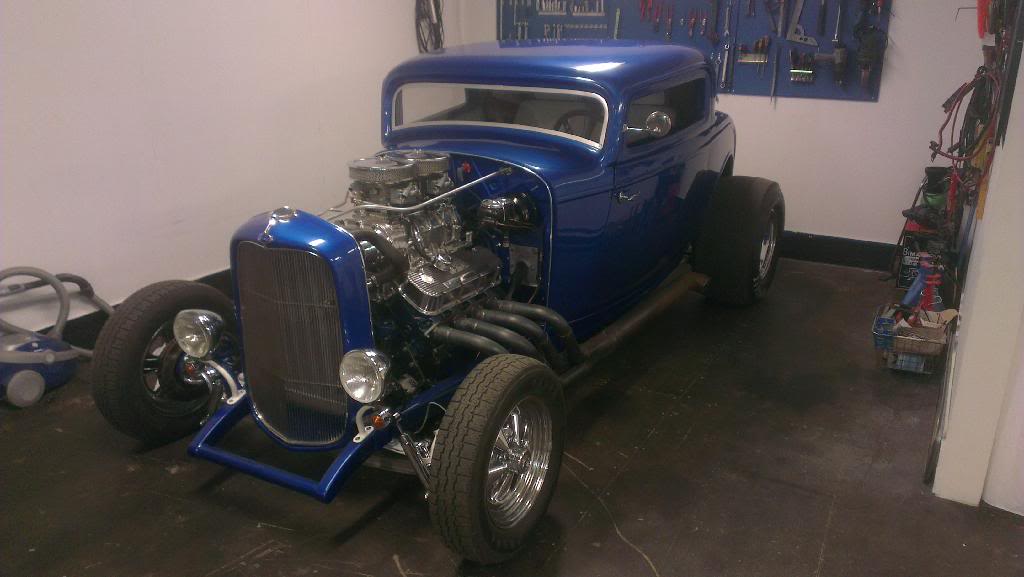
 i also popped by his garage and took a sneak pic of his hotrod. not my thing but its definately deserving of the name. it goes like **** off a stick* anyway. (*london slang for fast)
pity he is going to sell it.
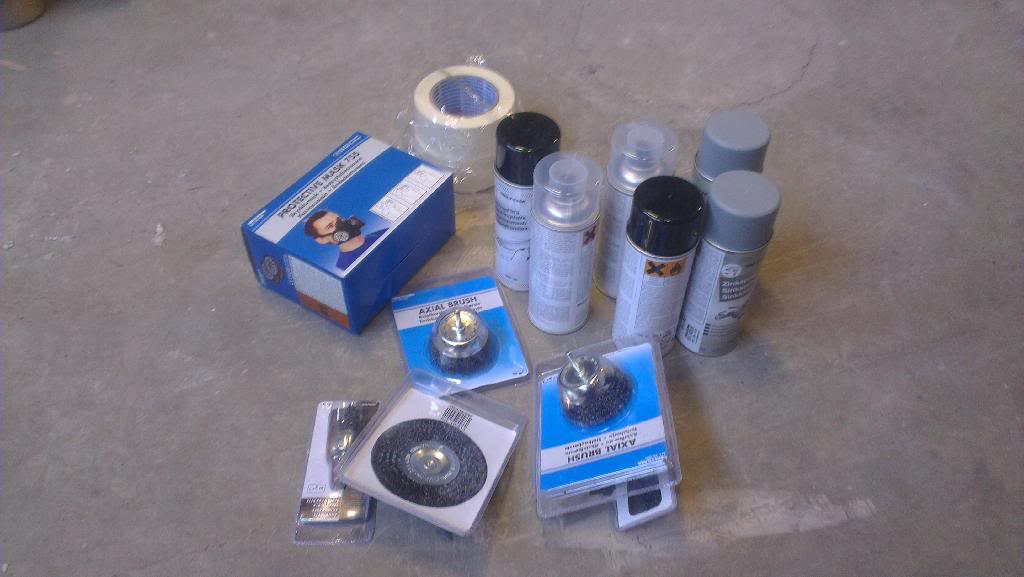
i think that it may be prudent to invest in some kind of mask for tomorrows work...
02-06-14, 04:32 AM
#406
troubleshooting sucks
Thread Starter
 02-06-14, 04:50 PM
#408
troubleshooting sucks
Thread Starter
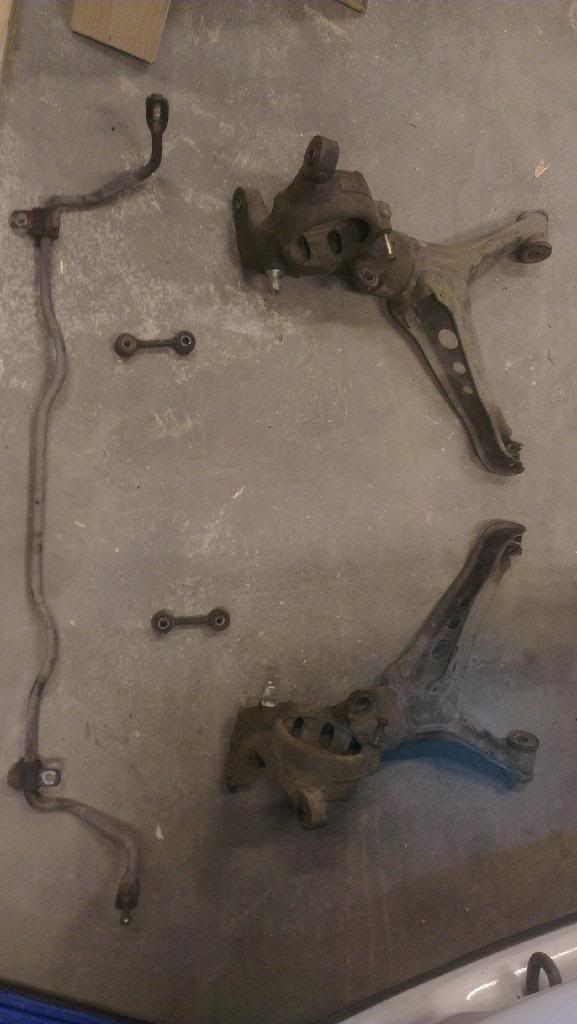
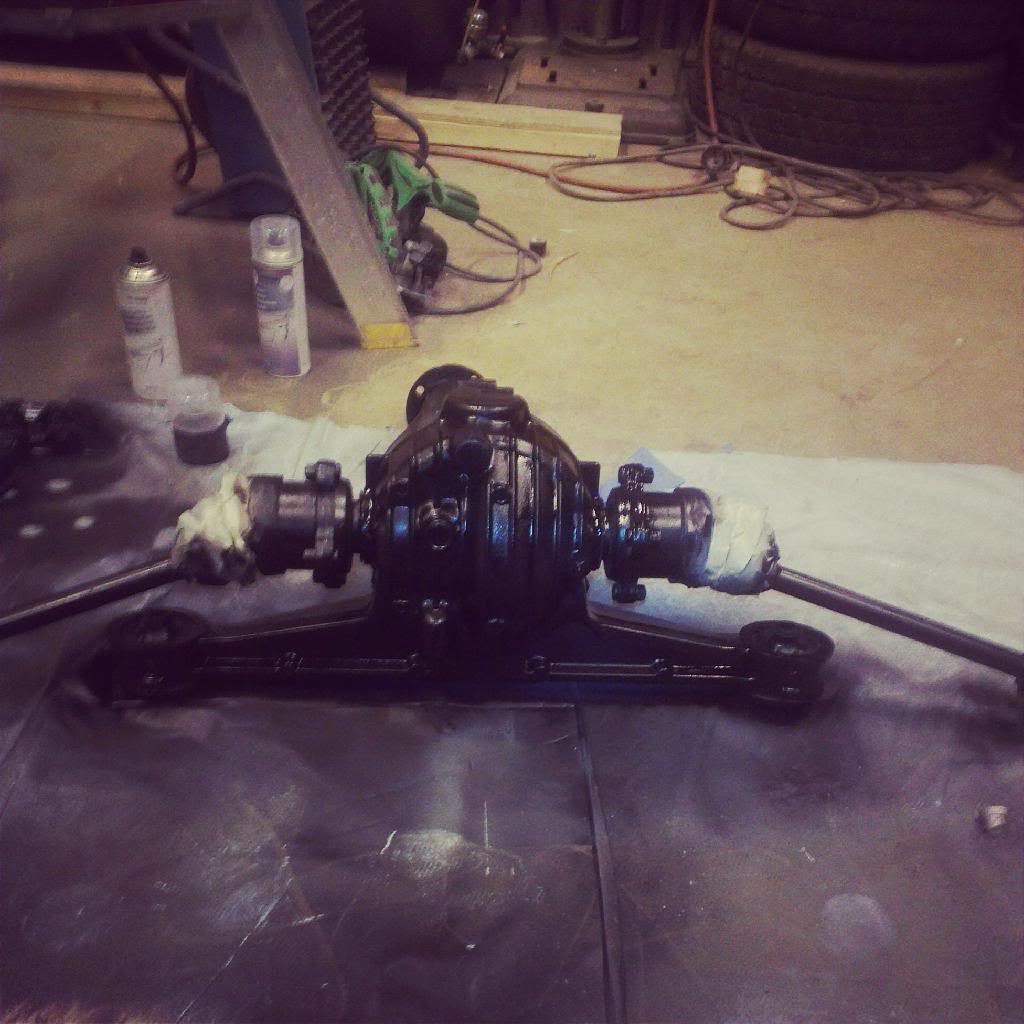
i managed a good 9hr stint at the garage today. the routine was almost monotonous, (clean, paint, clean , paint ect ect) but it was fairly therapeutic not having to think so much and just do. by the time i left the pile of cruddy bits i showed earlier looked like this...
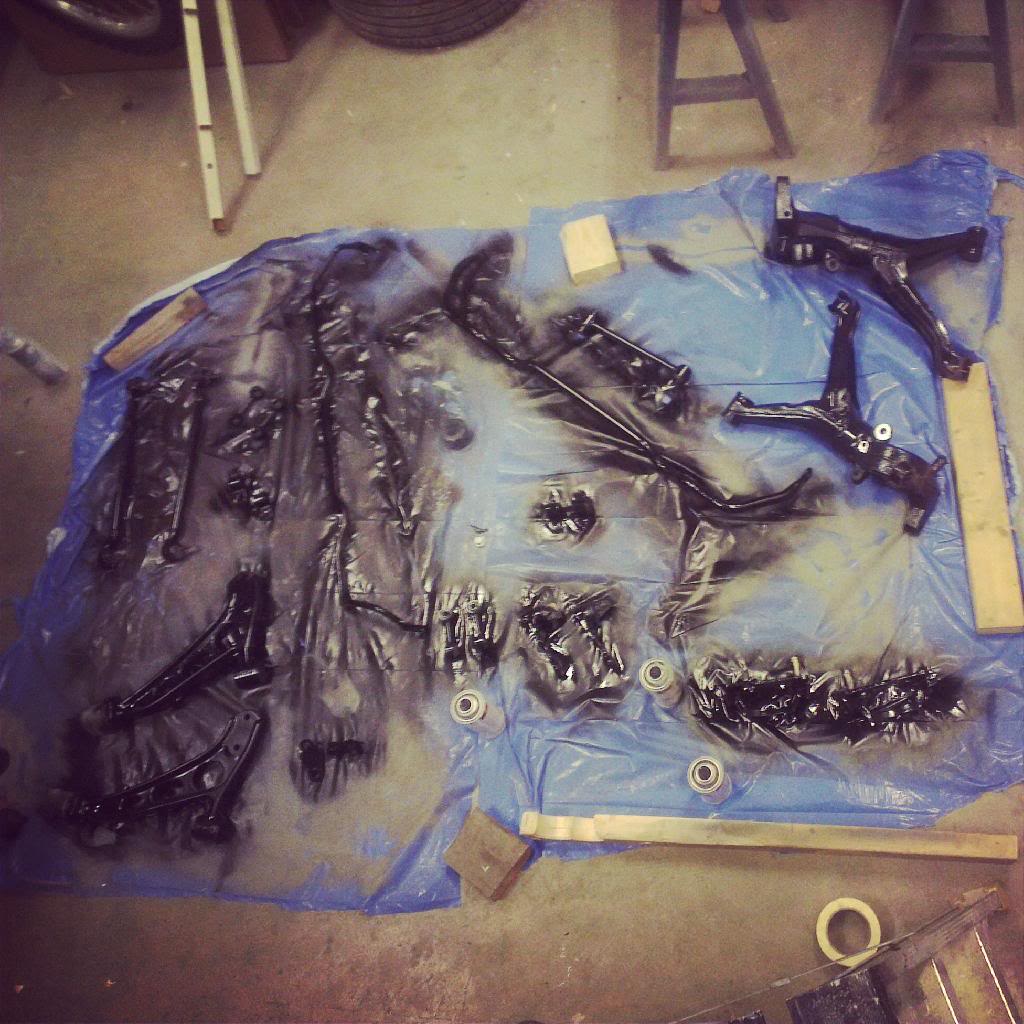
not the best picture but it does probably hide (at least a little bit) my crude attempt at painting the parts. i used cold galvanising paint as a primer, some black that my local auto parts store claims is "bmw black" (seems legit) and clear coat. came up quite nicely actually. tomorrow will be spent on the diff, subframe and brakes.
btw, i spoke with robban yesterday and he said that he had spoken to his contact about getting some ready-made cylinders for the wheel widening process and got a positive answer. he's going to send some measurements to him over the next few days. he also said that all of the wheels have been seperated up in readiness now so soon itll be a case of putting humpty-dumpty together again. its always nice to hear that its moving in the right direction.
its been a while since i have done such physical work, and frankly im pooped. im going to try to muster as much energy as i can for tomorrow by hitting the sack
 02-07-14, 03:07 AM
#410
troubleshooting sucks
Thread Starter
jeez man i just checked the weather forecast where you are. -24 at night? i promise clokker, i wont complain anymore about the winter this year. (this promise i may break)
we really are experiencing freak weather though. its sitting between 2-4 degrees at the moment which i assure you is really not normal here but most certainly not unwelcome. as long as we have 1-2 degrees its possible to warm up the garage. its so nice to not have to thaw my hands and feet every half an hour. i never freeze anywhere else...
looks like it'll be warming up for you towards the end of next week but this prediction is based on a norweigian weather site. i hope its as accurate for you as it is for me
 02-07-14, 09:09 AM
#412
It has been "unusually" nippy though, I had to dig around and find my old Alaska clothes just to venture outside:

I was going to take an "after" pic but frozen snot is sooo unbecoming.
Congratulations on your progress though, renewing the suspension is a big job no matter what the conditions are.
In fact, I remember bitching and moaning about how hot it was when I did the Z suspension last summer.
Too hot, too cold...bitch, bitch, bitch.
 02-08-14, 04:00 AM
#414
troubleshooting sucks
Thread Starter
It's actually warming up now, supposed to hit 40�F (@4.5�C for you metrical folk) this afternoon.
It has been "unusually" nippy though, I had to dig around and find my old Alaska clothes just to venture outside:
I was going to take an "after" pic but frozen snot is sooo unbecoming.
Congratulations on your progress though, renewing the suspension is a big job no matter what the conditions are.
In fact, I remember bitching and moaning about how hot it was when I did the Z suspension last summer.
Too hot, too cold...bitch, bitch, bitch.
yep. i have to admit its a bloody dirty pig of a job. at the end of the last couple of days im completely filthy and unnaturally fatigued, but satisfied. it took one look at the filters on my mask to confirm that it was a wise investment.
thanks archaphil! considering i have little to no experience with painting its nice to get some praise for what im sure is pretty horrendous work from an experienced painters viewpoint. i just cant seem to avoid using too much! thank god its under the car and will escape close scrutiny hehe
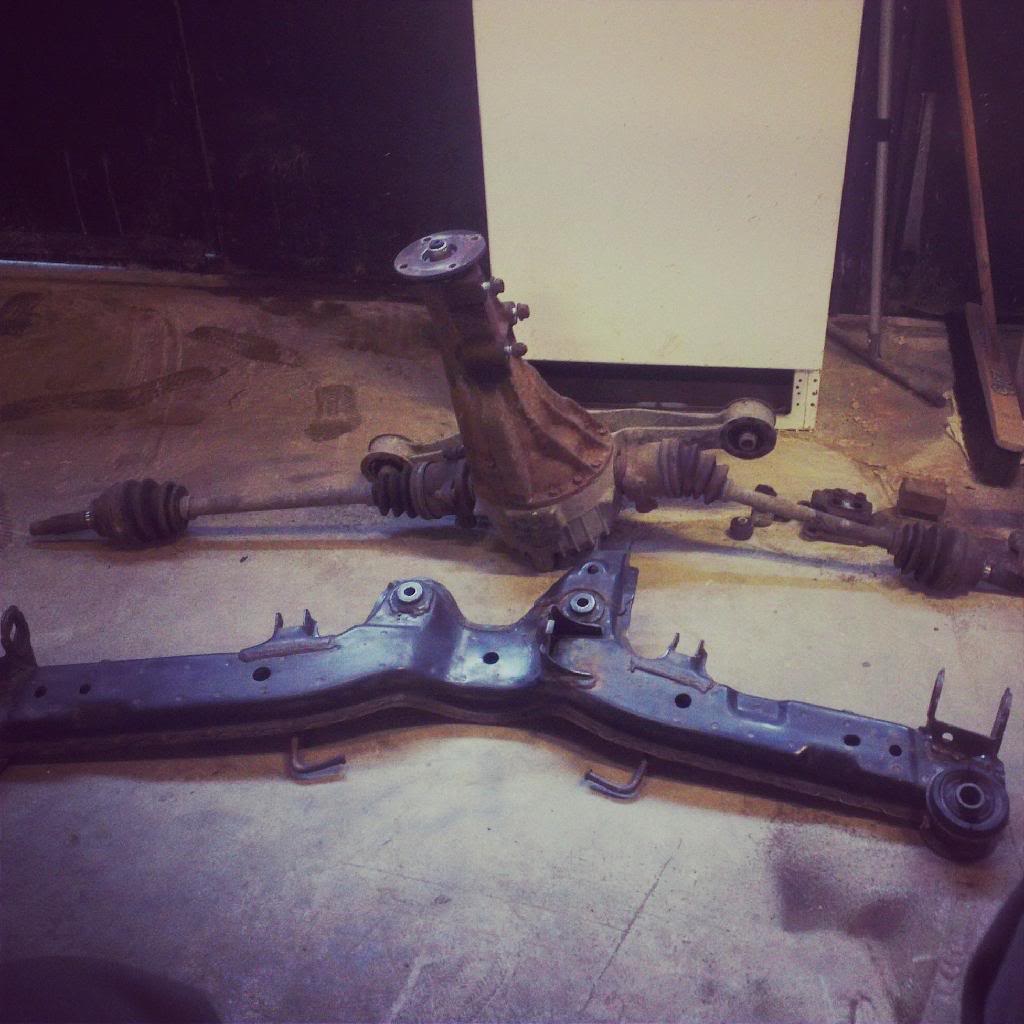
i did another 11 hour stint yesterday, i had already taken the worst off of the subrame so it just needed a little extra cleaning to get it ready for paint. i have basicly been using assorted wire wheels and a drill for the removal of the 27 years worth of doo doo that has accumulated on the parts, and used brake cleaner and a cloth to wipe them down. they turn off the water when its winter so washing parts isnt an option at the moment. i didnt see any cracking on the paint when it dried so it "should" hold but that remains to be seen. the diff cleaned up much better than i thought considering it was the cruddiest part i have removed so far.
before..
after. (i hasten to add that there was some touching up done after these were taken..
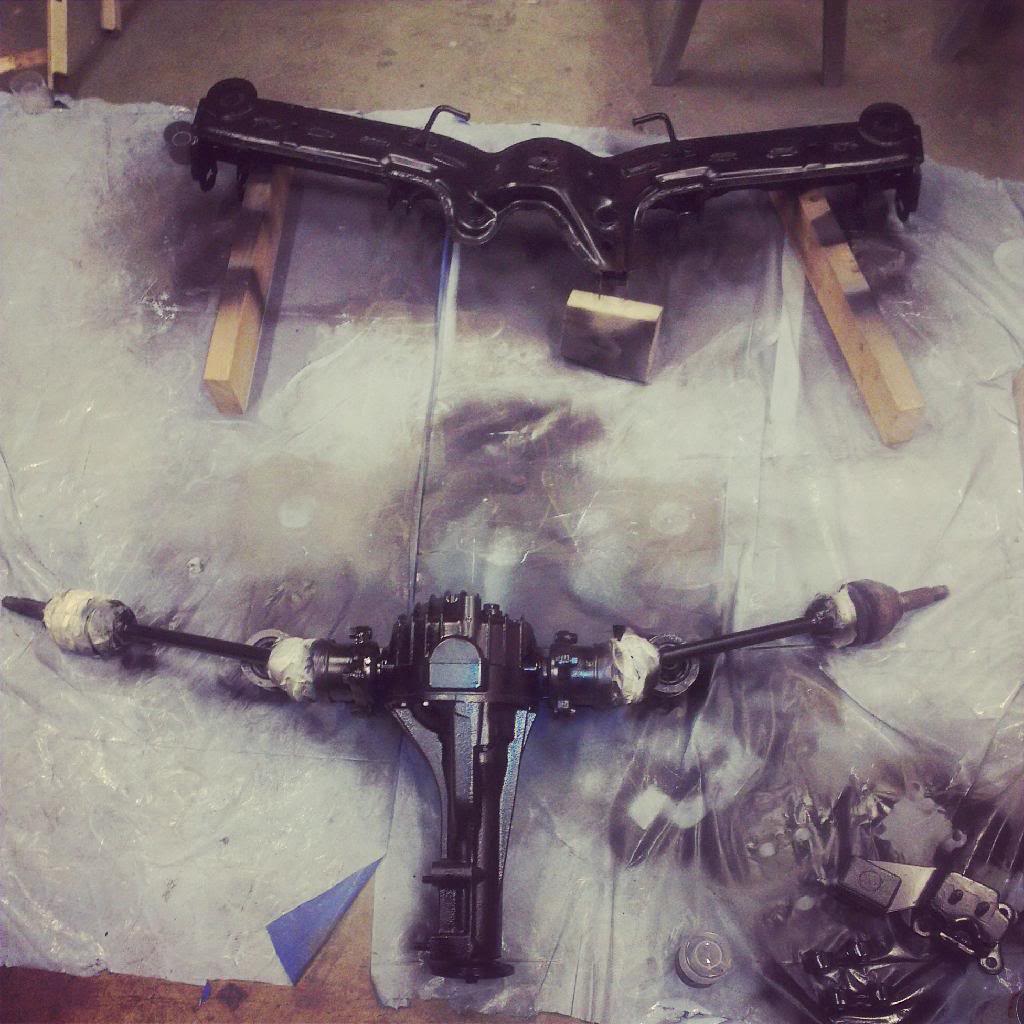
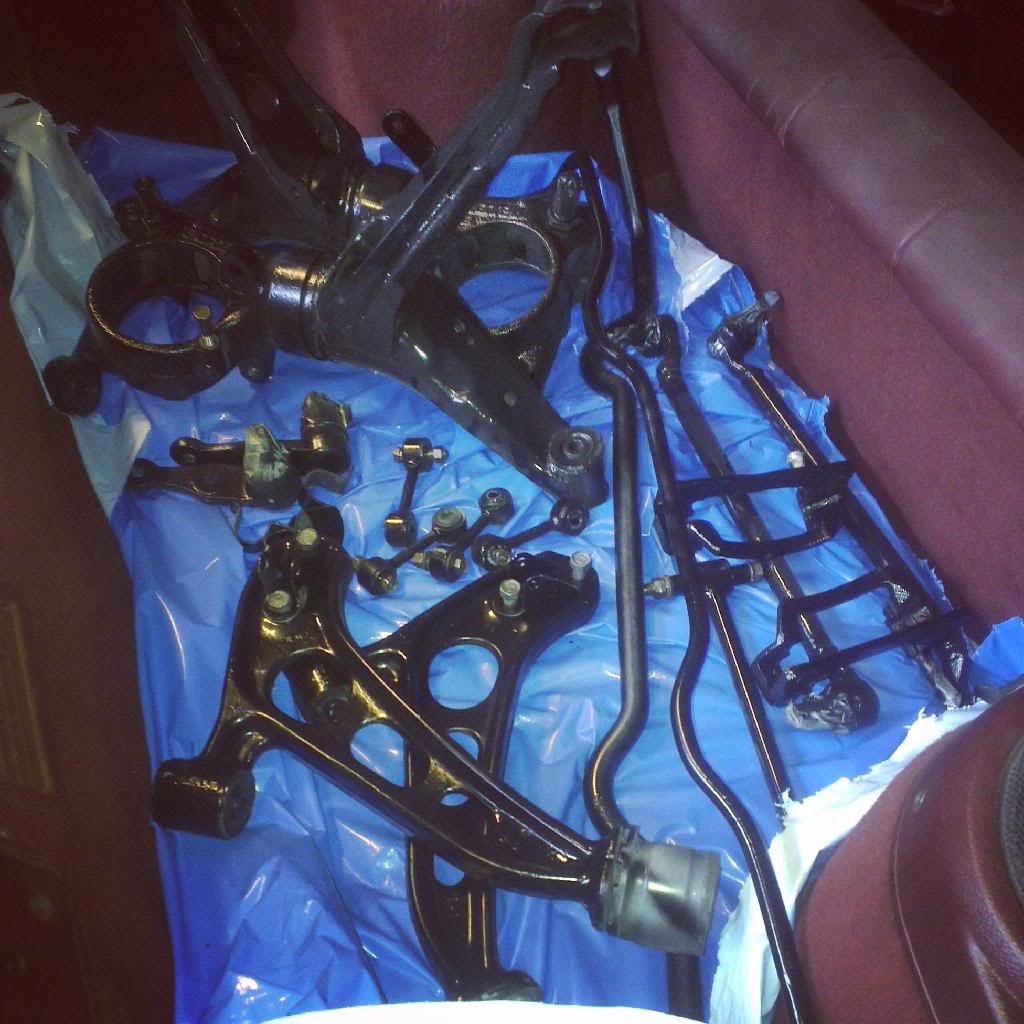
after cleaning and priming the diff and subframe i started removing the brakes. i had'nt originally intended to remove them but once the painting started one thing led to another and..you know how it is. this turned out to be another little lesson i have learned. always remove parts in the order described in the manual! all of the brakes were basicly hanging off of the shocks. there was a distinct lack of leverage to be had and i had to use my imagination and some serious karma-sutra moves to remove the remaining components. after two hours and a sore back, i got em all layed out..
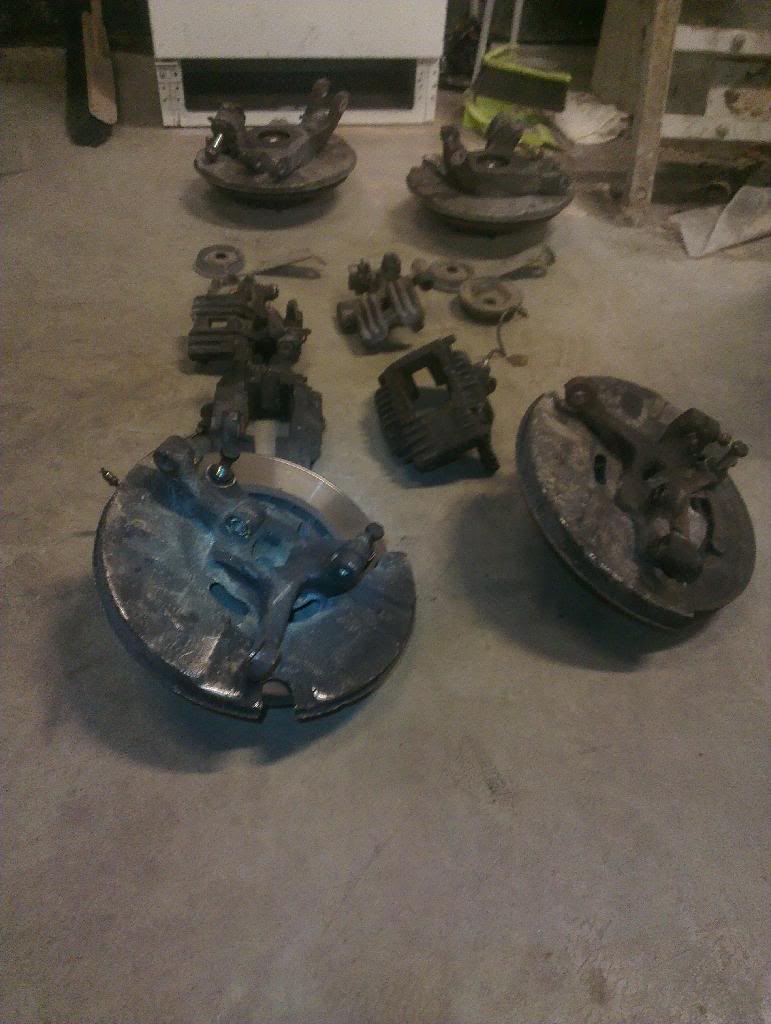
i made a start on the two discs but by then i was pretty nackered so i threw in the towel for the day. this really has taken alot more time than i had originally thought it would as per usual. once its done i know that the worst is out of the way. next week ill be handing over the relevant components to joels brother so that he can replace the bushings. (which reminds me, this job could have been a whole lot worse if i had done them myself). i can also add that according to richards dad the bushings werent in bad condition at least visually, but it cant hurt to change them anyway. i still have the engine and transmission mounts to change.. i cant help feeling a bit pissed off that i got sick. i lost five days to that damn virus and i would have come alot further if it wasnt for that. i dont know if ill be able to make it to the garage for another week but ill most certainly try if i can manage. i should have got the money together for the coilovers so ill be speaking to robban (the other one) to see if he can sort me out with some discount on those...
02-08-14, 05:39 AM
#416
troubleshooting sucks
Thread Starter
02-10-14, 01:05 PM
#419
troubleshooting sucks
Thread Starter
at least i wont have anyone else to blame when i eff them up.i found one write up but it was for an fd and tbh im not really sure if i understood it properly. https://www.rx7club.com/suspension-w...shings-648765/ im hoping someone in my little community has a press i can use..
if i am forced to do it in my garage, (i have a vice, assorted sockets and i can buy nuts and bolts) are there any tips/writeups specifically for the fc or will that writeup apply to mine? im not looking forward to this but i dont feel like i have much choice at the moment..
i have also been thinking about my brake pads. i had originally planned to buy some red stuff but tbh money is becoming rather tight and considering i have everything dismantled it would be nice to pop in some new ones while im at it. i thought i would just buy some stock patent brake pads for the moment and chenge them for something better when i have the money later. the fact that it has 4pot brakes up front is encouraging. and i havent made the seven that much faster to warrant a brake upgrade imo. i need to save some money somewhere..
02-10-14, 05:23 PM
#420
Spend money for good pads in the front, get cheap ones for the back.
Rear brakes are practically irrelevant on a street car anyway.
As for the bushings...not sure what to say since I've never done the FC.
However, assuming it's similar to the FD or the Z, the job is crappy but not truly awful.
I did the Z without a press by first burning out the rubber, then using a hacksaw to cut the outer sleeve out. The new bushes press in by hand, so no worries there.
I don't know if this is common or Z specific but you must be careful...one set of bushes (the trans mount) required LEAVING the old sleeve in place. Every other one the sleeve had to go but not that one.
Just to be on the safe side read the instructions and see if there are any special notes and after burning out the rubber, check fit to see if the old sleeve really does need removing.
A press is obviously much simpler and the tool a gentleman would prefer to use.
02-10-14, 06:04 PM
#421
Rx Bandit
Join Date: Jul 2008
Location: Fort St John, BC, Canada
Posts: 232
Likes: 0
Received 0 Likes
on
0 Posts
I did the bushings on my fc a couple months ago, and the only ones that were a huge problem were the rear control arm to subframe sleeved bushings. Those ones sucked.
The rest were simpler and came out with a bit of elbow grease, a good sized hammer and chisel, a vise, and various sized sockets and chunks of pipe.
Not exactly a step-by-step writeup but there's some pictures and descriptions in my build thread here.
End of the 2nd page and start of the 3rd page should be where the bushing replacement stuff shows up.
-sean
02-10-14, 10:50 PM
#422
troubleshooting sucks
Thread Starter
Spend money for good pads in the front, get cheap ones for the back.
Rear brakes are practically irrelevant on a street car anyway.
As for the bushings...not sure what to say since I've never done the FC.
However, assuming it's similar to the FD or the Z, the job is crappy but not truly awful.
I did the Z without a press by first burning out the rubber, then using a hacksaw to cut the outer sleeve out. The new bushes press in by hand, so no worries there.
I don't know if this is common or Z specific but you must be careful...one set of bushes (the trans mount) required LEAVING the old sleeve in place. Every other one the sleeve had to go but not that one.
Just to be on the safe side read the instructions and see if there are any special notes and after burning out the rubber, check fit to see if the old sleeve really does need removing.
A press is obviously much simpler and the tool a gentleman would prefer to use.
Rear brakes are practically irrelevant on a street car anyway.
As for the bushings...not sure what to say since I've never done the FC.
However, assuming it's similar to the FD or the Z, the job is crappy but not truly awful.
I did the Z without a press by first burning out the rubber, then using a hacksaw to cut the outer sleeve out. The new bushes press in by hand, so no worries there.
I don't know if this is common or Z specific but you must be careful...one set of bushes (the trans mount) required LEAVING the old sleeve in place. Every other one the sleeve had to go but not that one.
Just to be on the safe side read the instructions and see if there are any special notes and after burning out the rubber, check fit to see if the old sleeve really does need removing.
A press is obviously much simpler and the tool a gentleman would prefer to use.
ill go with your advice on the brakes. im thinking of going for some ebc ultimax or if i can get the money, green stuff.
I did the bushings on my fc a couple months ago, and the only ones that were a huge problem were the rear control arm to subframe sleeved bushings. Those ones sucked.
The rest were simpler and came out with a bit of elbow grease, a good sized hammer and chisel, a vise, and various sized sockets and chunks of pipe.
Not exactly a step-by-step writeup but there's some pictures and descriptions in my build thread here.
End of the 2nd page and start of the 3rd page should be where the bushing replacement stuff shows up.
-sean
The rest were simpler and came out with a bit of elbow grease, a good sized hammer and chisel, a vise, and various sized sockets and chunks of pipe.
Not exactly a step-by-step writeup but there's some pictures and descriptions in my build thread here.
End of the 2nd page and start of the 3rd page should be where the bushing replacement stuff shows up.
-sean
) it really goes to show that documentation, no matter how obvious it seems to others can help some poor bugger (me) to get his/her head around something they just cant seem to understand.
really impressed that you put your 13b back together yourself. i really pussied out on that one and ill probably regret it to the grave...
right. as i have mentioned a couple times in my more recent posts, i really need to reduce the costs of the rest of the project in some way but im not really that prepared to cheap out totally and just end up with worthless crap on my car if i can help it. turns out that one problem may have become a solution. i shall now proceed to elaborate and try to make sense at the same time. (this should be good)
due to an unfortunate oversight whilst ordering my stuff from racing beat, (tbh i dont know i how it happened/what i was thinking) i didnt order the rear camber adjustment bar that i wanted. i really cannot be asked to order anything else from the states if i can help it despite how quickly my parts came this time, and once i had a look at the camber adjustment bar and (now that i have had a fiddle with the rear suspension) understood what it was, i got to wondering if i could somehow sort one out here. there are no company's here that sell them so i trawled the net to see if there were people that had made their own. i found a couple of things but they were still ordering their stuff in the states. so i went about translating the names of the parts they had used into swedish and searched after them. it does really seem like i have run into a spot of luck!
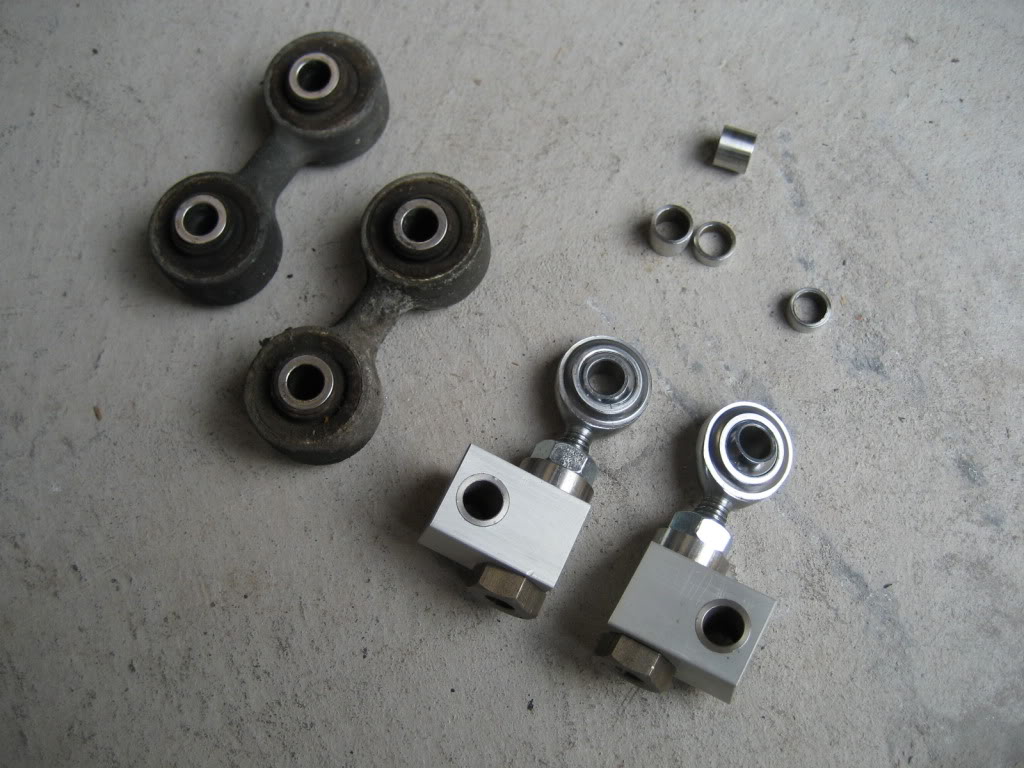
this is basicly what i was trying to emulate..
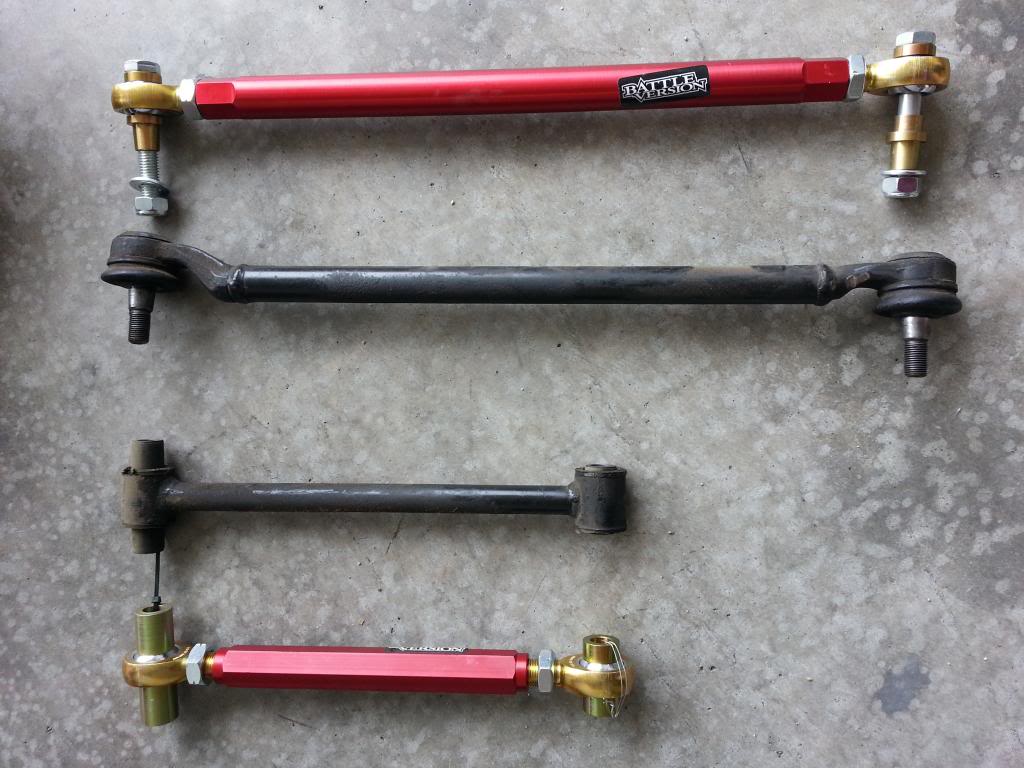
the component names brought me to a company here in sweden that seems to sell all of this kinda stuff. Mecmove - Ledande grossist av glidlager, kullager m.m the best thing about it is, their outlet is in the same industrial area as my garage! what are the odds.. from what i have seen in their catalogues, i should be able to peice together one of these.
now this is where i come to the "trying to save money part". i am really set on having some negative camber both at the front and the rear. the coilovers that i have been looking at that seem to be of reasonably good quality and have camber adjustment at the rear cost about 9000kr (1388 usd). my mate can arrange some discount for me but im still going to be looking at around 7000 and upwards. BC Racing V1 Coilovers RX7 FC3S 1987-1992 so i began looking around for some cheaper models that have had good reviews. i found these HSD DT Coilovers f�r Mazda RX7 FC3S hsd coilovers and they cost at least 3000kr less (462 usd less). its a hell of a saving but the camber is not adjustable in the rear.
thanks for bearing with my blathering so far. im getting to the point

the question i have is this. will i be able to slake my thirst for camber with just the camber adjustment bar (that is to say an adjustable sublink) and save some much needed moolah or has this tiringly long explanation been an exercise in futility?
when i say rear camber i mean this...

according to the post, this person has -3.2 in negative camber which i think is perfect. this whole look from the back has become a proper fetish for me and i dont feel that my car will look good (to me) without it. considering that im going to fab up my own adjustment bar, im wondering if i can deviate from the original length a bit and get a little bit more out of it. i just cant seem to figure out what gives more negative camber, lengthening the bar or shortening it, or if there is some reason that i shouldnt alter the length too much in case i put too much pressure on some other component or throw something else completely off..
02-10-14, 11:41 PM
#423
Rx Bandit
Join Date: Jul 2008
Location: Fort St John, BC, Canada
Posts: 232
Likes: 0
Received 0 Likes
on
0 Posts
02-11-14, 11:52 AM
#424
troubleshooting sucks
Thread Starter
i was on the night shift last night where i had a good four hours to stare at the same stuff 100 times until i finally got it. (its a method that has worked for me countless times) the two types of coilovers i was looking at, though there may be some subtle differences in quality and performance, were the same when it came to the adjustment to be had out of them. the only diifference was that one company claimed that theirs was possible to adjust at the rear and the other didnt. because of the double-wishbone setup, i can only adjust the rear camber on the actual wishbones. not the coilovers. this is going to be a streetcar so the hsd dt's will more than suffice for my application.
so now im focusing on the camber adjustment i can get out of the rear wishbones. as i previously showed in my last post, i reckon i can put together a adjustable sublink myself. i also found that some people use these separate adjustable camber links like the ones from msd pictured here..

im wondering if i could (with a little help from robban and his lathe) put together something like this also. the only thing i am wondering really is if i can/need to have both. i have also read several times that these have been known to break though i dont know how hard these cars were being driven at the time.
im going to go and meet skyline robban for a traditional swedish fika (coffee/tea and buns) and run my ideas by him.. then im gonna try and get in a stint at the garage to see if i can get a bit more done. for some reason unknown to myself, having the car up on jackstands is stressing me out and i just want to get it all back together nice and tidy and have her back on mother earth asap.
02-11-14, 01:45 PM
#425
Rx Bandit
Join Date: Jul 2008
Location: Fort St John, BC, Canada
Posts: 232
Likes: 0
Received 0 Likes
on
0 Posts
a couple of people here have tried different options for adjustable camber links, i remember one guy was using some aftermarket adjustable sway bar end links with some success.
i would try and get the suspension in and see how it sits before going too crazy making and buying camber links. lowering the car naturally gives the rear wheels quite a bit of negative camber (depending how low you go) and most people add camber links to try and remove some of that negative camber. also the bigger subframe camber adjuster will be less effective once you have the stiffer bushings in. it works by tilting the rear subframe forward or backward on its mounts, and there will be a lot less play with upgraded bushings there. the smaller control arm camber adjusters will probably give you more range of adjustability.
actually talk to eage8. i remember going through his build thread not to long ago and seeing a picture of a pile of different camber links that he had tried. he could probably let you know what he's tried and what worked/sucked. let me go find the post
-sean
EDIT: here's eage8's big pile of camber links