Getting her back on the road again (and sitting pretty..)
 02-11-14, 01:56 PM
#426
Full Member
Join Date: Jun 2011
Location: -
Posts: 149
Likes: 0
Received 0 Likes
on
0 Posts
I don't know how much you will lower your car but if you are going for the same height as the black one you will probably get around 3* of camber in the rear, something nice with the HSD DT's is that they have rubber inulated rear top mounts so they should be a bit more comfortable than the pillowball topmount that most coilovers have.
 02-11-14, 08:48 PM
#427
troubleshooting sucks
Thread Starter
i would try and get the suspension in and see how it sits before going too crazy making and buying camber links. lowering the car naturally gives the rear wheels quite a bit of negative camber (depending how low you go) and most people add camber links to try and remove some of that negative camber. also the bigger subframe camber adjuster will be less effective once you have the stiffer bushings in. it works by tilting the rear subframe forward or backward on its mounts, and there will be a lot less play with upgraded bushings there. the smaller control arm camber adjusters will probably give you more range of adjustability.
 ) i was aware of the natural camber you get with the beemer but i wasnt sure if it applied to all cars. should have checked that out but considering i was 12 hours into a 16 hr shift at the time i was a bit fuzzy in the head
ill definately be checking out that build thread to see if i can glean any info. it would be easier to put together and install the seperate ones for sure..
I don't know how much you will lower your car but if you are going for the same height as the black one you will probably get around 3* of camber in the rear, something nice with the HSD DT's is that they have rubber inulated rear top mounts so they should be a bit more comfortable than the pillowball topmount that most coilovers have.

i was definately thinking of going at least that low with mine. it means that ill have to be a bit careful with my route planning but they havent gone completely crazy with the speedhumps here in stockholm like they have in london. having a lowered car there is just a no no.
robban tried to convince me to buy some super duper racing coilovers and it took a good half hour to get him to understand that im broke.

the DT's definately look like they'll do the job so ill be getting them next week!
after visiting robban and helping him bleed the brakes on his new nissan leaf, i dropped joel home and managed to get a good four hours in. by the time i left everything was in some stage of being painted..
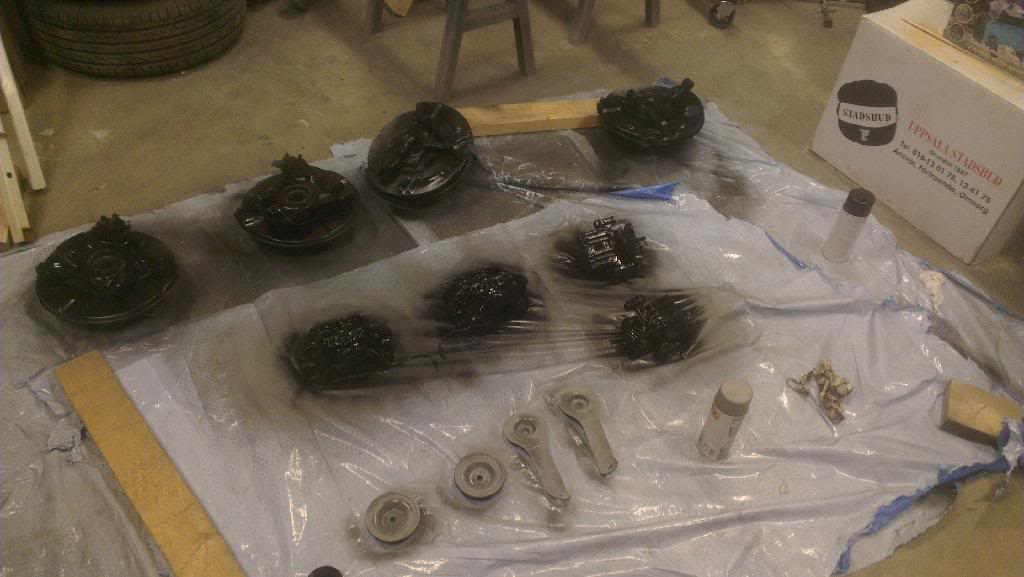
its just as well because the charm of this particular job had definately worn off. itll be nice to do something else while i finish off the painting next time im there.. ill be waiting until it gets a bit warmer then ill be powerwashing the wheel wells and painting them up too.
02-12-14, 08:04 PM
#428
troubleshooting sucks
Thread Starter
i have been a silly (and lazy) boy. i have made three mistakes.
1. when cleaning the brake calipers with my wire wheel, i did not notice that i had unwittingly worn away the rubber seals around the pistons.
2. i didnt paint the calipers in high temp paint.
3.i didnt just do them properly in the first place.
so i have to redo them. properly this time. im really hoping that i can get a hold of a renovation kit here without having to import them. i wonder if there are any (more common) cars from mazda that had the same brakes so that i could use the renovation kit from them or am i just going to have to go take one up the bum from mazda?
02-12-14, 08:56 PM
#429
Rx Bandit
Join Date: Jul 2008
Location: Fort St John, BC, Canada
Posts: 232
Likes: 0
Received 0 Likes
on
0 Posts
Ha ha good job, champ!
The Mazda part number for the rebuild kit is FB05-49-240 and it will do two 4-pot calipers (FC or FD). I don't believe it works for any other car unfortunately.
I was looking these rebuild kits up about a month ago and most online places in north america were charging around $30 USD. I don't know how much shipping and import fees would be for you on something relatively small and cheap like that
-sean
02-12-14, 11:19 PM
#430
troubleshooting sucks
Thread Starter
Ha ha good job, champ!
The Mazda part number for the rebuild kit is FB05-49-240 and it will do two 4-pot calipers (FC or FD). I don't believe it works for any other car unfortunately.
I was looking these rebuild kits up about a month ago and most online places in north america were charging around $30 USD. I don't know how much shipping and import fees would be for you on something relatively small and cheap like that
-sean
The Mazda part number for the rebuild kit is FB05-49-240 and it will do two 4-pot calipers (FC or FD). I don't believe it works for any other car unfortunately.
I was looking these rebuild kits up about a month ago and most online places in north america were charging around $30 USD. I don't know how much shipping and import fees would be for you on something relatively small and cheap like that
-sean
ill check mekonomen first tomorrow and if all else fails ill have to go to mazda and let them ransack my wallet. just to give you an idea of how import is here ill give you an example. when i ordered my last package from racing beat, the goods plus postage ran me about 3100kr, then when it got here i had to pay 900kr on top of it in duties. its approx 30%. racing beat did send the stuff quite quickly though ill give em that.
hopefully the only thing ill have to import from outside the country will be the s5 tails... hopefully..
02-13-14, 05:01 PM
#432
troubleshooting sucks
Thread Starter
i dont even want to know what i would have had to pay at mazda. i try to make a habit avoid authorised dealers of any company (for import cars which is all of them except for volvo and saab) like the plague.
i only had about 3 hours at the garage before i had to scurry off to work so i cleaned up a bit, then drained the oil and coolant from the engine and before i left had managed to remove all the bits that would hinder me from lifting the motor to change the engine mounts.
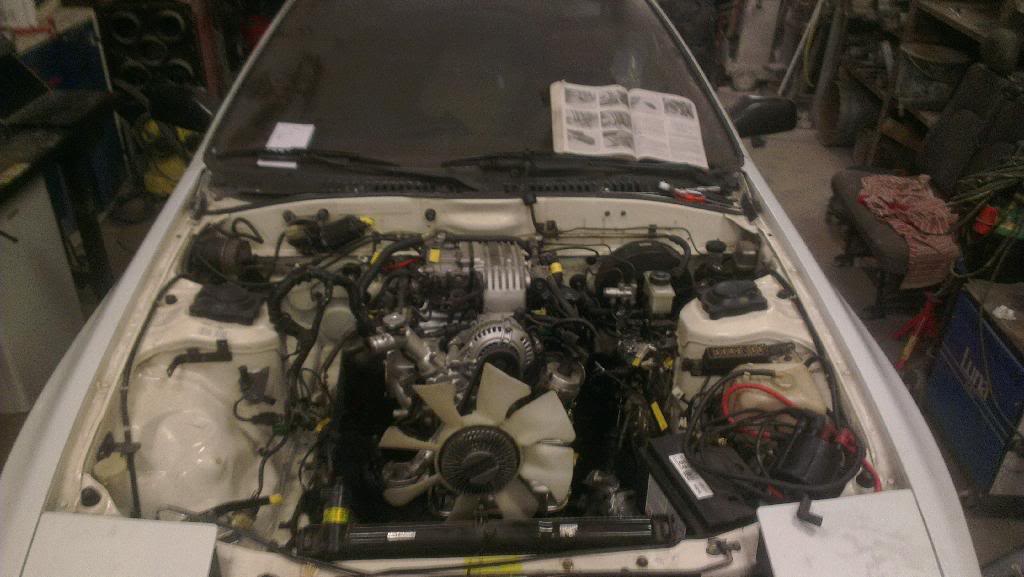
whilst doing this i noticed two things.
1. how dirty i have managed to make the engine bay again.
2. why i couldnt find my 12mm ratchet spanner anywhere
its definately moments like this that are quite rewarding though.. thinking back to last year (or the year before?) when i decided to first pull the engine and just looking at the great big mass of wires, hoses and components and not having a clue where to start. i was genuinely crapping myself then. now it all seems to have fallen into place. i have my little routine so that i remember what i have removed and i have stopped being so damn impatient, instead having more realistic goals for my alotted time at the garage. the whole process feels so much calmer and fluid, which actually makes it fun! a proffessional mechanic i am not, but it nice to feel like im progressing at least in my knowledge of my own car..
im going to be mostly working the shorter 6 hr shifts at work next week so i hope to really be able to get some time in before next weekend when i should be getting my coilovers.
02-13-14, 05:17 PM
#433
Senior Member
iTrader: (3)
Join Date: May 2013
Location: Kelowna, BC
Posts: 434
Likes: 0
Received 0 Likes
on
0 Posts
I admire the way you just soldier on in this build thread. Snow, flu, back pain, hangovers, nothing keeps you away from your little frozen piece of paradise aka your garage 
02-13-14, 07:05 PM
#434
troubleshooting sucks
Thread Starter
02-13-14, 07:22 PM
#435
.. thinking back to last year (or the year before?) when i decided to first pull the engine and just looking at the great big mass of wires, hoses and components and not having a clue where to start. i was genuinely crapping myself then. now it all seems to have fallen into place.
You were overwhelmed and nervous because viewed as a whole, the engine bay IS frighteningly complex and mysterious.
Over the course of the project though, you've had to break it down to subsystems and deal with them separately and you now know that all that intricacy is just a bunch of small systems overlaid and intertwined and it's not so incomprehensible as you thought.
In this same way, the engine bay serves as an analog example of the wiring harness.
Look at the complete schematic for the car and the electrical looks completely chaotic and unknowable. Ignore the whole and concentrate on individual circuits and suddenly you'll feel as you do now about the bay, yup, lots going on but it's actually lots of pretty simple **** that looks complex only due to size and number.
Extrapolated even further, your aha! moment can (and should) be applied to any project. Start breaking a job down into individual steps and you'll see that most of them are things you're already comfortable doing, it's only a few things (as opposed to everything) that you have to learn or figure out.
Much less daunting when viewed that way.
Regardless of how this particular car turns out, coming to this realization has already made the project a success.
You'll never look at a car the same way again.
02-13-14, 11:29 PM
#436
troubleshooting sucks
Thread Starter
your aha! moment can (and should) be applied to any project. Start breaking a job down into individual steps and you'll see that most of them are things you're already comfortable doing, it's only a few things (as opposed to everything) that you have to learn or figure out.
Much less daunting when viewed that way.
Regardless of how this particular car turns out, coming to this realization has already made the project a success.
You'll never look at a car the same way again.
Much less daunting when viewed that way.
Regardless of how this particular car turns out, coming to this realization has already made the project a success.
You'll never look at a car the same way again.
speaking of projects, i have often looked around for aero parts that would suit my car but havent found any that i liked. the only thing i have even remotely considered is some type of "rocket bunny style" wing like the one for the nissan s13 (200sx). i happened to see it on instagram the other day and thought it was proper nice!
fd9b02cf-f335-4271-86ea-1a30e8e32981.png?t=1392355399
wondering whether i should buy a replica or make my own from fibre glass that matches the rx7 form a bit better .i have no idea what i may be getting myself into but it could be something for later in the warmer months/next winter. i actually have spent the most of this night shift reading about making fibre glass panels/parts and it looks like it would be something fun to try. might take a few attempts but it would solve my little pickiness issue
Last edited by meerkat8701; 02-13-14 at 11:37 PM.
 02-13-14, 11:50 PM
#439
troubleshooting sucks
Thread Starter

not my taste either but i reckon it could work on the fc. just think of it as a little bit of an exaggerated duckbill =P
02-14-14, 06:30 PM
#442
troubleshooting sucks
Thread Starter
im still not sure what ill do tbh, the duckbill is very nice as it is and it sometimes feel like i want to change things just for the sake of changing them. the rocket bunny wing is though, unlike alot of cosmetic mods done to fc,s, quite unique. i dont know whether its because its ugly or not
i picked up my brake rebuild kits on the way to the garage but when i got there and opened them i saw this...
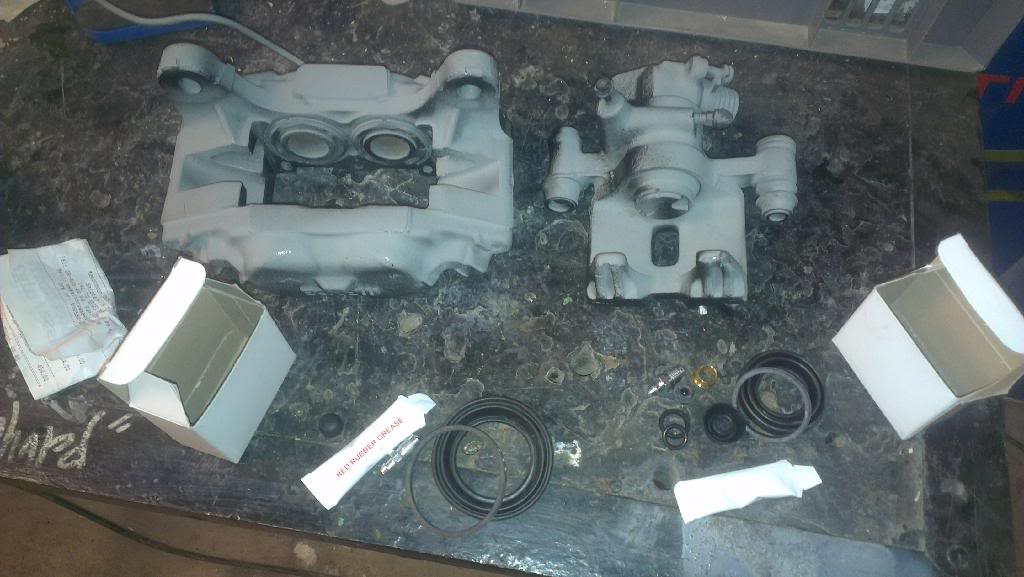
i asked specifically for kits for the front and rear brakes. i dont get it. it cost 450kr (cheaper than i originally thought but still you can see that one boot is way too big and the other one that seems to be the same size as the boot for the front brake caliper only has ONE boot! considering i have 8 pistons to repair, this would cost me a rediculous amount of money to repair them all. somethings definately wrong. ill have to back and find out what kind of catastrophic communication breakdown has occured to cause this.
seeing that i wasnt going to be getting anything done with the brakes today, i turned my attention to where i left off yesterday. i removed the transmission mounts and cleaned up the bracket and started painting it. all of the nuts broke off of the little sheild on it so i sawed them off, popped out the leftover bits of bolt with a punch and will be replacing them with new ones. im assuming that the reason that its there is so that the same thing doesnt happen to the nuts on the bushing so i thanked it for a job well done. (i think)
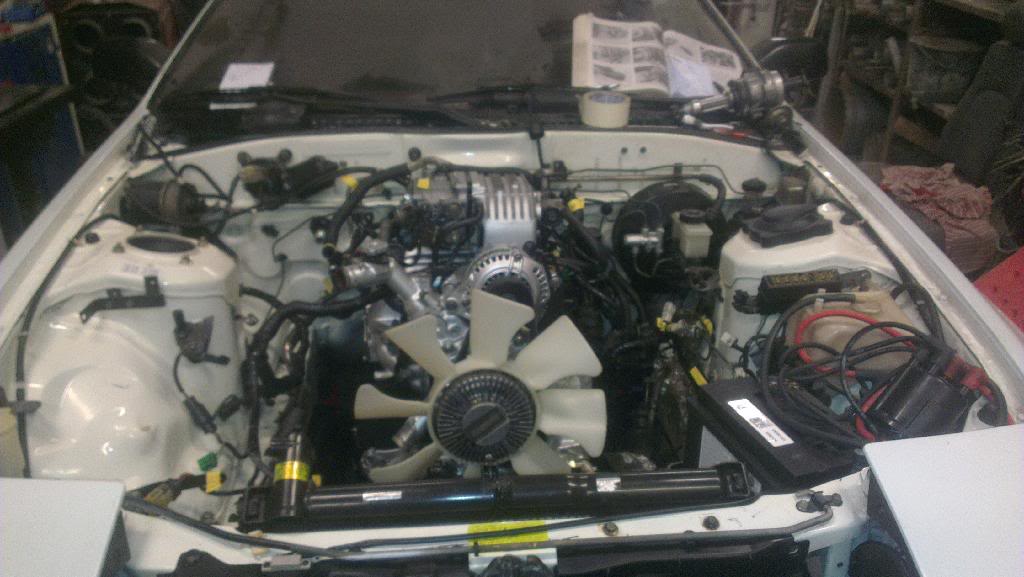
whilst spraying up the bracket, i changed out the engine mounts. through this i realised why it such an absolute bastard to get the engine into place last time. its alot easier if you leave them a bit loose when installing it. a lesson learned. i wasnt finished spraying the bracket so i took some cleaning agent i had left over from the job i did in j�nk�ping last autumn cleaning all those filthy cnc machines and started cleaning up the engine bay with it. fantastic stuff. spray, leave it for a couple minutes and wipe off crap with a damp cloth. worked a charm! i got halfway through before i had to go home. ( i should technically be asleep now).
its a bit hard to see the difference with this blurry pic but it made a big difference. i had cleaned the left side and trust me the right side is muckier than it looks. ill look forward to sorting it out so that it can all get dirty again
ill be working all day tomorrow and theres a possibillity that may be forced to work 24 hours if nobody turns up for the night shift. if things keep up like this ill at least be able to strike being broke off of my complaints list..
i picked up my brake rebuild kits on the way to the garage but when i got there and opened them i saw this...
i asked specifically for kits for the front and rear brakes. i dont get it. it cost 450kr (cheaper than i originally thought but still you can see that one boot is way too big and the other one that seems to be the same size as the boot for the front brake caliper only has ONE boot! considering i have 8 pistons to repair, this would cost me a rediculous amount of money to repair them all. somethings definately wrong. ill have to back and find out what kind of catastrophic communication breakdown has occured to cause this.
seeing that i wasnt going to be getting anything done with the brakes today, i turned my attention to where i left off yesterday. i removed the transmission mounts and cleaned up the bracket and started painting it. all of the nuts broke off of the little sheild on it so i sawed them off, popped out the leftover bits of bolt with a punch and will be replacing them with new ones. im assuming that the reason that its there is so that the same thing doesnt happen to the nuts on the bushing so i thanked it for a job well done. (i think)
whilst spraying up the bracket, i changed out the engine mounts. through this i realised why it such an absolute bastard to get the engine into place last time. its alot easier if you leave them a bit loose when installing it. a lesson learned. i wasnt finished spraying the bracket so i took some cleaning agent i had left over from the job i did in j�nk�ping last autumn cleaning all those filthy cnc machines and started cleaning up the engine bay with it. fantastic stuff. spray, leave it for a couple minutes and wipe off crap with a damp cloth. worked a charm! i got halfway through before i had to go home. ( i should technically be asleep now).
its a bit hard to see the difference with this blurry pic but it made a big difference. i had cleaned the left side and trust me the right side is muckier than it looks. ill look forward to sorting it out so that it can all get dirty again
ill be working all day tomorrow and theres a possibillity that may be forced to work 24 hours if nobody turns up for the night shift. if things keep up like this ill at least be able to strike being broke off of my complaints list..
02-14-14, 10:33 PM
#443
Rx Bandit
Join Date: Jul 2008
Location: Fort St John, BC, Canada
Posts: 232
Likes: 0
Received 0 Likes
on
0 Posts
engine bay looks good buddy! maybe bring a front and a rear caliper in with you when you talk to them about the rebuild kits so that they know what you need. the kit they gave you might be for a base model 4-bolt fc, which i believe had a single bigger piston in the front caliper. that might be what that one big boot is for.
last summer i was in pretty much the same boat as you with work, so much overtime that i got almost nothing done on my fc. it has paid for a hell of a lot of parts though!
a 24 hour shift will be super rough no matter what you do though, best of luck man
-sean
last summer i was in pretty much the same boat as you with work, so much overtime that i got almost nothing done on my fc. it has paid for a hell of a lot of parts though!
a 24 hour shift will be super rough no matter what you do though, best of luck man
-sean
02-15-14, 05:32 AM
#444
troubleshooting sucks
Thread Starter
engine bay looks good buddy! maybe bring a front and a rear caliper in with you when you talk to them about the rebuild kits so that they know what you need. the kit they gave you might be for a base model 4-bolt fc, which i believe had a single bigger piston in the front caliper. that might be what that one big boot is for.
last summer i was in pretty much the same boat as you with work, so much overtime that i got almost nothing done on my fc. it has paid for a hell of a lot of parts though!
a 24 hour shift will be super rough no matter what you do though, best of luck man
-sean
last summer i was in pretty much the same boat as you with work, so much overtime that i got almost nothing done on my fc. it has paid for a hell of a lot of parts though!
a 24 hour shift will be super rough no matter what you do though, best of luck man
-sean
ill have to get down there on monday and try to find out what happened. i thoguht that picture would suffice but its a good idea to take the calipers with me so that i can check them directly in the store.
it seems strange that i only got a kit for one side anyway. it all seems a bit expensive but i only have myself to blame for getting all cavalier with the wire wheel.
02-15-14, 08:57 AM
#446
troubleshooting sucks
Thread Starter

 02-15-14, 09:37 AM
#448
troubleshooting sucks
Thread Starter
busted. i am actually a little unsure of how to get them out. it would be really nice with some sort of writeup with pictures on how to do it because i found nothing in either the fsm or the book. there is a writeup "with pictures" on here but there werent any pictures. i think i read something about using compressed air or is there a simpler way?
02-15-14, 10:08 AM
#449
Well, the simplest way is to do it before you remove the calipers...use the hydraulics to force the pistons out.
You are, sadly, beyond that point, so compressed air will have to do.
The trick to this will be moving all the pistons without popping any single one completely free.
It appears that you've sandblasted the calipers, so before doing anything make sure they're clean of media/grit. Once clean, pry out the dust seals, they've done their bit and new ones are part of the kit.
It's easiest to just bolt the caliper back onto the knuckle w/rotor but I guess that's not an option for you now, so you'll just have to fix the caliper in a vise or some other method to stabilize it. Use a chunk of suitably thick wood in the caliper, thick enough so the pistons can extend but not pop completely out.
Apply air to the port that the hose feeds to...just a short burst.
You should see some-hopefully all, but probably not- of the pistons move out.
If they all moved- excellent.
If not, you must restrain all the pistons that did move (wood blocks, c clamps, whatever you can arrange), leaving only the stuck piston free to move. Apply more air till it frees the stuck one (but don't let it pop all the way out).
Once they all start moving, use thinner wood and more air to allow the pistons to equally extend till one finally pops all the way out.
The others should be extended far enough to just weasel out by hand or (carefully) pry out using screwdrivers in the dust seal groove.
It's pretty obvious once you start doing it and doesn't take a ton of time.
Just remember, the further extended you can get all the pistons before one pops and you lose pressure, the better off you are.
02-15-14, 11:15 AM
#450
troubleshooting sucks
Thread Starter
thanks clokker! you sir, are a gentleman and a scholar.
interesting that you mentioned sandblasting. the results you saw were from some serious over-zealousness with a drill and assorted wire wheels. hence the worn off parts of the dust seals. i actually had to google it to find what sandblasting is and what manner of sorcery it is. im definately going to be doing it on my steel wheels when theyre done anyway. thanks for the writeup ill be having a crack at it tomorrow if i get the chance to get over to the garage. all hopes of m getting out of this 24 hr shift are fully gone so i geuss ill have to do it when i wake up. considering my girlfriend is six months pregnant, it is an absolute frickin miracle that she hasnt lost it with me yet for being at the garage all the time. fingers crossed that it holds
interesting that you mentioned sandblasting. the results you saw were from some serious over-zealousness with a drill and assorted wire wheels. hence the worn off parts of the dust seals. i actually had to google it to find what sandblasting is and what manner of sorcery it is. im definately going to be doing it on my steel wheels when theyre done anyway. thanks for the writeup ill be having a crack at it tomorrow if i get the chance to get over to the garage. all hopes of m getting out of this 24 hr shift are fully gone so i geuss ill have to do it when i wake up. considering my girlfriend is six months pregnant, it is an absolute frickin miracle that she hasnt lost it with me yet for being at the garage all the time. fingers crossed that it holds