When you click on links to various merchants on this site and make a purchase, this can result in this site earning a commission. Affiliate programs and affiliations include, but are not limited to, the eBay Partner Network.
looks like the sort of heat marks that come from really high current. did you get something welded on the car at some point?
many, many moons ago, i took an oil cooler to get welded and (since i didn't know better) i didn't think anything of it when the guy connected his ground to my oil cooler line. needless to say i had to replace it, but the point right now is that the marks looked similar your photo.
is it leaking?
Nope, no welding on the car, but that was my first instinct as well. It definitely leaks, there was a 1" wide trail of oil into the garage after I took it out for a drive last winter. It's not catastrophic but definitely enough to keep me from running the car til it gets fixed, so that's the first priority next time I'm home.
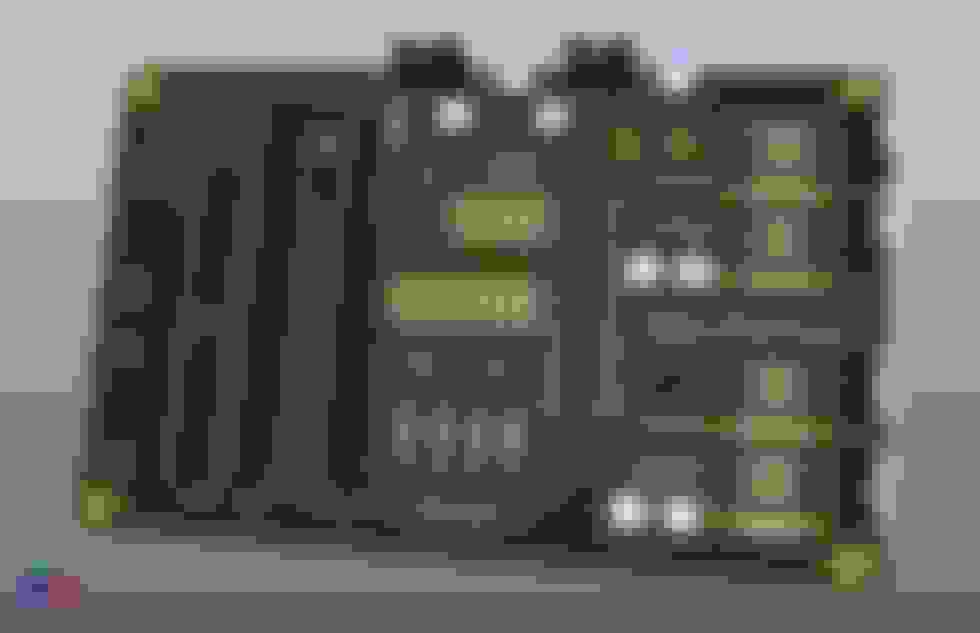
PCB's came in today, pretty happy with how they turned out. Unfortunately I was in a rush and made some mistakes on the design, including the circuit for the analog inputs which is bad enough that I'll have to order some new ones. Fortunately they are pretty cheap, and this provides an opportunity to integrate the CAN IC directly onto the board rather than using a breakout board as well as add a 6 pin header for an LCD display if I decide to go that route in the future. I did take the time to test fit some critical components to make sure everything fit how it was supposed to, and it looks to be good other than the aforementioned circuit snafu and some labeling errors. If anyone wants one of these boards (free) to play around with, let me know, they're still totally usable except with passive sensors like water temp which don't get power from an outside source. Since I have to order a minimum of 5 I'd also be willing to sell the extra revised boards at cost ($5 shipped ish) when they arrive, and can provide a BOM for anyone else interested in the project.
Naked PCB's
Test fitting some components to make sure the footprints are correct
Updated board with fixed inputs, on-board CAN, and LCD header
I ended up taking a long winter break and got home last week, and have been able to get a few things done on the car and actually try to start tuning the thing. It's been unseasonably warm here which makes both the car and myself less irritable, leading to more productive days and satisfying outcomes. The first item on the list, and the only thing I've spent money on car-wise in the last 6 months, was to make a new oil cooler line to replace the one that failed last winter. It was my first time working with large stainless braid AN hose, but it went together pretty easily, and I've confirmed that it doesn't leak.
The most boring $100 you can spend on a car
Following my rear subframe rebuild last year, I wasn't happy with the DIY dogbone solution after seeing another member had done something similar and ended up ripping the threads out of the heim joint while driving. I bought a set of Ronin camber links to replace them, and finally got to install them this time around. It took less than an hour, including jacking the car up and taking the wheels off.
I could hang the whole car off the Ronin link. The Ebay one, maybe not...
The last thing I did to the car was change the oil. Last year it was struggling with low cranking speed, even after the starter upgrade. I did some googling and noticed that the 20w50 I had put in when I rebuilt the engine is 3-5x as viscous as 10w30 in the cold, which was probably significantly affecting the cranking speed from cold. I had already partially drained the oil to redo the oil cooler line, so I ended up draining the whole pan and refilling with the lighter oil. Man, it made a huge difference. The water temp was reading 47F today when I first went to crank it up, similar to last year, but it turned over much faster and caught in a few seconds. I let it run for a while in the garage, rechecking for leaks, and everything was dry as a bone until the heater core inlet hose blew off the tube. It was a quick fix, and after hosing the coolant off the engine bay I started doing a few easy trips down the road to see how it ran under load.
I'm still surprised at how well it drives... it starts up great when hot, it's easy to get going from a stop, and doesn't buck or pop when cruising. I only really have two complaints: one, the exhaust sound is awful. I'm using a set of mufflers that came with the car and I can't stand how it sounds. Will be looking for something quieter soon, once I have the kinks worked out of everything. Second, if you're around the car for more than 30 seconds while it's running, you're gonna smell like gas for hours.
I tried my best to do some longer "pulls" to get a feel for the AFR range, but since the car isn't registered I can only go so far away from home. Based on the data logs I got from my driving today, I think it's running pig rich everywhere except perhaps idle. I originally had 65 idle jets and 195 mains in, and I think those are both too big for the 40mm venturi I have in right now. I had a set of 60 idles, but I think it needs less than that. I didn't have any mains smaller than 195 so it's staying like that for now. I think there is an MG shop in Cincinnati that might sell Weber jets, but obviously I won't be able to get those in the next few days.
At idle, the AFR sensor is reading real high, in the 15-17 range. However, the car seems happy with the idle screws in their current positions and the exhaust still smells like gas, so I'm more inclined to believe this is something to do with the sensor or uneven exhaust pulses than the true reading.
RPM, AFR, and MAP readings from the highest RPM pull of the day
Another thing I noticed is that it starts to go way lean at high RPMs, as in the center right of the graph above. I think this is the classic Weber dry fuel bowl syndrome, where the gas gets sucked out faster than the needle valve can supply. I put in a 200 needle and seat last winter because it was blowing the 300 open and dripping out the mains at idle. Fortunately I ordered a 3.3mm glass ball style valve, which are supposedly less sensitive to fuel pressure changes. Less fortunately, I am a moron and cannot for the life of me figure out how the stupid thing is supposed to be installed.
Child-proof 3.3mm needle valve
It came with a small steel ball loose in the bag, which at first I assumed is supposed to be dropped in from the top prior to installation. That assumption was wrong, as a) that would result in the valve opening as the float rose, and b) the glass ball doesn't travel high enough to move the steel ball off the seat. Am I supposed to push the glass ball out, drop the steel ball in, and then replace the glass ball? Or am I missing something completely?
Other than that, the only issue remaining to diagnose is the trailing ignition. The stock tach and the TunerStudio tach were reading significantly different, particularly engine speeds above 3k RPM. Coincidentally, there was some sort of ignition breakup happening above this region, keeping the engine from revving higher than 4k or so. Since the stock tach pulls off the trailing coil, and the TS tach reads the input from the more reliable FFE wheel, I figured something was wrong with the trailing ignition and unplugged the coil. Et, voila! The engine revs fine now until it runs out of gas. I'm assuming I just have a setting wrong somewhere in TS but if anyone has run into this before, please chime in.
That's it for now. I hope y'all are having a good holiday season and are also getting some well-deserved time off.
Following my rear subframe rebuild last year, I wasn't happy with the DIY dogbone solution after seeing another member had done something similar and ended up ripping the threads out of the heim joint while driving. I bought a set of Ronin camber links to replace them, and finally got to install them this time around. It took less than an hour, including jacking the car up and taking the wheels off.
I could hang the whole car off the Ronin link. The Ebay one, maybe not...
Yeah, I had to buy a new set of underwear after that link broke on me . Luckily I was only driving out in the country with nobody around.
I love your build by the way. I've never been into carbs personally but your work is really clean
Well, it's been a while. Over the last eight months I was engaged in a mad sprint to finish my degree, after getting the news that my advisors would be leaving the school this August. I essentially had zero free time between February and mid July, preventing me from making a visit home to work on the car. Fortunately, the hard work paid off and I finished my dissertation a few weeks ago. Currently, I am back home taking a breather and working on finding a job I'll enjoy, which leaves me some time to tinker on the project here and there.
I've been home for about two weeks and knocked out several small but important projects: fixed the trailing plugs (the trigger and select wires were crossed), tightened a leaky brake line, installed new headlights, a new battery, and two extremely satisfying pieces of NOS interior plastic:
NOS steering column plastics I've been saving until I was sure I was done messing around behind the dash
Last winter I had taken the car on a few unsanctioned drives on the road by my house, but never had the time to register or insure it. That changed earlier this week: after verifying that it still started and ran, I took the title to the DMV and got it registered. The insurance kicked in today, and of course the maiden voyage was to fill up the thirsty beast:
Bad time to be a rotary owner
After putting in about half a tank, I drove over to a straight highway to record some data to see how the carb was doing. The gist of it, is that it's pig friggin' rich. Essentially between 10.5 and 11.5 AFR in all conditions except idle. It also has some trouble in the idle/main jet transition region, which seems to be around 3,500 rpm. Had to shift all the way down to first to get out of the valley we live in without a load of bucking. I ordered some smaller jets to try to lean it out a bit, and also some 42mm chokes (currently using 40mm) to potentially let more air into the engine and keep a similar jetting to the current setup. I'm accumulating quite the collection of Weber jets trying to get this thing tuned right, but that's all part of the learning curve I guess. It drives well enough right now to get around town, so even with the issues it puts a big ole smile on my face. On the way home I was obligated to stop and take a couple more pictures with some decent golden hour lighting:
Of course the random plate number I was assigned is cursed
Besides the carb jetting, there are a few other issues to tackle. Last winter I noticed that the battery voltage in the MS readout was low, around 11.5V. Following up on that with a volt meter earlier this week, the alternator was putting out 14V while the voltage at the battery terminals was only 12V. After some poking about, there seems to be a 2V difference between the battery negative terminal and the alternator casing (which should be ground as well). To me, this points to a poor battery ground connection. It's currently grounded to the chassis at the mouse trap seat belt attachment point on the trans tunnel, without a direct connection to the engine. I was hoping this beefy anchor point would provide a good electrical connection, but clearly I need an additional cable between the battery ground and engine. Hopefully I can get that taken care of this week.
Otherwise, I don't have any big projects in mind for the near future. Money will be tight until I become employed again, so I'll just be working on the tune and general tidying of old and corroded stuff where possible. As always, thanks for reading!
So far I've put about 150 miles on the car, and it was behaving wonderfully until I started digging into a few small issues. By yesterday I had gotten the carburetor tune dialed in pretty close - still some rich/lean areas, but the bucking was eliminated and it was easy enough to drive around the street. The longest trip so far was about 45 minutes one way to get a few spare keys made from some blanks I bought from Atkins. This turned into a bigger pain than expected, as the closest dealership refused to cut them unless I could prove the blanks were purchased directly from Mazda, and another wanted $70 for a "programming fee." Instead, I ended up taking it to a nearby locksmith and having them copy the old, worn key. Not the best option but the new ones turn the cylinders, which is all that matters.
I initially started the carb tuning process with jet sizes based on old threads here and on Aus rotary. Unfortunately, those turned out to be waaay too rich, and by yesterday I had worked down to only 55 idle and 170 main jets. The engine should want significantly more fuel, but the AFRs were checking out and it seemed happy enough. However, I had always been suspicious of the air horn screens I was using as a stop-gap in place of the K&N canister which was too big to fit without cutting the hood support. I knew they were reducing air flow, but wasn't sure by how much. To find out, I did two back to back pulls down a nearby straightaway, one with the screens and one without. The data logs are below.
AFR (red trace) with screens in place. Green trace is target AFR from AaronCake's table (not used, just for reference) and white is engine speed. Probably could use one size smaller idle jet and a bigger pump jet, but overall looking good.
Three minutes later, same jets, without screens in place. Wow... a ~5 point difference across the board compared to with the screens in place.
Clearly the screens are a significant restriction, much more so than I had been assuming. I was actually a little glad to find this out, as the car didn't have much get up and go up to this point. Fortunately I have an assortment of larger jets to throw in to account for the additional airflow without the screens, but I'll need to cut part of the hood structure to make enough clearance for the K&N filter, which will take a few days to get sorted. I'll probably end up taking the carb off entirely, as the I noticed the rear barrel is leaking fuel out the main jet after shutdown so I need to check the float level and replace the top gasket anyway. Also don't want to shower the leaky carb in sparks while I cut the support, sounds like a good way to end up in the ER.
In terms of other projects, I got some parts powder coated in preparation for the next big undertaking, which I foresee happening some time this winter. When I originally bought the car it came with a load of spare parts, which has been a boon during the build process. The good fortune continues, as while digging through my parts shelves I was able to put together almost a complete front subframe assembly, including S4 control arms. I had the steel parts coated in a satin black and the LCAs blasted, in keeping with the theme of last year's rear sub frame rebuild. The idea here is that I'll be able to put together a complete subframe with spare parts and do a direct swap with the existing unit, to replace the old bushings, ball joints, and other wear items all in one go. I'm still on the hunt for a few parts (the bracket for the rear LCA bushings, front/rear LCA bushing bolts, and steering rack bolts in particular), but once I have those I should have a plug and play front subframe ready to go.
Cleaned up spare subframe parts and other junk
I got a few other bits and bobs done as well... heater core piping, so I can finally hook up the heater core, one piece of the exhaust heat shield I managed to save, etc. Tomorrow I'll see about draining the radiator to do the heater core pipe and taking the carb off to sort it out. There are a few other smaller projects on the horizon but for now I think getting the existing parts dialed in and getting some seat time is going to take priority.
As always, thanks for reading, and any advice/comments are welcome
Got the heater core piping hooked up today, and the hood support cut, which turned out to be easier than expected. The section I need to remove was only attached to the outer sheet metal by a few dollops of seam sealer, and the cutoff wheel made quick work of the whole thing. After closing the hood as far as I good while keeping an eye on the canister, it seemed like it was going to fit. Not so... the hood impacted the top of the canister and creased the filter a bit. The damage is done, and the hood closes, so I'm going to leave it as-is for now. Definitely not a long-term solution though. The flange that the carb attaches to is probably 20-25mm thick, so I could get that milled down some to increase clearance, otherwise I think the RB manifold is shorter (but also another $300 to spend).
Woops. Still need to find some more clearance after cutting the hood support
With the filter on, I started working my way back up the jet sizes, starting from the 55 idles and 170 mains I had on yesterday. I ended today with 70 idles and 200 mains, which is more in line with what other people have reported using for similar ports, and looked pretty good on a 2nd gear pull I did before the sun went down:
Second gear pull to 5k rpm with 70 idles and 200 mains
I could maybe go one size bigger on the idles, or one size smaller on the mains, but it matches well with the EFI AFR target I am using as a sanity check during the tuning process. Definitely needs a bigger pump jet to take care of the lean spike on throttle, but I can only find those from an Italian guy on Ebay so they take a while to get here. I also might have to fiddle with the air corrector once I raise the red line, but to my understanding it doesn't really do much in the range I'm currently testing.
Otherwise, just working out a few kinks here and there. I rechecked the trailing coils after I thought I fixed them, and they still aren't working right. One fires sporadically, and the other not at all, though the tach is getting a signal (and is different than the MS reading by 10-20% depending on engine speed). I tried a spare coil pack, and recrimped new terminals on the Weatherpak and Molex connectors in the signal path, but neither of those seemed to do anything. Other than messing with the ECU settings, which seem right in their current state, I'm not sure what options are left as far as trouble shooting. Moving to a coil-on-plug setup is definitely something I have in mind, but is very far down the pipeline in terms of project funding allocation.
I'm pretty happy with the progress so far, despite some setbacks and minor issues. I'm planning to meet a friend at Cars and Coffee tomorrow morning, which will be the first time I bring this thing out in public, so I'm looking forward to that - hopefully no catastrophic failures occur en route.
 09-20-21, 04:19 PM


 . Luckily I was only driving out in the country with nobody around.