
Angie's FC Exterior Buildup thread

So on the driver door, those lines you see are from the stand it was on. Not really sure what happened but Im kinda mad about it so lets not talk about it anymore.
The hatch pic - Thats what the hatch of an FC looks like when its body color. I really like it personally. Some people Ive talked to dont like it and thats cool with me.
I put the interior all together although I didnt take any pics. Im sure most people know what a red FC interior looks like.


The hatch pic - Thats what the hatch of an FC looks like when its body color. I really like it personally. Some people Ive talked to dont like it and thats cool with me.
I put the interior all together although I didnt take any pics. Im sure most people know what a red FC interior looks like.
Most manufactures super whites are the same. For example, Toyotas super white paint code 040. They would have different variations like 040 yellower, 040 bluer, 040 darker.
If you get the formula for other manufacturers superwhites its pretty much very close.
I used to work with ppg global paint, and most of the time super whites[nissan, Ford, mazda, toyota] are just gloss white with a drip of jet black, or yellow, or blue w/e it takes to color match the car and have a good blend. I painted my fc3s superwhite before as well, it was hella bright..
yeah just some paint info haha
Yes sanding/polishing are on the list to do.
It appears now that I wont have enough time to finish this before x-mas break. Also the weather has been really crappy lately and doesnt look like its going to get much better so I doubt I will be able to drive it home even if its done in time.
I will be posting the first series of body kit pics here in an hour or so.
dkwasherexd - Thanks for the paint info, good stuff.
Here are pics of some of the damage that I get to fix on the bodykit. Some of it happened in transit and some happened from me moving it around the shop to different locations for storage. Mostly mild scratches and dings.


Also will be working on reinforcing some of the weaker areas of the bodykit pieces. Mainly the "weaker areas" would be the areas that have 90 degree angles, as the pieces fit a bit tight so those places cant bend as easy - therefore crack.
Here are pics of some of the damage that I get to fix on the bodykit. Some of it happened in transit and some happened from me moving it around the shop to different locations for storage. Mostly mild scratches and dings.
Also will be working on reinforcing some of the weaker areas of the bodykit pieces. Mainly the "weaker areas" would be the areas that have 90 degree angles, as the pieces fit a bit tight so those places cant bend as easy - therefore crack.
dude please tell me you are going to be putting s4 moldings back on the door. The stupidest thing I see is people leaving the moldings off of the car and having the gap or having s5 bumpers with s4 trim.

As for the door - Yes I will be sanding/buffing the whole thing so hopefully the lines on the driver door will go away.
Moulding - I actually bought this particular body kit because it had the S4 moulding. I didnt want to have to buy S5 stuff when I had perfectly good S4 stuff already. The moulding pieces will all be painted gloss black. I decided gloss black because I hate how the mouldings get all faded and old looking. I figure this way they will always look good.
Pics of the bodykit mocked up one last time are on the way (couple-few hours).
driftfc87 AKA Steve - The lines are from the stand that the door was sitting on when I sprayed the jamb. Not sure why it happened but I guarandamntee that there will be masking paper wrapped around the stand areas when i paint the hood.
OK, so the final test fit pics. On the front bumper, it needs to be moved up some which isnt a problem as its not mounted in the pic anyways. The rear bumper also needs to move up a bit as its sitting way too low.....
Standing height:

Kneeling height:


Finally, these are all the parts getting sprayed brilliant black (minus headlight trims, license plate, and bag of light lenses):

OK, so the final test fit pics. On the front bumper, it needs to be moved up some which isnt a problem as its not mounted in the pic anyways. The rear bumper also needs to move up a bit as its sitting way too low.....
Standing height:
Kneeling height:
Finally, these are all the parts getting sprayed brilliant black (minus headlight trims, license plate, and bag of light lenses):
Last update of the year:
In the first pic I took you can see the damage of test fitting the front bumper. The cracks are from spreading out the areas that cover the front fender for mounting. SOOO I figured up a new plan for the front bumper:
I will mount the bumper, then fix the imperfections and spray it while installed instead of the previous plan of painting off car and then installing. I fear that any reinforcements will cause the bumper to crack worse when it comes time to install (which would force me to fix and respray).

You can see in the pic where the crack is (if not, its where the part gets considerably wider). Also you can see the weird hole/puncture mark that happened during shipment apparently.
In the next few (6 lol) pics you can see where I sprayed the rock guard (anti-chip). This is normally on cars from the OEM on the bottom of the doors, fenders, and sometimes on the front of the hood (rarely). The rock guard is sprayed on with a special gun (same as undercoating is applied with). Not too bad for my first time if I say so myself


No, thats not me in the last pic (Im older and also fat lol). Also not me in the background of the other pics.
Tomorrow I would like to spray the underside of the hood, although I probably wont get a chance. Its the last day of school before X-mas break so I wont be having any more updates until after Jan 5th. It sucks I didnt get it done before my deadline. On the other hand there are other students trying to use the paint booth, so I have to share (dammit).
In the first pic I took you can see the damage of test fitting the front bumper. The cracks are from spreading out the areas that cover the front fender for mounting. SOOO I figured up a new plan for the front bumper:
I will mount the bumper, then fix the imperfections and spray it while installed instead of the previous plan of painting off car and then installing. I fear that any reinforcements will cause the bumper to crack worse when it comes time to install (which would force me to fix and respray).
You can see in the pic where the crack is (if not, its where the part gets considerably wider). Also you can see the weird hole/puncture mark that happened during shipment apparently.
In the next few (6 lol) pics you can see where I sprayed the rock guard (anti-chip). This is normally on cars from the OEM on the bottom of the doors, fenders, and sometimes on the front of the hood (rarely). The rock guard is sprayed on with a special gun (same as undercoating is applied with). Not too bad for my first time if I say so myself
No, thats not me in the last pic (Im older and also fat lol). Also not me in the background of the other pics.
Tomorrow I would like to spray the underside of the hood, although I probably wont get a chance. Its the last day of school before X-mas break so I wont be having any more updates until after Jan 5th. It sucks I didnt get it done before my deadline. On the other hand there are other students trying to use the paint booth, so I have to share (dammit).
I've got the same bumper.
It cracks right where your pointing. I actually left one of the side pieces unbolted to give it some movement so it doesn't sheer the main mounting bolts out of the FG. The purple tape on the driver side is holding that side up because my sliding bolts ripped out when I went over a turn strip there.
The drivers side of my bumper will pop up about an inch if I go over a curb or bump. I just walk out and tap it back down to normal location. Then again. My bumper is about 1 inch off the ground.

The purple tape on the pass side is where I've cracked it a few times.
It's still hanging in there though. Although I've reglassed the back side a few times to firm it back up.
It cracks right where your pointing. I actually left one of the side pieces unbolted to give it some movement so it doesn't sheer the main mounting bolts out of the FG. The purple tape on the driver side is holding that side up because my sliding bolts ripped out when I went over a turn strip there.
The drivers side of my bumper will pop up about an inch if I go over a curb or bump. I just walk out and tap it back down to normal location. Then again. My bumper is about 1 inch off the ground.
The purple tape on the pass side is where I've cracked it a few times.
It's still hanging in there though. Although I've reglassed the back side a few times to firm it back up.
Looks good, especially sideways. Her car isnt going to sit that low, but good to know about your problems/solutions with the bumper.
I cant tell, did you put the mesh screen in yours? I am debating wether or not to do it...
I cant tell, did you put the mesh screen in yours? I am debating wether or not to do it...
mesh lasted for a couple months and then just got tangled up. Partly because of the hooks were latching around the very edge of the mesh because it was cut a tad too small. If it had some excess on the edges it would have held on better. The tab in the bumper for the mesh are still there.
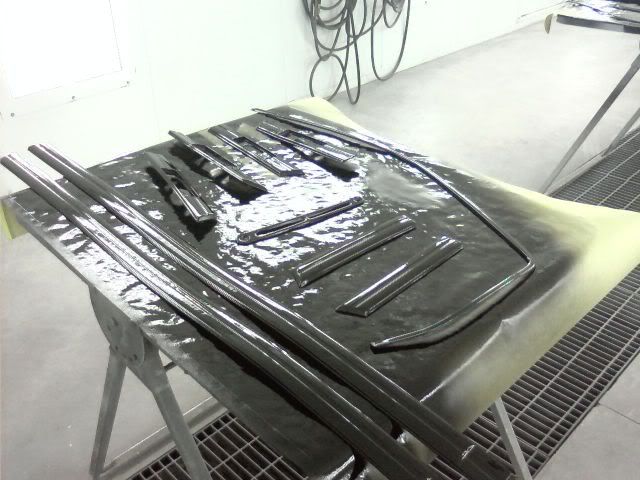
School has been back in full swing since Monday. I finally got some time to get into the booth and spray all the misc pieces black. Granted, most of the parts wont be installed until last but at least they are done and ready to go when the rest is. I will install the cowl panel, wiper arms and blades, and those grill things that the sunroof drains out of in the rear (under hatch).

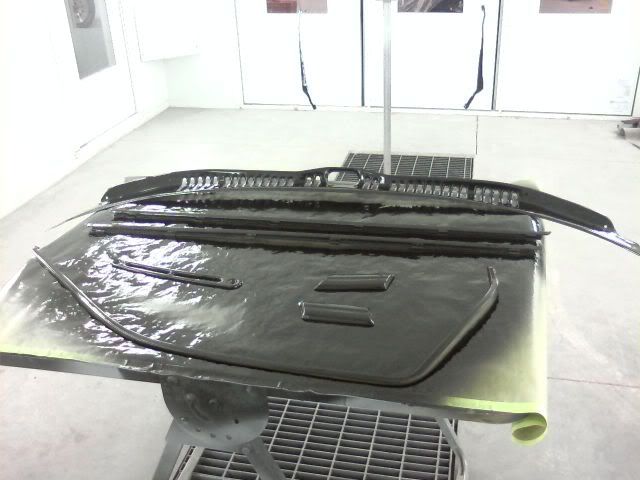
More updates to come soon. I plan on either spraying the bottom of the hood or spraying the rest of the rocker guard on the bodykit pieces. Most likely will do the underside of hood. I'll have pics as it happens.
More updates to come soon. I plan on either spraying the bottom of the hood or spraying the rest of the rocker guard on the bodykit pieces. Most likely will do the underside of hood. I'll have pics as it happens.

looks good, did you have any problem with particles coming off of the table and paper and landing on your black paint? when i paint smaller objects i like to place them on a clean stand where the air goes past the object and not on to the table.
The table is literally so dirty that putting the paper on it helps quite a bit. I had alot of dirt fly off the table before I started putting the paper on and ended up repainting a few parts.
Update:
I painted the bottom of the hood but unfortunately forgot to take a pic. I will post a pic of it on Monday and then of the top of the hood painted since that is the plan for monday. I know Im only doing random and few parts now but there isnt much left to do so it kind of slowed down on progress.
Mounted the cowl panel cover along with the wiper arms and the sunroof drains in the hatch.