
Angie's FC Exterior Buildup thread

Here is the only real before picture we have. Before when it had the spoiler, TII hood, and when it had the polished TII wheels. BTW, Angie is my fiance not the car's name (yes she helps me with it).

The car is an '87 TII and has all TII driveline and an S4 vert NA engine. Mods include Monza full exhaust header back (sounds pretty good actually), K&N FIPK, and Pineapple sleeve inserts. Since the before pic has been taken the pass door and sunroof assembly were replaced. One of the many previous owners apparently had a sunroof leak issue and RTV'd the sunroof closed. Upon removal I found that 2 of the 4 drain tubes were not connected properly, this must have been where the leak was coming from.
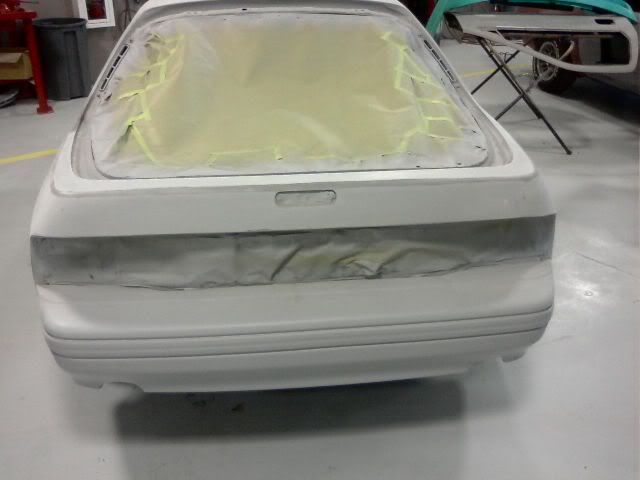
Here are pics after day 1. Yes, the rear was white. We spray painted it to make sure that white was the color we wanted to use. We decided on 'Super White' from a '91 Nissan 300ZX. It is a very nice bright white. We also plan on installing a full body kit that was purchased from eBay. Included with the repaint and bodykit plans for this car are windshield replacement and rear pass side diff mount stud replacement. New brakes and a few other things are also on the list.
I will update this thread as more progress is made. Stay tuned!


The car is an '87 TII and has all TII driveline and an S4 vert NA engine. Mods include Monza full exhaust header back (sounds pretty good actually), K&N FIPK, and Pineapple sleeve inserts. Since the before pic has been taken the pass door and sunroof assembly were replaced. One of the many previous owners apparently had a sunroof leak issue and RTV'd the sunroof closed. Upon removal I found that 2 of the 4 drain tubes were not connected properly, this must have been where the leak was coming from.
Here are pics after day 1. Yes, the rear was white. We spray painted it to make sure that white was the color we wanted to use. We decided on 'Super White' from a '91 Nissan 300ZX. It is a very nice bright white. We also plan on installing a full body kit that was purchased from eBay. Included with the repaint and bodykit plans for this car are windshield replacement and rear pass side diff mount stud replacement. New brakes and a few other things are also on the list.
I will update this thread as more progress is made. Stay tuned!
good start. What body kit did you buy, I have a GP Sports kit just waiting for the right time to install, I'd love to see how you do it. Keep up the nice work and good luck with the project.
It looks like this. If you search for AIT D RX7 Bodykit you will find it.
For wheels they are American Racing (I think lol) 18s, chrome. Should go good with the chrome tips.
For wheels they are American Racing (I think lol) 18s, chrome. Should go good with the chrome tips.
Hey, I was wrong they are Eagle Alloy, not sure of the model though. Simple 5 spoke wheel.
Click on this link for pic of wheels.
https://www.rx7club.com/attachment.p...0&d=1210824621
Click on this link for pic of wheels.
https://www.rx7club.com/attachment.p...0&d=1210824621
Last edited by IanS; Sep 27, 2008 at 10:44 AM.
Trending Topics
Update: Took the hatch off, got the hatch jamb all cleaned out and sanded. Also took the fender off and found that I need to replace a piece behind there. Its all bent up from falling off the jackstands with the tire off... More sanding got done on the door and driver fender. Not much else to do on the outside as far as sanding. Still need to sand the pass door and then onto the door jambs.
For the fender - OK, this is kinda hard to explain. The bumper studs attach to the fender by going through this metal piece and then the nuts go against the fender. Is this metal piece normally bolted on? Mine is welded and I really didnt want to take off the fender and look (yeah Im lazy). Does anyone know what this item is called and what do they normally go for?
On with the pics.


This last pic you can see what I am talking about kind of as far as the fender bracket thing.

Enjoy, and thanks in advance for any help.
For the fender - OK, this is kinda hard to explain. The bumper studs attach to the fender by going through this metal piece and then the nuts go against the fender. Is this metal piece normally bolted on? Mine is welded and I really didnt want to take off the fender and look (yeah Im lazy). Does anyone know what this item is called and what do they normally go for?
On with the pics.
This last pic you can see what I am talking about kind of as far as the fender bracket thing.
Enjoy, and thanks in advance for any help.
Update:
Working on sanding still on the outside areas. Tomorrow the rear bumper and rearmost parts of the quarter panels will be ready to go. Hopefully by thursday I will have at least one sideskirt installed and trimmed as needed. I will have pics of that when it happens.
After the sideskirts are installed and lined up properly, they will be removed and stored until after the rest of the car is ready. Then the front bumper will be mounted. Im really hoping that the front bumper lines up correctly. Lastly, the rear bumper piece will be glued to the rear bumper cover. I will post pics of how the rear bumper is installed for those of you who are interested in seeing how that works.
Looking nice man. And please do post the process of installing the kit. I just decided to sell my GP kit and I'm buying one of these like I wanted to in the first place. I would really appreciate it if you could document the kit install, I don't really have access to good info like this where I am at.
In these pics are the test fit of the sideskirts. They fit surprisingly well, except for the front part firectly ahead of the door. You can see this in the pics. I plan on using body glue to hold it down.


I have also test fitted the rear bumper and the front bumper. I forgot to take pics but overall I think the kit fits very welland much better than expected.
I have also test fitted the rear bumper and the front bumper. I forgot to take pics but overall I think the kit fits very welland much better than expected.
Last edited by IanS; Oct 31, 2008 at 09:38 AM.
In these pics you can see after I sprayed the etch prime and 3 coats of primer-surfacer so that I can block it out. The dark gray is the dry guide coat I am using that 3M makes (great stuff - well worth the money).


I will be taking more detailed pics for the rear bumper and also for the permanent fitment of the sideskirts. Im hoping to have the entire car done before my X-mas break. I figure if it is after that the possibility of bad roads is increased and I obviously would rather not drive it home on snowy roads with a brand new paint job and body kit.
Forgot to mention before that there was a pretty good amount of surface rust so it was all sanded out and then etch primer was sprayed on the bare metal. This should keep the rust from coming back for hopefully many years.
Forgot to mention before that there was a pretty good amount of surface rust so it was all sanded out and then etch primer was sprayed on the bare metal. This should keep the rust from coming back for hopefully many years.
Because the car had been repainted once I wanted to remove the new color, or at least most of it. I used 80 grit for the paint removal, then went over that with 180 to remove the big scratches left by the 80. If the car had not been repainted previously I would have simply went over the whole thing with either 180 or 240. Now that the primer has been sprayed I will use 320 for block sanding. After it is all blocked out it will be sprayed with primer again and sanded lightly with 400 and then the paint will be applied. Lots of steps, but in the end I think it will look really good.
As far as "what I have used to sand with" - mainly a DA and have been doing some by hand in the smaller areas that cant be reached with my DA.
As far as "what I have used to sand with" - mainly a DA and have been doing some by hand in the smaller areas that cant be reached with my DA.
Update on the blocking. I got the majority of the back half done and will need to do some more work on the roof as I found some wavy areas that need filled. that will get fixed and primed again. Anyways, on with the pics.


I got the roof all fixed up and straight. Been working on the style lines straight and block sanded. The car looks basically the same so no pics (and I forgot to take them). Im pretty sure the main chassis will be getting paint next week sometime so STAY TUNED!!!
Pics showing that all of the car has been final sanded and is about as straight as its gonna get.
Plans for next week:
Monday - Unmask the car, clean everything including the interior, along with washing the exterior. Lots of dust is inside the car and needs to be blown/vac'd out as to not contaminate the booth with excess dust.
Tuesday - Degrease and mask off the car.
Wednesday - Spray primer-sealer and then shoot base and clear.
Pics of current status of car all blocked out:


I will post pics of the chassis painted white on wednesday. After the chassis is done I will start on the doors, hood, and hatch. After those are finished the bodykit pieces along with the mirrors and headlight covers will be done. Lastly, the molding pieces will be painted black as they were previously painted body color and by painting them gloss black, they will maintain good looks along with exactly matching the molding areas on the front and read bumpers.
Plans for next week:
Monday - Unmask the car, clean everything including the interior, along with washing the exterior. Lots of dust is inside the car and needs to be blown/vac'd out as to not contaminate the booth with excess dust.
Tuesday - Degrease and mask off the car.
Wednesday - Spray primer-sealer and then shoot base and clear.
Pics of current status of car all blocked out:
I will post pics of the chassis painted white on wednesday. After the chassis is done I will start on the doors, hood, and hatch. After those are finished the bodykit pieces along with the mirrors and headlight covers will be done. Lastly, the molding pieces will be painted black as they were previously painted body color and by painting them gloss black, they will maintain good looks along with exactly matching the molding areas on the front and read bumpers.
