
4-Rotor FC Build


Exhaust Manifold Leak

Joined: Jun 2005
Posts: 815
Likes: 42
From: western europe
hmm, combustion efficiency of the other 2 rotors would slightly increase but pumping losses of the 2 shut off rotors would remain te same. unlike in a piston engine there are no vavles to manipulate to get rid of the pumping losses.
Thread Starter
Joined: Oct 2010
Posts: 605
Likes: 13
From: The Netherlands
Wait... what? rotor de-activation?... On a 4-rotor? That's like the worst idea ever! Why on earth would I want to do that? Yeah it uses some fuel at idle, but the noise it makes more than makes up for it! I don't mind the fuel usage a lot, it was just an observation. Now excuse me while I go and vomit. 
Oh, I mounted the new alternator with a fancy aluminium bracket by the way, but forgot my camera. I also removed the intake and exhaust and checked everything out. Everything is looking good! The engine is making 12 very solid pops now, it's gained some compression. One thing I noticed is the intake being very dirty and oily because of the port overlap. I hope my TPS sensor isn't going to give me any problems, as some of the grimey stuff found it's way into the sensor. Time will tell though, I'll keep a spare just incase.
Now I need to relocate the fuel pressure regulator, and fix the leaks.
Thread Starter
Joined: Oct 2010
Posts: 605
Likes: 13
From: The Netherlands
Just a little update, been working on some stuff today. First thing I did was mess with the alternator. The small one I had didn't work, and I couldn't find one that had the same size with more output, so I got a bigger one with more output which didn't fit. After some messing around I made this bracket:
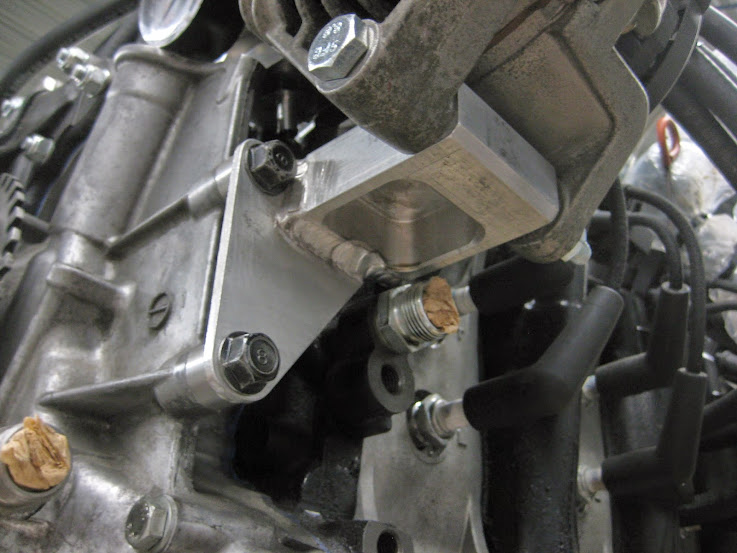
Which puts it in the power steering pump location like this:

I'm not over the moon with how it looks, but there's just nowhere else to put it. I'll mount the FPR between the alternator and the waterpump to fill up the empty space a bit. Also need to machine a new pully for the alternator, get a belt, and machine up some sort of tensioner.
I also found what I thought was an oil pan leak. It turned out the exhaust gaskets were leaking a lot, and because of all the raw fuel getting into the exhaust the guey stuff that leaks out of there looked a lot like oil. It was leaking because the homemade exhaust gasket did not work. My engine has wierd exhaust ports so the oem gaskets don't work, so I got some copper plate, and fitted some cutting rings into the exhaust flange to keep the copper from being pressed out.

There seems to be a pretty good seal between the exhaust flange and the copper, but it's very leaky between the copper and the engine, so not really a succes. The next best bet is probaby to just machine the exhaust flange flat and find some sort of gasket material that works. I already cobbled together a jig and machined it flat:

Pretty difficult to get a good surface finish but came out alright
Now I need to find some sort of gasket material that I can use to seal it up.
After that I got around to fit a few K-type thermocouples for measuring EGT:
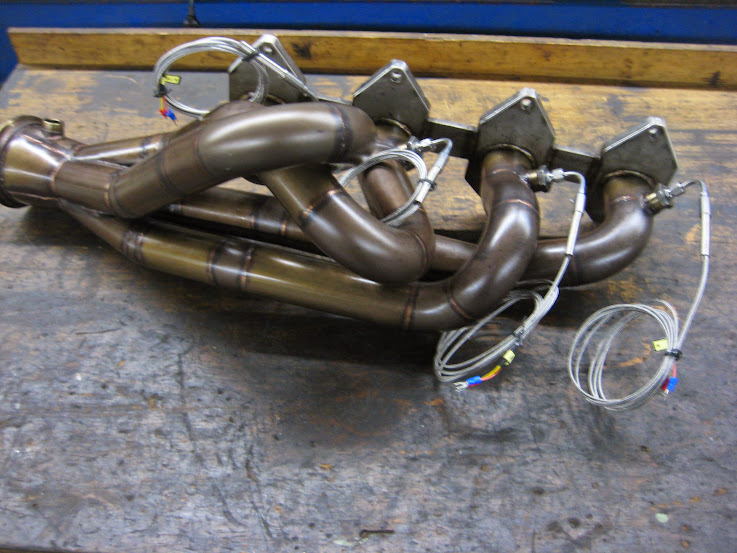
The probes extrude right into the exhaust stream like so:

Now I need to find a spot to mount the 4 EGT displays I got for now. I want to get a better ecu so I can hook these EGT sensors up to it, together with the oil pressure and temperature sensors and the speed sensor. That way when I make a log I can see more info about what everything is doing, and it would allow me to get just one nice display which hooks up via canbus instead of all the crappy analog gauges I currently have. That would simplify the wiring, and allow me to remove a lot of sensors. I don't really have the time for either right now, which is why I got the crappy gauges, but it would make a nice winter project.
Which puts it in the power steering pump location like this:
I'm not over the moon with how it looks, but there's just nowhere else to put it. I'll mount the FPR between the alternator and the waterpump to fill up the empty space a bit. Also need to machine a new pully for the alternator, get a belt, and machine up some sort of tensioner.
I also found what I thought was an oil pan leak. It turned out the exhaust gaskets were leaking a lot, and because of all the raw fuel getting into the exhaust the guey stuff that leaks out of there looked a lot like oil. It was leaking because the homemade exhaust gasket did not work. My engine has wierd exhaust ports so the oem gaskets don't work, so I got some copper plate, and fitted some cutting rings into the exhaust flange to keep the copper from being pressed out.
There seems to be a pretty good seal between the exhaust flange and the copper, but it's very leaky between the copper and the engine, so not really a succes. The next best bet is probaby to just machine the exhaust flange flat and find some sort of gasket material that works. I already cobbled together a jig and machined it flat:
Pretty difficult to get a good surface finish but came out alright
Now I need to find some sort of gasket material that I can use to seal it up.
After that I got around to fit a few K-type thermocouples for measuring EGT:
The probes extrude right into the exhaust stream like so:
Now I need to find a spot to mount the 4 EGT displays I got for now. I want to get a better ecu so I can hook these EGT sensors up to it, together with the oil pressure and temperature sensors and the speed sensor. That way when I make a log I can see more info about what everything is doing, and it would allow me to get just one nice display which hooks up via canbus instead of all the crappy analog gauges I currently have. That would simplify the wiring, and allow me to remove a lot of sensors. I don't really have the time for either right now, which is why I got the crappy gauges, but it would make a nice winter project.
I am using Remflex gaskets on my turbo car. They make an off-the-shelf 13b gasket which may not fit your application, but they also sell thier product in sheet form. I am using their block-manifold gasket, a T4 turbo gasket, a T4 turbo gasket I hacked up to adapt to my VGT turbo, and I made a wastegate gasket from the sample piece they include with the sale. I have about 1000miles on everything currently and no leaks. I see 1700F EGTs daily and particularly high exhaust back pressures with the VGT closed (I BENT my ACV block off plate away from the intake manifold!). I'm not sure if they ship to your part of the world, but worth checking out.
I am using Remflex gaskets on my turbo car. They make an off-the-shelf 13b gasket which may not fit your application, but they also sell thier product in sheet form. I am using their block-manifold gasket, a T4 turbo gasket, a T4 turbo gasket I hacked up to adapt to my VGT turbo, and I made a wastegate gasket from the sample piece they include with the sale. I have about 1000miles on everything currently and no leaks. I see 1700F EGTs daily and particularly high exhaust back pressures with the VGT closed (I BENT my ACV block off plate away from the intake manifold!). I'm not sure if they ship to your part of the world, but worth checking out.
Interesting product, much cheaper than the OEM exhaust gasket, would be willing to give it a try next time around

Joined: Mar 2001
Posts: 31,837
Likes: 3,234
From: https://www2.mazda.com/en/100th/
I needed a quick but reliable exhaust gasket on my old FB (sprung an exhaust leak a few days before leaving for DGRR11). I went to the local hardware and got a sheet of 3mm copper and cut it to shape. put high-temp copper RTV on both sides of it and re-assembled with new SS hardware. Torqued it down to the point where the copper sheet deformed to my flanges. Never leaked over 10k miles.

Now I need to find a spot to mount the 4 EGT displays I got for now. I want to get a better ecu so I can hook these EGT sensors up to it, together with the oil pressure and temperature sensors and the speed sensor. That way when I make a log I can see more info about what everything is doing, and it would allow me to get just one nice display which hooks up via canbus instead of all the crappy analog gauges I currently have. That would simplify the wiring, and allow me to remove a lot of sensors. I don't really have the time for either right now, which is why I got the crappy gauges, but it would make a nice winter project.
Check out either diyautotune or speak with Jean from jbperf.com.
for an epic build you need epic gauges. why look at a stock setup while driving a custom 4 rotor? the ONLY person I would contact for a super clean custom install is BROADFIELD. Broadfield Customs | Custom Clusters & More
I think he is on this forum. if not, he is all over the internet. his fitment and fab work with plastics and fiberglass are top notch. expert skills would add to your expertly constructed FC
I think he is on this forum. if not, he is all over the internet. his fitment and fab work with plastics and fiberglass are top notch. expert skills would add to your expertly constructed FC
MECP Certified Installer
Joined: Feb 2009
Posts: 3,176
Likes: 3
From: Mesquite, TX-DFW
The ability to fire up an engine without the starter with direct injection already exists.
*Almost* every non-hybrid start-stop system does not use the starter to re-fire the engine. There is a faint memory that I have of start-system using another system to re-fire the engine, but for all intents and purposes all non-hybrid start-stop systems do not use the starter to re-fire the engine.
A combustion chamber is not a perfect seal. Over some amount of time you will lose all of the pressure on the cylinder that is under compression For restart systems this isn't an issue as the time between stop and restart should be rather small. However, letting the car sit over night it will become an issue. It could lead to washed cylinder walls and excessive fuel in the oil too.
Joined: Mar 2001
Posts: 31,837
Likes: 3,234
From: https://www2.mazda.com/en/100th/
Thread Starter
Joined: Oct 2010
Posts: 605
Likes: 13
From: The Netherlands
Maybe when the combustion chamber is cold it's not completely reliable to start it like that? And I wonder how they position the crankshaft in the right orientation 
Anyway, I went ahead with the engine, finished up the alternator stuff, mounted the fpr. Then I removed the oilpan and front cover to fix some leaking issues. When it was off though I found some stuff I'm not happy about.
First thing I noticed was the chain tensioner doesn't like oil. It's all bubbly and deformed! Chain still looks good thankfully. To fix the issue I made another part from a different kind of material that is harder and resistant to motor oil. Should be ok now.


The next thing I found though, was much more disturbing. This picture shows the inside of my sump:
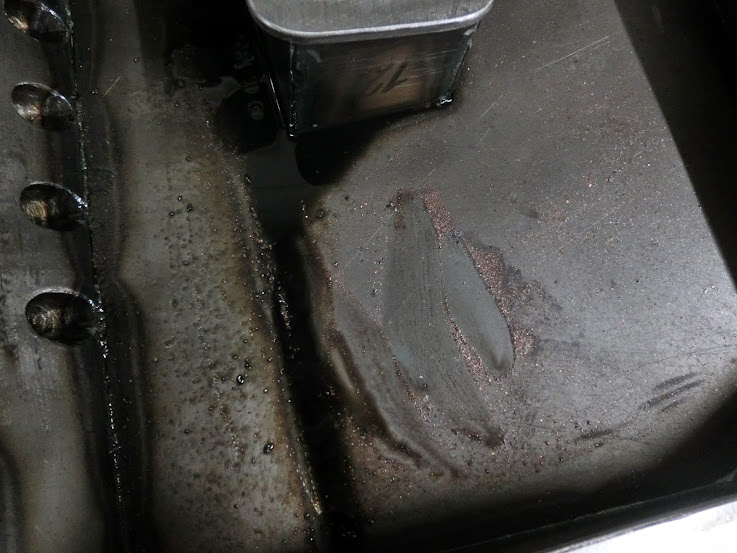
Looks like there is copper coloured gunk in the sump, so I think there is something up with my main bearings or rotor bearings. I didn't have the time to pull the flywheel, counterweight and the rear stationairy gear so I can check, but I did have time to check the front one. So I took it out, and more wear is visible than I would like to see. So I'll pull the rear stationairy gear in the next few days, and inspect that, but I think it's maybe best to disassemble the engine while it's out and see how everything is looking. Crap.
Anyway, I went ahead with the engine, finished up the alternator stuff, mounted the fpr. Then I removed the oilpan and front cover to fix some leaking issues. When it was off though I found some stuff I'm not happy about.
First thing I noticed was the chain tensioner doesn't like oil. It's all bubbly and deformed! Chain still looks good thankfully. To fix the issue I made another part from a different kind of material that is harder and resistant to motor oil. Should be ok now.
The next thing I found though, was much more disturbing. This picture shows the inside of my sump:
Looks like there is copper coloured gunk in the sump, so I think there is something up with my main bearings or rotor bearings. I didn't have the time to pull the flywheel, counterweight and the rear stationairy gear so I can check, but I did have time to check the front one. So I took it out, and more wear is visible than I would like to see.
So I'll pull the rear stationairy gear in the next few days, and inspect that, but I think it's maybe best to disassemble the engine while it's out and see how everything is looking. Crap.
Crap is right. Yeah, eshaft bearings are rather vital. Is the bearing wear uniform of shifted to one side? Did you race clearance the bearings? Any pics of the wear pattern?
Full Member
Joined: Sep 2012
Posts: 94
Likes: 0
From: Dalen, Netherlands
Exhaust Manifold Leak
Joined: Jun 2005
Posts: 815
Likes: 42
From: western europe
Dry sump is the way ahead =) I would be really scared to cavicate the stock oilpump spinning it so fast and feeding it with hot aerated oil. all it takes is a second with no oil to weld the bearing to the shaft.
What helps is enough clearance, good balancing, good synthetic oil and DLC coating on the shaft. We ran with the 2 rotor 13B 45 min with every right hand corner less than 0.3 bar oil (light went on) at over 8k rpm WOT. opened up the engine to find no damage at all.. what we did notice was accelerated wear on the side housings, we guess it comes due to the rotor wobbeleing on the shaft. after we fixed the oil issues with dry sump we opened the engine up again after each race for a variaty of silly reasons. the wear remained constant after each race afterwards.
I heard from other builders that at these rpm anything less than a few bar of oil would kill the stationary bearing real soon, at least they ran old tech SAE oil and no DLC coating ..
For clearance we run 0.13mm on the main bearings. tapered them .2mm towards the end as described the old competitoon manual.. did a few pulls to 10k5 rpm with no ill effects so far.

