
SCCA Super Touring U Build

Thread Starter


Joined: Nov 2006
Posts: 1,578
Likes: 288
From: Parkville, Mo
As somebody else already commented -- thanks for documenting and sharinig. I'm doing the same sort of thing (Toyota 8 in FB), and I'm glad I found your thread.
Regarding lateral axle location -- have you considered a horizontally mounted watts link attached to the bottom of the pumpkin? It seems to provide a low roll center, and it moves the mechanism away from the back of the axle, where I'm lacking in real estate.
Regarding lateral axle location -- have you considered a horizontally mounted watts link attached to the bottom of the pumpkin? It seems to provide a low roll center, and it moves the mechanism away from the back of the axle, where I'm lacking in real estate.
The only negative is that roll center isn't very adjustable and can be pretty low depending on the diameter of the rear tires.
Thread Starter
Joined: Nov 2006
Posts: 1,578
Likes: 288
From: Parkville, Mo
5 lug to 4 lugs how to
I am using the RE Speed big brake kit on my car. This alows me to use FC 11" Turbo brakes. These brakes came from the factory with a 5x4.5 lug pattern. However, I decided to run a 4 lug pattern on my car because it is easier to get 15x7 and 15X8 wheels in the right offset. To do this, I had to redrill the lug pattern on the brake rotors. Here is how I did it.
Tools:
1 4 lug base model FC brake rotor to be used as a drill pattern - I used a front rotor but it would have been better to use both front and rear rotors as patterns - buy the cheapest ones you can find.
2 1/2x2.5" fine thread bolts
2 1/2" 20 tappered lug nuts
1 1/2" drill bit
1 big clamp
1/2" Drill Press
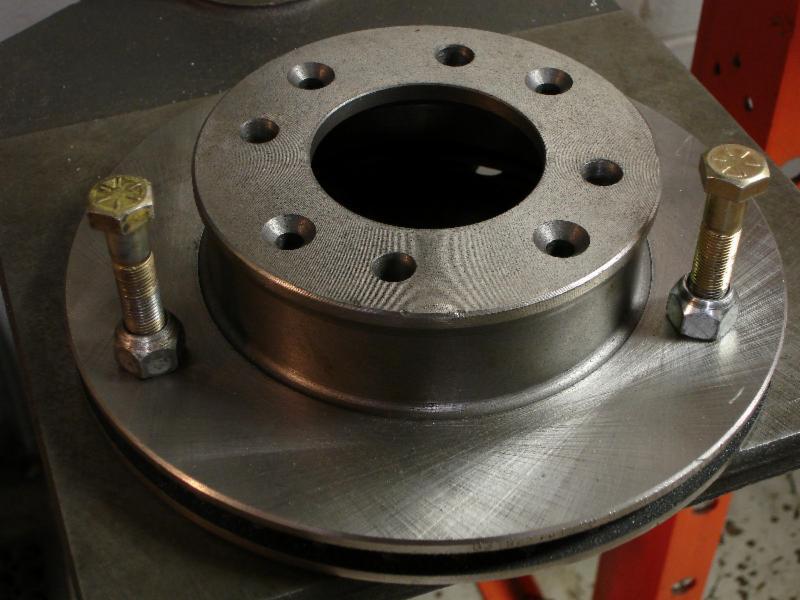
Here is the rear rotor that I am going to drill
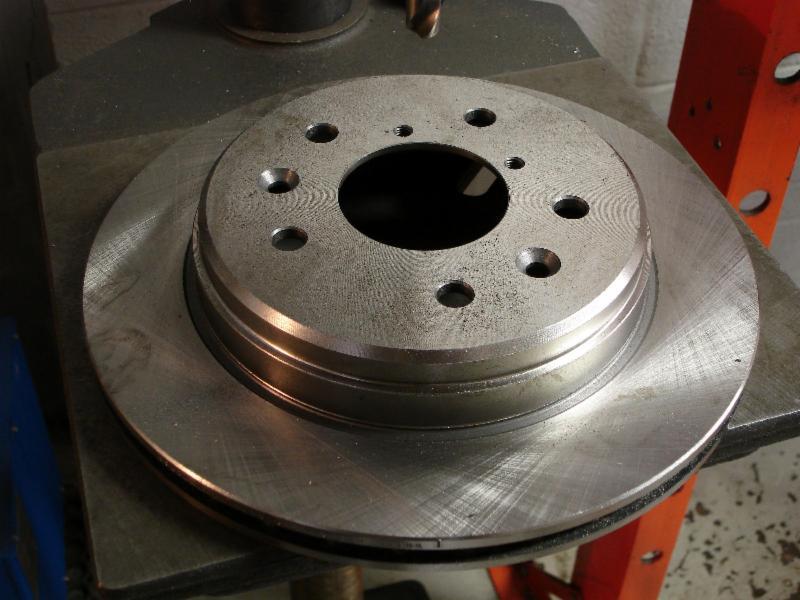
Because the 4 lug and 5 lug patterns share the same bolt circle (4.5") one of the lug holes on the 5 lub rotor will be reused. To begin the process, bolt the 4 lug rotor to the 5 lug rotor. Make sure that the rotors are centered and the bolt/nut is tight. Note that the tappered end on the lug nut will help to center the holes in each rotor.
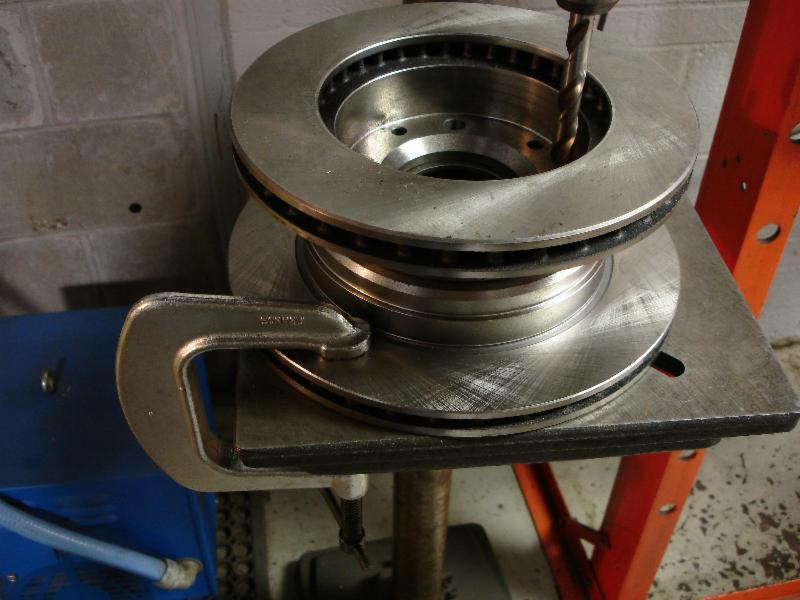
Make sure you clamp the rotor to the drill press and drill the first hole. Once you have the first hole drilled, insert the second bolt/nut and tighten it. Now the rotors are held together using two bolts. Drill the remaining 2 holes.
Here is the finished product
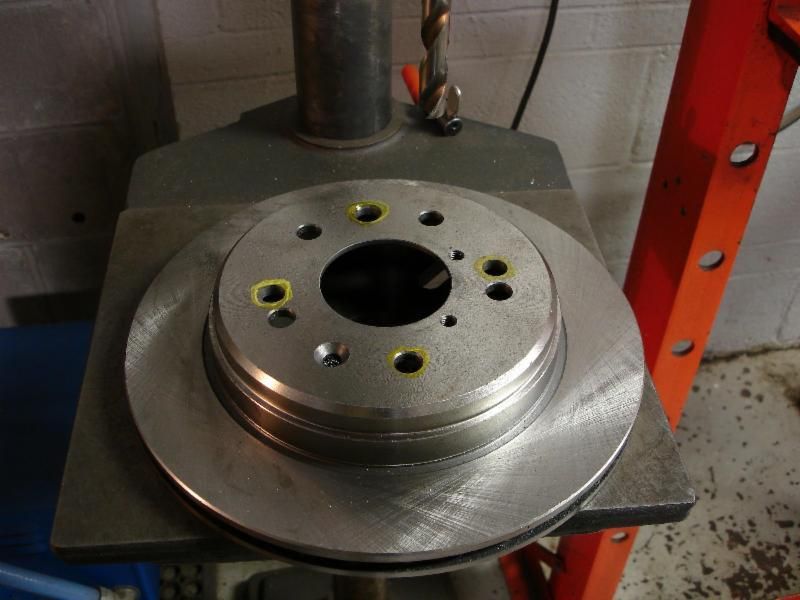
Note that two of the new 4 lug holes are close to 2 of the original 5 lug holes. This isn't an issue.
If you are going to use the OE 12mm lug studs, the 1/2 holes drilled in the rotor will provide plenty of clearance. If you are using 1/2 studs like I am you will need drill the holes out to 9/16.
Tools:
1 4 lug base model FC brake rotor to be used as a drill pattern - I used a front rotor but it would have been better to use both front and rear rotors as patterns - buy the cheapest ones you can find.
2 1/2x2.5" fine thread bolts
2 1/2" 20 tappered lug nuts
1 1/2" drill bit
1 big clamp
1/2" Drill Press

Here is the rear rotor that I am going to drill

Because the 4 lug and 5 lug patterns share the same bolt circle (4.5") one of the lug holes on the 5 lub rotor will be reused. To begin the process, bolt the 4 lug rotor to the 5 lug rotor. Make sure that the rotors are centered and the bolt/nut is tight. Note that the tappered end on the lug nut will help to center the holes in each rotor.
Make sure you clamp the rotor to the drill press and drill the first hole. Once you have the first hole drilled, insert the second bolt/nut and tighten it. Now the rotors are held together using two bolts. Drill the remaining 2 holes.

Here is the finished product

Note that two of the new 4 lug holes are close to 2 of the original 5 lug holes. This isn't an issue.
If you are going to use the OE 12mm lug studs, the 1/2 holes drilled in the rotor will provide plenty of clearance. If you are using 1/2 studs like I am you will need drill the holes out to 9/16.
Thread Starter
Joined: Nov 2006
Posts: 1,578
Likes: 288
From: Parkville, Mo

Yeah I have seen this setup. A friend of mine had an SCCA GTL Nissan Sentra with a 3 link and a bottom mount watts link. It seemed to work just fine.
The only negative is that roll center isn't very adjustable and can be pretty low depending on the diameter of the rear tires.
The only negative is that roll center isn't very adjustable and can be pretty low depending on the diameter of the rear tires.
Roll Center: Do you have a feel for what's optimal on an FB? My G-Force panhard had the nominal roll center set about 4 inches below axle centerline (adjustable up or down about an inch). A horizontal watts link would put it about 7 inches below centerline.
Ground Clearance: This definitely concerns me so I'll make some drawings to check it. I'm running 15" wheels with 225/50 tires, but I'll lose some clearance with my larger Toyota 8 pumpkin.
Also, it looks like you must be using springs with flat ends top and bottom. Where did you find them in the correct rate? I need 8" long ones at approx. 200 lb rate. Most of the ones I find at that length have rates that are too high.
Thread Starter
Joined: Nov 2006
Posts: 1,578
Likes: 288
From: Parkville, Mo
Good points.
Roll Center: Do you have a feel for what's optimal on an FB? My G-Force panhard had the nominal roll center set about 4 inches below axle centerline (adjustable up or down about an inch). A horizontal watts link would put it about 7 inches below centerline.
Ground Clearance: This definitely concerns me so I'll make some drawings to check it. I'm running 15" wheels with 225/50 tires, but I'll lose some clearance with my larger Toyota 8 pumpkin.
Thread Starter
Joined: Nov 2006
Posts: 1,578
Likes: 288
From: Parkville, Mo
Basically you can source these from a Circle Track supplier. www.pitstopusa.com is pretty good to deal with. Colemanmachine is another great company to deal with. There are allot of circle track vendors out there maybe even a brick and motar busines near you.
These are 2.5" coil over springs. The springs I have under the car at the moment are 275lb 7" springs. I will probably need 6" springs on the rear of the car to get the ride height I want. For rates I am planning on running 225lb to 300lb springs for the rear depending on the track and conditions.
Basically you can source these from a Circle Track supplier. www.pitstopusa.com is pretty good to deal with. Colemanmachine is another great company to deal with. There are allot of circle track vendors out there maybe even a brick and motar busines near you.
Basically you can source these from a Circle Track supplier. www.pitstopusa.com is pretty good to deal with. Colemanmachine is another great company to deal with. There are allot of circle track vendors out there maybe even a brick and motar busines near you.
Thread Starter
Joined: Nov 2006
Posts: 1,578
Likes: 288
From: Parkville, Mo
Elwood,
You're probably not going to find a 5" spring that is short enough with two flat ends. You'll need a pig tail mount on the rear axle. You could always cut them off of a stock rear axle housing.
With a pigtail mount on the axle you could buy some tall - 13" - low rate springs and cut them down. We had the best luck using Eibach 100-125lb 13" springs and then cutting them in half. This nets a 225-250 spring that is the right free height.
Before figuring this out we were using 8" 175lb springs and shortening them. This worked but they were prone to coil bind. The taller springs the Eibach sells have fewer active coils so coil bind isn't an issue.
I have used Suspension Springs for years and they are a good spring for the money. They don't offer the light weight springs that Swift and Eibach make but for coil overs they are a good choice.
If you want to switch over to 2.5" coil overs you have to cut out the factory spring mount that is on the body. I used a plasma cutter to remove mine and replaced them with these;
The 2.5 coil overs are lighter than the 5 inch springs but on the downside you can't cut them down to change their rate. So you have to buy the specific rates that you want.
Another option would be to go to coil over shocks. I can't do this beacause of the rule set that I am building to. That said, I would consider it if rules/budget allow.
You're probably not going to find a 5" spring that is short enough with two flat ends. You'll need a pig tail mount on the rear axle. You could always cut them off of a stock rear axle housing.
With a pigtail mount on the axle you could buy some tall - 13" - low rate springs and cut them down. We had the best luck using Eibach 100-125lb 13" springs and then cutting them in half. This nets a 225-250 spring that is the right free height.
Before figuring this out we were using 8" 175lb springs and shortening them. This worked but they were prone to coil bind. The taller springs the Eibach sells have fewer active coils so coil bind isn't an issue.
I have used Suspension Springs for years and they are a good spring for the money. They don't offer the light weight springs that Swift and Eibach make but for coil overs they are a good choice.
If you want to switch over to 2.5" coil overs you have to cut out the factory spring mount that is on the body. I used a plasma cutter to remove mine and replaced them with these;

The 2.5 coil overs are lighter than the 5 inch springs but on the downside you can't cut them down to change their rate. So you have to buy the specific rates that you want.
Another option would be to go to coil over shocks. I can't do this beacause of the rule set that I am building to. That said, I would consider it if rules/budget allow.
Thanks for the wealth of info! I'm leaning towards putting pigtail spring seats on my axle. Do you have any suggestions on where to find a pair? I don't want to destroy a good axle housing just to cannibalize the spring seats.
Thread Starter
Joined: Nov 2006
Posts: 1,578
Likes: 288
From: Parkville, Mo
Well, you could cut the spring pockets out of a 79-2004 mustang front control arms. Those cars used a 5" spring with a pig tail on the bottom. With some trimming that would be a very effective mount.
Thread Starter
Joined: Nov 2006
Posts: 1,578
Likes: 288
From: Parkville, Mo
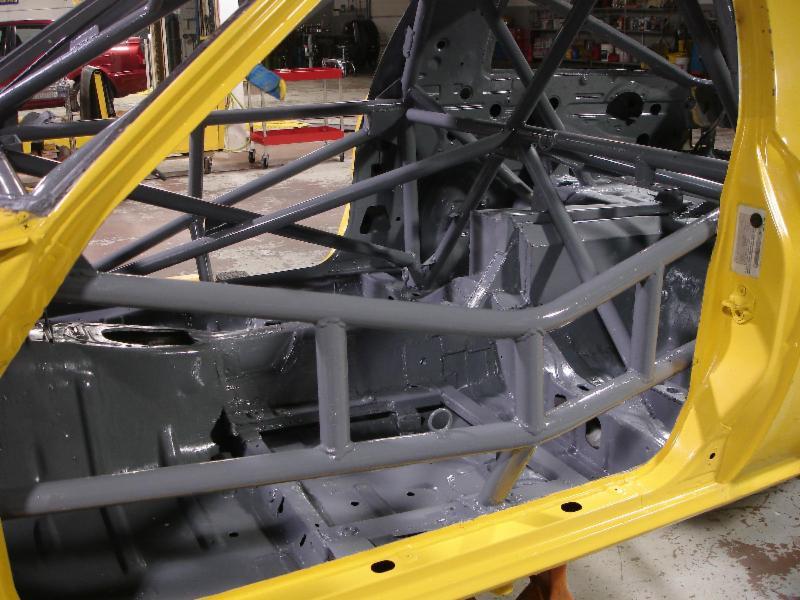
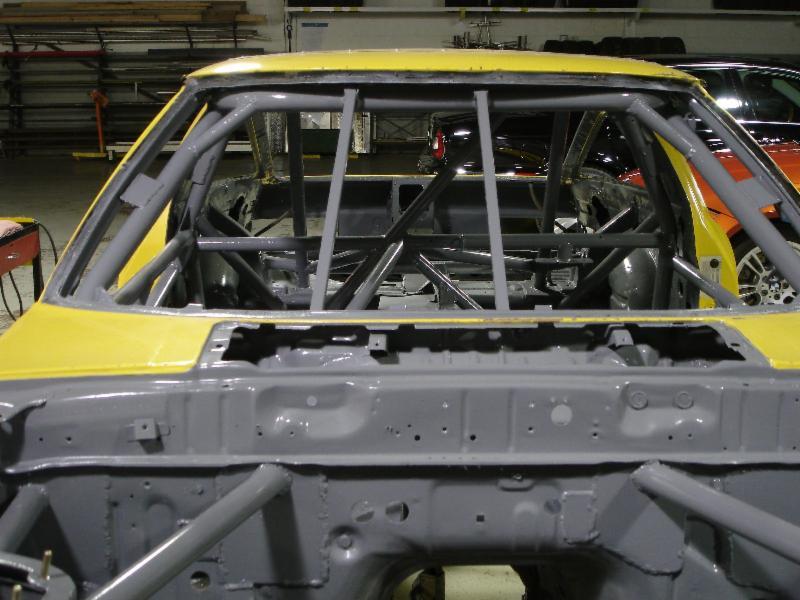
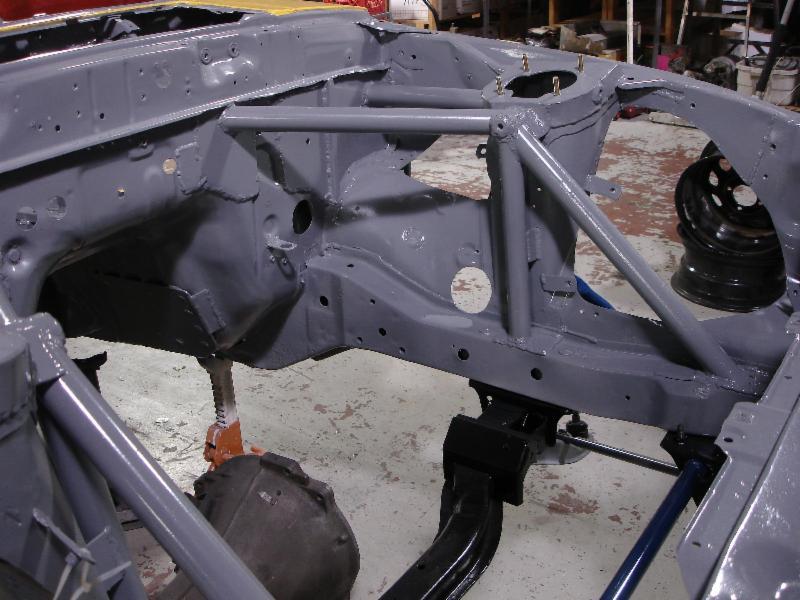
Paint
I painted the interior, engine compartment and rear of the car. I used Rustoleum brush and rattle can Smoke Gray. I also repainted the door jams. Really makes the car look cleaner.


Thread Starter
Joined: Nov 2006
Posts: 1,578
Likes: 288
From: Parkville, Mo
Thanks guys!
Yeah a brush on the lower surfaces and a rattle can on the upper surfaces so they would be smoother. I ended up spraying most of the insides like the roof and it was a pain in the ***. The brush painted sections seem to be holding up a little better than the sprayed sections. Took about a month start to finish.
The shop is the Santa Fe Garage. I rent a stall from them - have for a long time. Santa Fe Garage started as a hobby shop for racers and slowly it has turned into a serious repair shop specializing in alignments and high end tire work. The do allot of Viper work. It would not be possible for me to do this work at home. www.santafegarage.com
Thread Starter
Joined: Nov 2006
Posts: 1,578
Likes: 288
From: Parkville, Mo
Struts
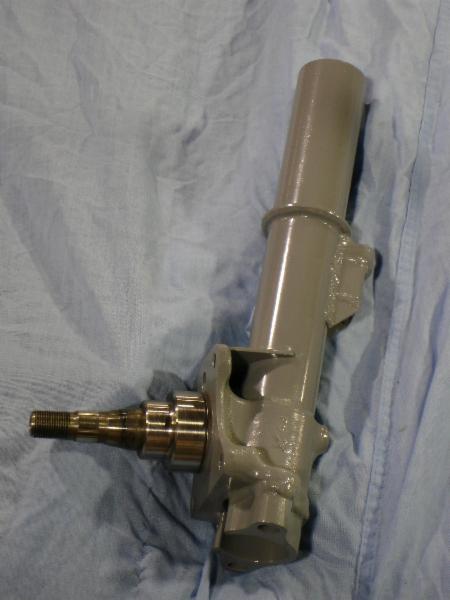
Here are some shots of the struts I am using on the car.
These started life as big bearing spindles from an 84-85 model car. I have been using them on this car since 2006 or so. The OE tubes were cut and machined out of the spindles on a lathe. New 2"diameter tubes sources from ground control were welded in so that Koni racing struts can be used.
Here is a comparison between the finished strut and an original one
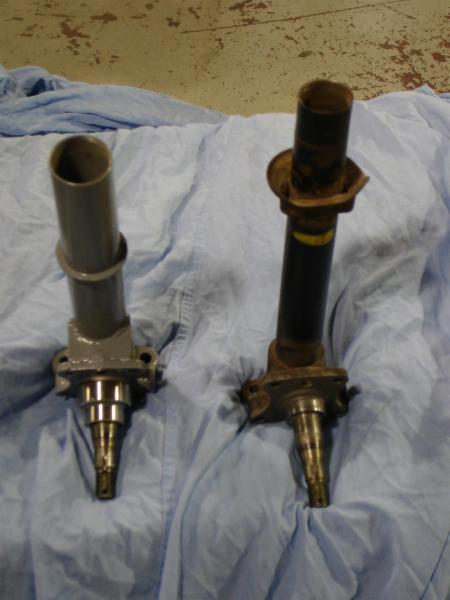
Before being repainted, I sand blasted them and had them checked for cracks
Here is a shot after paint and the installation of the RE-Speed big brake spacers. I have also added reinforcments between the spindle and the tube as well as a sway bar mount on the back of the tube. A 1" spacer is welded to the bottom of the strut tube. These do not add additional ackerman.
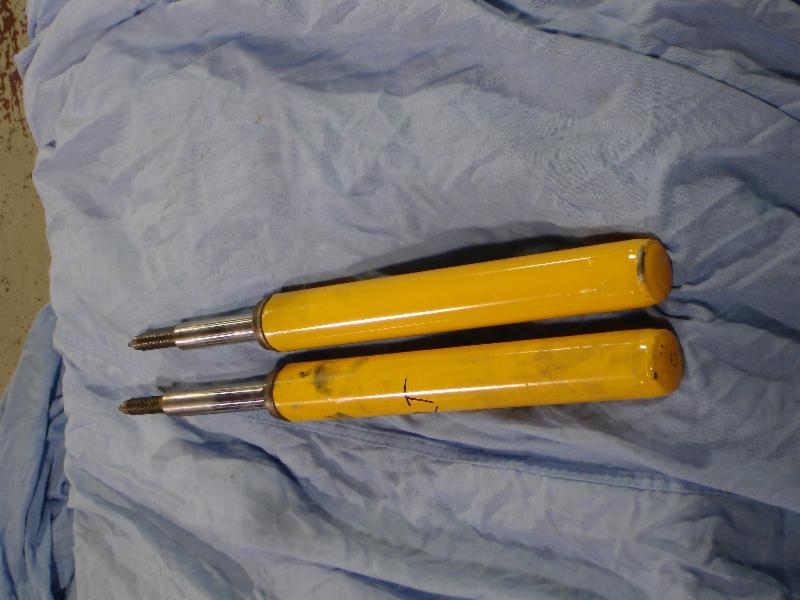
Koni inserts - Single Adjustables
These started life as big bearing spindles from an 84-85 model car. I have been using them on this car since 2006 or so. The OE tubes were cut and machined out of the spindles on a lathe. New 2"diameter tubes sources from ground control were welded in so that Koni racing struts can be used.
Here is a comparison between the finished strut and an original one

Before being repainted, I sand blasted them and had them checked for cracks

Here is a shot after paint and the installation of the RE-Speed big brake spacers. I have also added reinforcments between the spindle and the tube as well as a sway bar mount on the back of the tube. A 1" spacer is welded to the bottom of the strut tube. These do not add additional ackerman.

Koni inserts - Single Adjustables

Thread Starter
Joined: Nov 2006
Posts: 1,578
Likes: 288
From: Parkville, Mo
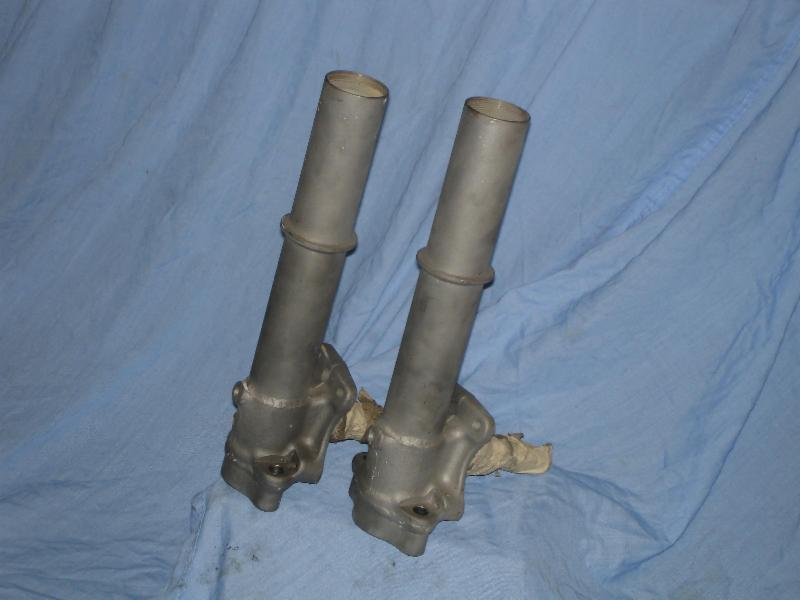
Another 1" drop
I have been using a 1" strut spacer on my car for a long time. When I bought the car is had G-Force Ackerman spacers installed but they didn't fit my driving style. So I installed non-ackerman spacers and welded them in place. By the way, the stock RX7 suspension already has Ackerman steering so the "Ackerman" style spacers just add more. Great for Solo.....not some much for club racing in my opinion.
For the STU conversion I made a few more mods to the struts. The 12mm bolt holes were drilled out to 1/2" and the area around the bolt holes were spot faced so that bolts and nuts can be used to hold the struts to the steering knuckles.
Next, because STU allows for a lower ride height I decided to use a second 1" spacer on each strut. This sounds like a simple enough change but it added allot more complexity to the car. For example, I had to raise the strut tops to accomodate the lower ride height.
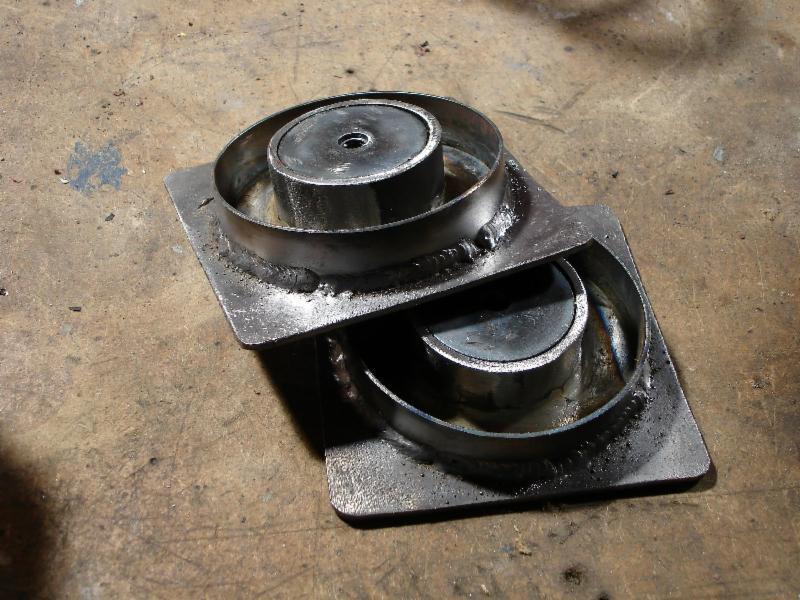
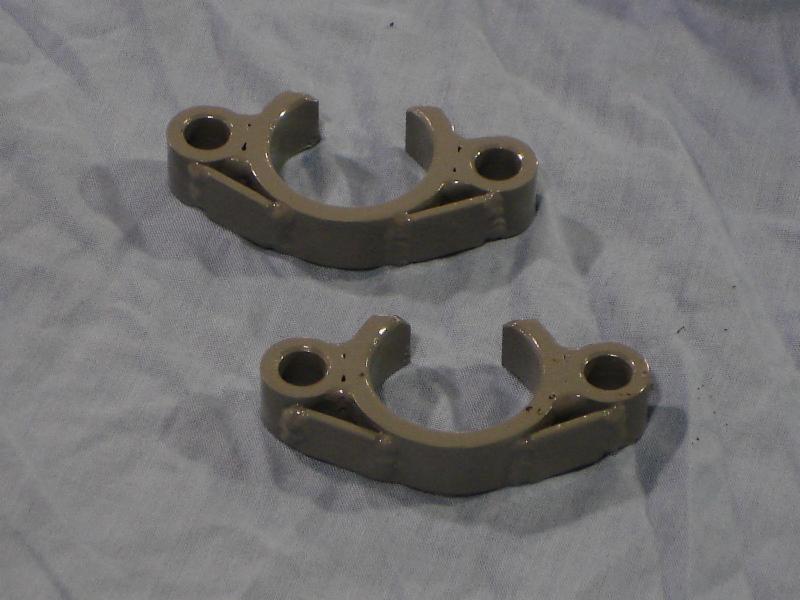
These are the spacers - these are from G-Force
[
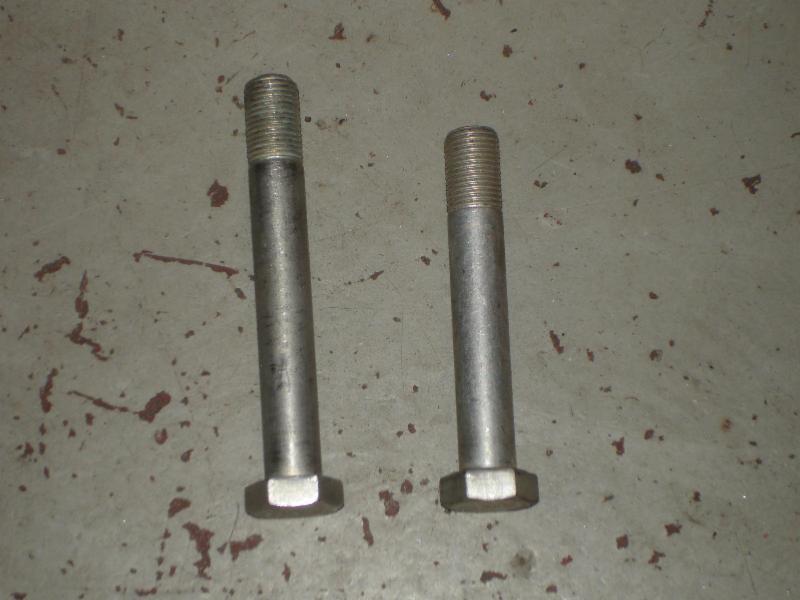
Here are the bolts I am using to hold the struts to the steering knuckles - they are AN 8 MIL spec bolts. AN bolts are listed in increments of 1/16" so an AN 8 is a 1/2" bolt. Note the long shoulders on the bolts. This means there are no threads in shear.
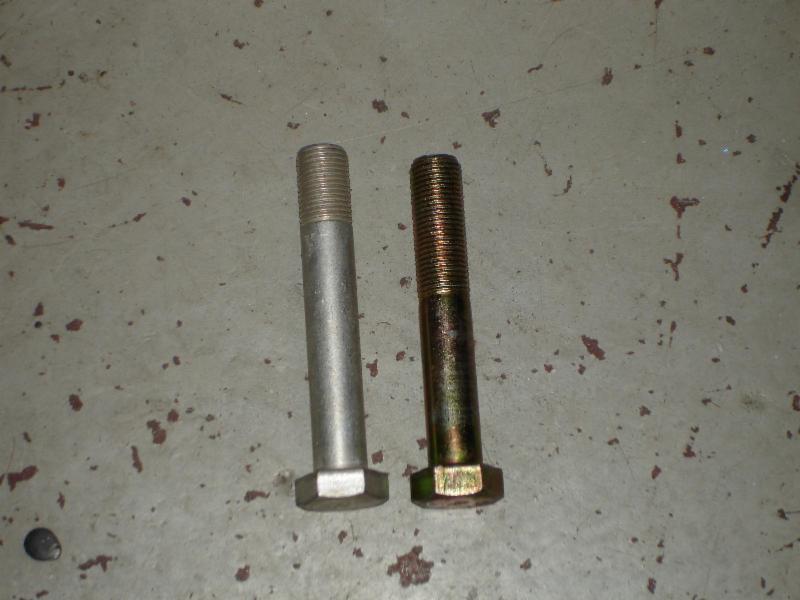
Here is a comparison between standard Grade 8 bolts and AN bolts of the same length
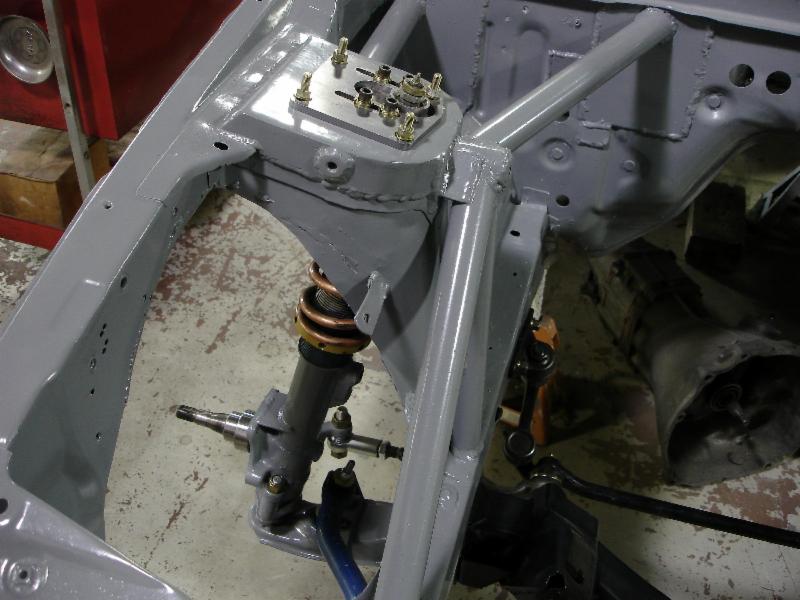
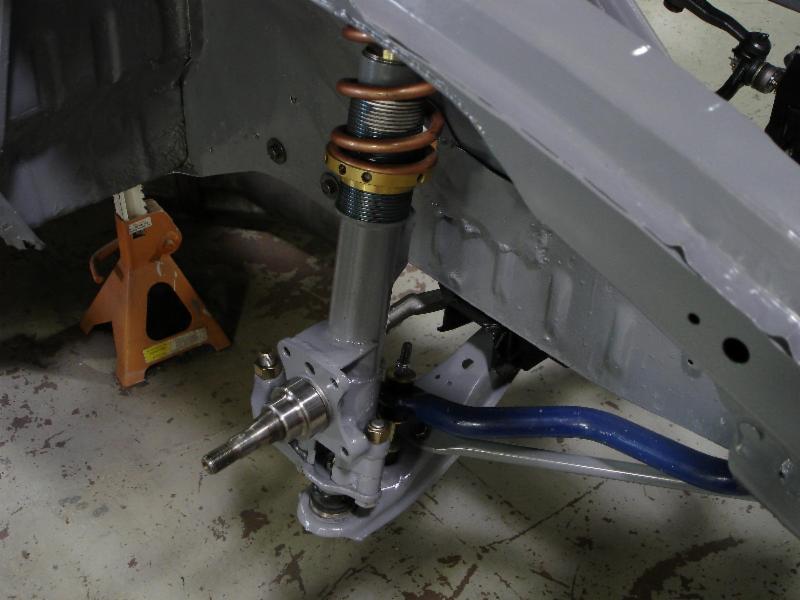
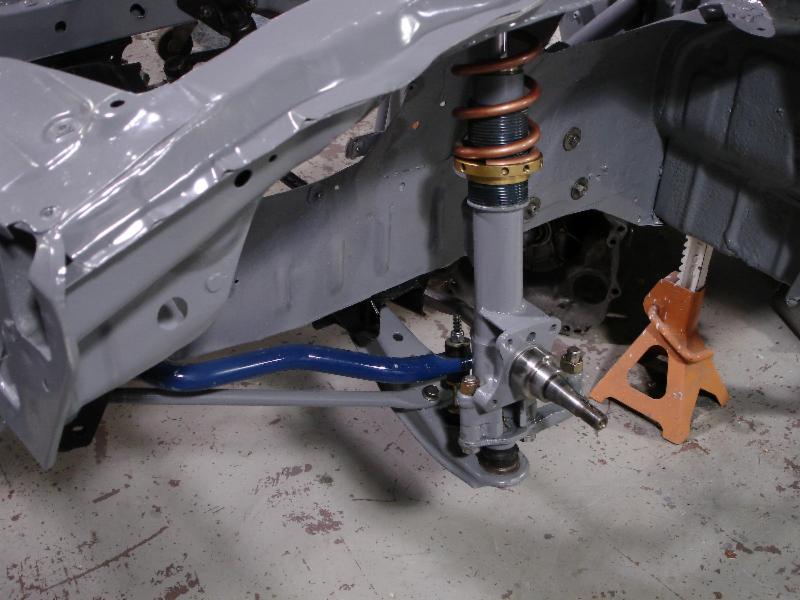
Here are some shots of the struts installed.
For the STU conversion I made a few more mods to the struts. The 12mm bolt holes were drilled out to 1/2" and the area around the bolt holes were spot faced so that bolts and nuts can be used to hold the struts to the steering knuckles.
Next, because STU allows for a lower ride height I decided to use a second 1" spacer on each strut. This sounds like a simple enough change but it added allot more complexity to the car. For example, I had to raise the strut tops to accomodate the lower ride height.
These are the spacers - these are from G-Force
[

Here are the bolts I am using to hold the struts to the steering knuckles - they are AN 8 MIL spec bolts. AN bolts are listed in increments of 1/16" so an AN 8 is a 1/2" bolt. Note the long shoulders on the bolts. This means there are no threads in shear.

Here is a comparison between standard Grade 8 bolts and AN bolts of the same length

Here are some shots of the struts installed.


Thread Starter
Joined: Nov 2006
Posts: 1,578
Likes: 288
From: Parkville, Mo
The current spring rates are 400lbs. Probably going to add 450 and 500lb springs to my inventory.
A friend of mine does the TIG work - he is really good. The braces are a good idea as we have had struts fail in that area before.
A friend of mine does the TIG work - he is really good. The braces are a good idea as we have had struts fail in that area before.
Thread Starter
Joined: Nov 2006
Posts: 1,578
Likes: 288
From: Parkville, Mo
Yeah and more than just the strut tops. I have fitted an FC 4 lug hub to one of the spindles and.....drum roll.....the 11" turbo rotors hit the end of the control arms. I will be making some spacers to fix this....film at 11:00 as they say.

