When you click on links to various merchants on this site and make a purchase, this can result in this site earning a commission. Affiliate programs and affiliations include, but are not limited to, the eBay Partner Network.
That's where I put my coils. I flipped them around so I didn't have to look at the harness connections. It's just a piece of scrap aluminum with a few holes drilled to line up with factory holes and the coils are mounted with some long screws and spacers.
What's the deal with the two 3-port boost solenoids? Are you doing C02/compressed air dome control? I switched to it this year and will never go back to conventional boost control ever again. It's deadnuts simple to setup. You also have the flexibility of a 4 port but with much more resolution and easier/faster for the PID to adjust. I'm running 20psi with a 3psi spring and it holds boost +/- 3kpa on target over a 4th gear pull. I used a Escalade air ride compressor and a cheap 1/2 gal tank mounted in the storage bins to control dome pressure. I think I have about $200 in the whole setup, including tank, compressor, reg, fittings, tubing and solenoids.Highly recommend it.
What's the deal with the two 3-port boost solenoids? Are you doing C02/compressed air dome control? I switched to it this year and will never go back to conventional boost control ever again. It's deadnuts simple to setup. You also have the flexibility of a 4 port but with much more resolution and easier/faster for the PID to adjust. I'm running 20psi with a 3psi spring and it holds boost +/- 3kpa on target over a 4th gear pull. I used a Escalade air ride compressor and a cheap 1/2 gal tank mounted in the storage bins to control dome pressure. I think I have about $200 in the whole setup, including tank, compressor, reg, fittings, tubing and solenoids.Highly recommend it.
You want independent control of the top and bottom of the wastegate. If you use a single 4, it�s always trying to control both sides equally and that doesn�t work in all scenarios. You have some control from about 20-55% duty but above 55-60 you are all in no matter what.
With a 3 port controlling the top port of the WG, you have a range of control from about 15-90% duty.
Once your specific setup has more backpressure than the Spring PSI + Top Port Boost PSI (blow the gates open) you then start bleeding off Boost from the bottom port of the WG to attempt to keep the gate(s) closed for longer.
If you monitor backpressure and gate position, you will know exactly when to start pulsing the bottom solenoid.
That's pretty similar concept to dome control, except you have 70psi of regulated air to press down on the dome. This allows you to very very quickly hit your target pressure since you're not relying on the turbo to make source pressure.
I agree about eMap. I did notice that as I made higher and higher MAP, it required slightly more dome pressure to make target boost. For example, at 4000rpm, every kPa of pressure added to the dome equaled a kPa above spring pressure. At 7000 rpm, I had to add about 10 more kPa to make target boost (230 kPa-a). At least with MS3Pro, �Open loop� dome control is actually a closed loop PID that targets a specific kPa value in the dome. �Closed loop� dome control targets a specific boost kPa value buy varying the dome pressure target. Once you build the reference chart of known good values, it has a good starting point and the PID takes very little fussing with.
It looks like you already have the solenoids and plumbing that would work with dome control, you would just need to add a pressure source to the red solenoid in your diagram. And you�d need a dome pressure transducer for the PID.
Right, except for this is a street car and will get driven thousands and thousands of abusive miles a year once completed. The fact is that you don't NEED a secondary source if you run it this way. Smart logic systems like this on cars is what makes them so cool.
As always, I love your input and how you're always able to see something differently than others. It's a breath of fresh air.
Now it's time to locate the last of the bung locations for exhaust manifold, charge piping, AI, etc and choose what color cerakoting I want to run with on all this stuff.
I keep getting asked why this car isn't finished yet. I just laugh, point, and enjoy the fact that things are laid out how I wish. Good planning takes time. Enjoy the moment.
An alan banjo bolt might better suit you on that oil return line.
Yes, so I called ATP Turbo who makes this, as well as a few others and no one makes a 30-35mm variant of M14x1.5. What I would end up having to do is this, then shaving this head down:
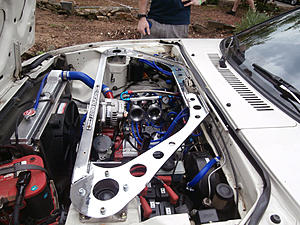
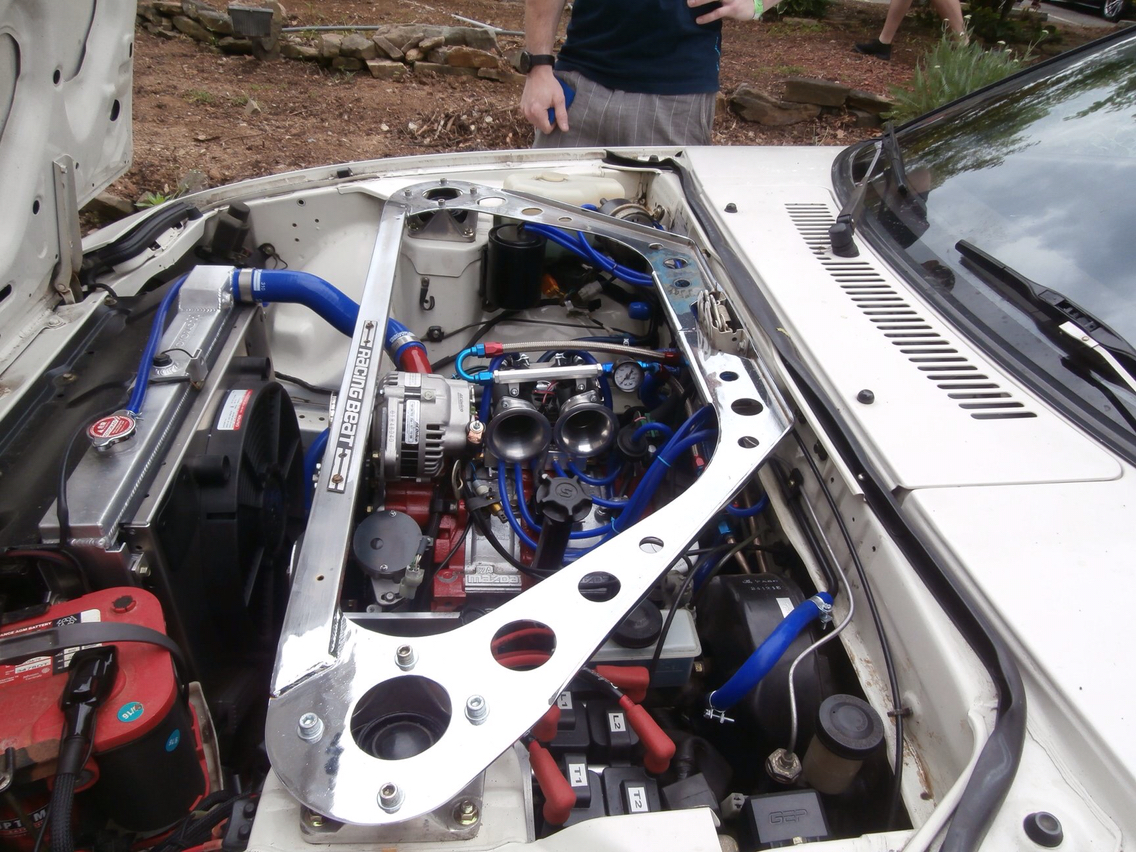
Sweet. I finally decided to stop lagging and welded up the majority of my turbo manifold for fitment. Its way far down and back with the center section in line with the center iron. Also, did you go to sevenstock?
Sweet. I finally decided to stop lagging and welded up the majority of my turbo manifold for fitment. Its way far down and back with the center section in line with the center iron. Also, did you go to sevenstock?
Didn't go to Sevenstock because I was working on this, but I am going to GTA this weekend to tune a few cars and catch up with a few buddies.
Ohh, here's today's quick installation of a few parts. Getting back to now...
I PROMISE I'll stop doing camera to IG to Facebook to here because the quality and color is abysmal.
Fuel line coming off the secondary rail looks dangerously close to the turbo in the photos.
The compressor is pretty cold, but yea, I'm planning on redoing it shorter. Good call. Very hard angles to approach and that arc helped the stiff PTFE line not run into trouble.
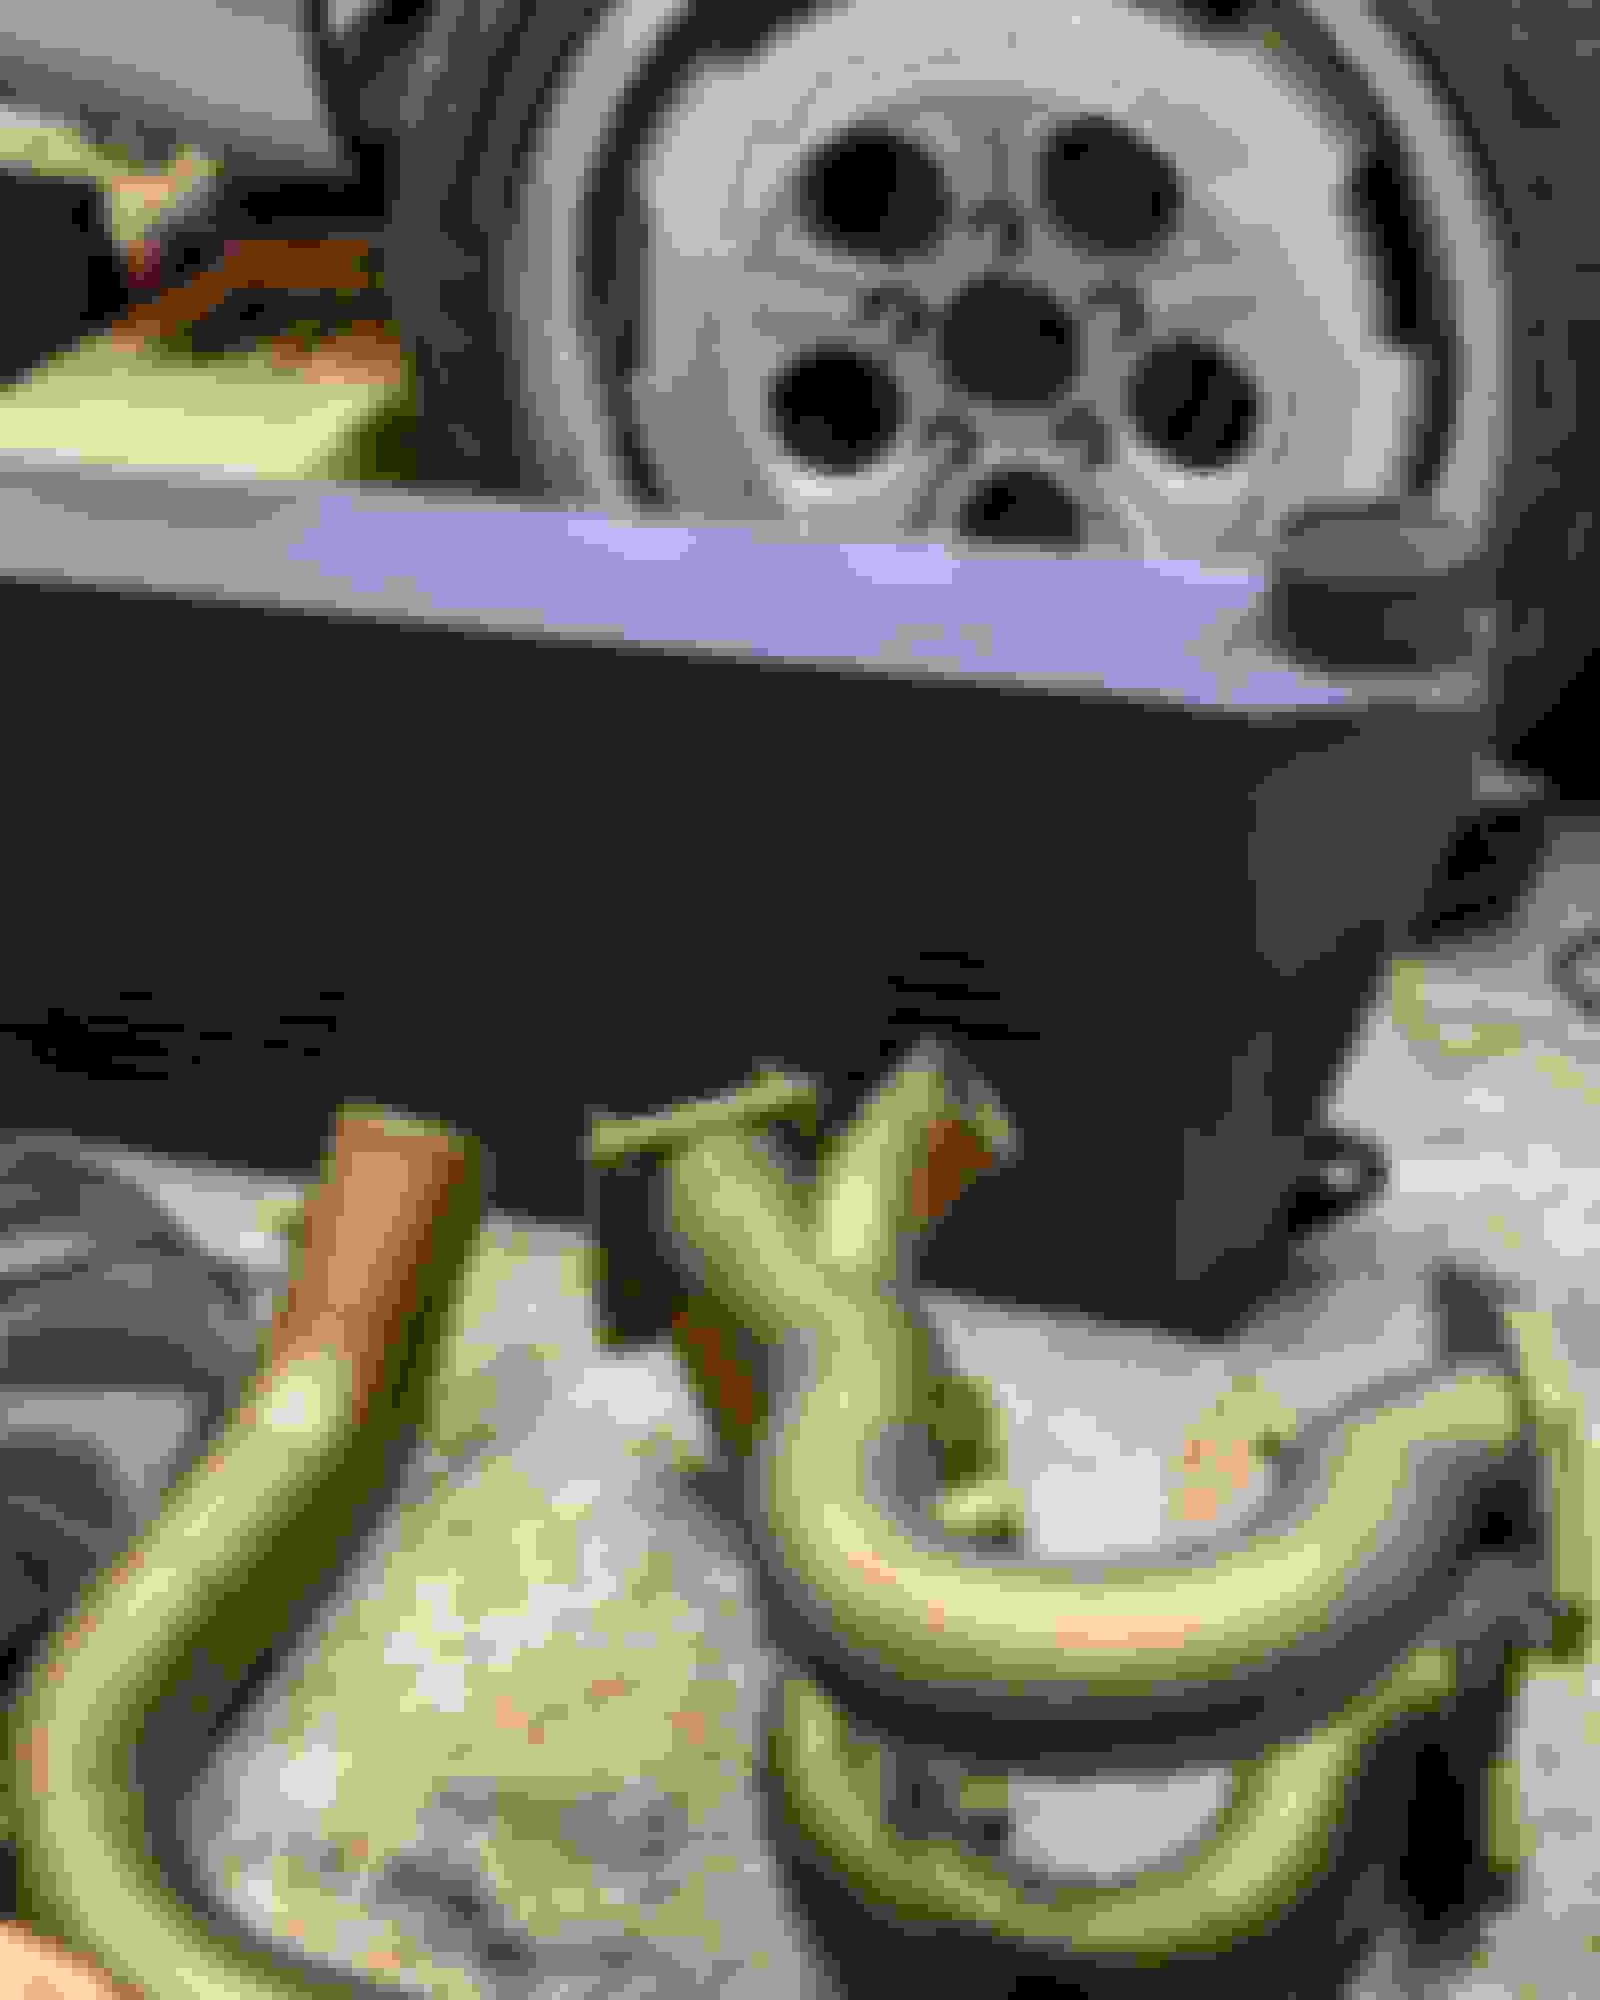
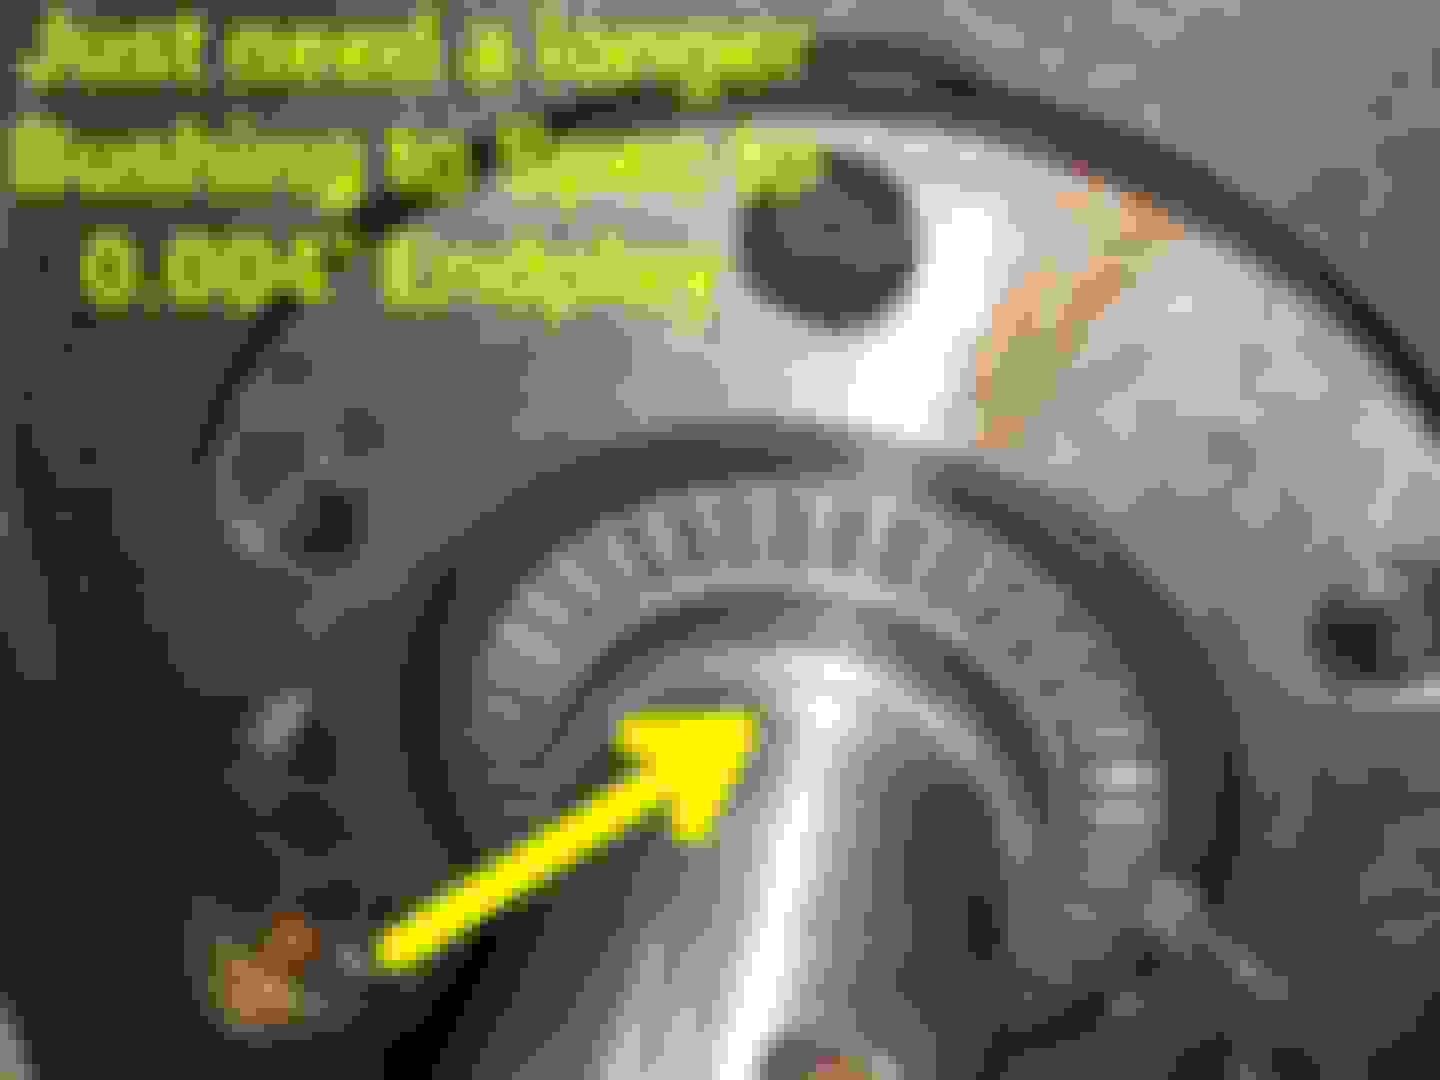
Just working on assembly for now, but I managed to set TDC on my 60-2 trigger wheel this week and am incredibly frustrated now learning that this motor has incorrect end-play at the Front Cover. So tomorrow I'll be grinding away at my current eccentric shaft spacer to attempt 0.004" endplay, not 1/8"... Oh well, might just be time to overhaul the whole motor. Totally sucks. I've been tuning cars all around the world this year. Pretty cool seeing some of my favorites come to completion. Tomorrow I start the journey with a local, Alex, who wants to crush SakeBomb's dyno record. I think we'll be REALLY close. Can't wait to see what happens.
All of the Bosch 044 stuff is now for sale if anyone needs it. I'll be selling it all NEW in Box, below cost, because I'm funding all the wiring and such (which is expensive...).
In the meantime, I'll be setting End Play today with the newly ordered Mazda Parts and final assembling once the rest of the brand new stuff comes in for it.
With the front cover off and all the accessories off, it gives me a chance to detail the engine bay and build in the power steering lines. I'm actually going to aim for 0.006" to handle a bit more revs safely. The engine previously was set to ZERO (or overly clamping torrington bearings with a preload!), so I'm glad I checked and found this.
This week has been incredibly busy with cars, rain, building a new website, tuning, and finally getting some time to do my eccentric shaft endplay. Turned out really good.
It's just a start (not bad for a day!), but eventually will have 60+ products and make ease of access to parts a whole heck of a lot easier. I think the layout works.
Got my first message from a possible client. Man, some people have ALL the jokes.
Back to the cars...
Here's the front cover coming together back with a few accessories installed. Eccentric shaft has just a hair of play which when compared to a feeler gauge (0.006"), looks to be right on the money. I'm happy. Anything is better than 0.
This build is Bonkers!! I just spent alittle over an hour reading from start to finish.
I really enjoy the technical discussions along with all the awesome fab you've done! I'm actually surprised with how much you've done that you went ahead and used the CXracing thermostat neck instead of making a quick one yourself. I had fitment issues with mine that I purchased..maybe 2 years ago? The bolt holes were not drilled correctly and the flange was far from flat.
 08-14-19, 07:32 AM


 Smart logic systems like this on cars is what makes them so cool.