
Project Resurrection: Running Log

Thread Starter
Joined: Jun 2008
Posts: 8,376
Likes: 28
From: Chino Hills, CA
It's the locknut that holds the threaded cover which the steering column goes into. 68mm, made of thin, soft iron, and (it turns out) held in place with locking compound.
I got it off tonight; a combination of PB Blaster, acetone, a carefully tightened pipe wrench, and a 4-lb crosspeen hammer got'er done. The cast-iron cover itself had to be urged along with a punch driver and hammer until it turned about a half-turn; after that, padded pliers got it the rest of the way out.
Beauty, now I can fully clean all the 30-year-old sludge out of the recesses of the unit. Truly gross down in there. Like liquid rust mixed with snot. Pretty amazing smell, too.
Sounds like you are making some progress. I took a steering box apart once after I removed the column to use for a rack and pinion swap. Theres so many little parts in there its amazing it works at all! lol


Joined: Mar 2001
Posts: 31,851
Likes: 3,239
From: https://www2.mazda.com/en/100th/
with peepers i pulled the box, blasted it out as well as i could, filled with redline synthetic, and adjusted it on the bench wrong. i spent another day or so adjusting it on the car....
on the 82+ boxes they added an adjustment, so you have play, effort and the big 65mm nut that doesn't budge. go the wrong way and you can have tons of slop AND high effort!
Thread Starter
Joined: Jun 2008
Posts: 8,376
Likes: 28
From: Chino Hills, CA
"...tons of slop AND high effort! "
Which is to say, 'also British.'
I'm hoping to get the bench adjust dialled in, as adjusting that bugger on the car looks damn near impossible without specialized tools.
So, how much of a PITA was cutting the grooves in the steering column bolts, to get them out? And are new break-off ones still available, or did you re-use them?
^It's not difficult, just use a small cutoff wheel on a dremel to cut the slots, use a screwdriver to remove them. Toss them and just replace them with some 8x1.25 hex head bolts to make it easier...
Oh and it helps if you have the box/column disconneted from the car and lowered a bit to give the dremel some room, otherwise its very close to the dash and you can risk damaging it (the dash)
Oh and it helps if you have the box/column disconneted from the car and lowered a bit to give the dremel some room, otherwise its very close to the dash and you can risk damaging it (the dash)
Joined: Mar 2001
Posts: 31,851
Likes: 3,239
From: https://www2.mazda.com/en/100th/
"...tons of slop AND high effort! "
Which is to say, 'also British.'
I'm hoping to get the bench adjust dialled in, as adjusting that bugger on the car looks damn near impossible without specialized tools.
So, how much of a PITA was cutting the grooves in the steering column bolts, to get them out? And are new break-off ones still available, or did you re-use them?
Which is to say, 'also British.'
I'm hoping to get the bench adjust dialled in, as adjusting that bugger on the car looks damn near impossible without specialized tools.
So, how much of a PITA was cutting the grooves in the steering column bolts, to get them out? And are new break-off ones still available, or did you re-use them?
i usually just tap them out with a punch/chisel/screw driver, its pretty rare that they are tight, and access is good. sometimes i even just tap them back in
sometimes i use a normal 8mm bolt, like on Mike #2's car, but that's more in case i need to move it and he forgot the key!
Thread Starter
Joined: Jun 2008
Posts: 8,376
Likes: 28
From: Chino Hills, CA
they are available H043-66-154 is the Mazda number.
i usually just tap them out with a punch/chisel/screw driver, its pretty rare that they are tight, and access is good. sometimes i even just tap them back in
sometimes i use a normal 8mm bolt, like on Mike #2's car, but that's more in case i need to move it and he forgot the key!
i usually just tap them out with a punch/chisel/screw driver, its pretty rare that they are tight, and access is good. sometimes i even just tap them back in
sometimes i use a normal 8mm bolt, like on Mike #2's car, but that's more in case i need to move it and he forgot the key!
Thread Starter
Joined: Jun 2008
Posts: 8,376
Likes: 28
From: Chino Hills, CA
Day 1293
It chose to rain again on Saturday, which made progress cleaning and painting impossible; too cold and humid for paint to dry properly, and when it comes to really messy cleaning efforts (like degreasing and decarbonizing housings) I prefer to do those outside where I can just rinse the leavings away with a hose. My garage has no sink!
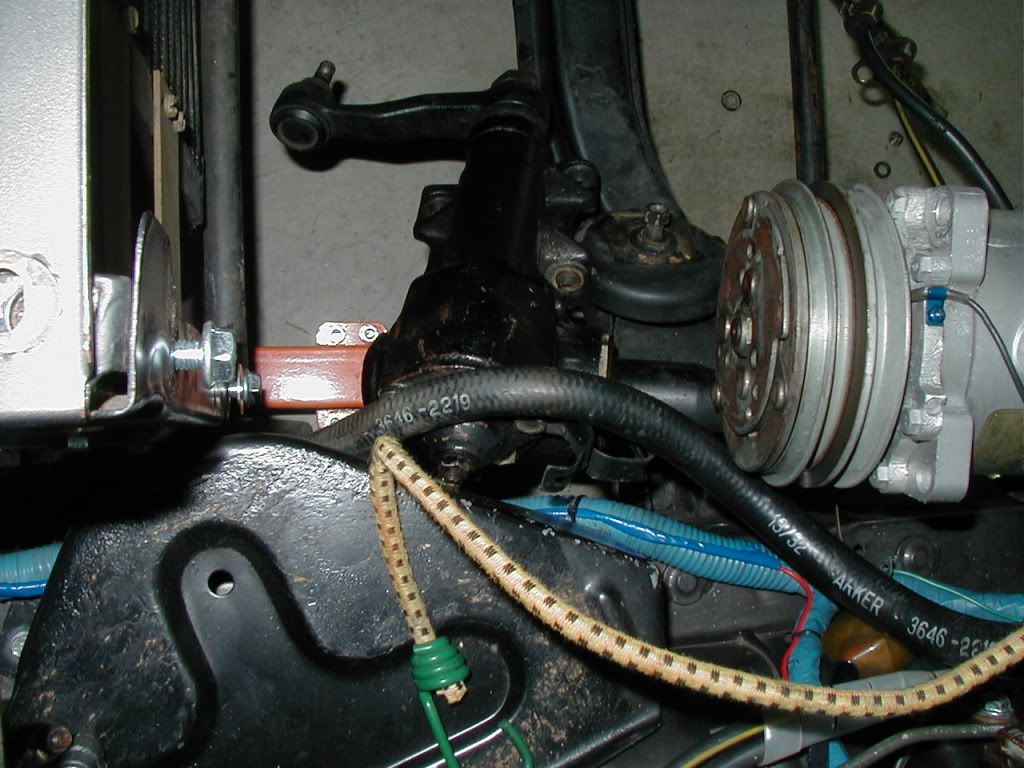
So instead, yesterday was a focused effort on the steering gear project; I finished disassembling and prepping the replacement gear for interior purge and paint, and got the original gearbox out of the car.
I do not see how it could be possible to get a steerning gearbox out of a 1st gen with the engine and wiring/plumbing still in place... and it would be utterly impossible when said car has air conditioning, as mine does. It was challenging enough to remove with the engine out.
But out it eventually came. One of the hardest parts is getting the welded-on nuts on the shaft cover through the hole in the floorboard. The shaft cover will ride againt the brake pedal lever on one side, and the floorboard hole on the other, until you have enough clearance with the gearbox forward of the front crossmember to rotate the gearbox.
I found it necessary to remove the left engine mount to get the box to clear... by fractions of an inch.
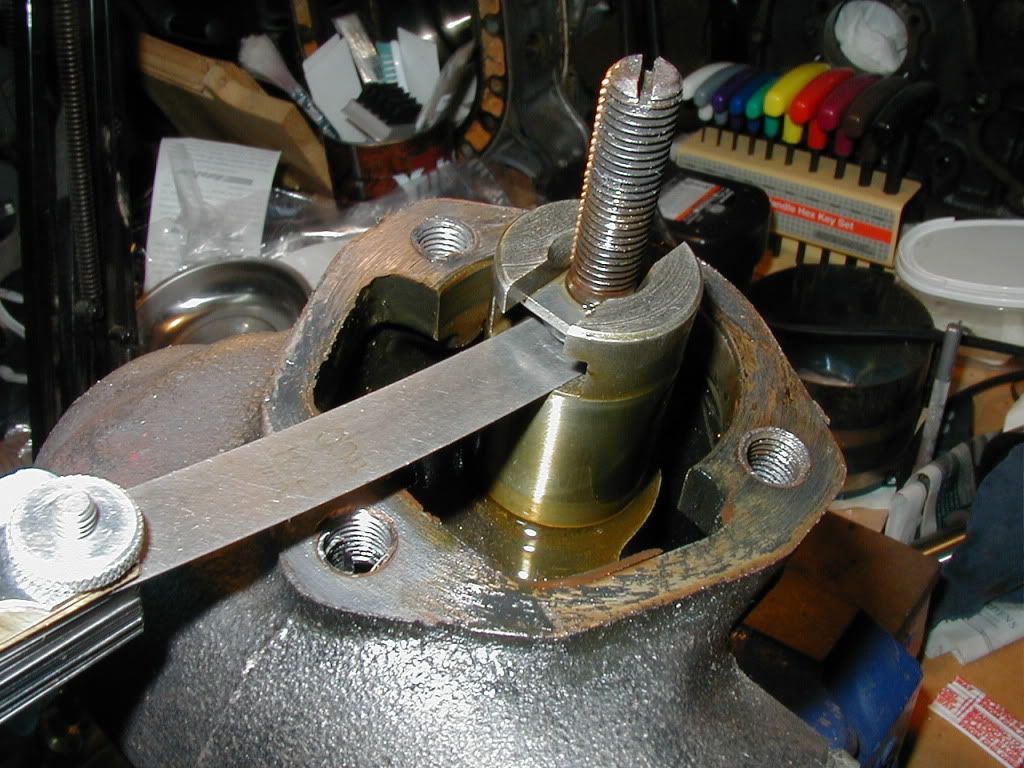
Some pix of that phase of the operation:
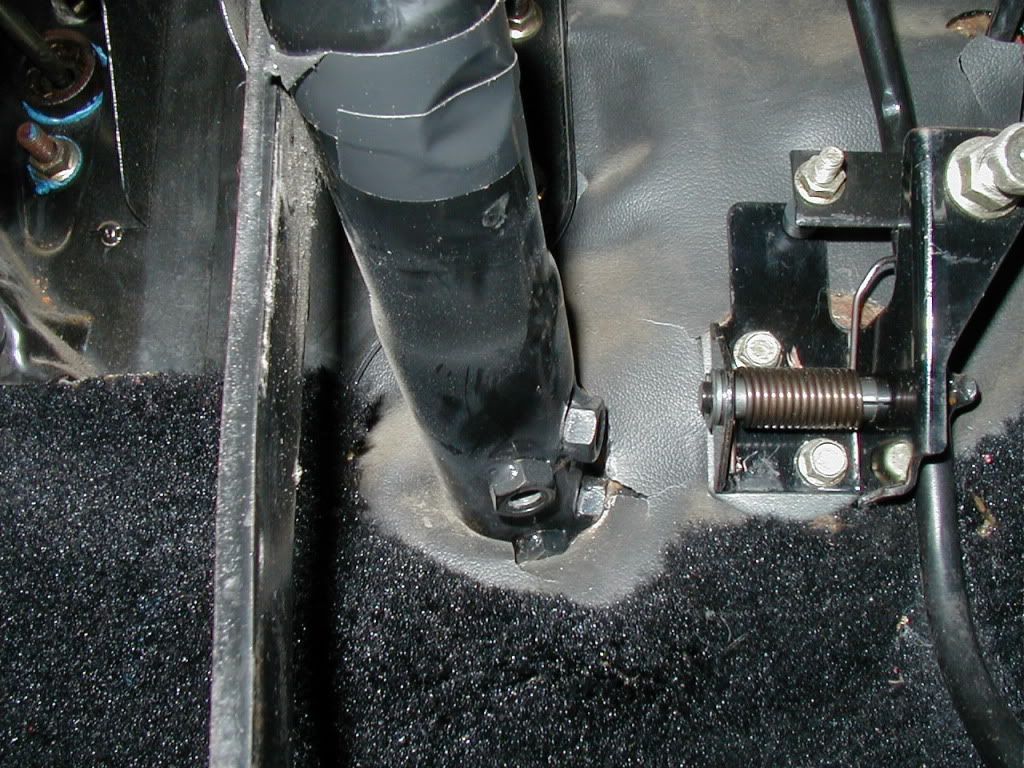
Getting the security bolts out of the lock proved to be most easily done using a Dremel tool with a small engraving bit to carve screwdriver slots in the bolt heads. "Easy," outside of having to be done 1) standing on your head, 2) with your eyes directly under all the sharp metal shards falling from the operation. Wear a face sheild, and put newspaper down on your carpet first!
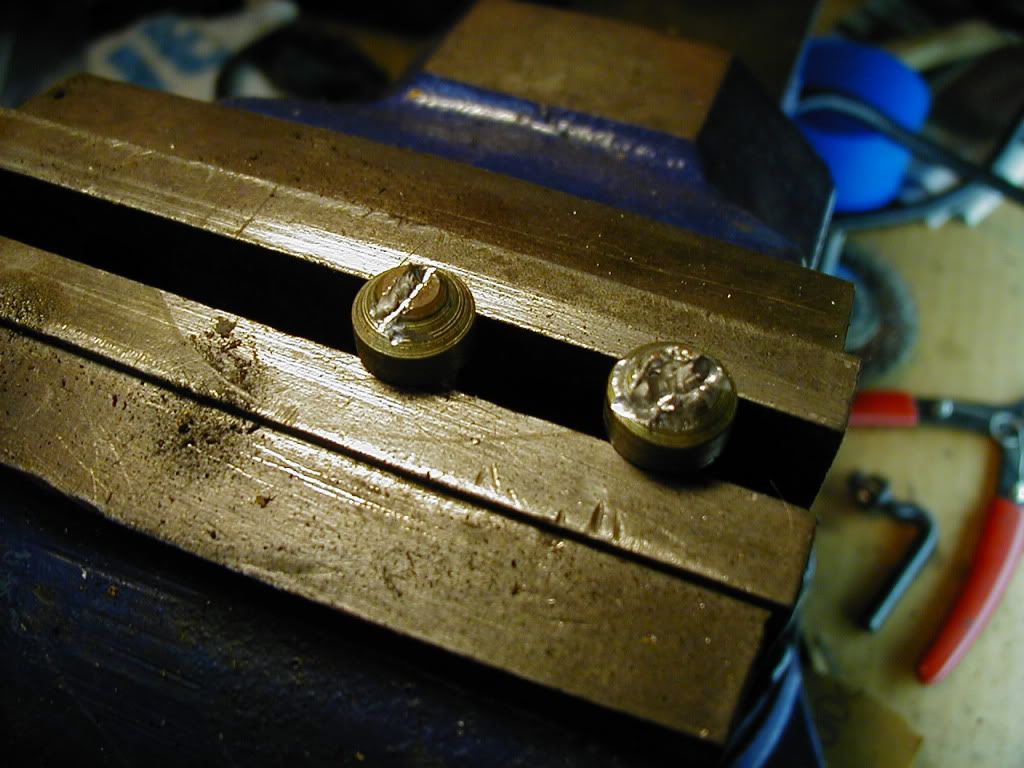
I plan to replace them with stainless tamper-proof screws instead; I have a good collection of anti-tamper bits around. Probably I'll go with a pinned Torx design.
I've got a lot of very good pix of the inside of the steering gearbox; provided my refurb works out, I'll likely do a separate thread on refurbishment of that puppy.
Here's one of the adjusting screw mechanism, and one of how the clearance needs to be checked for wear; these pics in most copies of the FSM I've seen are so dark as to be indecipherable:
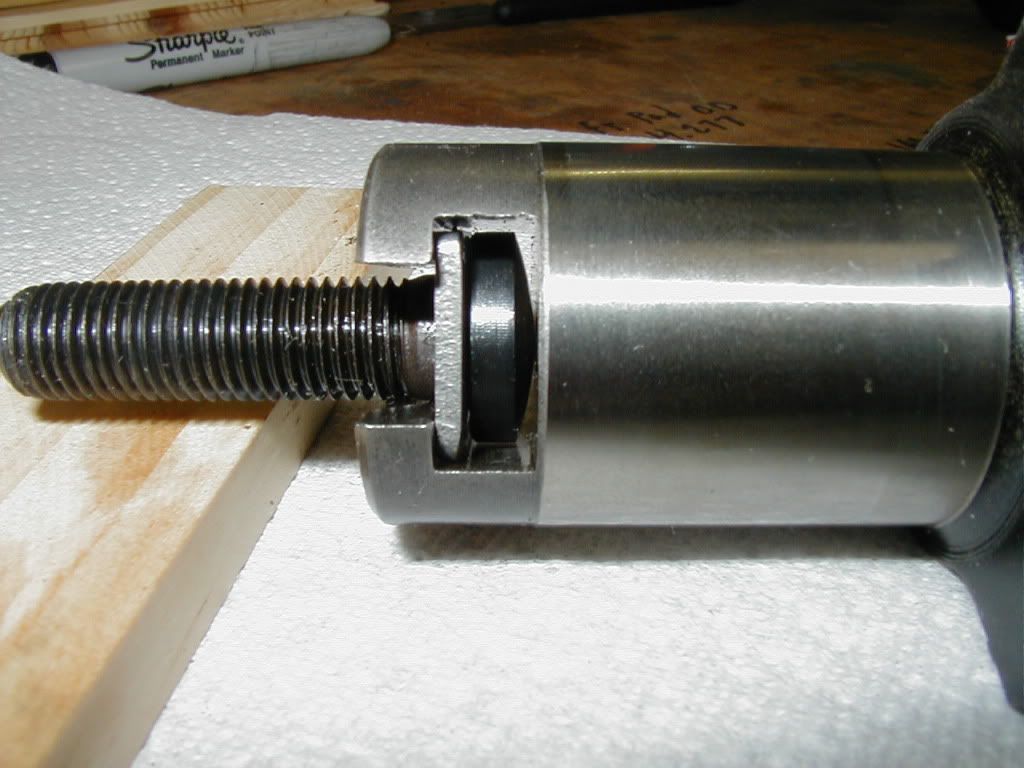
Clearancing:
Today was still cool out, but no rain and some occasional sun, which let me start cleaning engine housings at last.
I'm always paranoid about cleaning side housings; once you get them truly clean and degreased, you need to re-oil the working faces quckly to prevent flash rust.
My basic cleaning method is to first get rid of any gasket sealant that may be left, then soak them down thoroughly in Gunk Engine Bright, which is a petroleum-based degreaser that emulsifies in water. Once they've soaked in the degreaser (optimally in bright sun, so they warm up), a thorough brushing with a stiff brush will get loose any carbon, exterior grease, or other gunk. I use a stainless brush on the exterior, and only stiff plastic "paint stripper" brushes on the working faces.
After everything is scrubbed thoroughly, the housing gets thoroughly rinsed in water by hose, being sure to completely purge all water and oil passages of the degreasing agent.
Then, without wasting any time, I towel dry the working faces and wipe on a coat of light machine oil, then dry the rest of the housing using compressed air, and let them bake in the sun if possible When properly clean, there is no oily residue or any smell of the degreaser left, and everything is grit-free.
The working faces then get another light coat of machine oil, and I stretch a piece of saran wrap overjust the working faces, pressing out air bubbles. This seals the oil away from any dust or other contaminants, while letting the rest of the oil and water passages in the housing completely air-dry.
Housings are then ready for masking and painting of the outside surfaces.
My plan at this point is to re-paint the end housings with "cast-iron" engine paint, which closely matches the factory finish, and if I have time I plan to polish the rotor housings and front cover.
I have to keep in mind that my March 20th deadline has to include break-in and tuning time. With the short winter days, it's not a lot of time.
It chose to rain again on Saturday, which made progress cleaning and painting impossible; too cold and humid for paint to dry properly, and when it comes to really messy cleaning efforts (like degreasing and decarbonizing housings) I prefer to do those outside where I can just rinse the leavings away with a hose. My garage has no sink!
So instead, yesterday was a focused effort on the steering gear project; I finished disassembling and prepping the replacement gear for interior purge and paint, and got the original gearbox out of the car.
I do not see how it could be possible to get a steerning gearbox out of a 1st gen with the engine and wiring/plumbing still in place... and it would be utterly impossible when said car has air conditioning, as mine does. It was challenging enough to remove with the engine out.
But out it eventually came. One of the hardest parts is getting the welded-on nuts on the shaft cover through the hole in the floorboard. The shaft cover will ride againt the brake pedal lever on one side, and the floorboard hole on the other, until you have enough clearance with the gearbox forward of the front crossmember to rotate the gearbox.
I found it necessary to remove the left engine mount to get the box to clear... by fractions of an inch.
Some pix of that phase of the operation:
Getting the security bolts out of the lock proved to be most easily done using a Dremel tool with a small engraving bit to carve screwdriver slots in the bolt heads. "Easy," outside of having to be done 1) standing on your head, 2) with your eyes directly under all the sharp metal shards falling from the operation. Wear a face sheild, and put newspaper down on your carpet first!
I plan to replace them with stainless tamper-proof screws instead; I have a good collection of anti-tamper bits around. Probably I'll go with a pinned Torx design.
I've got a lot of very good pix of the inside of the steering gearbox; provided my refurb works out, I'll likely do a separate thread on refurbishment of that puppy.
Here's one of the adjusting screw mechanism, and one of how the clearance needs to be checked for wear; these pics in most copies of the FSM I've seen are so dark as to be indecipherable:
Clearancing:
Today was still cool out, but no rain and some occasional sun, which let me start cleaning engine housings at last.
I'm always paranoid about cleaning side housings; once you get them truly clean and degreased, you need to re-oil the working faces quckly to prevent flash rust.
My basic cleaning method is to first get rid of any gasket sealant that may be left, then soak them down thoroughly in Gunk Engine Bright, which is a petroleum-based degreaser that emulsifies in water. Once they've soaked in the degreaser (optimally in bright sun, so they warm up), a thorough brushing with a stiff brush will get loose any carbon, exterior grease, or other gunk. I use a stainless brush on the exterior, and only stiff plastic "paint stripper" brushes on the working faces.
After everything is scrubbed thoroughly, the housing gets thoroughly rinsed in water by hose, being sure to completely purge all water and oil passages of the degreasing agent.
Then, without wasting any time, I towel dry the working faces and wipe on a coat of light machine oil, then dry the rest of the housing using compressed air, and let them bake in the sun if possible When properly clean, there is no oily residue or any smell of the degreaser left, and everything is grit-free.
The working faces then get another light coat of machine oil, and I stretch a piece of saran wrap overjust the working faces, pressing out air bubbles. This seals the oil away from any dust or other contaminants, while letting the rest of the oil and water passages in the housing completely air-dry.
Housings are then ready for masking and painting of the outside surfaces.
My plan at this point is to re-paint the end housings with "cast-iron" engine paint, which closely matches the factory finish, and if I have time I plan to polish the rotor housings and front cover.
I have to keep in mind that my March 20th deadline has to include break-in and tuning time. With the short winter days, it's not a lot of time.
I must have missed it, whats the March 20 deadline?
Oh and I'll second your comment about the steering box being hard to get out. Last time I changed one with the engine still in, I suppored it with a jack and removed the crossmember, that gives JUST enough room to get it out of there.. Was still pretty hard to get it out without damaging the a/c compressor and oil cooler though...
Looks like you're making progress though, looking forward to seeing the engine painted up and reassembled.
Thread Starter
Joined: Jun 2008
Posts: 8,376
Likes: 28
From: Chino Hills, CA
The March 20th deadline is dictated by the Smog *****. On that date*, I must either have my smog certificate in hand, or register the car for "planned non-operation," and then later beg permission (in person, at the DMV) to buy a temporary pass to be allowed to drive the car to the smog station & get inspected.
Breaking in an engine is a lot harder, though, when you can't legally drive the car on the streets. So my preference is to get all done by then if possible.
Cali smog rules are a Byzantine nightmare if you get off the main track in any way. Their literal, stated goal is to remove cars from the road, and they pursue it with zeal.
*Actually, I can stretch the smog date to the end of March, when the current sticker expires, by paying full fees for renewal. But I still couldn't drive it without passing smog & submitting the cert, and obviously it's hard to pass smog if the engine isn't broken in and tuned, which requires driving it. Catch-22.
Ah ok, thats what I was thinking it was. What a mess that is seriously. It's a shame too because you don't have the road salt that we do out here... You still have 2 months though, i'm sure you can manage.
Joined: Mar 2001
Posts: 31,851
Likes: 3,239
From: https://www2.mazda.com/en/100th/
i don't remember pulling the box out of peepers being hard, but i had no engine or dash and it was a long time ago!
Thread Starter
Joined: Jun 2008
Posts: 8,376
Likes: 28
From: Chino Hills, CA
It'll be a tight race, as I had other stuff I want to do while the engine's out... like maybe tackling a trans rebuild, & various beautification projects. And we have company coming to visit for much of February.
& there's this "job" thing I have. Which includes 2 business trips this Feb.
life... (sigh)
& there's this "job" thing I have. Which includes 2 business trips this Feb.
life... (sigh)
"& there's this "job" thing I have. Which includes 2 business trips this Feb.
life... (sigh)"... I'm glad someone mentioned their job...sometimes when I am on the boards following other projects, it feels like I'm the only one who has to put things off because I have to go to work for the week...lol
Divin, you look like you got a serious handle on whats in front of you...you just need a couple of consecutive days off to get it done. I am willing to bet you reach your deadline without a problem...although it is amusing to read about you laid back Cali dudes pressing for a deadline...lol. Good Luck...looks like it is coming along great!
Thread Starter
Joined: Jun 2008
Posts: 8,376
Likes: 28
From: Chino Hills, CA
So far, yes... but hte taking apart seems to always work.
The putting together, on the other hand...
Raining again today... so I know the paint I sprayed yesterday will take til Friday to fully cure. Bummer.
Time for internet shopping!
The putting together, on the other hand...
Raining again today... so I know the paint I sprayed yesterday will take til Friday to fully cure. Bummer.
Time for internet shopping!
California is so frigging stupid. I am trying to get a moped registered. The moped has a value of about $250. Since the PO did NOT non-op. The California facists want over $400 to register this little bike!!! JEEZ!!!
Thread Starter
Joined: Jun 2008
Posts: 8,376
Likes: 28
From: Chino Hills, CA
Moving along sputteringly but steadily, Jim. Looking out the office window at the beautiful Tuesday weather, it's enough to make me crazy. Er.
At least next weekend is supposed to be nice. I'll probably end up spending it cleaning the house or something.
Re: your moped; back in the early parts of this megathread, around Day 165, is the story of my attempts to re-register the Beastie once I had the carb ready, only to determine that the DMV had never 1) filed my PNO, nor 2) sent me any renewal notices after. I spent a lot of time & energy getting that mess resolved, and it still cost me a pile of money - - just not quite the sizable pile they initially asked.
https://www.rx7club.com/showpost.php...2&postcount=79
Good luck with it. Luck's required, because good sense and simple logic clearly don't enter into the acts of a state agency.
Joined: Mar 2001
Posts: 31,851
Likes: 3,239
From: https://www2.mazda.com/en/100th/
in the good old days the DMV would waive the fees, or at least not charge the BS penalties. if you asked how much it was, but didn't do anything, go ask again.
when i went to go register the Tr3 (looong story), they said $420, and if i didn't do it before march 20th, it would be another year, and thus more $$.
i went in may, got registration that was good for more than 2 weeks, and it was only $300....
when i went to go register the Tr3 (looong story), they said $420, and if i didn't do it before march 20th, it would be another year, and thus more $$.
i went in may, got registration that was good for more than 2 weeks, and it was only $300....

Thread Starter
Joined: Jun 2008
Posts: 8,376
Likes: 28
From: Chino Hills, CA
Day 1298 Mini-update:
*Still waiting on my replacement front plate to arrive (shipping complexities) might show up today or Saturday.
*Steering box is painted & & paint has hardened, ready to go back together. Bought a 2Kg spring dynamometer off Amazon for $4.75, for use in adjusting preloads.
*Finished measuring & cleaning all seals & bearings; except for the oil hard rings, everything else is well within spec. Bought a dozen new corner seal inserts & replacement eccentric seals.
*Good weather this weekend for once, so my goal for the weekend is to get all housings finished with cleaning, irons painted, and start in on polishing the front cover and rotor housings. Alternated with engine bay clean out, and possibly assembling/installing the refreshed steering box.

Joined: Mar 2001
Posts: 31,851
Likes: 3,239
From: https://www2.mazda.com/en/100th/
*http://www.specmiata.com/setupguide/...ing%20Tips.pdf
spec miata is a VERY competitive class, you need to really have a good car AND drive it really well, most other classes you can have one or the other.