Project Naomi V : Finally PAINT!
 05-26-14, 07:49 PM
#26
I'm doing it as a 2-part install. Damplifier Pro for the sound deadening (sticks to the metal and muffles vibrations) and Luxury Liner Pro, also by second skin, for absorption of remaining sound / cabin sound.
So the Damplifier isn't as thick as that - definitely not a 1/2", probably more like 1/4" - but that gives flexibility. I can sound deaden in hard-to-reach areas, and sound absorb in large flat areas where I can afford the extra thickness.
The ReSpeed steering rack setup is a godsend, but it really does increase the amount of engine vibration that gets transmitted into the body due to the stiffer engine mount. I'm hoping all of this soundproofing will help with that so that I don't have to crank the stereo or speak loudly when talking to my passengers.
 06-30-14, 02:26 PM
#27
Small update:
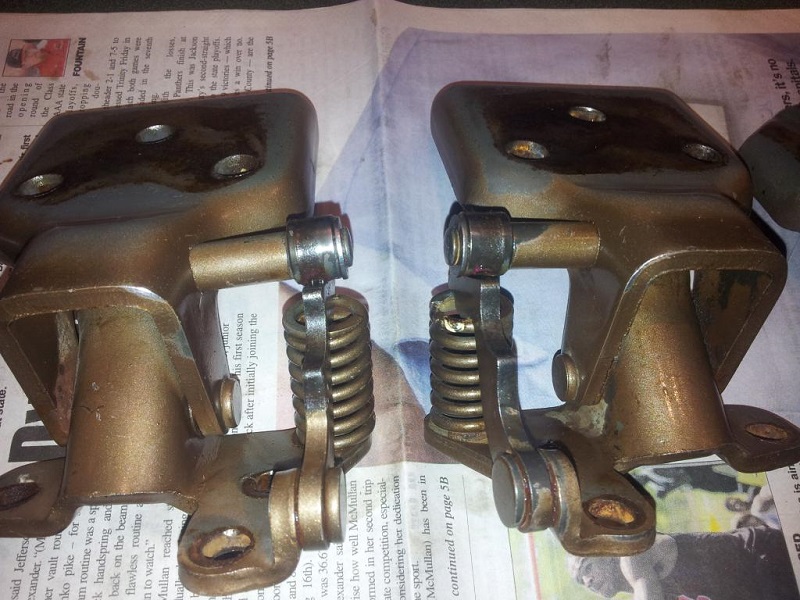
Joe was looking at hanging the doors and realized that the hinges I had were in pretty bad shape. The pin was fine and the hinges would hang straight, but the spring and metal piece that hold the door out at 1/2 and full-out were mangled. The ones we had on the parts cars were just as badly mangled so I went looking for 30yr old NLA hinges.
Ray Green came through with a practically mint set of hinges, and stubbornly refused to take any cash for them (well, except paying the shipping into Canuckistan). Big thanks to Ray for that!
Joe has had his nose to the grindstone and been doing all the thankless work recently - stuff that won't be seen in the final product but requires just as much time and effort as everything else.
After getting the sound deadening material (Damplifier Pro) laid down, he pushed forward to the second stage - the sound absorbing mats (Luxury Liner Pro). Where the Damplifier is designed to adhere to the metal and reduce the vibration of the metal itself, the Luxury Liner is a material designed to absorb sound after the fact. It goes in with the same painstaking care as the Damplifier layer - measure, cut, peel, place, pound, repeat.
After putting luxury liner in any place that could take the extra padding without getting in the way, next came the carpet. We've gone with an entirely new carpet set from stockinteriors.com in black instead of the stock grey. While the carpet set does come pre-formed for the floorpan of the 1st gen rx7, there's still a lot of work needed to make it perfect. It has none of the holes for things like the e-brake, the shifter, the seat bolts, the seatbelt bolts, etc... There's also some extra material at the edges that must be trimmed once you get it placed. It's really a bugger to get it in place and set. We did the one on Marc's car and we must have pulled it up dozens of times to re-adjust or find the locations of bolt holes to line up.
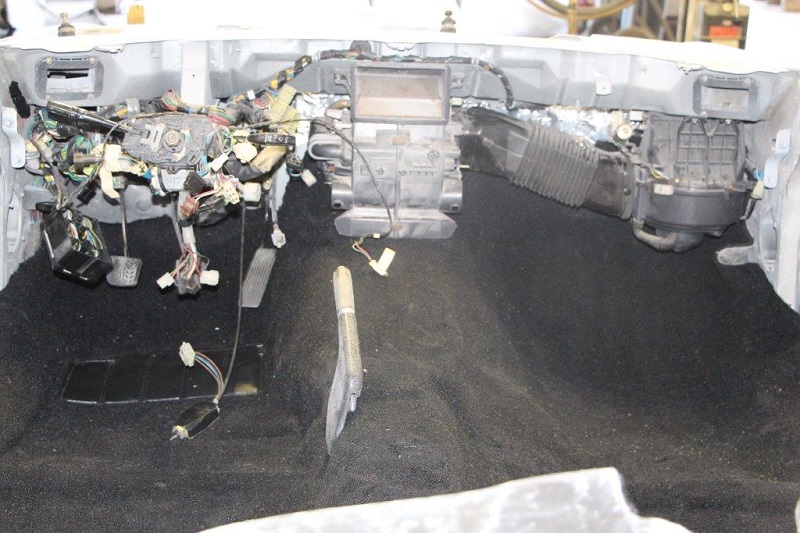
So the Luxury Liner is in, as well as the carpet. "But Jon" you're saying "Didn't you say there'd be an engine install coming?". Well yes, but when considering the engine install, we figured that we wanted to get the heater core in place first. The heater core needs the carpet, the carpet needs the luxury liner, etc.. etc.. So the engine's not in yet, but the heater core finally is!
So this one unassuming picture doesn't look like much, but it reflects a metric crap-ton of interior work out of the way.
Joe tells me that the upholsterer should have mock-ups/designs of the door panels ready for my approval in the coming weeks. I've found it damn near impossible to find a good condition set of grey interior panels for an S3 with manual windows. So since we're changing the carpet anyway, we're going to reupholster the door panels and roof liner to match.
The more interior we can get rolling, the better. I find interior work to be the most annoying and finicky of all, so I'll be really glad once the dash is in, the newly upholstered parts are installed and the glass is in place. Mechanicals have a habit of either fitting and working, or not. Especially when re-assembling something that was once an assembled and running machine. Interiors are a much less precise science and more of an art. I suck at art.
Until next update, Cheers!
Jon
Joe was looking at hanging the doors and realized that the hinges I had were in pretty bad shape. The pin was fine and the hinges would hang straight, but the spring and metal piece that hold the door out at 1/2 and full-out were mangled. The ones we had on the parts cars were just as badly mangled so I went looking for 30yr old NLA hinges.
Ray Green came through with a practically mint set of hinges, and stubbornly refused to take any cash for them (well, except paying the shipping into Canuckistan). Big thanks to Ray for that!
Joe has had his nose to the grindstone and been doing all the thankless work recently - stuff that won't be seen in the final product but requires just as much time and effort as everything else.
After getting the sound deadening material (Damplifier Pro) laid down, he pushed forward to the second stage - the sound absorbing mats (Luxury Liner Pro). Where the Damplifier is designed to adhere to the metal and reduce the vibration of the metal itself, the Luxury Liner is a material designed to absorb sound after the fact. It goes in with the same painstaking care as the Damplifier layer - measure, cut, peel, place, pound, repeat.
After putting luxury liner in any place that could take the extra padding without getting in the way, next came the carpet. We've gone with an entirely new carpet set from stockinteriors.com in black instead of the stock grey. While the carpet set does come pre-formed for the floorpan of the 1st gen rx7, there's still a lot of work needed to make it perfect. It has none of the holes for things like the e-brake, the shifter, the seat bolts, the seatbelt bolts, etc... There's also some extra material at the edges that must be trimmed once you get it placed. It's really a bugger to get it in place and set. We did the one on Marc's car and we must have pulled it up dozens of times to re-adjust or find the locations of bolt holes to line up.
So the Luxury Liner is in, as well as the carpet. "But Jon" you're saying "Didn't you say there'd be an engine install coming?". Well yes, but when considering the engine install, we figured that we wanted to get the heater core in place first. The heater core needs the carpet, the carpet needs the luxury liner, etc.. etc.. So the engine's not in yet, but the heater core finally is!
So this one unassuming picture doesn't look like much, but it reflects a metric crap-ton of interior work out of the way.
Joe tells me that the upholsterer should have mock-ups/designs of the door panels ready for my approval in the coming weeks. I've found it damn near impossible to find a good condition set of grey interior panels for an S3 with manual windows. So since we're changing the carpet anyway, we're going to reupholster the door panels and roof liner to match.
The more interior we can get rolling, the better. I find interior work to be the most annoying and finicky of all, so I'll be really glad once the dash is in, the newly upholstered parts are installed and the glass is in place. Mechanicals have a habit of either fitting and working, or not. Especially when re-assembling something that was once an assembled and running machine. Interiors are a much less precise science and more of an art. I suck at art.
Until next update, Cheers!
Jon
01-23-15, 10:41 AM
#28
Small Interior Progress Update
It took a bit of time, but back in October we got the door panels reupholstered and they turned out beautifully! I think we managed to strike an awesome balance between updating the look while still keeping with the original style. Other interior bits like the seats will be done in the same style with the same materials.
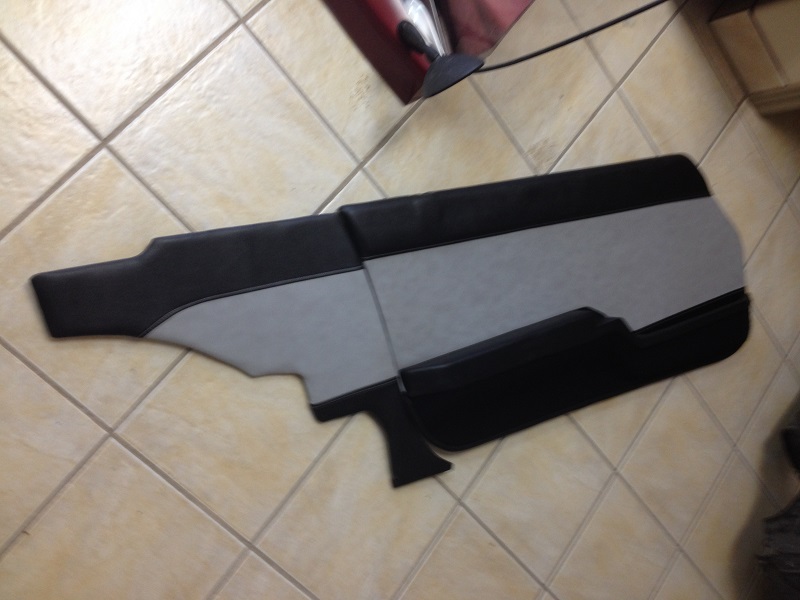
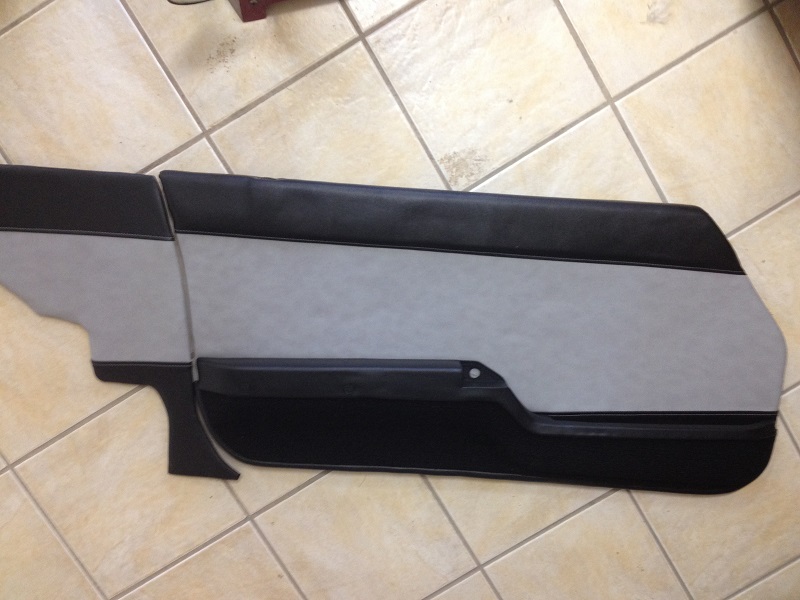
We decided to go with a set of power window door panels, and we'll try to wire up some power windows to go with it. I've got all the parts from the parts car, but my original harness was a non-power-window harness so I'll have to make a new set of wires for the power windows. Worst case, we kept the manual window door-pull, so if we end up going back to manual windows we can just punch the holes in the panels and mount the crank without the door pull getting in the way.
More recently we got the dash and a bunch of misc interior parts back from being dyed. The original grey is giving way to a nice black which will match with the new black carpets and the black pleather used on the door panels:


So now the interior reassembly can really pick up pace. Joe is going to work on getting the dash installed and working on as much of the interior reassembly as he can in the next two months. The seats still have to go out for reupholstery and I think the roof liner does as well. The plastic covers for the rear hatch area also have to be reconditioned/dyed, but all of that is stuff that comes very late in the reassembly process so there's a bit of time there.
By the end of February we're going to see how far forward we are and I'll be arranging to head down there in the spring to spend a week helping with the mechanical reassembly. I'm hoping that in April/May I can take a week to pitch in with that, and hopefully wrap up the whole project at that point.
There are still a lot of little things left but we have much less work ahead of us than is already behind us. With gas prices as low as they are I'm anxious to get the car back so that I can make 2015 the year of the road trip!
I'm pretty excited about how things are looking. With a bit of work the interior should end up looking pretty awesome, with a much needed refresh to match all the awesome paint work that's been done on the exterior. There are also a few bits in the engine bay that we're going to colour match to the body (or paint in glass black like the 83LE wheels that I'll be having reconditioned with black centres and polished lips).
The work continues!
We decided to go with a set of power window door panels, and we'll try to wire up some power windows to go with it. I've got all the parts from the parts car, but my original harness was a non-power-window harness so I'll have to make a new set of wires for the power windows. Worst case, we kept the manual window door-pull, so if we end up going back to manual windows we can just punch the holes in the panels and mount the crank without the door pull getting in the way.
More recently we got the dash and a bunch of misc interior parts back from being dyed. The original grey is giving way to a nice black which will match with the new black carpets and the black pleather used on the door panels:
So now the interior reassembly can really pick up pace. Joe is going to work on getting the dash installed and working on as much of the interior reassembly as he can in the next two months. The seats still have to go out for reupholstery and I think the roof liner does as well. The plastic covers for the rear hatch area also have to be reconditioned/dyed, but all of that is stuff that comes very late in the reassembly process so there's a bit of time there.
By the end of February we're going to see how far forward we are and I'll be arranging to head down there in the spring to spend a week helping with the mechanical reassembly. I'm hoping that in April/May I can take a week to pitch in with that, and hopefully wrap up the whole project at that point.
There are still a lot of little things left but we have much less work ahead of us than is already behind us. With gas prices as low as they are I'm anxious to get the car back so that I can make 2015 the year of the road trip!
I'm pretty excited about how things are looking. With a bit of work the interior should end up looking pretty awesome, with a much needed refresh to match all the awesome paint work that's been done on the exterior. There are also a few bits in the engine bay that we're going to colour match to the body (or paint in glass black like the 83LE wheels that I'll be having reconditioned with black centres and polished lips).
The work continues!
Last edited by vipernicus42; 01-23-15 at 10:53 AM.
03-10-15, 01:28 PM
#30
Panels look really good . Funny , I was thinking a similar pattern for my 79 turbo project , based on my old '79 Limited panels which those kind of resemble . My car is still in Kitchener area where progress is in geologic time . Who did the door panel work ?
 07-01-15, 10:49 AM
#32
Thanks for your help!