My 79 "barn find" project

 08-29-14, 02:16 PM
#402
ALMOST there!
Well, I haven't had the chance to work on ole rusty much over the summer. Work has been CRAZY busy and I've been traveling a LOT, including weekends here and there so I haven't been able to do much since July, but I was able to pretty much replace the front of the drivers side rear wheel well and floors behind the drivers seat. All that's left is the rear of the drivers rear wheel well area, and that isn't too awful bad. I'll post some pics of that section after this post...
I think I'm gonna go with the truck bed liner after I paint with POR-15. Seems to be more durable and looks neater than the spray on undercoating, which I unfortunately already applied to the passenger rear wheel well. I'm prolly gonna strip that out and paint it with truck bed liner too. Here's where I'm at. Hopefully I can get a little more done this Labor Day weekend AND celebrate Labor Day!


Replacement parts from my donor section...


Here's the rear of the drivers rear wheel well area: As you can see, I found a bunch of rust lurking around underneath the factory undercoating in the outer wheel well area...


So, a bit more cutting, welding, and grinding is necessary but hopefully I'll pretty much have it licked by then. Then I can start thinking about ... getting the body sanded down and painted, and turn my attention to the interior. Need to research sound deadening material / carpet padding and such. I'm thinking dynamat or something similar and new padding. My carpet was pretty rotten so I may just replace if it doesn't clean up too well...
09-01-14, 05:47 PM
#403
Removed my gas tank
AND a lot of mud, muck, and rust... Not sure if this is salvageable or not as there was lots of rusty scale on there, but after a quick hand scrub with a wire brush it seemed to be intact. The moisture you can see on the forward most fuel line connection I think came from the fuel line after running it a bit. I don't know if I'll be able to do much with this except scrub, scrub, scrub with a wire brush and repaint with POR-15. I doubt that I can use electrolysis on this item - wouldn't want to introduce water into it....
This pic was taken before I removed the fuel lines. Lots of scale!

Pics of it as removed and after a quick scrub with the wire brush:


Good news is: Not too much rust lurking beneath the tank! Nothing that the grinder and a bit of POR-15 can't take care of!

This pic was taken before I removed the fuel lines. Lots of scale!
Pics of it as removed and after a quick scrub with the wire brush:
Good news is: Not too much rust lurking beneath the tank! Nothing that the grinder and a bit of POR-15 can't take care of!
 09-05-14, 11:06 AM
#406
I don't have my sandblasting setup anymore but I may be able to borrow one from a buddy of mine. I don't think the tank has a leak so it should be ok. Good to know that it's salvageable anyway. I think I can safely guess that this car of mine has seen plenty of miles down dirt roads!!
10-05-14, 04:40 PM
#407
I am declaring the bone marrow transplant COMPLETE! I finally had the time this weekend to finish up the welding, POR-15'ing, seam sealing, and finally truck bed lining the underside of ole Rusty! I had to grind off a bunch of moderate surface rust on the underside where the tank was and on the frame on both sides. Once the tank was out I had complete access. I'm pretty happy with the results!

You can definitely see where I (maybe) overapplied the seam sealer, but I'd rather overdo that a bit and not have to worry about water intrusion any longer... Functional? You bet! Pretty? Not so much... Frankenstein for sure.


I'm really happy with the way the underside turned out... I spent more than a few hours with the grinder and wire wheel removing all the rust and scale, then sealing with POR-15 gloss black, and finally applying truck bed liner. Best looking part of the car so far, aside from the engine bay....


And here's a couple shots of the floor behind the drivers seat. Treated, POR-15'd, seam sealed, primed. DONE!


I'm just glad to have gotten to this point so far. I wish I had kept a timecard but I didn't....
You can definitely see where I (maybe) overapplied the seam sealer, but I'd rather overdo that a bit and not have to worry about water intrusion any longer... Functional? You bet! Pretty? Not so much... Frankenstein for sure.
I'm really happy with the way the underside turned out... I spent more than a few hours with the grinder and wire wheel removing all the rust and scale, then sealing with POR-15 gloss black, and finally applying truck bed liner. Best looking part of the car so far, aside from the engine bay....
And here's a couple shots of the floor behind the drivers seat. Treated, POR-15'd, seam sealed, primed. DONE!
I'm just glad to have gotten to this point so far. I wish I had kept a timecard but I didn't....
10-05-14, 05:42 PM
#408
acdelco d1906 Nkg 49034

that rust is scary!! was the 1979 more prone for rust than the later years.
My 1983 gets a underbody undercoating every summer, and it is my daily driver. I worry about the rust that I cannot see.
My 1983 gets a underbody undercoating every summer, and it is my daily driver. I worry about the rust that I cannot see.
 10-06-14, 06:27 PM
#410
Here's a picture of all the old rusty metal I cut out of the car. Don't know why I saved it, other than to maybe see how big the pile got.

Thanks for the sentiment WJM, I appreciate it! It's nothing like the professional job you're doing with the rally car, but it's better than it was and hopefully good to go for another 35 years!
 10-19-14, 04:44 PM
#414
Thanks Sean, I'm trying! There are builds in here that have set the bar pretty high!
Worked on the gas tank a bit today. Pretty happy with these results! Grinder, wire wheel, elbow grease, POR-15:


Looking a bit less "titanic-like". Gonna let that sit, hit it with truck bed liner, then scrub the bottom side clean and paint the whole thing and get new foam and reinstall.
Worked on the gas tank a bit today. Pretty happy with these results! Grinder, wire wheel, elbow grease, POR-15:
Looking a bit less "titanic-like". Gonna let that sit, hit it with truck bed liner, then scrub the bottom side clean and paint the whole thing and get new foam and reinstall.
10-24-14, 05:03 PM
#415
Aaaaand the gas tank is almost done!
Got the truck liner on the gas tank and it looks fantabulous! Loving the look of this thing. Just wish I hadn't broken one of the blades on the electric connection:
https://www.rx7club.com/1st-generati...-unit-1073533/
Aside from that little snafu, the tank is done.


https://www.rx7club.com/1st-generati...-unit-1073533/
Aside from that little snafu, the tank is done.
10-27-14, 06:29 PM
#416
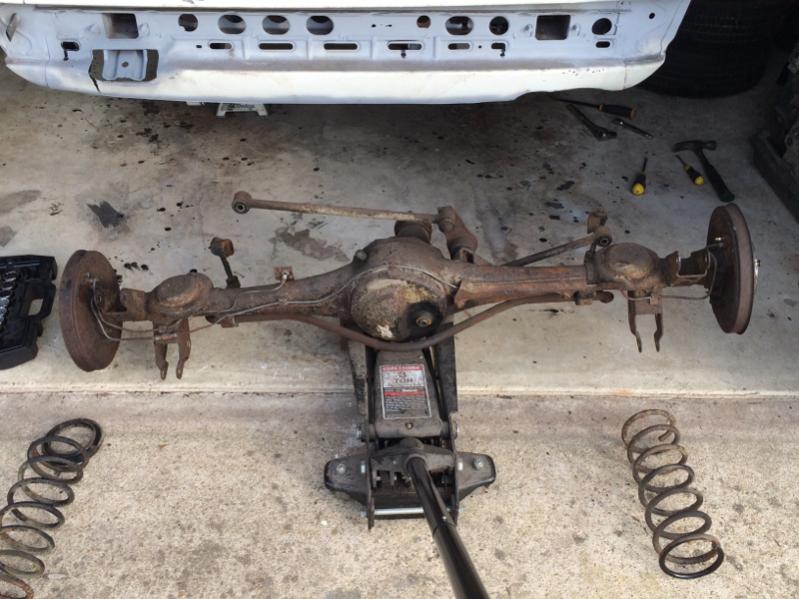
My rear end is rusty....
HA!! Well, it is. A couple weekends ago I removed the rear end. Been stripping the watts links and brake lines off getting ready to de-rustify this thing. Not sure how yet, but it's gonna happen.


The rear sway bar and its links are pretty toasted too. The swaybar I can clean up:


And remember the red doors I got from the junkyard? Stripped them and found they've been patched up previously. They had a bunch of bondo on them and there's some moderate surface rust, but I think they'll work a lot better than the ones that were on there because those have big rotten holes in the bottom of them. These just have a bit of rusty scale along the bottom, and the moderate surface rust. I'll have to bondo them back up, but these had three layers of paint on them. Original silver and two coats of red.


And then this past weekend I got to working on my rusty torsion bars. There's lots of built up scale that took me over an hour with a dremel to remove on just one end, so I went back to my old go to - electrolysis.


I'm running out of things to fix up without having to spend some money, and this is not the time of year to be spending money. Maybe Santa Claus will bring me some gift cards to Black Dragon, Rock Auto, Autozone, or the body shop down the road for a new paint job!!
The rear sway bar and its links are pretty toasted too. The swaybar I can clean up:
And remember the red doors I got from the junkyard? Stripped them and found they've been patched up previously. They had a bunch of bondo on them and there's some moderate surface rust, but I think they'll work a lot better than the ones that were on there because those have big rotten holes in the bottom of them. These just have a bit of rusty scale along the bottom, and the moderate surface rust. I'll have to bondo them back up, but these had three layers of paint on them. Original silver and two coats of red.
And then this past weekend I got to working on my rusty torsion bars. There's lots of built up scale that took me over an hour with a dremel to remove on just one end, so I went back to my old go to - electrolysis.
I'm running out of things to fix up without having to spend some money, and this is not the time of year to be spending money. Maybe Santa Claus will bring me some gift cards to Black Dragon, Rock Auto, Autozone, or the body shop down the road for a new paint job!!
11-04-14, 10:27 AM
#419
Thanks ACR! Electrolysis is fun and works quite well with little effort. I completed the process on the rear end this past weekend but I need to finish working a few nooks and crannies and crevices mechanically with a wire wheel. One of my boys is helping me today on that since he's out of school for the elections today, but so far the results are tremendous. I was amazed at how well it came out actually. I'll post pics when I get it finished up and painted.
Last edited by woodmv; 11-04-14 at 10:33 AM. Reason: typo
11-07-14, 05:03 PM
#420
Rear suspension parts are rust free!
Check this out. Got the dog bones clean with electrolysis. They really cleaned up well! Got them prepped for paint, which I'll do tomorrow, along with the rear end. Here's some pics to enjoy. The difference between the way they were and the way they are now is like night and day...
This is pretty much what they all looked like to start:
After 48 hours in the bucket:

You can see the pitting that these suffered in places. The two longer ones are the worst, but only on one side:


And here they are after a few minutes with the wire wheel on my bench grinder: WOW!


This is a good pic of the before, after electrolysis, and after POR-15 gloss black. Better than rust!

This is pretty much what they all looked like to start:
After 48 hours in the bucket:
You can see the pitting that these suffered in places. The two longer ones are the worst, but only on one side:
And here they are after a few minutes with the wire wheel on my bench grinder: WOW!
This is a good pic of the before, after electrolysis, and after POR-15 gloss black. Better than rust!
11-08-14, 03:37 PM
#423
Thanks Qingdao! It's been awhile since we've heard from you - I don't envy you with your schedule (looked at your turbo thread - good stuff going on there!). Been there, done that, paid the loans, got the T-shirt.
I plan to clean up and put back the black interior I had. The carpet isn't the best and honestly, it ripped a bit trying to remove it, so I may (key word, MAY) replace it. I got the car with a header on it, so my plan is to make this car as stock as I can except for some performance upgrades (RB springs, delete rats nest), bigger wheels (maybe), and return it to stock color, etc.).
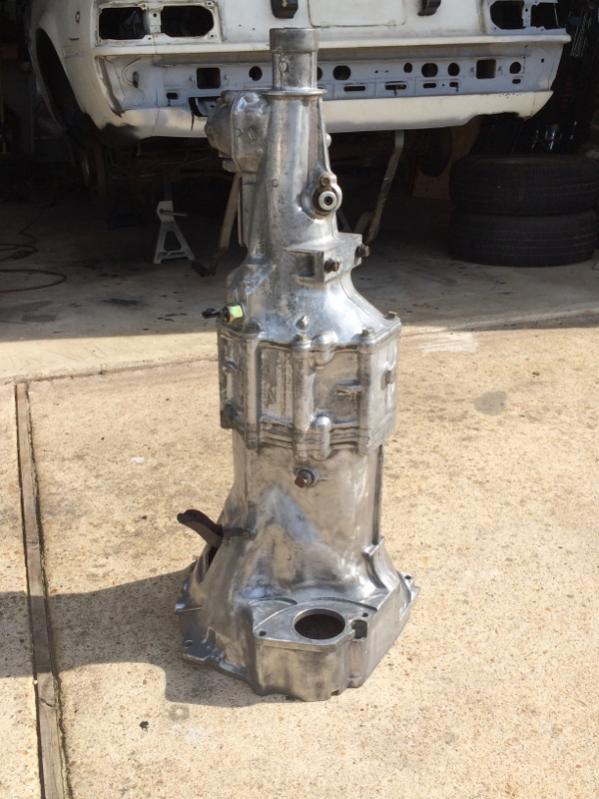
The rear end came out fantastic! Here's the setup I had. Made a box out of scrap 2x4s and some 3/8 particle board I had, and lined it with 3' wide 4 mil plastic Left it in to bake for three days.

Working its magic:


When it came out after a quick scrub with a wire brush. It's pretty freakin' CRAZY how much better this thing looked after the process. I was surprised it came out looking as good as it did.


I took the differential and axles out to get to the spaces I needed to get to, and so I could get the differential in the bucket. Here it is after a day of grinding off the really fine stuff in the pits. Electrolysis doesn't fix the pitting, but that's what gives this thing character. It looked pretty good after I was done:


Next post I put up some before and afters.
The rear end came out fantastic! Here's the setup I had. Made a box out of scrap 2x4s and some 3/8 particle board I had, and lined it with 3' wide 4 mil plastic Left it in to bake for three days.
Working its magic:
When it came out after a quick scrub with a wire brush. It's pretty freakin' CRAZY how much better this thing looked after the process. I was surprised it came out looking as good as it did.
I took the differential and axles out to get to the spaces I needed to get to, and so I could get the differential in the bucket. Here it is after a day of grinding off the really fine stuff in the pits. Electrolysis doesn't fix the pitting, but that's what gives this thing character. It looked pretty good after I was done:
Next post I put up some before and afters.
11-08-14, 03:53 PM
#424
Rear end before and afters
So this thing has come a long way in the last few weekends. Got it treated with the metal ready after I cleaned it up and painted it gloss black with POR-15. Amazing how much better it looks.


Pretty amazing stuff!
Pretty amazing stuff!
11-08-14, 04:45 PM
#425
WOW. thank you for sharing, you have systematically gone thru this car, showing all of us that it can be done!
the next time I need to know what my car looks like in a certain place or how it comes apart, I will just pull up your thread, yep found it page ...!
I admire your abilities and motivation!
you are a great asset to this site!
Thanks again Rick
the next time I need to know what my car looks like in a certain place or how it comes apart, I will just pull up your thread, yep found it page ...!
I admire your abilities and motivation!
you are a great asset to this site!
Thanks again Rick