
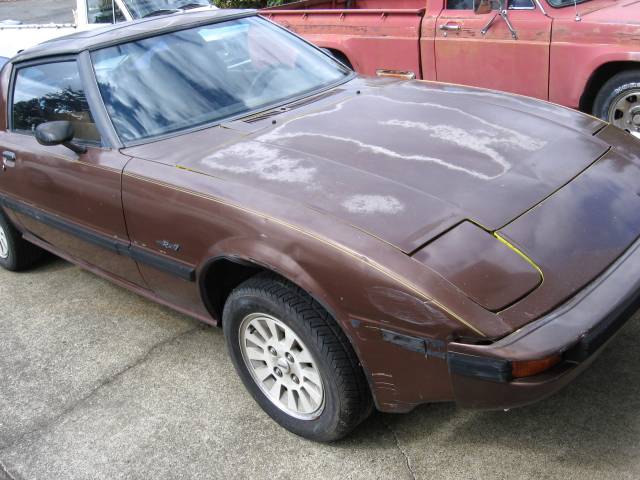
Brown car build

Thread Starter
Joined: Aug 2001
Posts: 15,725
Likes: 91
From: Near Seattle
Brown car build
It's been a long strange journey.
First a little history. I got the car from the PO in summer 2011 and promptly began a 20B build but changed my mind in late 2012 after it just didn't quite do it for me. More info below.
The PO got the car in 1997 and had an FD conversion done in 2000 at a local rotary shop. It never ran. He painted the engine bay CYM because it's an FD color. See link: https://www.rx7club.com/1st-gen-non-.../#post11833198
The way it looked as delivered in 2007 for a 4 rotor conversion. This too never ran. See link: https://www.rx7club.com/1st-generati...-build-638177/
In case you're wondering, I did eventually stack the real 4 rotor to go into the blue car or something, but it never ran and the owner wanted to sell the parts so I tore it down and sold everything.
The 20B build began in Sept 2011. It actually ran! See link: https://www.rx7club.com/20b-forum-95...gsl-se-967803/
But I wasn't happy with the result. I'm a carb guy. I only tried EFI because of the 20B. I didn't enjoy the process at all. I love wiring, don't get me wrong; I fabbed the whole harness. I also soldered the MegaSquirt together. That part I enjoyed, but when it came time to tune with a laptop and mess around with fuel injectors, fuel rails, the big six fingered hand of the 20B upper manifold etc, I just wasn't feeling any of it. Then when it came time to tune, I was totally clueless. See, with a carb, you're starting with something physical that actually exists in our 3d environment. With EFI, it's all stored in a chip. For you younger guys who've only ever driven and worked on EFI cars, this may not relate to you.
Because the 20B was not tuned, it had no real power, and the drivability sucked. At some point I had to move the blue car (81 S model with a 4 port 13B and Hitachi carb) out of the way to get the brown one out for some test driving, and the blue one fired right up for me and ran great! The 20B would always flood on startup which required a quickie deflood procedure every time (maybe due to the walbro). I think it was at that moment I realized the whole 20B setup just wasn't turning out as I had hoped. I spent probably hundreds of hours on it and it was only barely able to move under its own power. It didn't even sound that cool with the first full 3" exhaust, which was terrible, to the second long primary that had a little more power, but still didn't sound the way I had hoped and still didn't have the power I was looking for (I read I was supposed to get like 250HP NA out of this thing, which it wasn't even close to making). And even if I did manage to street tune it, and who knows how long that would take, my background is with carbs. Maybe I could wrap my head around EFI tuning and maybe I couldn't. But the proof was right there in front of my face as I was moving the blue car out of the way. I did't have to fight it to drive it, you know?
Did I fail, ultimately, with the 20B? Or did I wise up and move on at the right time? I think it was mostly the latter. I've been 100% happier since with the current setup.
In early 2013 I built two 13Bs for this car to try them both. An R5 4 port 13B and an S4 NA 6 port. I tried them both. I went with the R5! The S4 NA went into PercentSevenC's red car. See this link from before he got it back when it was my brother's car. https://www.rx7club.com/1st-gen-non-...ed-car-778113/
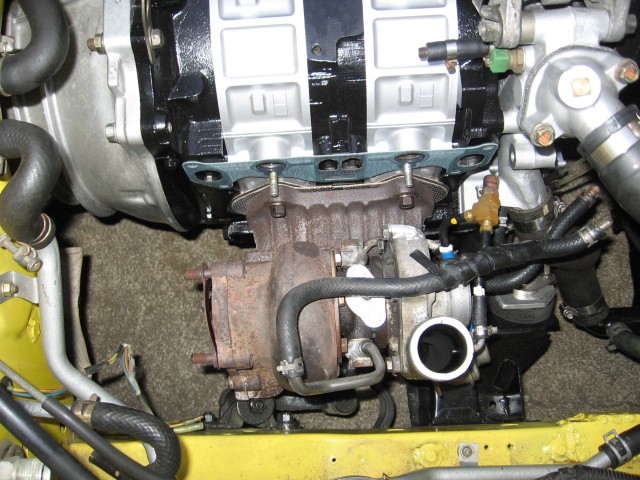
The R5 4 port 13B was broken-in NA with a hogged Nikki and then got a turbo! I spent the better part of 2014 learning how to boost tune it with the wideband.
Check out some early S5 turbo test fitting pics from late 2013:
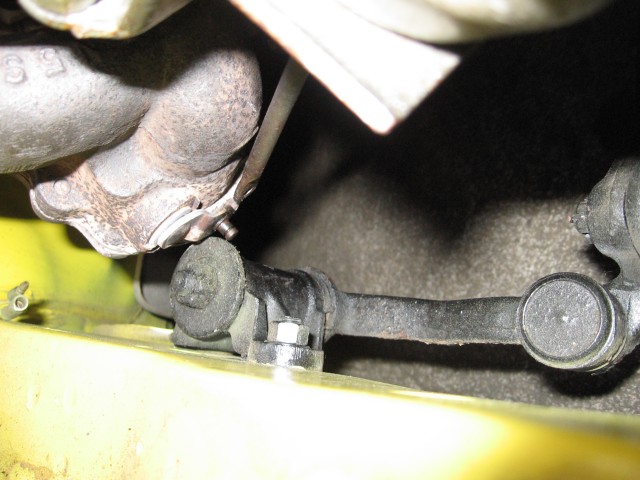
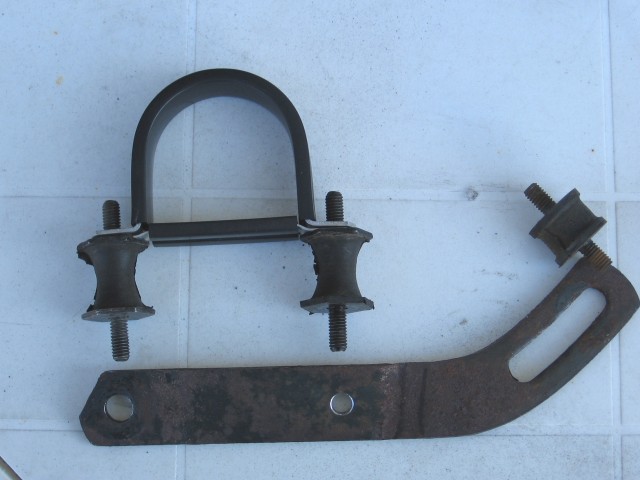
Detached the wastegate arm to show how it hits the stock idler arm. This is why you need a MOOG idler arm.
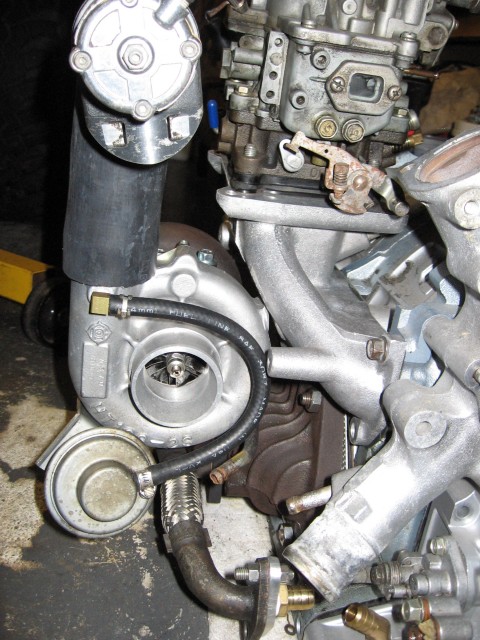
With the MOOG installed, I set my sites on boost prepping a Nikki. My first thread on the subject where I go through everything I've ever read and try to come up with a game plan. Note several conclusions are wrong. Just FYI. https://www.rx7club.com/1st-generati...nikki-1049641/
My second thread attempting to stop a flooding problem. This is where a lot of progress was made. https://www.rx7club.com/1st-generati...nikki-1073440/
And just for fun, a mini build thread with mockup pics from before any testing was ever done in a car, showing how the Nikki and S5 turbo will fit on a 4 port 13B! https://www.rx7club.com/build-thread...build-1072467/
Here is a teaser pic.
And one of the hogged boost prepped Nikkis in the process of tuning (solder filled sec slow air bleeds swapped in).

First a little history. I got the car from the PO in summer 2011 and promptly began a 20B build but changed my mind in late 2012 after it just didn't quite do it for me. More info below.
The PO got the car in 1997 and had an FD conversion done in 2000 at a local rotary shop. It never ran. He painted the engine bay CYM because it's an FD color. See link: https://www.rx7club.com/1st-gen-non-.../#post11833198
The way it looked as delivered in 2007 for a 4 rotor conversion. This too never ran. See link: https://www.rx7club.com/1st-generati...-build-638177/
In case you're wondering, I did eventually stack the real 4 rotor to go into the blue car or something, but it never ran and the owner wanted to sell the parts so I tore it down and sold everything.
The 20B build began in Sept 2011. It actually ran! See link: https://www.rx7club.com/20b-forum-95...gsl-se-967803/
But I wasn't happy with the result. I'm a carb guy. I only tried EFI because of the 20B. I didn't enjoy the process at all. I love wiring, don't get me wrong; I fabbed the whole harness. I also soldered the MegaSquirt together. That part I enjoyed, but when it came time to tune with a laptop and mess around with fuel injectors, fuel rails, the big six fingered hand of the 20B upper manifold etc, I just wasn't feeling any of it. Then when it came time to tune, I was totally clueless. See, with a carb, you're starting with something physical that actually exists in our 3d environment. With EFI, it's all stored in a chip. For you younger guys who've only ever driven and worked on EFI cars, this may not relate to you.
Because the 20B was not tuned, it had no real power, and the drivability sucked. At some point I had to move the blue car (81 S model with a 4 port 13B and Hitachi carb) out of the way to get the brown one out for some test driving, and the blue one fired right up for me and ran great! The 20B would always flood on startup which required a quickie deflood procedure every time (maybe due to the walbro). I think it was at that moment I realized the whole 20B setup just wasn't turning out as I had hoped. I spent probably hundreds of hours on it and it was only barely able to move under its own power. It didn't even sound that cool with the first full 3" exhaust, which was terrible, to the second long primary that had a little more power, but still didn't sound the way I had hoped and still didn't have the power I was looking for (I read I was supposed to get like 250HP NA out of this thing, which it wasn't even close to making). And even if I did manage to street tune it, and who knows how long that would take, my background is with carbs. Maybe I could wrap my head around EFI tuning and maybe I couldn't. But the proof was right there in front of my face as I was moving the blue car out of the way. I did't have to fight it to drive it, you know?
Did I fail, ultimately, with the 20B? Or did I wise up and move on at the right time? I think it was mostly the latter. I've been 100% happier since with the current setup.
In early 2013 I built two 13Bs for this car to try them both. An R5 4 port 13B and an S4 NA 6 port. I tried them both. I went with the R5! The S4 NA went into PercentSevenC's red car. See this link from before he got it back when it was my brother's car. https://www.rx7club.com/1st-gen-non-...ed-car-778113/
The R5 4 port 13B was broken-in NA with a hogged Nikki and then got a turbo! I spent the better part of 2014 learning how to boost tune it with the wideband.
Check out some early S5 turbo test fitting pics from late 2013:
Detached the wastegate arm to show how it hits the stock idler arm. This is why you need a MOOG idler arm.
With the MOOG installed, I set my sites on boost prepping a Nikki. My first thread on the subject where I go through everything I've ever read and try to come up with a game plan. Note several conclusions are wrong. Just FYI. https://www.rx7club.com/1st-generati...nikki-1049641/
My second thread attempting to stop a flooding problem. This is where a lot of progress was made. https://www.rx7club.com/1st-generati...nikki-1073440/
And just for fun, a mini build thread with mockup pics from before any testing was ever done in a car, showing how the Nikki and S5 turbo will fit on a 4 port 13B! https://www.rx7club.com/build-thread...build-1072467/
Here is a teaser pic.
And one of the hogged boost prepped Nikkis in the process of tuning (solder filled sec slow air bleeds swapped in).
Thread Starter
Joined: Aug 2001
Posts: 15,725
Likes: 91
From: Near Seattle
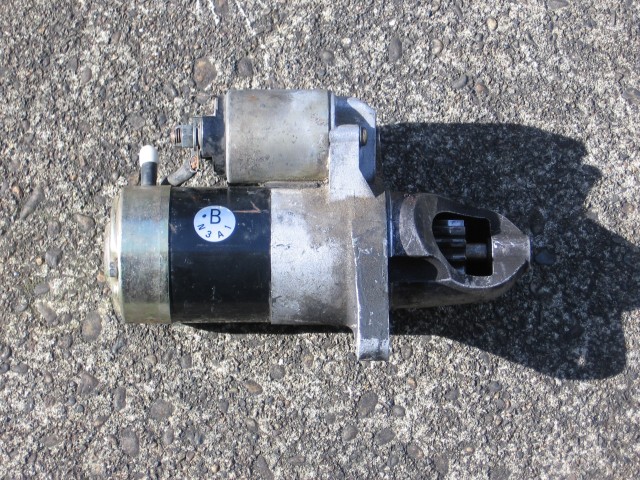
And here is the starter with the FD motor swapped into an FC nose. Notice I put a little vinyl cap over the weep hose because it's facing up now.
Clutch parts waiting to go in.
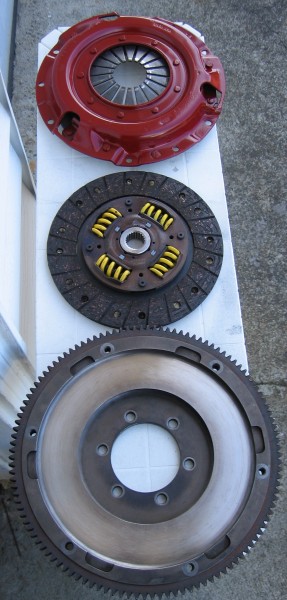
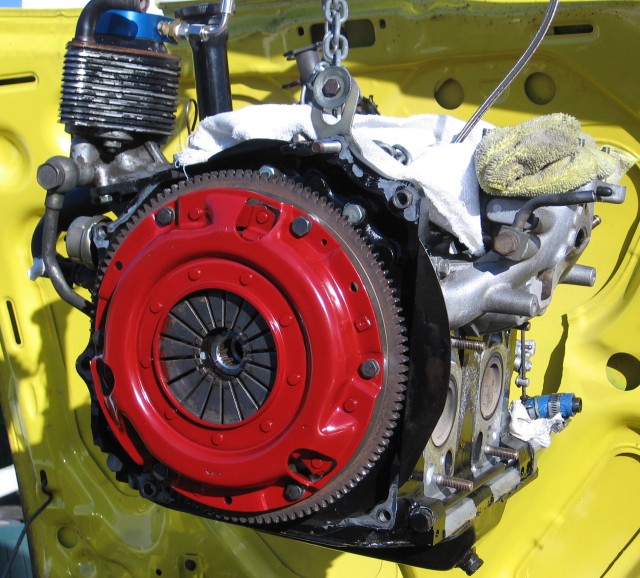
Going in. I realize it looks like ketchup and mustard. I had to grab a quick pic before it went it.
The Mallory with some proper 5/16" nipples swapped into the inlet/outlet.
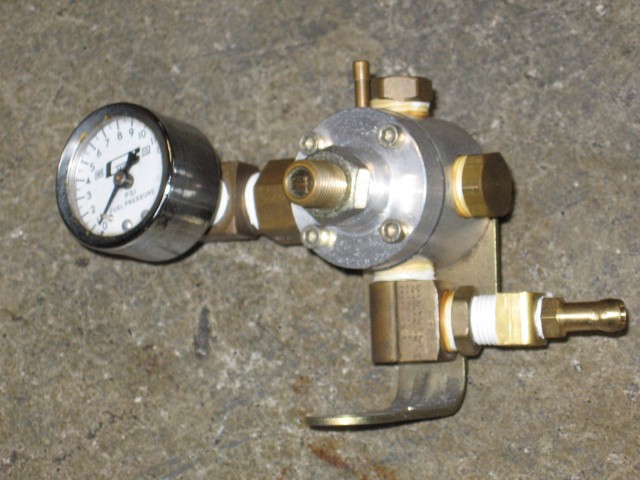
And a proper 3/8" return.
More pics coming as I piece everything back together.
Clutch parts waiting to go in.
Going in. I realize it looks like ketchup and mustard. I had to grab a quick pic before it went it.
The Mallory with some proper 5/16" nipples swapped into the inlet/outlet.
And a proper 3/8" return.
More pics coming as I piece everything back together.
Thread Starter
Joined: Aug 2001
Posts: 15,725
Likes: 91
From: Near Seattle
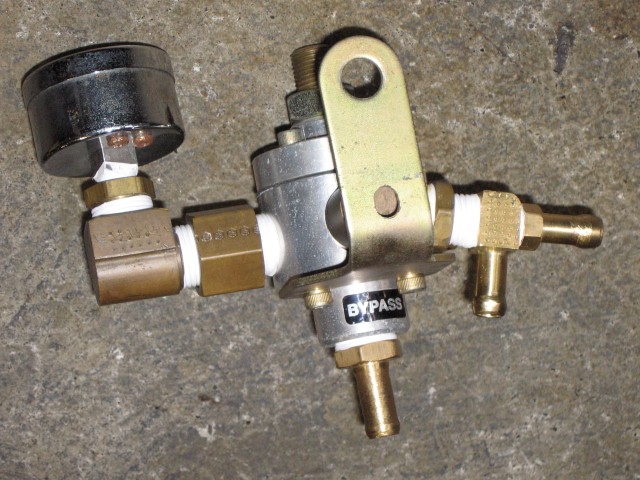
One more thing before I continue. This type of 90 degree brass nipple fitting is what I drilled and tapped to install a second nipple to work with the Mallory. It was seen buried near the bottom of page 2 of my Mallory thread so here it is again. There are many different ways to install a Mallory. I chose to do a T style fitting due to limited space reasons where the GSL-SE fuel lines are.

Now that introductions are out of the way, I can start posting build pics.
Here is one teaser pic of the housings I used. More info can be seen here: https://www.rx7club.com/1st-generati...dness-1019622/
That about does it for pics already uploaded on the forum. Now here are some archival ones.
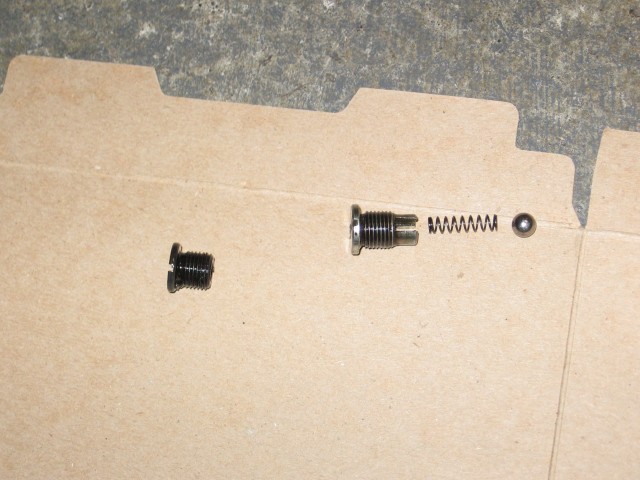
How to deal with stupid R5 full flow oil squirters in the shaft.
Mazdatrix sells these for racing only.
It's better to use normal checkball squirters on the street.
And now the engine is stacked.
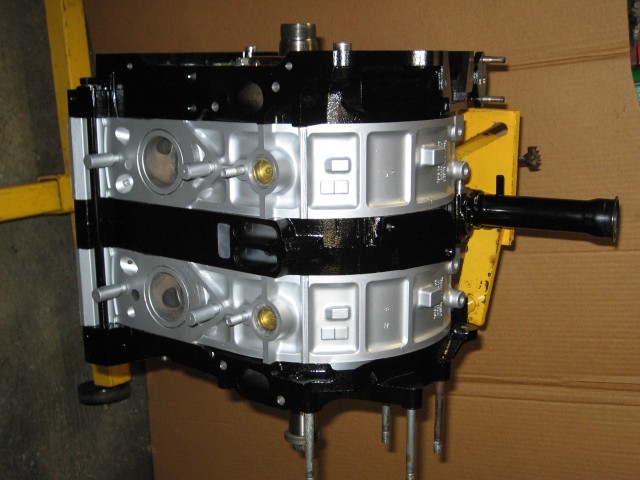
So beautiful.
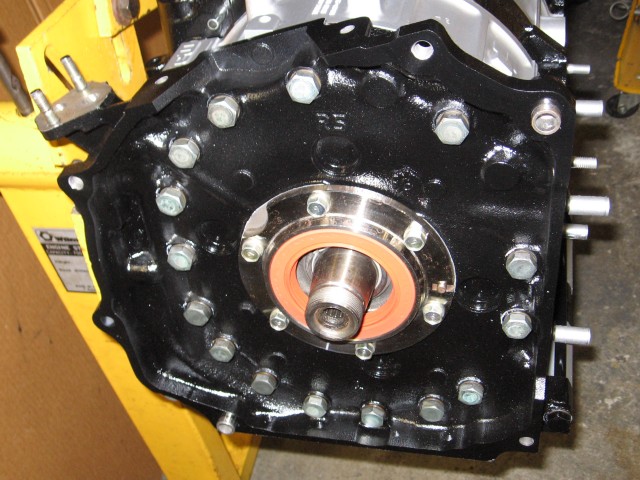
And the wonderful R5 we all know and love. Well, some of us like divindriver do.
Notice this is only a 17 tension bolt R5. Not bad though.
Now that introductions are out of the way, I can start posting build pics.
Here is one teaser pic of the housings I used. More info can be seen here: https://www.rx7club.com/1st-generati...dness-1019622/
That about does it for pics already uploaded on the forum. Now here are some archival ones.
How to deal with stupid R5 full flow oil squirters in the shaft.
Mazdatrix sells these for racing only.
It's better to use normal checkball squirters on the street.
And now the engine is stacked.
So beautiful.
And the wonderful R5 we all know and love. Well, some of us like divindriver do.
Notice this is only a 17 tension bolt R5. Not bad though.
Thread Starter
Joined: Aug 2001
Posts: 15,725
Likes: 91
From: Near Seattle
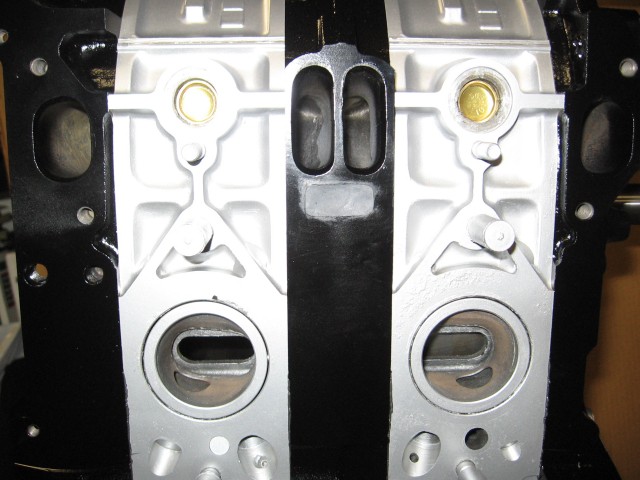
Specs for the engine are:
•17 tension bolt nitrided R5 front and rear irons with a Y intermediate plate.
•All ported to 74 spec
•J-spec old school rotor housings came stock with weird double wall sleeves that tend to get loose over time. I cut out the restrictive inner sleeves to drive a turbo better. I kept the stock GSL-SE exhaust port timing but in hind sight could have ported out to T2 spec and still retained an anti-reversion lip. I may get my wish as will be seen and explained at the end of this post.
•S4 NA rotating assembly
•high volume oil pump
•crushed ROPR for about 85 psi
•filled coolant ports with brass freeze plugs
•filled ACV port because some intake manifolds don't cover it and I can't have exhaust gasses pulsing up and heating an intake manifold.
•R5 front cover for more strength
•early short nipple OMP for more volume (sprung a leak recently gurr)
•front cover drilled and tapped for turbo oil return
I could have gone way bigger on those exhaust ports.
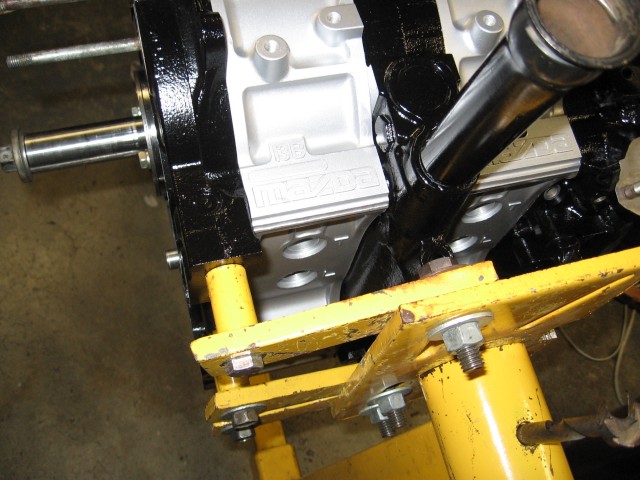
For those who asked about using the arms that come with engine stands, yes, they work.
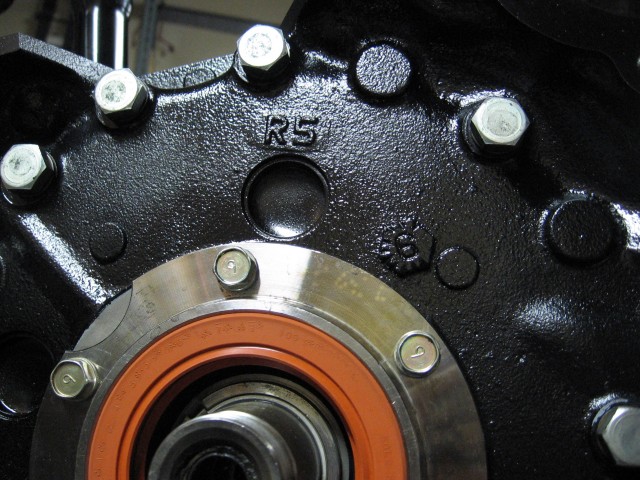
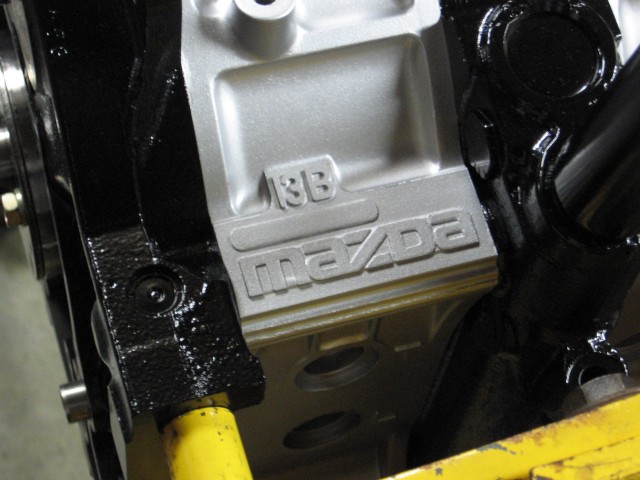
Just a closeup of the weird blank where it used to say "Automobiles" on earlier J-spec housings.
Peek-a-boo. This front iron had a bad threaded hole so I only used three arms.
John Huijben would like this. Just an experiment I needed to test on an assembled engine. It obviously came back off before the front cover went on.
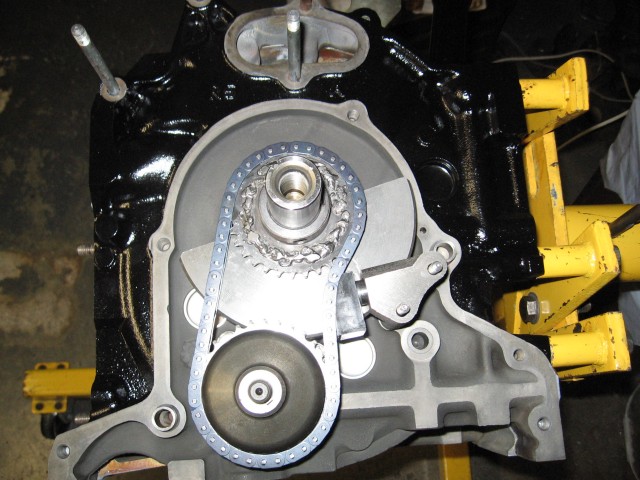
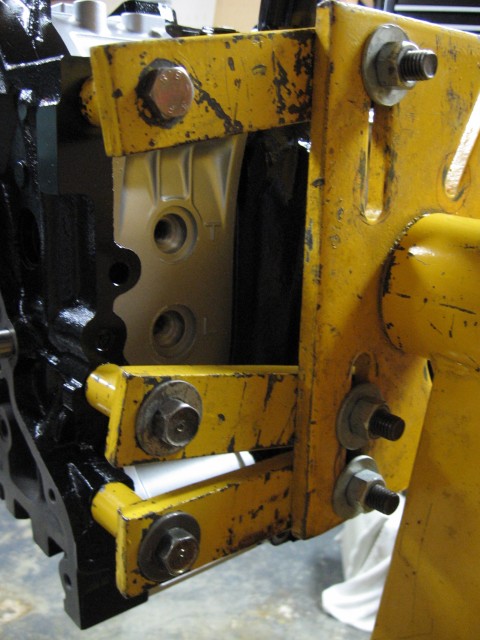
Here is the reason to maybe tear this engine back down.
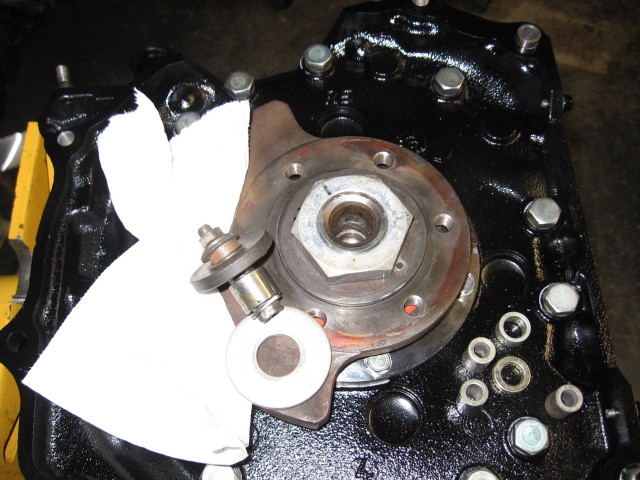
Turns out the previous owner hogged out the pilot bearing hole. I fabbed up a little pilot bearing puller and easily got the old one out. The hole is so big it is no longer an interference fit. When I tapped the new pilot bearing in, it had to go all the way in until it hit the stop ridge inside. The new pilot seal didn't fit right at all. I attempted to add girth to it with two wraps of aluminum tape. It seemed to work. However just the other day when I pulled the engine for a clutch swap as seen above, the pilot seal had come loose and allowed grease to fling out. Fortunately it got caught in the grease trap of the RB light steel flywheel so none got on the disc.
This problem will occour again. The last clutch was in there for only 325 miles because it felt a little weak with a turbo, and this was enough time for the aluminum tape to fail. So now I have about 300 miles to figure out my next move.
I'm not aware of a quick fix for a wallowed out hole. Maybe I can find an oversized pilot seal? Or maybe I can just do a quickie teardown to swap shafts?
I'm beginning to work on a plan to swap in a set of 18 tension bolt R5 irons to this beast and also port out the exhaust ports to T2 spec! You know, two birds, one stone. I'm just on the lookout for a spare e-shaft. I might go ahead and build a Y 13B in the meantime, just to tide me over and do a little more turbo testing until the R5 can be swapped around.
•17 tension bolt nitrided R5 front and rear irons with a Y intermediate plate.
•All ported to 74 spec
•J-spec old school rotor housings came stock with weird double wall sleeves that tend to get loose over time. I cut out the restrictive inner sleeves to drive a turbo better.
I kept the stock GSL-SE exhaust port timing but in hind sight could have ported out to T2 spec and still retained an anti-reversion lip. I may get my wish as will be seen and explained at the end of this post.•S4 NA rotating assembly
•high volume oil pump
•crushed ROPR for about 85 psi
•filled coolant ports with brass freeze plugs
•filled ACV port because some intake manifolds don't cover it and I can't have exhaust gasses pulsing up and heating an intake manifold.
•R5 front cover for more strength
•early short nipple OMP for more volume (sprung a leak recently gurr)
•front cover drilled and tapped for turbo oil return
I could have gone way bigger on those exhaust ports.
For those who asked about using the arms that come with engine stands, yes, they work.
Just a closeup of the weird blank where it used to say "Automobiles" on earlier J-spec housings.
Peek-a-boo. This front iron had a bad threaded hole so I only used three arms.
John Huijben would like this. Just an experiment I needed to test on an assembled engine. It obviously came back off before the front cover went on.
Here is the reason to maybe tear this engine back down.
Turns out the previous owner hogged out the pilot bearing hole. I fabbed up a little pilot bearing puller and easily got the old one out. The hole is so big it is no longer an interference fit. When I tapped the new pilot bearing in, it had to go all the way in until it hit the stop ridge inside. The new pilot seal didn't fit right at all. I attempted to add girth to it with two wraps of aluminum tape. It seemed to work. However just the other day when I pulled the engine for a clutch swap as seen above, the pilot seal had come loose and allowed grease to fling out. Fortunately it got caught in the grease trap of the RB light steel flywheel so none got on the disc.
This problem will occour again. The last clutch was in there for only 325 miles because it felt a little weak with a turbo, and this was enough time for the aluminum tape to fail. So now I have about 300 miles to figure out my next move.
I'm not aware of a quick fix for a wallowed out hole. Maybe I can find an oversized pilot seal? Or maybe I can just do a quickie teardown to swap shafts?
I'm beginning to work on a plan to swap in a set of 18 tension bolt R5 irons to this beast and also port out the exhaust ports to T2 spec! You know, two birds, one stone. I'm just on the lookout for a spare e-shaft. I might go ahead and build a Y 13B in the meantime, just to tide me over and do a little more turbo testing until the R5 can be swapped around.


I think my turbo is gonna be closer than yours; I have a 5/8" spacer on mine to clear the intake manifold.
Good to have a nice reference thread here... this ought to clear up my favorites list on IE. :P
Good to have a nice reference thread here... this ought to clear up my favorites list on IE. :P
Thread Starter
Joined: Aug 2001
Posts: 15,725
Likes: 91
From: Near Seattle
And now for a couple of extra pics.
This is of the slightly longer straighter header made from an RB kit. This was for PercentSevenC's red car. It's relevant because...
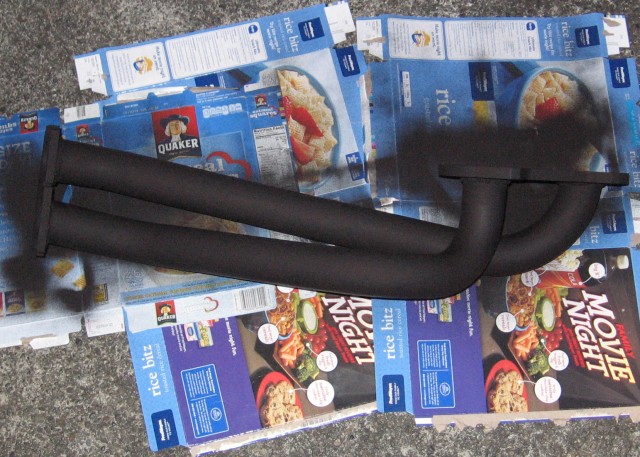
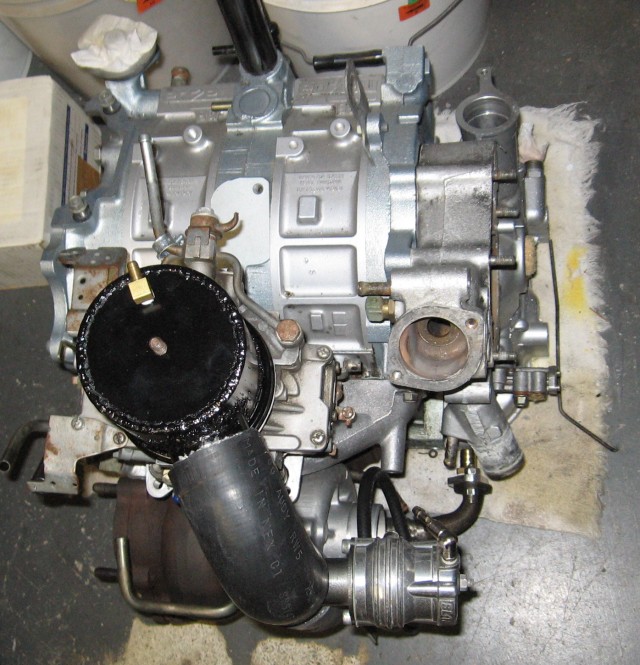
It was fabbed in the brown car. And here it is being tested on the 6 port, also in the brown car. I think this is the only pic I have of the 6 port. Seen here the injectors were blocked to run with a carb. I test drove this engine in the brown car first, before the R5. It reved well enough to hear the tach buzzer for the first time!
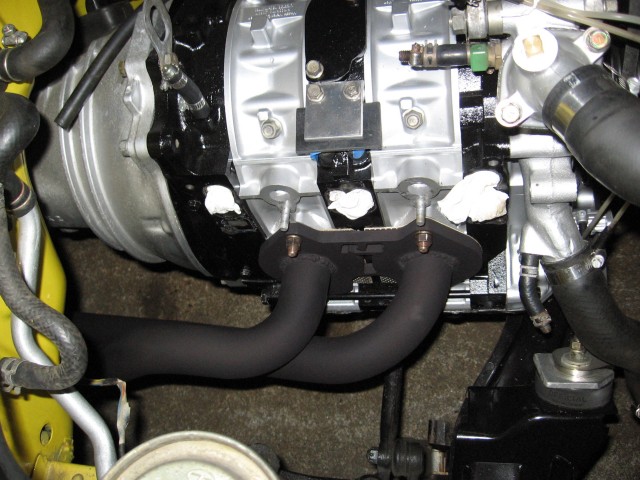
I did eventually test run it with the stock S4 NA ECU in this car, but only briefly. Then we did the actual install in the red car early 2014. I just wanted to get it out of the way for some R5 turbo action that was yet to come!
This is of the slightly longer straighter header made from an RB kit. This was for PercentSevenC's red car. It's relevant because...
It was fabbed in the brown car. And here it is being tested on the 6 port, also in the brown car. I think this is the only pic I have of the 6 port. Seen here the injectors were blocked to run with a carb. I test drove this engine in the brown car first, before the R5. It reved well enough to hear the tach buzzer for the first time!
I did eventually test run it with the stock S4 NA ECU in this car, but only briefly. Then we did the actual install in the red car early 2014. I just wanted to get it out of the way for some R5 turbo action that was yet to come!

Trending Topics
Thread Starter
Joined: Aug 2001
Posts: 15,725
Likes: 91
From: Near Seattle
Thanks, Qingdao.
Now with 6 port stuff out of the way, I can get to the good stuff.
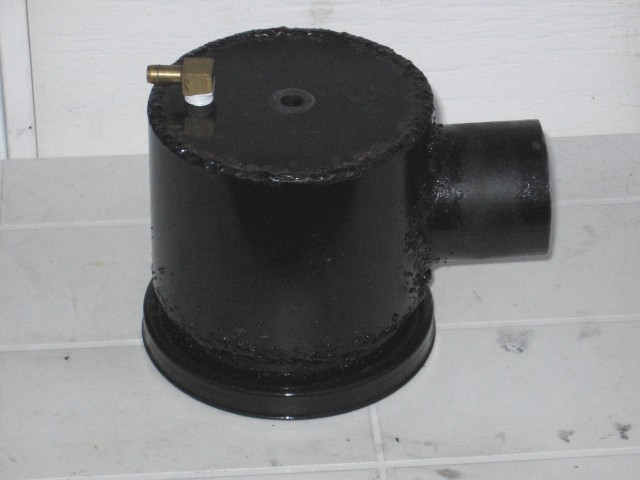
The carb hat was custom made from a stock blue air cleaner assembly; the rubber seal part was welded to a 4" ERW tube a little over 2" tall and a 1/4" steel plate welded to the top for the hold down nut to not deform it. A 2" 14 gauge tube is welded at a 90 degree for the charge pipe inlet. Then painted with epoxy paint for rust prevention. I suppose powercoating would be better.
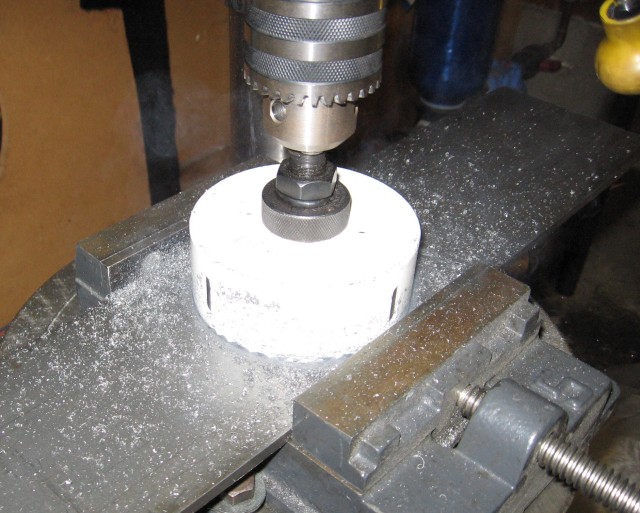
Just a shot of the 4" hole saw doing its thing to some 1018 steel plate.
I don't have any other pics of the build process, but it's pretty straight forward.
Here is the finished hat from above as seen in the thread linked to earlier.
The brass nipple is for the Mallory 4309's boost reference hose. Works well but is quite sensitive. I had to add a calibrated boost leak of about 1mm inline as seen in the mallory thread above. This tamed the mallory and worked out very well. I'm not sure anyone else ever did this before. Or had to do this before.
Now with 6 port stuff out of the way, I can get to the good stuff.
The carb hat was custom made from a stock blue air cleaner assembly; the rubber seal part was welded to a 4" ERW tube a little over 2" tall and a 1/4" steel plate welded to the top for the hold down nut to not deform it. A 2" 14 gauge tube is welded at a 90 degree for the charge pipe inlet. Then painted with epoxy paint for rust prevention. I suppose powercoating would be better.
Just a shot of the 4" hole saw doing its thing to some 1018 steel plate.
I don't have any other pics of the build process, but it's pretty straight forward.
Here is the finished hat from above as seen in the thread linked to earlier.
The brass nipple is for the Mallory 4309's boost reference hose. Works well but is quite sensitive. I had to add a calibrated boost leak of about 1mm inline as seen in the mallory thread above. This tamed the mallory and worked out very well. I'm not sure anyone else ever did this before. Or had to do this before.
Thread Starter
Joined: Aug 2001
Posts: 15,725
Likes: 91
From: Near Seattle
Thanks Lindahl. I figured you'd like the part with the engine stand arms. I knew I had a pic or two somewhere around here.
I almost forgot to mention the brown car's original setup when the PO got it back in '97. It was a very stock GSL-SE. He did a little burnout at the end of his street, I think with me in it. It seemed tighter than my brother's GSL-SE because it had only 148k while my brother's had 200k. Then he pulled the engine and sold it for 400 bucks to the shop that did the FD conversion. And that's when it sat for a really long time until he just wanted it gone. He even bought a widebody kit for it which never got installed, thank goodness. I was able to get the car probably because it never got molested and never ran for him after he pulled the stock engine lol.
I almost forgot to mention the brown car's original setup when the PO got it back in '97. It was a very stock GSL-SE. He did a little burnout at the end of his street, I think with me in it. It seemed tighter than my brother's GSL-SE because it had only 148k while my brother's had 200k. Then he pulled the engine and sold it for 400 bucks to the shop that did the FD conversion. And that's when it sat for a really long time until he just wanted it gone. He even bought a widebody kit for it which never got installed, thank goodness. I was able to get the car probably because it never got molested and never ran for him after he pulled the stock engine lol.
Thread Starter
Joined: Aug 2001
Posts: 15,725
Likes: 91
From: Near Seattle
I recently did a production run of semi-locked distributors. Thread can be seen here: https://www.rx7club.com/1st-generati...boost-1077251/
Teaser pic:
The reason to go semi-locked or limited advance is pretty duh-simple. I won't get into how limiting total advance on a boosted engine is a good idea here, but I will say it is far superior compared to a fully locked dizzy if you plan to start your engine and then drive it. Oh and the ability to idle correctly is pretty important too.
Now I don't know about any of you, but whenever I would rotate a dizzy too far advanced at idle, the engine sounds like it doesn't really like it. Same goes for when you retard the timing too far. What semi-locking does is allows for a correct idle timing of TDC or 0 degrees and then only advances as far as it is allowed to as set by the slot length. I know it seems pretty hands-on compared to just punching something into a laptop, but hands-on is how I roll, I guess. Plus no need for a fragile laptop in a car environment!
I also have classic DLIDFIS installed with J-109 ignitors and stock Diamond coils. Not even an ignition relay - it all runs through the key switch! No need for fancy aftermarket HEIs or accel super coils or whatever, either. My ignition has plenty of "juice" for boost. Or that is to say the boost creep to 7psi or whatever the stock unported wastegate on a full 3" exhaust gets to, hasn't caused any problems at all, ignition wise.
Stock 12A BR8EQ-14 spark plugs too. I guess I can get a set of BR9EQ-14 for a stock GSL-SE if I need a cooler plug in the future. No need for weird motorcycle plugs, even though I think I could install them because my housings don't seem to have eyebrows over the plug holes.
What did you do for air filtration?
I'm thinking about finding a motorcycle "pod" filter to slip over that factory tinny compressor intake. I really want to hear my turbo spool more than anything else.
I'm thinking about finding a motorcycle "pod" filter to slip over that factory tinny compressor intake. I really want to hear my turbo spool more than anything else.
Thread Starter
Joined: Aug 2001
Posts: 15,725
Likes: 91
From: Near Seattle
Just a cheap Spetre filter from o'reilly's and a 60 degree elbow. Also a 2.5" to 3" rubber adaptor. It's not a cold air intake, but it does the job so far. I'll post pics when everything is back in.
I can hear mine spool quite well.
I can hear mine spool quite well.
Thread Starter
Joined: Aug 2001
Posts: 15,725
Likes: 91
From: Near Seattle
Now that it's all back together I thought I'd post a pic from each side to give you guys some ideas for setting up your own blow through Nikkis.
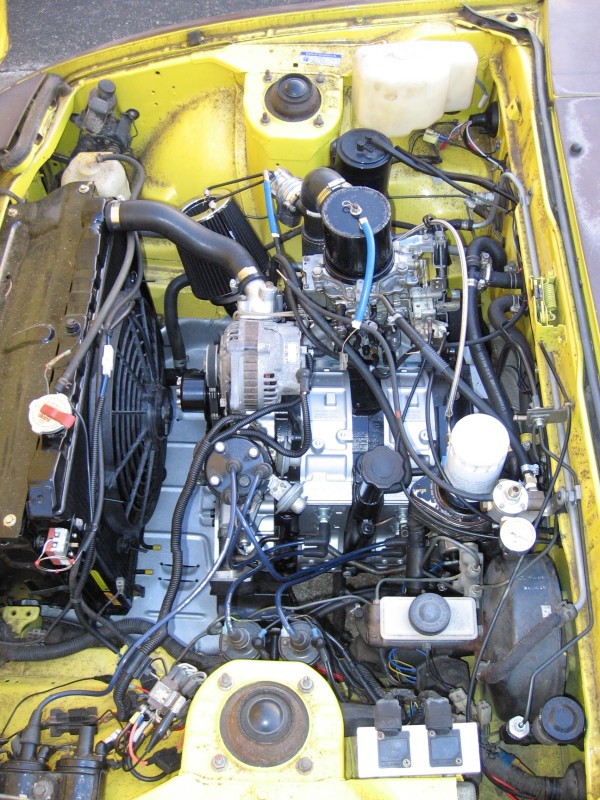
And here is the carb hat from the side. Very simple with parts easy to get and easy to assemble.
Speaking of easy to assemble, check out this noise isolation mount idea. Air pump brackets can be useful.
MSD 2225
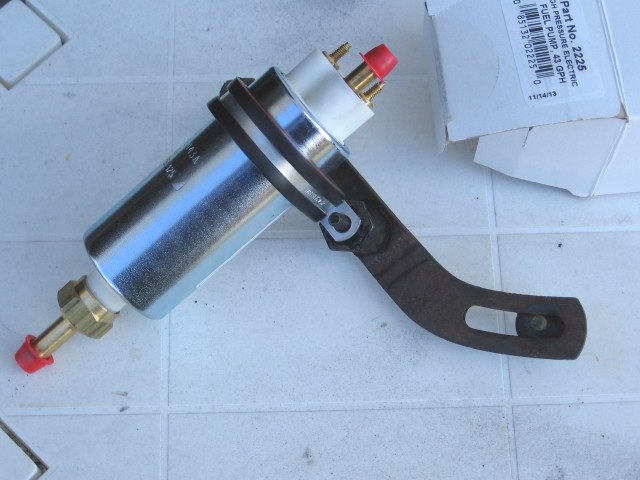
One bracket wasn't enough support so I installed a second at the other end of the pump. It's very well isolated and nice and quiet even without storage bins or sound deadening back there. I'm very happy with the results. I'll get a fully installed pic next time.
And here is the carb hat from the side. Very simple with parts easy to get and easy to assemble.
Speaking of easy to assemble, check out this noise isolation mount idea. Air pump brackets can be useful.
MSD 2225
One bracket wasn't enough support so I installed a second at the other end of the pump. It's very well isolated and nice and quiet even without storage bins or sound deadening back there. I'm very happy with the results. I'll get a fully installed pic next time.

hadn't seen this 'til now, so yeah ... status check?
oh yeah, and while i don't mind the bruises and dead clear coat, can you promise me that you'll fix the engine bay, please? even if it's just a rattle can.
oh yeah, and while i don't mind the bruises and dead clear coat, can you promise me that you'll fix the engine bay, please? even if it's just a rattle can.

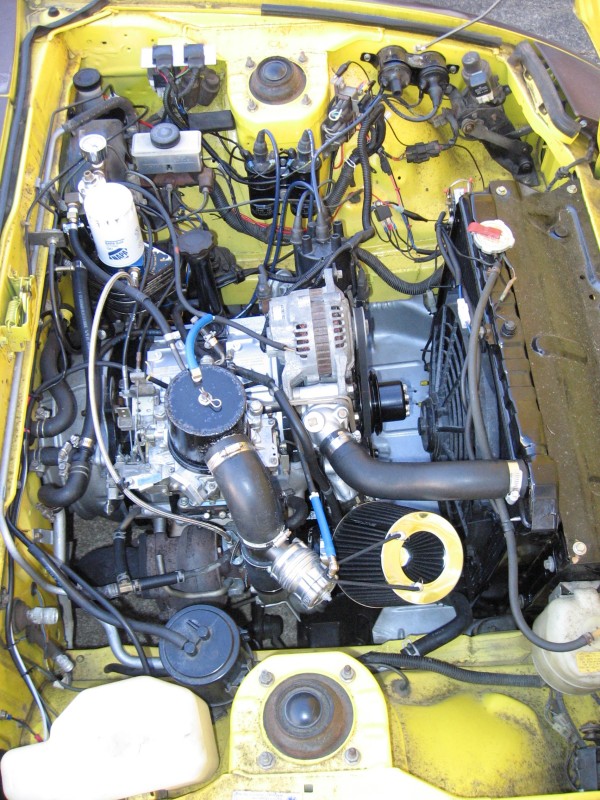
Yes that engine looks awesome!
I also noticed that you put the engine pan/shield under the radiator back in the car. Do they make a difference in anything? I've always removed them as weight reduction and it's easier to drain the radiator.
I also noticed that you put the engine pan/shield under the radiator back in the car. Do they make a difference in anything? I've always removed them as weight reduction and it's easier to drain the radiator.
My local rotary mechanic has always harassed me about keeping the pan on. It is important for keeping the air moving from the front of the car through the radiator, as opposed to the air going around the radiator. I have always imagined it as like ram-air for cooling.