
Austin's Red RestoMod - You Just Wait and See...

Thread Starter
Joined: Aug 2011
Posts: 3,078
Likes: 42
From: Cambridge, Minnesota
Austin's Red RestoMod - You Just Wait and See...
Hey again guys,
I've been on the forum for just over 3 years and 3 months now, had 4 FB's before this one, one FC, TII swapped an FB, had many daily driven cars and a lot of fun with the rotary up to this point in my life. First one I ever owned I bought at 17 years old from my then-girlfriend(now fiance, soon to be wife)'s grandpa after he heard I was looking for a small car. From that point on I was hooked and I haven't lost the rotary bug since. They're my addiction and I'm fine admitting that even though most people don't understand it - but I know you guys understand what I'm talking about.
Thanks for looking guys, I look forward to this build and all that it'll teach me!
Austin
Well that's enough about me, let's get on to the build at hand!
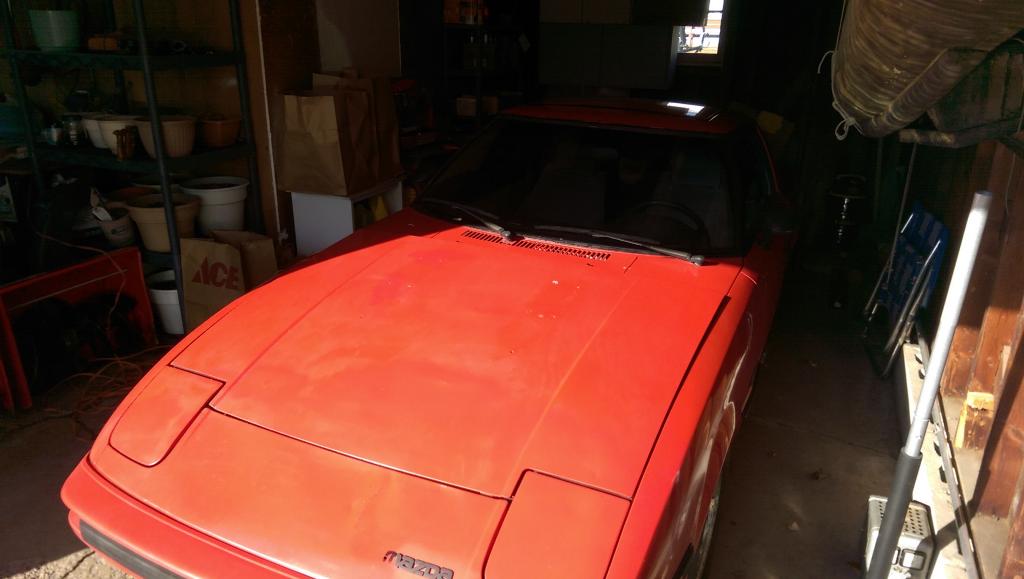
The Red Recipient
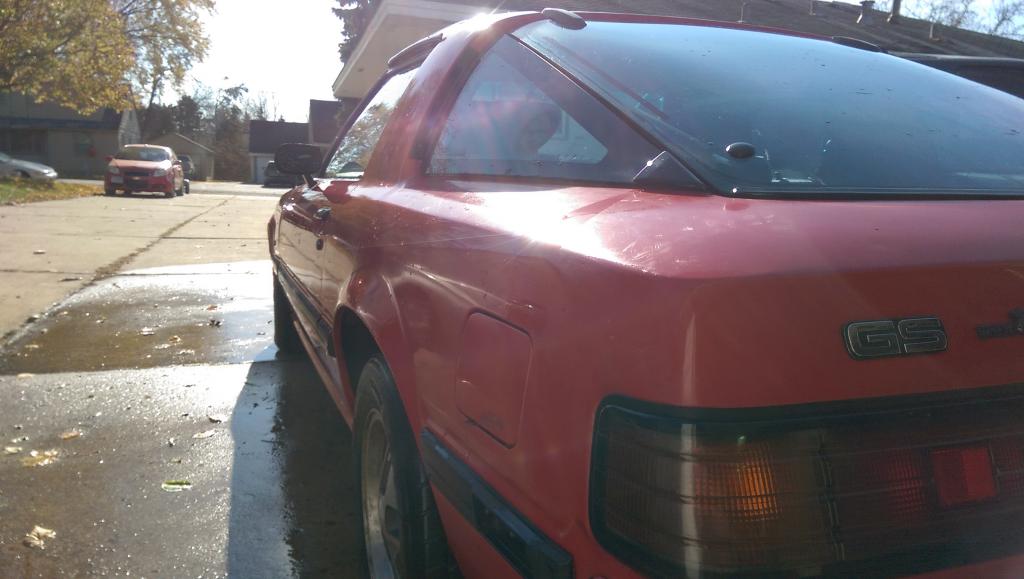
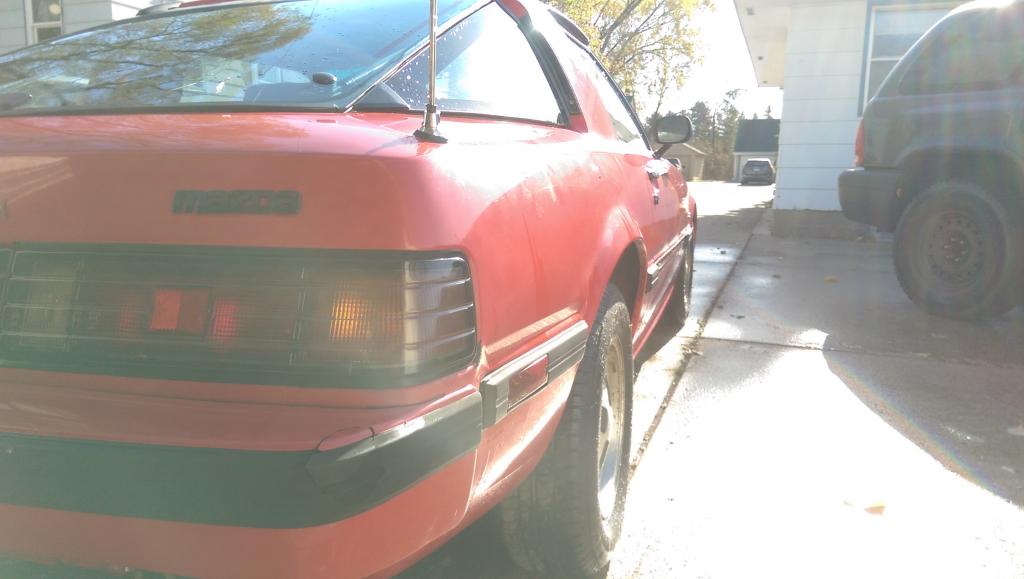
1984 Mazda GS RX-7
12a Rotary Engine with 4 speed Automatic transmission option
04/84 Build Date with RH "Sunrise Red" Paint Code
70,815mi on the Odometer
I'm the second long-term owner (title will show 3 owners)
Original owner had it for 30 years according to the title, will be contacting him to verify that fact (and see if he has any leftover parts laying around )
)
Restomod definition:
"You take an old car and modernize it with an updated engine, suspension, brakes, tires and electronics. And if you restomod the right way, you can revert back to stock at any time." - Jay Leno, Popular Mechanics
Build Details/Ideas/Never-Ending-To-Do-List
My plan is to restore the car to "better than original" condition by updating many parts and systems on the car including:
Body:
Repair all body damage on the car
Replace all body panels that are beyond repair
Door and window seals from Mazda
Rear wing - IMSA 3 piece or something very similar
Delete rubber side molding
Custom LED side markers
Sand and paint prep for respray
Respray car in RH "Sunrise Red" FB paint code or NT/NU "Vintage Red" FD paint code
Drivetrain:
Different gas tank (spotted a repair in the current tank on the car)
Full exhaust system from the header back, thinking long-primary style system
Nikki rebuild
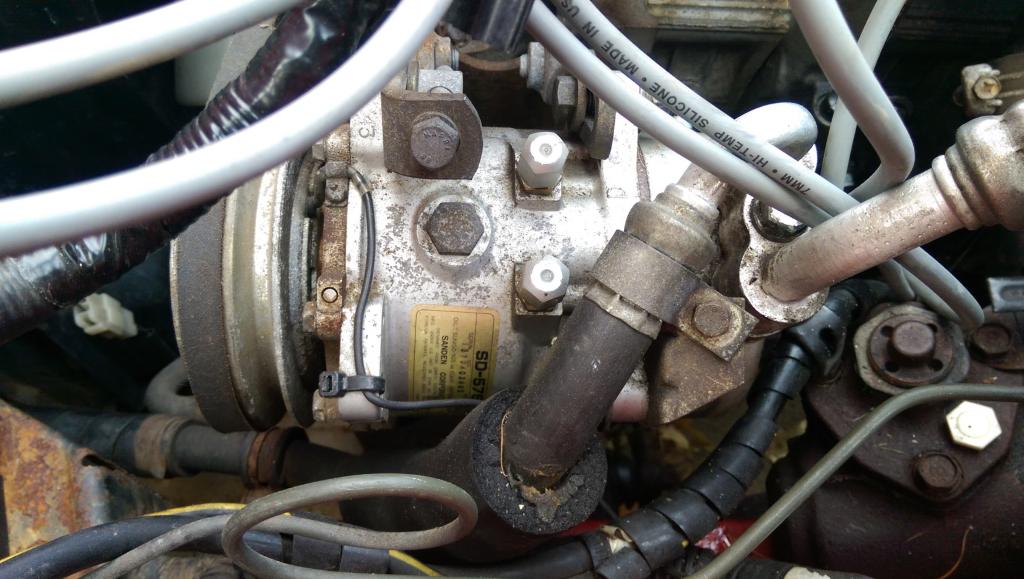
A/C full recharge for those muggy days
12a refresh - whether that means rebuild, new gaskets, whatever it needs to be reliable
Manual swap to 5 speed FB transmission
Update/replace suspension parts like bushings, shocks, springs, etc.
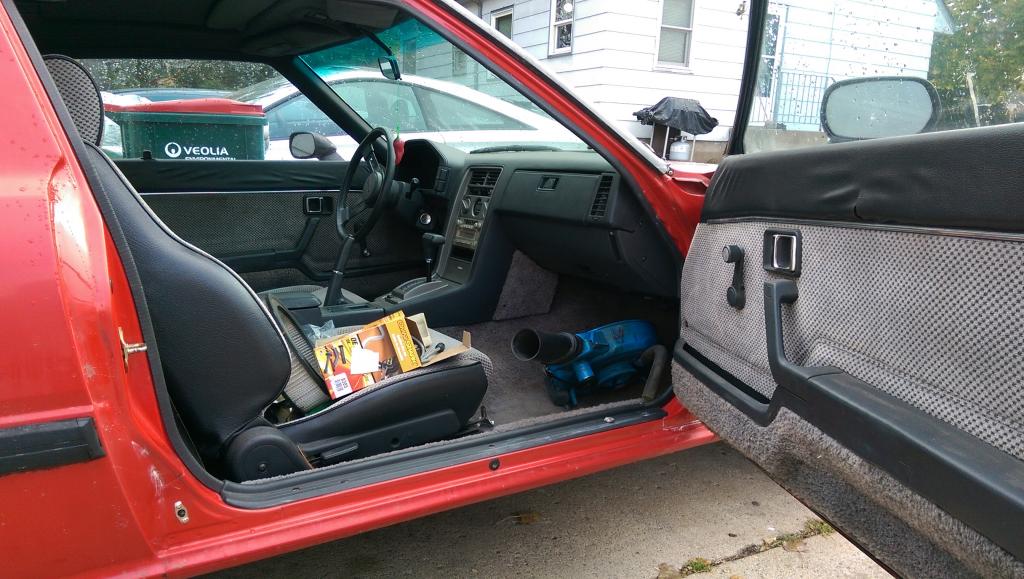
Interior:
Full set of front floor mats and rear hatch mat from the guy here on 7Club in gray
Stereo system upgrade to single-DIN deck and 4 new speakers
Sound deadening mats on doors especially, rear hatch and maybe some other areas
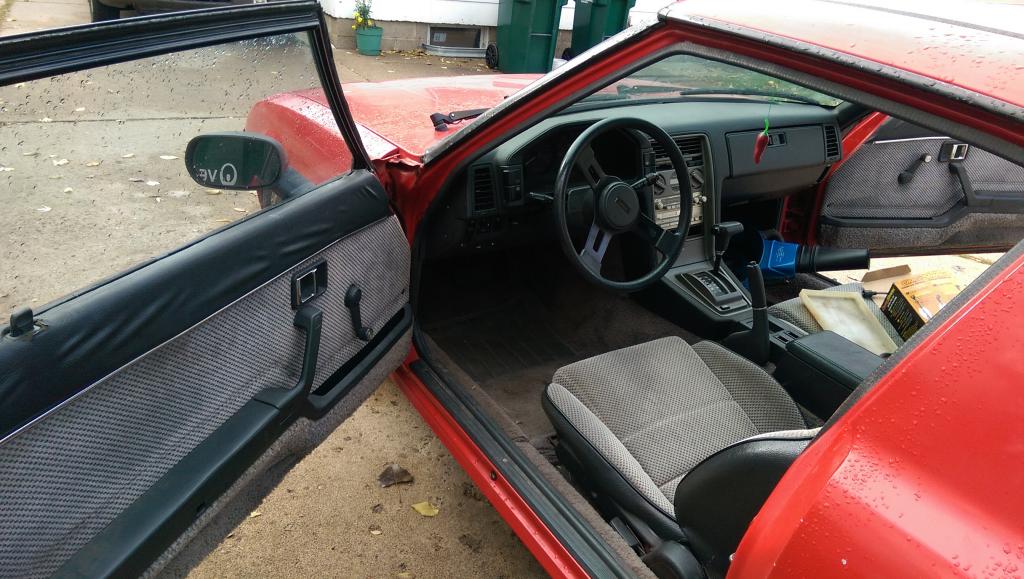
Reupholster top of door cards to look like factory but with marine-grade vinyl
Custom triple gauge center console insert
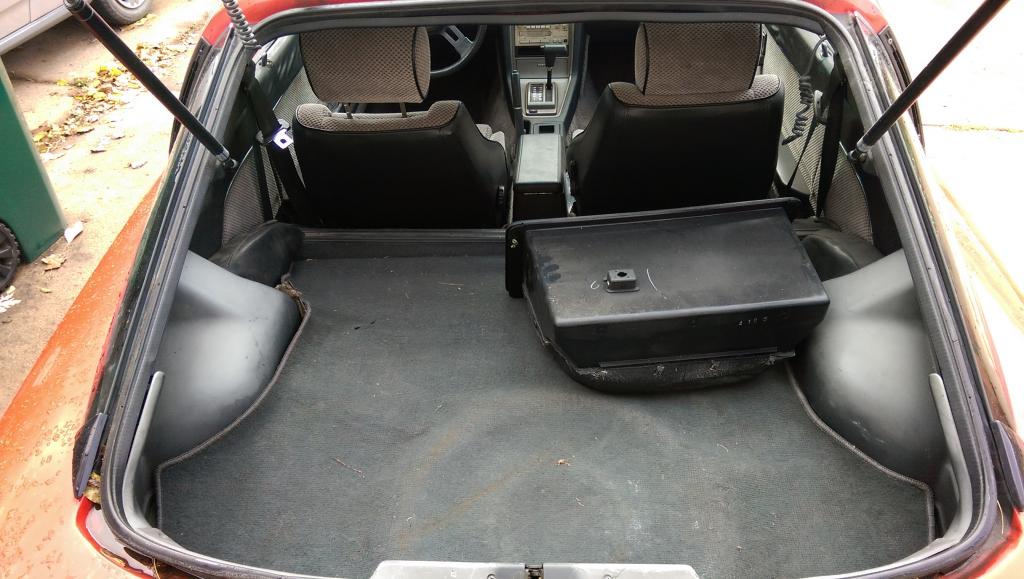
Relocate battery to rear bin behind passenger seat
Tint windows to 50% or 35%
Replace/fix all interior issues that I find

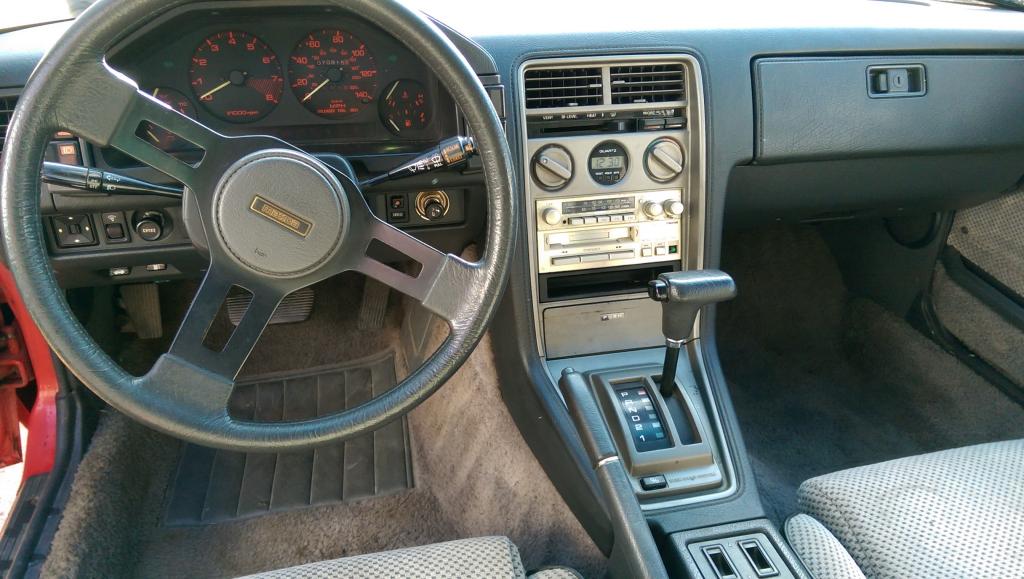
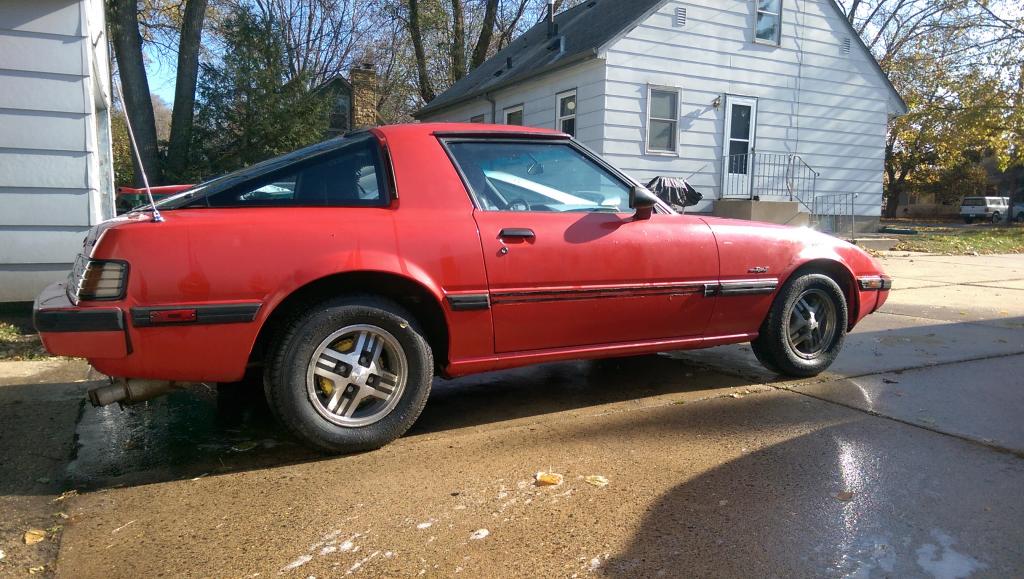
How she sits tonight:
Hey again guys,
I've been on the forum for just over 3 years and 3 months now, had 4 FB's before this one, one FC, TII swapped an FB, had many daily driven cars and a lot of fun with the rotary up to this point in my life. First one I ever owned I bought at 17 years old from my then-girlfriend(now fiance, soon to be wife)'s grandpa after he heard I was looking for a small car. From that point on I was hooked and I haven't lost the rotary bug since. They're my addiction and I'm fine admitting that even though most people don't understand it - but I know you guys understand what I'm talking about.
Thanks for looking guys, I look forward to this build and all that it'll teach me!
Austin
Well that's enough about me, let's get on to the build at hand!
The Red Recipient
1984 Mazda GS RX-7
12a Rotary Engine with 4 speed Automatic transmission option
04/84 Build Date with RH "Sunrise Red" Paint Code
70,815mi on the Odometer
I'm the second long-term owner (title will show 3 owners)
Original owner had it for 30 years according to the title, will be contacting him to verify that fact (and see if he has any leftover parts laying around
)Restomod definition:
"You take an old car and modernize it with an updated engine, suspension, brakes, tires and electronics. And if you restomod the right way, you can revert back to stock at any time." - Jay Leno, Popular Mechanics
Build Details/Ideas/Never-Ending-To-Do-List
My plan is to restore the car to "better than original" condition by updating many parts and systems on the car including:
Body:
Repair all body damage on the car
Replace all body panels that are beyond repair
Door and window seals from Mazda
Rear wing - IMSA 3 piece or something very similar
Delete rubber side molding
Custom LED side markers
Sand and paint prep for respray
Respray car in RH "Sunrise Red" FB paint code or NT/NU "Vintage Red" FD paint code


Drivetrain:
Different gas tank (spotted a repair in the current tank on the car)
Full exhaust system from the header back, thinking long-primary style system
Nikki rebuild
A/C full recharge for those muggy days
12a refresh - whether that means rebuild, new gaskets, whatever it needs to be reliable
Manual swap to 5 speed FB transmission
Update/replace suspension parts like bushings, shocks, springs, etc.


Interior:
Full set of front floor mats and rear hatch mat from the guy here on 7Club in gray
Stereo system upgrade to single-DIN deck and 4 new speakers
Sound deadening mats on doors especially, rear hatch and maybe some other areas
Reupholster top of door cards to look like factory but with marine-grade vinyl
Custom triple gauge center console insert
Relocate battery to rear bin behind passenger seat
Tint windows to 50% or 35%
Replace/fix all interior issues that I find


How she sits tonight:

Thread Starter
Joined: Aug 2011
Posts: 3,078
Likes: 42
From: Cambridge, Minnesota
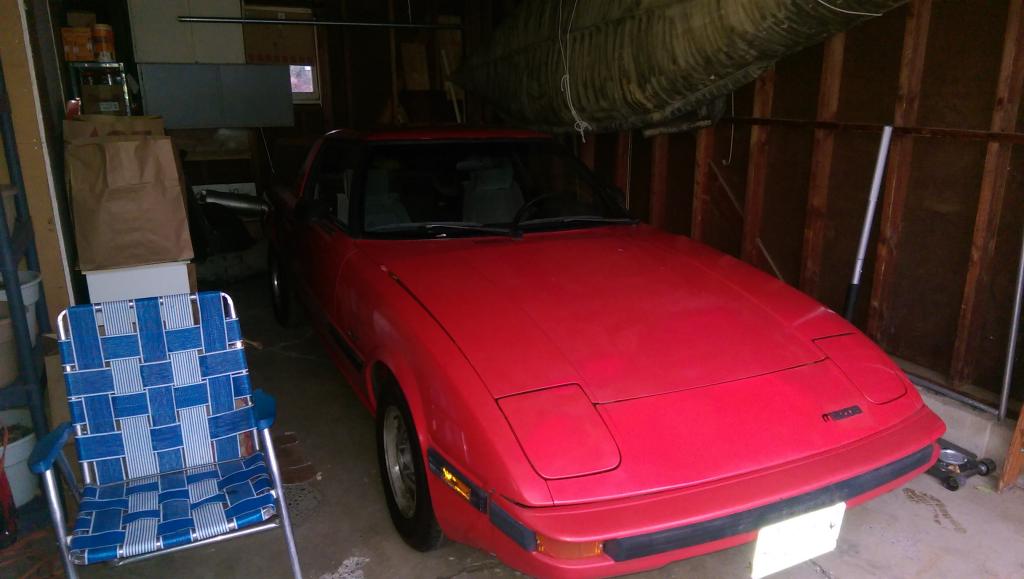
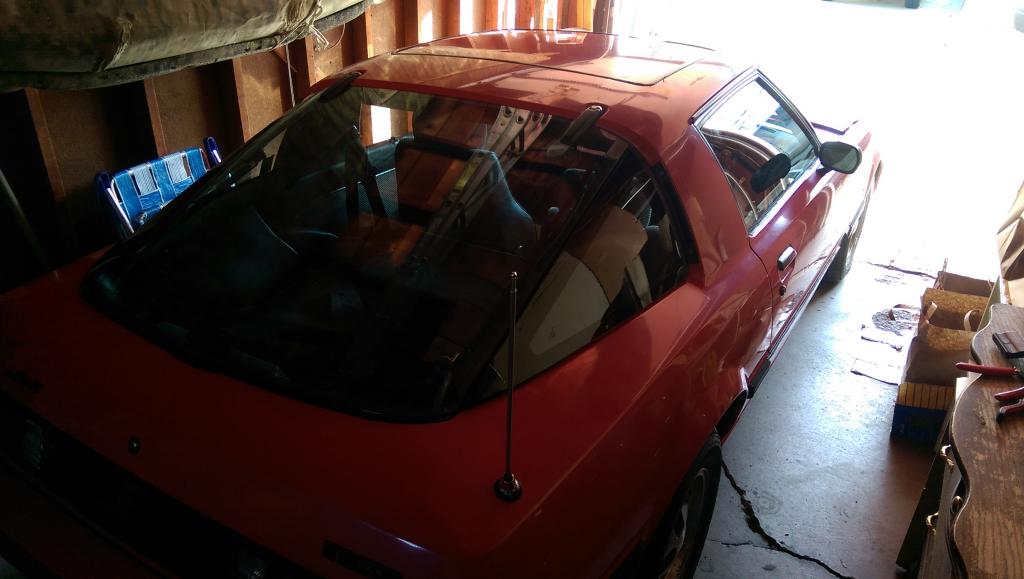
Cleaned the outside of the car and I admit that it cleaned up rather nicely. Still many body blemishes that really bother me, but I'll be fixing those over the winter. Once she was mostly dry I pushed it into its new home that I cleaned out, it fit rather well. Pretty snug in there but better than sitting outside!

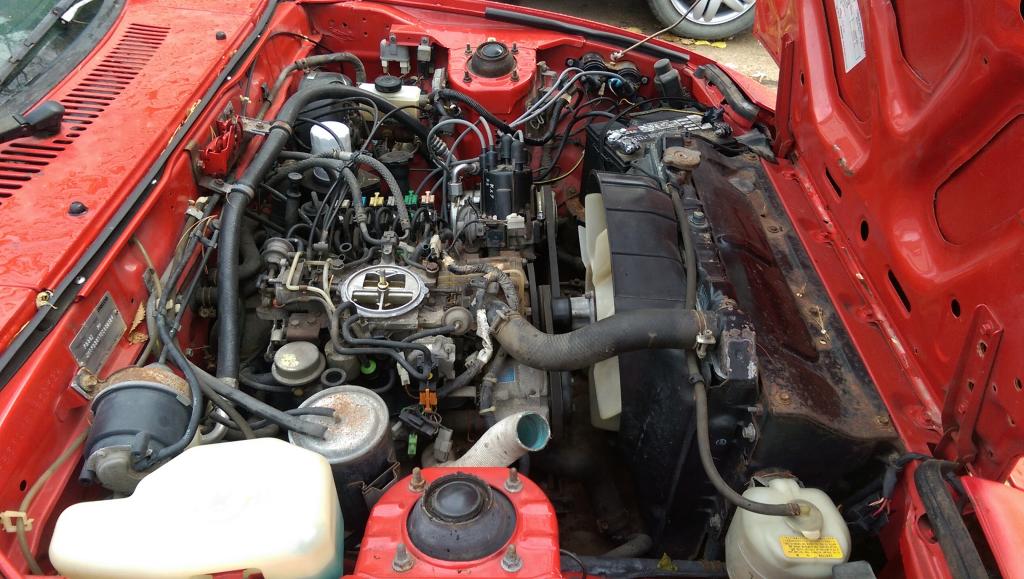
Worked on the car today and got a lot done in my opinion. The car still won't start, heck it won't even fire!
3 basic things to get a car to at least fire:
Fuel - yes
The fuel pump cutoff relay is now jumpered so the pump turns on when it's supposed to. Tested the flow and it appears to be working well enough to feed the Nikki. It's delivering and returning fuel so I'm not too terribly worried about fuel at the moment. (The ECU isn't sending power out to the B/Y wire in the fuel pump cutoff relay so I have to check out why that's happening, but the jumper is solving that problem for now). If anybody has any helpful ideas let me know. I'm thinking it has something to do with the Auto transmission, maybe a parking/neutral switch or something?

Air - yes
The throttle cable works correctly and it's getting air to the rotors. Pretty simple.
Spark - yes
We checked spark and it's getting spark at each plug. Both trailing and leading coils are working, getting power and creating spark.
My guess? Timing is way off.
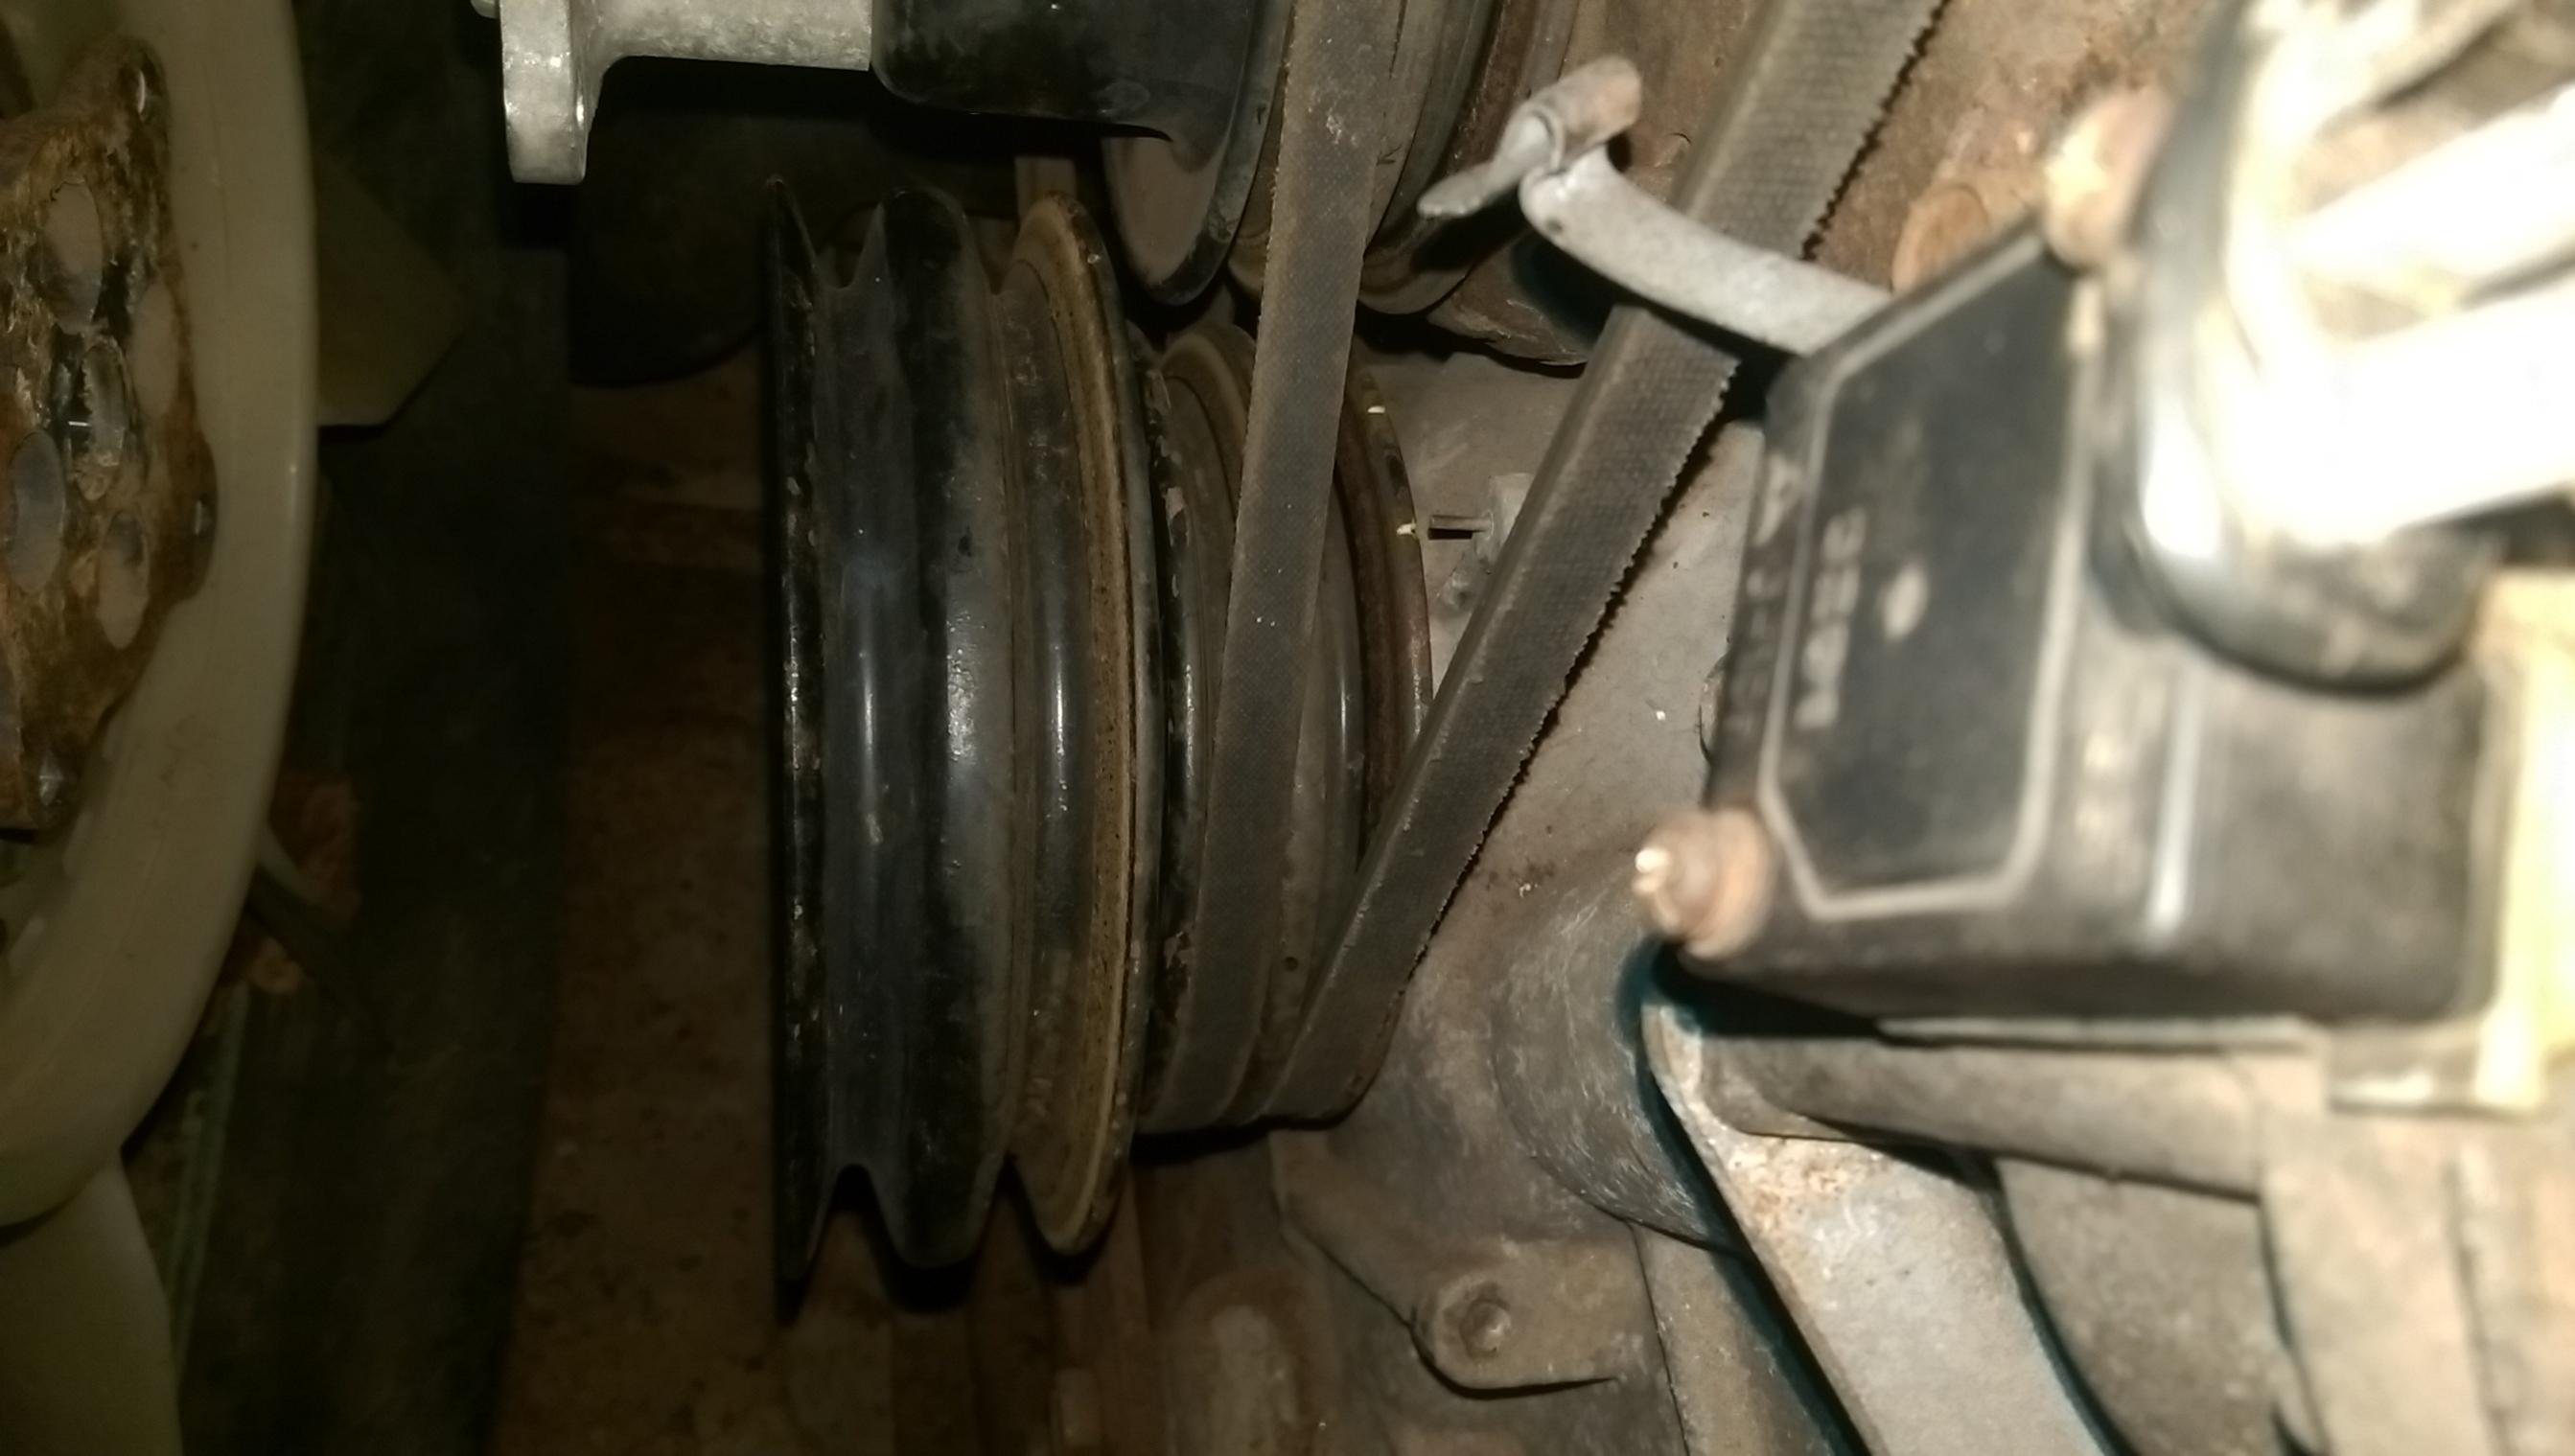
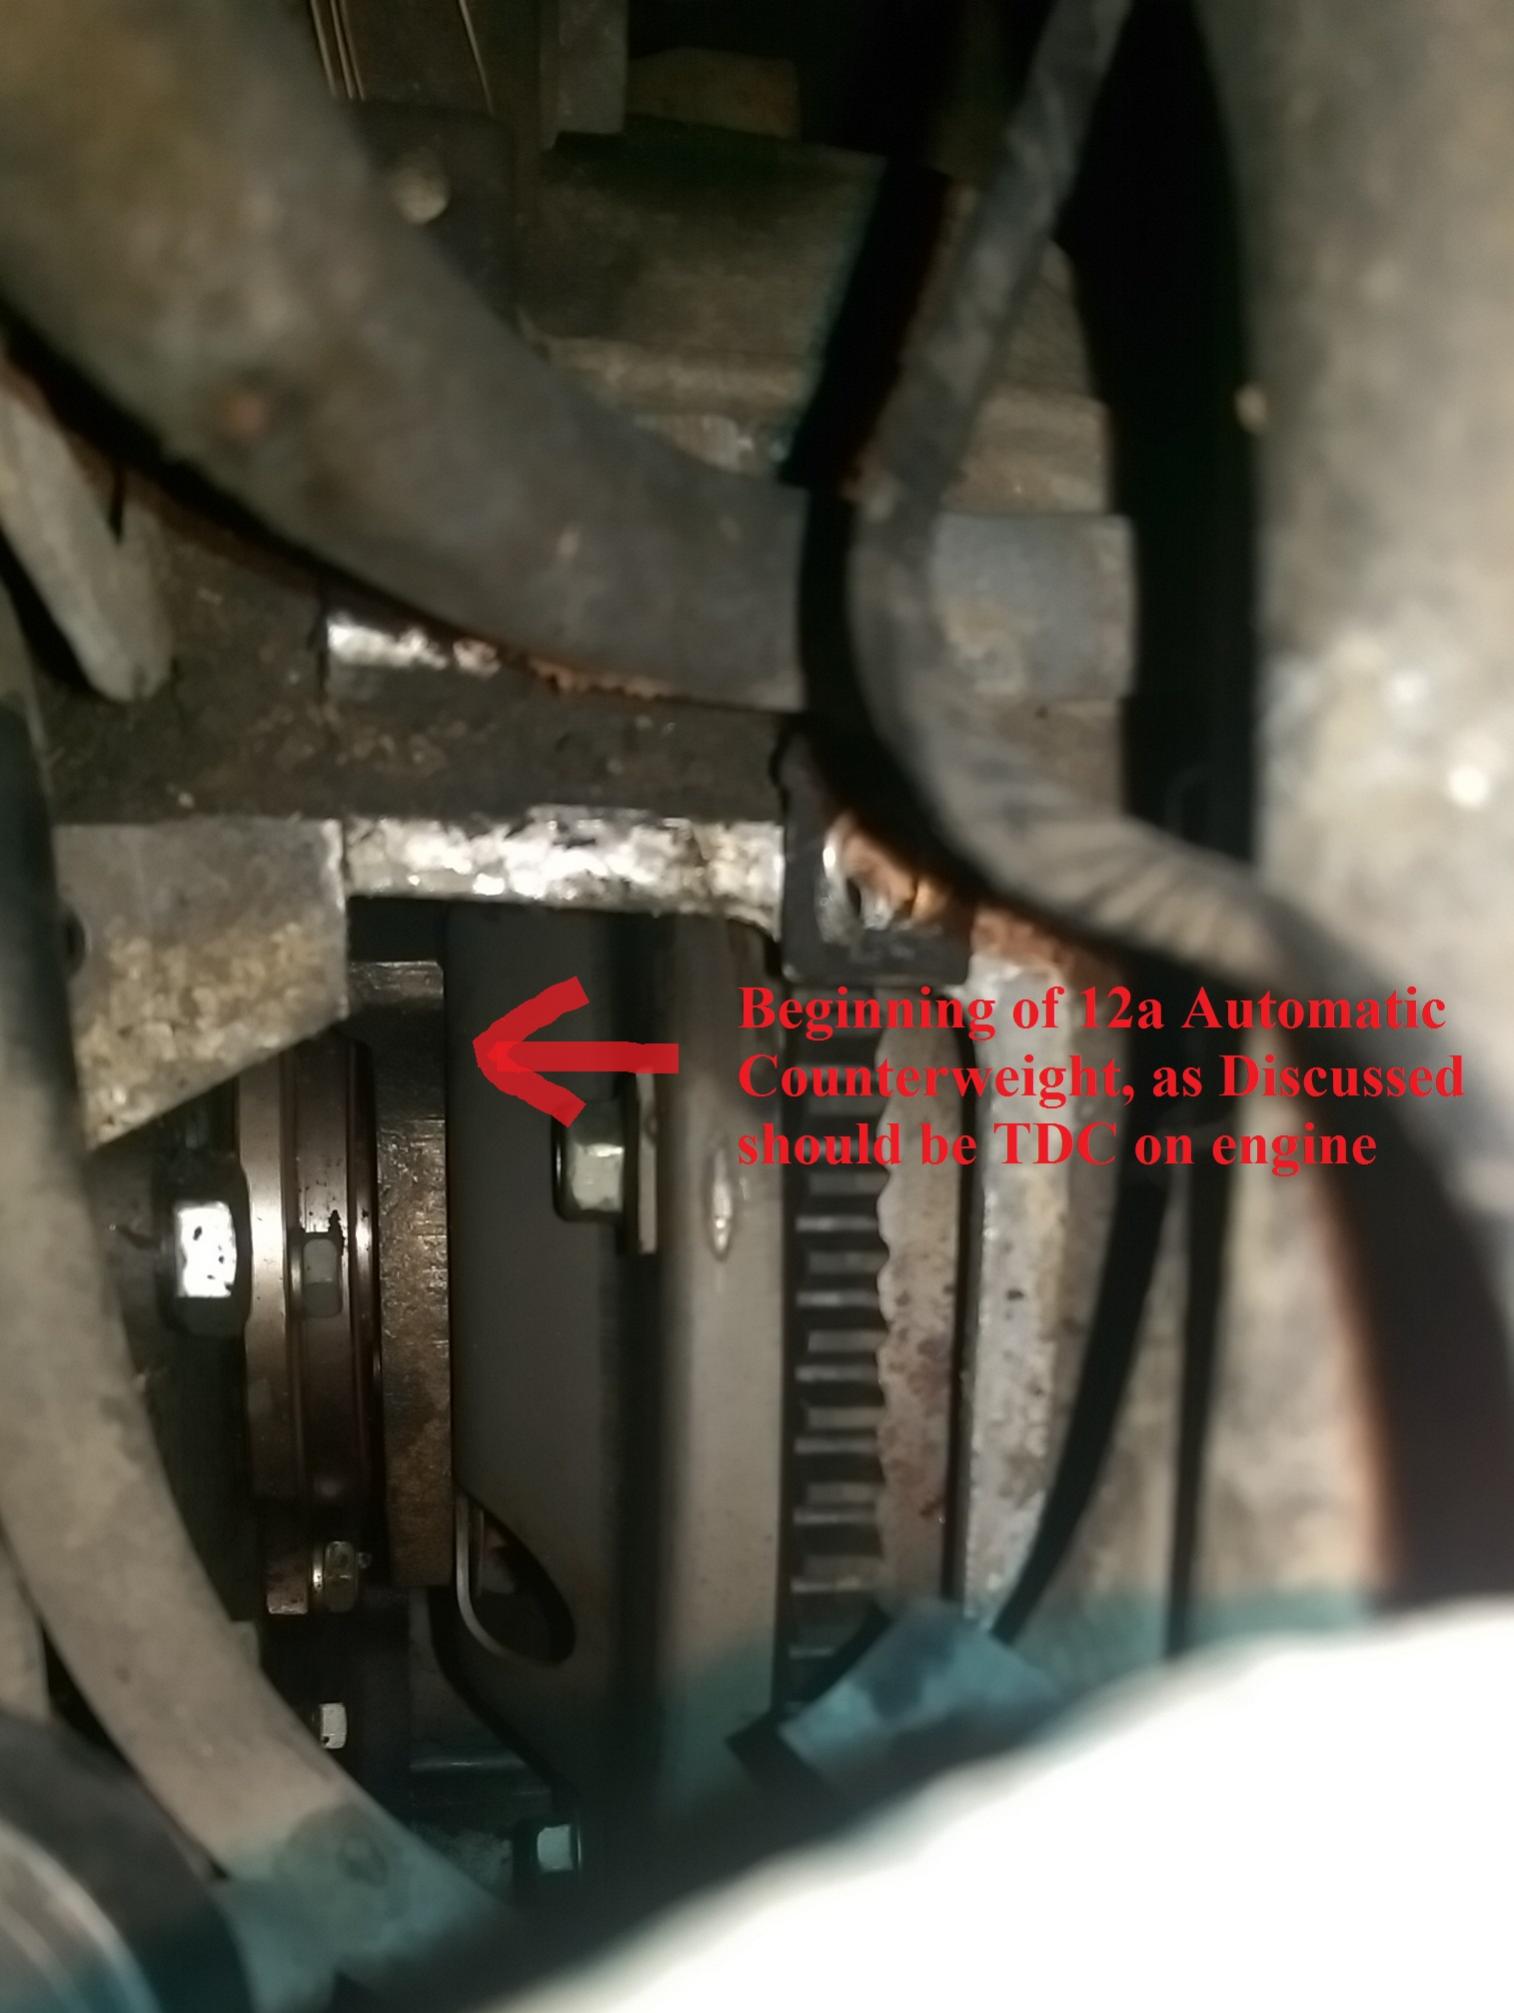
Previous owner said he replaced the plugs, wires, distributor cap and rotor. I'm betting something got screwed up in the system there and caused the timing to go haywire. Ended up redoing the timing marks on the pulley because they were impossible to see with the corrosion. Got both the accessory and main pulleys off of the car to do this. Once off I used a triangle file and made new indentations for the timing marks and used paint marker to fill in the notches for easy visibility. Re-installed the pulleys and the belts at top dead center according to the timing marks and rear counterweight location (it's an Auto) and everything is lined up the way it should be. I did that so I can check the timing with a light once it's actually running. Last thing to do timing-wise is to re-stab the distributor just to make entirely sure that everything is lined up how I want it to be.


Worked on the car today and got a lot done in my opinion. The car still won't start, heck it won't even fire!
3 basic things to get a car to at least fire:
Fuel - yes
The fuel pump cutoff relay is now jumpered so the pump turns on when it's supposed to. Tested the flow and it appears to be working well enough to feed the Nikki. It's delivering and returning fuel so I'm not too terribly worried about fuel at the moment. (The ECU isn't sending power out to the B/Y wire in the fuel pump cutoff relay so I have to check out why that's happening, but the jumper is solving that problem for now). If anybody has any helpful ideas let me know. I'm thinking it has something to do with the Auto transmission, maybe a parking/neutral switch or something?

Air - yes
The throttle cable works correctly and it's getting air to the rotors. Pretty simple.
Spark - yes
We checked spark and it's getting spark at each plug. Both trailing and leading coils are working, getting power and creating spark.
My guess? Timing is way off.
Previous owner said he replaced the plugs, wires, distributor cap and rotor. I'm betting something got screwed up in the system there and caused the timing to go haywire. Ended up redoing the timing marks on the pulley because they were impossible to see with the corrosion. Got both the accessory and main pulleys off of the car to do this. Once off I used a triangle file and made new indentations for the timing marks and used paint marker to fill in the notches for easy visibility. Re-installed the pulleys and the belts at top dead center according to the timing marks and rear counterweight location (it's an Auto) and everything is lined up the way it should be. I did that so I can check the timing with a light once it's actually running. Last thing to do timing-wise is to re-stab the distributor just to make entirely sure that everything is lined up how I want it to be.
Thread Starter
Joined: Aug 2011
Posts: 3,078
Likes: 42
From: Cambridge, Minnesota


Ooooohhh! This is gonna be another fantastic build thread like the Turbo II build! Can't wait to see this project as it goes along. I'm subscribed!
Last edited by woodmv; Nov 5, 2014 at 07:36 PM. Reason: Stupidity on the part of the Village Idiot...
Trending Topics
Thread Starter
Joined: Aug 2011
Posts: 3,078
Likes: 42
From: Cambridge, Minnesota
Thanks, and yeah we need to get together already! I've been promising to get those LE wheels from you for like 2 years now - my bad. If you didn't live on the border of Canada practically it would be easier
 Maybe next summer
 I've got a timing issue with this car right now that I'm clearing up in the "What Did You Do To Your FB Today?" thread in the 1st Gen Non-Technical forum section, will post the results on that endeavor once I get a response. Hopefully it's just timing that's stopping this car from running right now and not something more serious...
Is your dizzy stabbed correctly? Do you know how to static time one of these engines? Maybe Siraniko will step in, but probably better to search. He covers the counterweight method a lot.
Thread Starter
Joined: Aug 2011
Posts: 3,078
Likes: 42
From: Cambridge, Minnesota
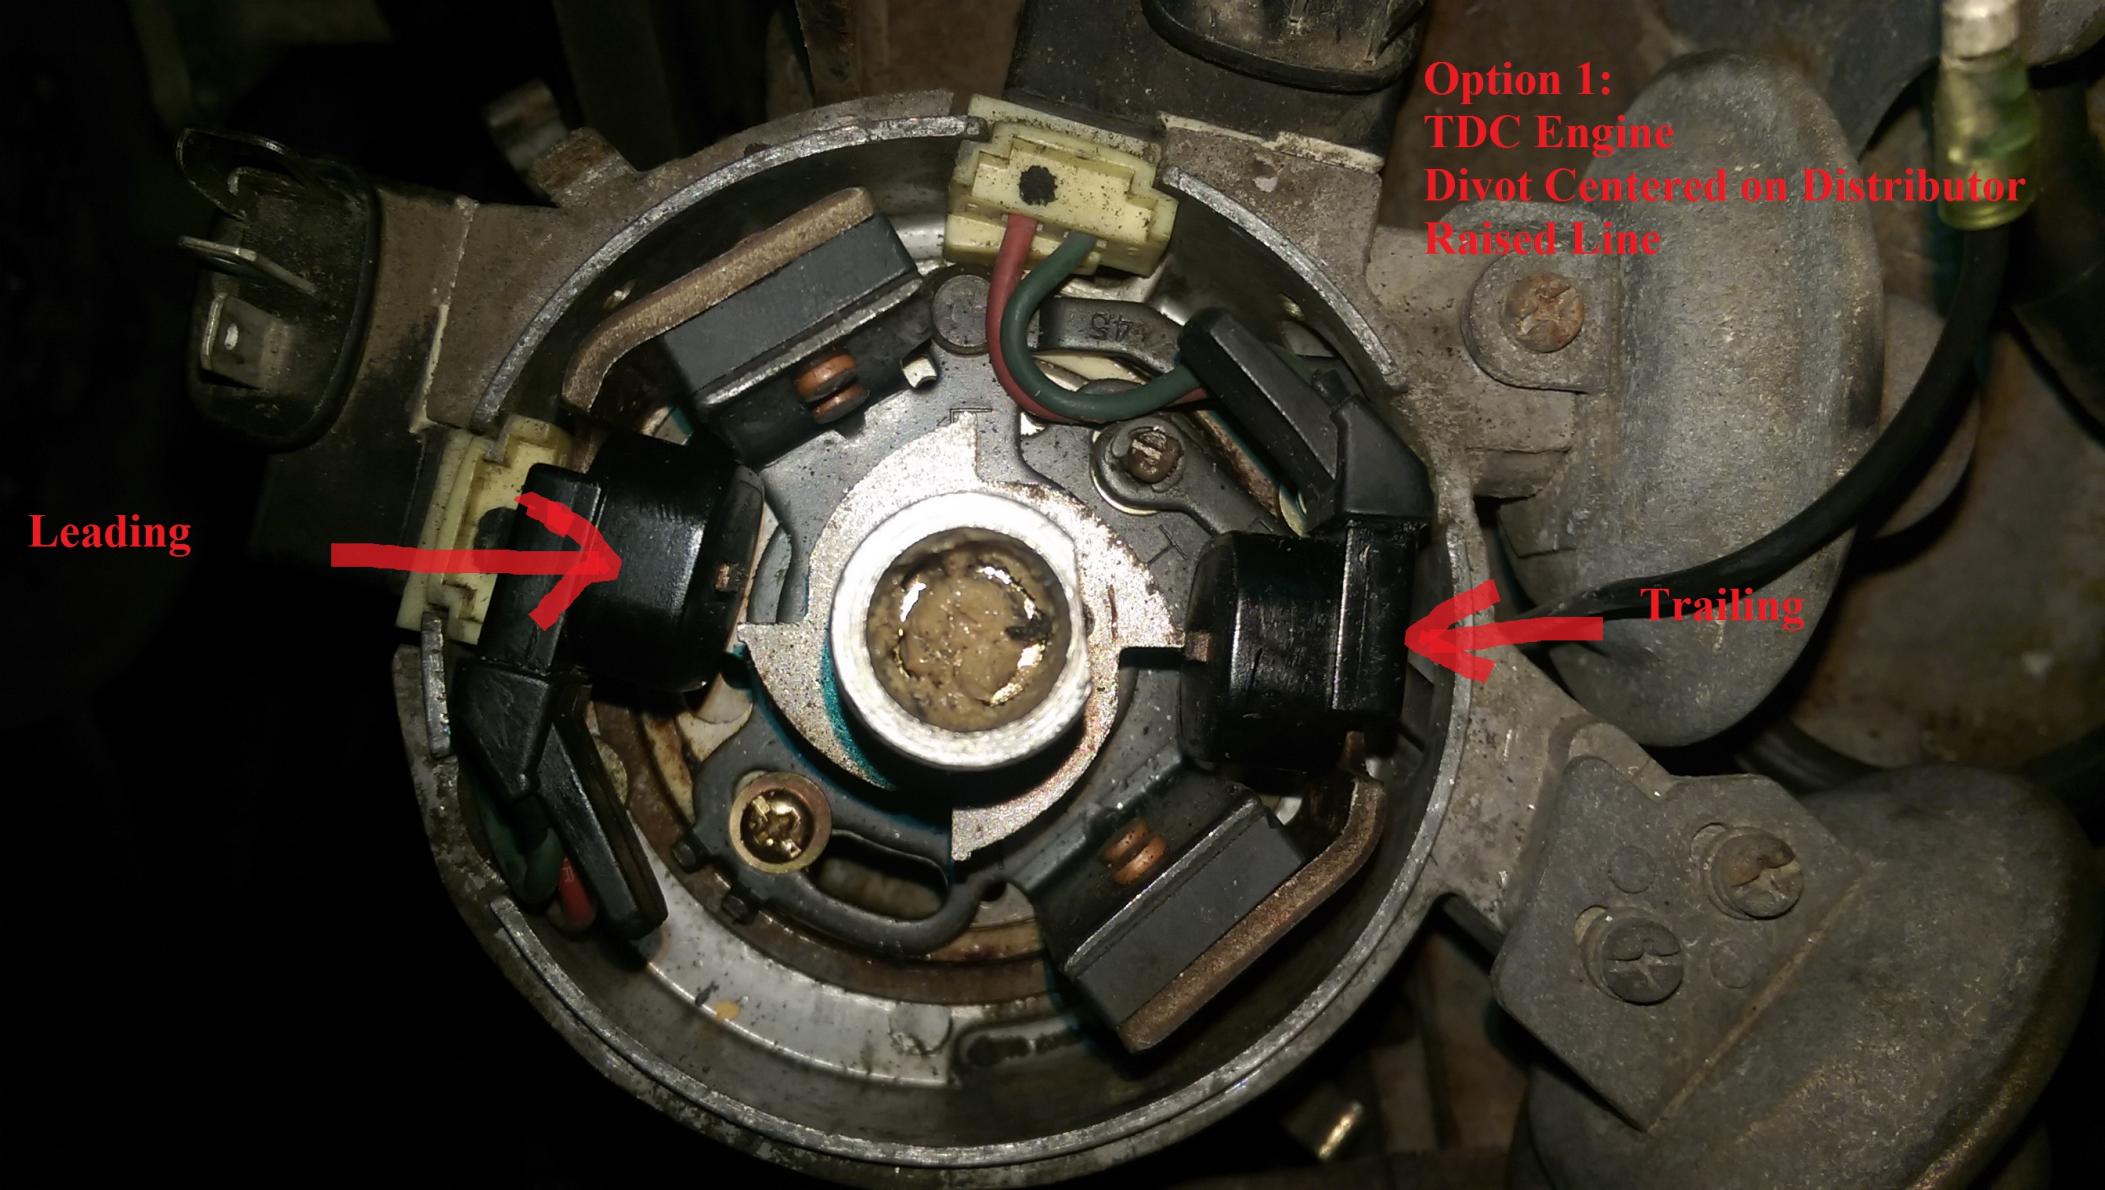
I pulled the distributor out of its housing when I thought I had it at TDC. The indent on the cog that is supposed to line up with the raised cast line on the aluminum distributor housing was 180* off of where it should have been. My one thought is that I was wrong in the timing method because it looked like the distributor hadn't been removed in a very long time (if ever) due to the corrosion buildup between the front cover and the distributor housing. So I'm wondering if my timing method is 180* off of TDC and the timing was correct to begin with. That's why in the other thread I asked about the correct orientation of the rear auto counterweight - I did it with my "Option 2" where the keyway of the counterweight would be at 9'o-clock according to the pictures in that thread. But if I have that incorrect then I did the timing 180* off, both the front pulley and distributor are exactly opposite of what they should be I think if that is the case.
I'm sure the time was correct to begin with. The whole 180 degree out thing is fine too. This is because the dizzy spins at half speed (so it only moves 180 degrees for every 360 e-shaft rotation anyway).
One way to find TDC is to use a thick soft wire like a spark plug wire, cut the end off, poke the wire in the spark plug holes and feel the rotor face. The front rotor face should be right at the L1 spark plug hole. The L2 hole should be open. Now hand crank the engine backwards until the apex seal touches the wire in the L2 hole. Now crank forward a little and you've basically found TDC. Stab the dizzy and it should align correctly.
I had to use this method once (actually this is where I came up with the idea) on a crappy S4 NA 6 port in a 79 SA once. Turns out the engine builder installed the dizzy drive gear upside down, so you can imagine it made for a tough time trying to find TDC on that engine. We never took off the front cover to correct it as the car had other problems so we decided to let it go to someone else.

acdelco d1906 Nkg 49034


Joined: Aug 2012
Posts: 1,154
Likes: 97
From: huntsville
Lost the timing mark? The way I found mine: First I noticed there are 4 possibilities (four bolts) on the timing mark pulley. So I tried all four, and chose the best one. For simplicity and not to f u things up too much, only the leading front rotor's spark plug was connected. Then I rotated/stabbed the distributor and cap to the conventional correct position. Finally I connected the rest of the spark plugs and made the fine adjustments to the distributor.
Yes, this is kludgey. But the engine has survived +10 years.
Yes, this is kludgey. But the engine has survived +10 years.
Auto to 5 speed trans swap
Sorry I didn't take some photos, but we just swapped a 85 GSL, made a modified crossmember and it was not complicated. The car just went away to a new owner about a month ago, and he seems happy. The motor was built by Jeff20b, starts and runs perfectly.
I think you should consider doing a 3 rotor swap like I did in my current driver - I put in a motor that has a crankshaft and two camshafts, all rotating in the same direction - isn't that a 3 rotor?
Details shown in the automotive section of my website, the red/silver car.
I think you should consider doing a 3 rotor swap like I did in my current driver - I put in a motor that has a crankshaft and two camshafts, all rotating in the same direction - isn't that a 3 rotor?
Details shown in the automotive section of my website, the red/silver car.
Thread Starter
Joined: Aug 2011
Posts: 3,078
Likes: 42
From: Cambridge, Minnesota
I'm sure the time was correct to begin with. The whole 180 degree out thing is fine too. This is because the dizzy spins at half speed (so it only moves 180 degrees for every 360 e-shaft rotation anyway).
One way to find TDC is to use a thick soft wire like a spark plug wire, cut the end off, poke the wire in the spark plug holes and feel the rotor face. The front rotor face should be right at the L1 spark plug hole. The L2 hole should be open. Now hand crank the engine backwards until the apex seal touches the wire in the L2 hole. Now crank forward a little and you've basically found TDC. Stab the dizzy and it should align correctly.
I had to use this method once (actually this is where I came up with the idea) on a crappy S4 NA 6 port in a 79 SA once. Turns out the engine builder installed the dizzy drive gear upside down, so you can imagine it made for a tough time trying to find TDC on that engine. We never took off the front cover to correct it as the car had other problems so we decided to let it go to someone else.
One way to find TDC is to use a thick soft wire like a spark plug wire, cut the end off, poke the wire in the spark plug holes and feel the rotor face. The front rotor face should be right at the L1 spark plug hole. The L2 hole should be open. Now hand crank the engine backwards until the apex seal touches the wire in the L2 hole. Now crank forward a little and you've basically found TDC. Stab the dizzy and it should align correctly.
I had to use this method once (actually this is where I came up with the idea) on a crappy S4 NA 6 port in a 79 SA once. Turns out the engine builder installed the dizzy drive gear upside down, so you can imagine it made for a tough time trying to find TDC on that engine. We never took off the front cover to correct it as the car had other problems so we decided to let it go to someone else.
I know you've got one for sale, don't tempt me!
$10,000 build:
$5,000 cash deposit
-REW engine swap
-Turbo-back full exhaust
-REW wiring harness conversion
-Custom front mount intercooler setup
-TII transmission
-TII lightweight flywheel with auto counterweight and performance clutch
-Custom driveshaft
-LSD/disc brake rear end conversion
-Wheel bolt pattern swap
-Different wheels and suspension upgrade all around
-Respray VR paint code and clean up the body to mint-condition
$5,000 cash on delivery
Perfect sleeper car with a good exhaust on it
Lost the timing mark? The way I found mine: First I noticed there are 4 possibilities (four bolts) on the timing mark pulley. So I tried all four, and chose the best one. For simplicity and not to f u things up too much, only the leading front rotor's spark plug was connected. Then I rotated/stabbed the distributor and cap to the conventional correct position. Finally I connected the rest of the spark plugs and made the fine adjustments to the distributor.
Yes, this is kludgey. But the engine has survived +10 years.
Yes, this is kludgey. But the engine has survived +10 years.
Sorry I didn't take some photos, but we just swapped a 85 GSL, made a modified crossmember and it was not complicated. The car just went away to a new owner about a month ago, and he seems happy. The motor was built by Jeff20b, starts and runs perfectly.
I think you should consider doing a 3 rotor swap like I did in my current driver - I put in a motor that has a crankshaft and two camshafts, all rotating in the same direction - isn't that a 3 rotor?
Details shown in the automotive section of my website, the red/silver car.
I think you should consider doing a 3 rotor swap like I did in my current driver - I put in a motor that has a crankshaft and two camshafts, all rotating in the same direction - isn't that a 3 rotor?
Details shown in the automotive section of my website, the red/silver car.
The R32 engine swap would be much more up my alley - a V8 is amazing in an FB but the RB20DET would be such a blast! V8 is much cheaper though I assume, and a local buddy has it done to his 7. I call it a cheap, better looking, better performing, less cost to insure and much more fun Corvette.
I haven't really accomplished anything to this car lately guys. Taking 16 credits at a nationally ranked university for Mechanical Engineering, having a fiance, an active social life, trying to get good grades while maintaining enough sleep and working on a Formula SAE engine team really sucks the time away. Hopefully this winter break I'll get some time to spend with the old girl in the garage before everything really ramps up in spring semester.
Thread Starter
Joined: Aug 2011
Posts: 3,078
Likes: 42
From: Cambridge, Minnesota
What I was alluding to earlier is that I believe I'm off with the ignition timing now. The points in the distributor look like they're not straight across from each other (not sure if that's possible or how it's supposed to be - I can't remember...or find my Hayne's manual for that matter, I really need to order another one).
Why I think it's ignition timing versus engine timing:
Jeff's method lined up the front pulley mark with the rear counterweight location and I could feel what I was supposed to through the leading spark plug holes
The engine still won't fire, not even a hint with the throttle closed
There's fuel getting to the engine and plugs are plenty wet enough
At WOT it sounds like it fires - so I assume I'm one tooth off in the timing right now
Found these snippets of information while searching on tuning a street port 12a...hint hint...
Tuning 12a Streetport
Somebody put the dizzy drive gear on backwards. I've ran across a few rebuilt engines with this mistake. The newer gears don't have an F mark but they do have a beveled edge. Easy to overlook.
What is the quick fix? I'm not sure as I've torn down all of them so far because they were in need of a rebuild anyway.
What is the quick fix? I'm not sure as I've torn down all of them so far because they were in need of a rebuild anyway.
Ah well, we will find out soon...motor will hopefully be pulled over break and a manual trans will get dropped into this car. Have all the parts, just gotta do a custom trans mount since it'll be from an auto to a manual.
Something I've found that starts stubborn engines is 24 volts. It can be tricky to get it to the starter and solenoid only while not letting the rest of the car's electrical see it because it can easily blow fuses and fusible links.
You need a remote starter switch (the pistol grip style is what I use), jumper cables and two batteries. If you're smart you can even get away with the battery in the stock location and some creative wiring to a second battery and the starter. This allows 24V to the starter and the solenoid only, while keeping 12V going to the car's other electrical like at the fusible link hookup point so the distributor (ignitors) and the coils, fuel pump tach etc are powered so the engine will run.
I did this last year on a stubborn rebuild that just wouldn't start. Once I hooked up the two batteries in series, it started in I think 6 seconds of cranking. It was extremely flooded and I had exhausted all my other ideas for three hours such as oil down the carb, wet plugs taken out and cleaned several times, new plugs swapped in still got wet, tried three different used Nikkis off the shelf, and pull or push starting was not an option. 24 volts was the only thing that worked. Not very easy to do properly, and the risk of destroying your car's electrical is very real, but in the end it worked out. Try at your own risk. Oh but obviously make sure it's not something simple like a dead ignitor first.
Psh, I'm finishing my 16 credit engineering semester and barely have time to sleep - letalone work on the rotary! But it's all over in two weeks with finals so I'll have a nice long break to get some hours in to the car.
What I was alluding to earlier is that I believe I'm off with the ignition timing now. The points in the distributor look like they're not straight across from each other (not sure if that's possible or how it's supposed to be - I can't remember...or find my Hayne's manual for that matter, I really need to order another one).
Why I think it's ignition timing versus engine timing:
Jeff's method lined up the front pulley mark with the rear counterweight location and I could feel what I was supposed to through the leading spark plug holes
The engine still won't fire, not even a hint with the throttle closed
There's fuel getting to the engine and plugs are plenty wet enough
At WOT it sounds like it fires - so I assume I'm one tooth off in the timing right now
Found these snippets of information while searching on tuning a street port 12a...hint hint...
Tuning 12a Streetport
So I'm wondering if I'm one tooth off on the distributor now. Maybe it's a dead ignitor as well, I only checked spark on one plug - just haven't had a helper around to crank the car while I check for spark in all plugs.
Ah well, we will find out soon...motor will hopefully be pulled over break and a manual trans will get dropped into this car. Have all the parts, just gotta do a custom trans mount since it'll be from an auto to a manual.
I'll one up this... I finished DE and Physics and Chemical engineering courses. I'm moving 100 miles cross state. AND I am pulling 60 hour weeks at Firestone. I am a ******* machine.
But anyway. Have you tested compression? Could be a stuck seal. A cap of MMO in the carb does WONDERS!
Re stabbing the distributer is easy on these things. Just rotate to TDC. Then pull the cap off the distributer. Line up your *** on the shaft by the teeth; then hold the rotor with your thumb while you drop it back in. The two contact pickups are labeled L & T. Line up the little swirly X thing (I don't have the foggiest clue what its called) to the pickup labled L. Put the cap back on and you should be in time.

As for checking spark. Get four spark plugs (they don't have to be rotary specific) plug all four up and lay them on any metal part of the car that you can see. Painted or not the spark should jump. It should light up like a Christmas tree.
Thread Starter
Joined: Aug 2011
Posts: 3,078
Likes: 42
From: Cambridge, Minnesota
Something I've found that starts stubborn engines is 24 volts. It can be tricky to get it to the starter and solenoid only while not letting the rest of the car's electrical see it because it can easily blow fuses and fusible links.
You need a remote starter switch (the pistol grip style is what I use), jumper cables and two batteries. If you're smart you can even get away with the battery in the stock location and some creative wiring to a second battery and the starter. This allows 24V to the starter and the solenoid only, while keeping 12V going to the car's other electrical like at the fusible link hookup point so the distributor (ignitors) and the coils, fuel pump tach etc are powered so the engine will run.
I did this last year on a stubborn rebuild that just wouldn't start. Once I hooked up the two batteries in series, it started in I think 6 seconds of cranking. It was extremely flooded and I had exhausted all my other ideas for three hours such as oil down the carb, wet plugs taken out and cleaned several times, new plugs swapped in still got wet, tried three different used Nikkis off the shelf, and pull or push starting was not an option. 24 volts was the only thing that worked. Not very easy to do properly, and the risk of destroying your car's electrical is very real, but in the end it worked out. Try at your own risk. Oh but obviously make sure it's not something simple like a dead ignitor first.
You need a remote starter switch (the pistol grip style is what I use), jumper cables and two batteries. If you're smart you can even get away with the battery in the stock location and some creative wiring to a second battery and the starter. This allows 24V to the starter and the solenoid only, while keeping 12V going to the car's other electrical like at the fusible link hookup point so the distributor (ignitors) and the coils, fuel pump tach etc are powered so the engine will run.
I did this last year on a stubborn rebuild that just wouldn't start. Once I hooked up the two batteries in series, it started in I think 6 seconds of cranking. It was extremely flooded and I had exhausted all my other ideas for three hours such as oil down the carb, wet plugs taken out and cleaned several times, new plugs swapped in still got wet, tried three different used Nikkis off the shelf, and pull or push starting was not an option. 24 volts was the only thing that worked. Not very easy to do properly, and the risk of destroying your car's electrical is very real, but in the end it worked out. Try at your own risk. Oh but obviously make sure it's not something simple like a dead ignitor first.
I'll one up this... I finished DE and Physics and Chemical engineering courses. I'm moving 100 miles cross state. AND I am pulling 60 hour weeks at Firestone. I am a ******* machine.
But anyway. Have you tested compression? Could be a stuck seal. A cap of MMO in the carb does WONDERS!
Re stabbing the distributer is easy on these things. Just rotate to TDC. Then pull the cap off the distributer. Line up your *** on the shaft by the teeth; then hold the rotor with your thumb while you drop it back in. The two contact pickups are labeled L & T. Line up the little swirly X thing (I don't have the foggiest clue what its called) to the pickup labled L. Put the cap back on and you should be in time.
As for checking spark. Get four spark plugs (they don't have to be rotary specific) plug all four up and lay them on any metal part of the car that you can see. Painted or not the spark should jump. It should light up like a Christmas tree.
So updates on this car are as follows:
1. Ignition timing has got me all confused
2. I lost the ONLY key for the car


1. Ignition Timing
Pictures say 1,000 words, so a picture with words must say 10,000 words right?
Timing Mark for Whole Procedure:
Counterweight for Whole Procedure:
Option 1:
Option 2:
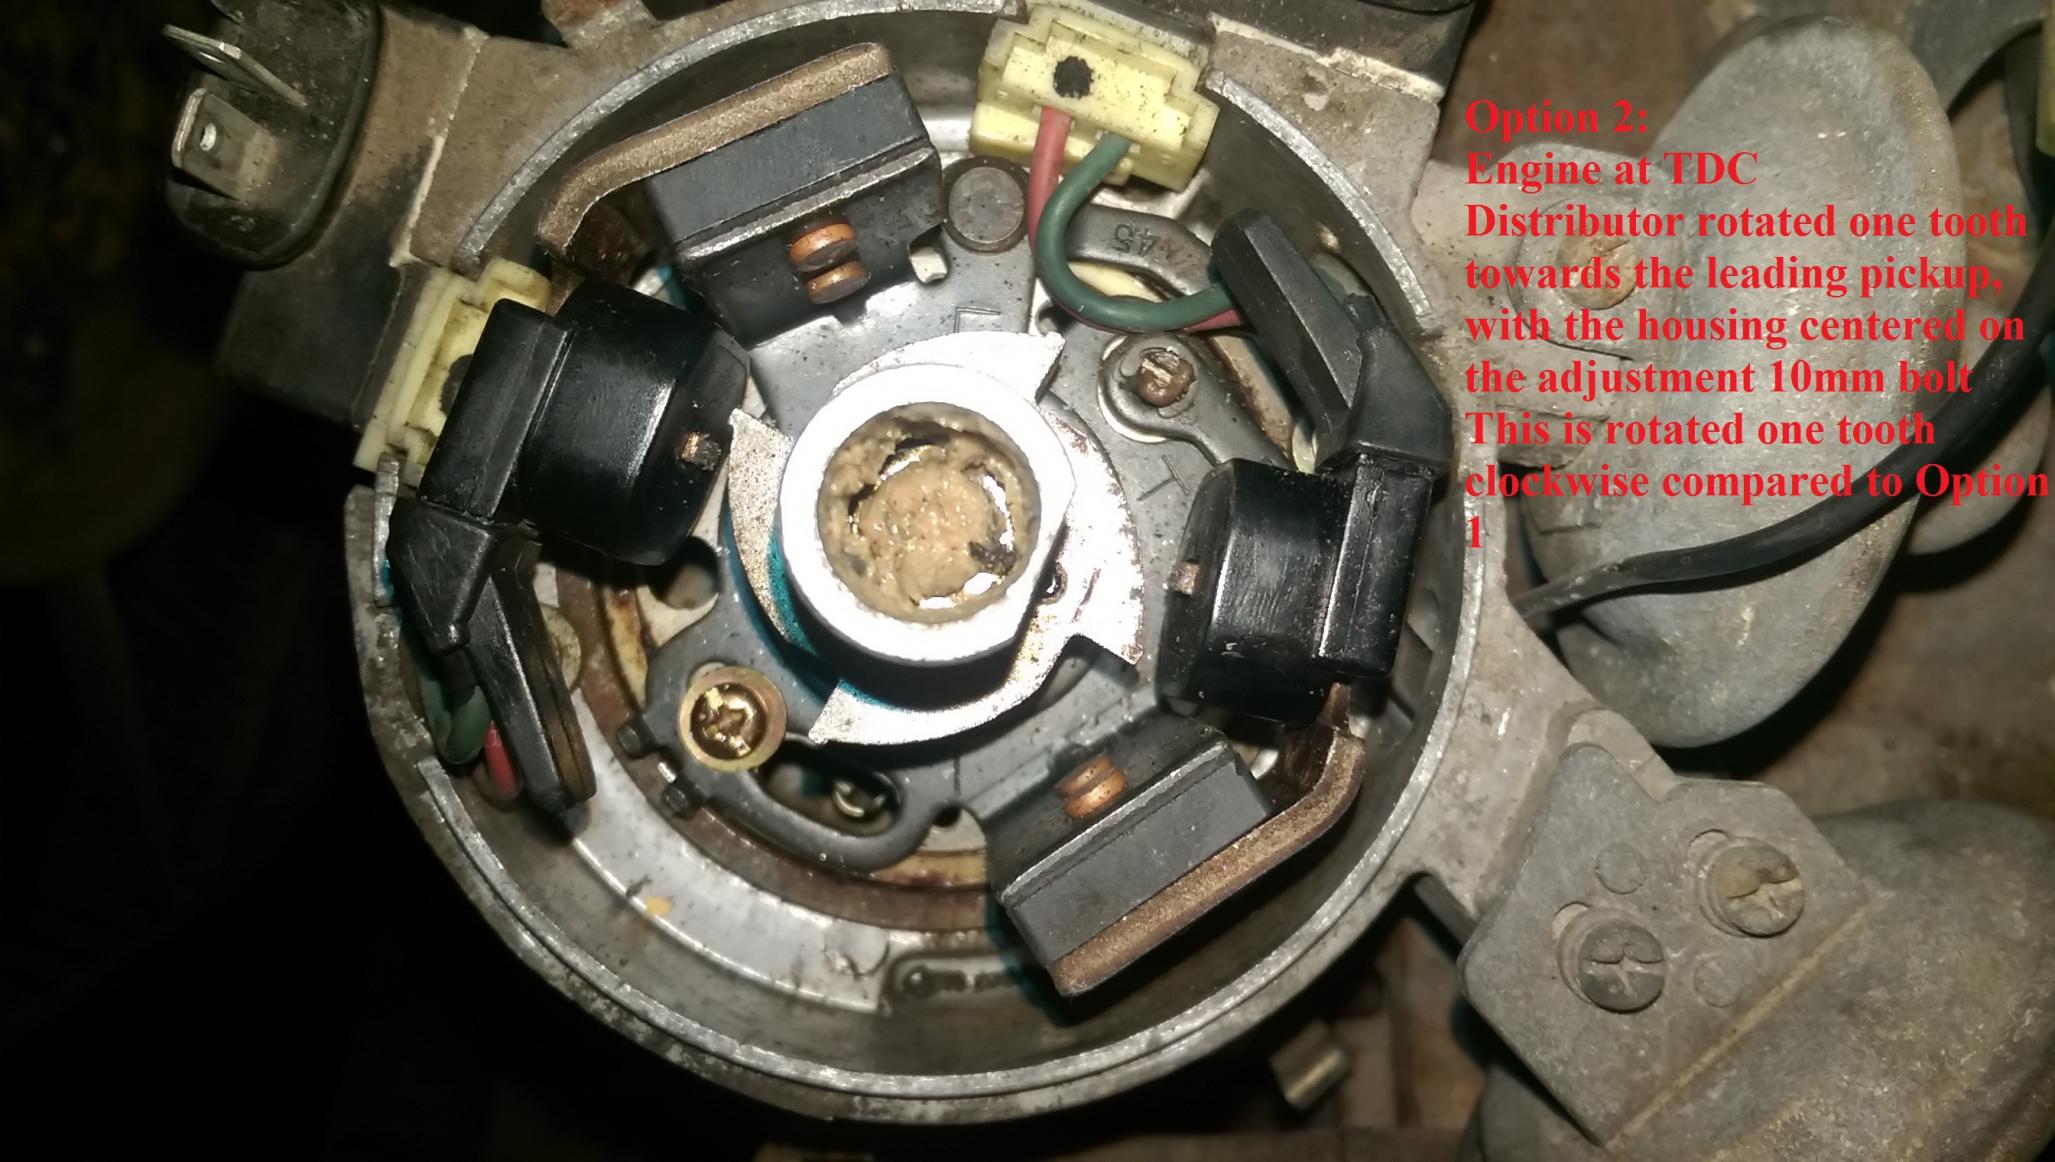
Option 3:
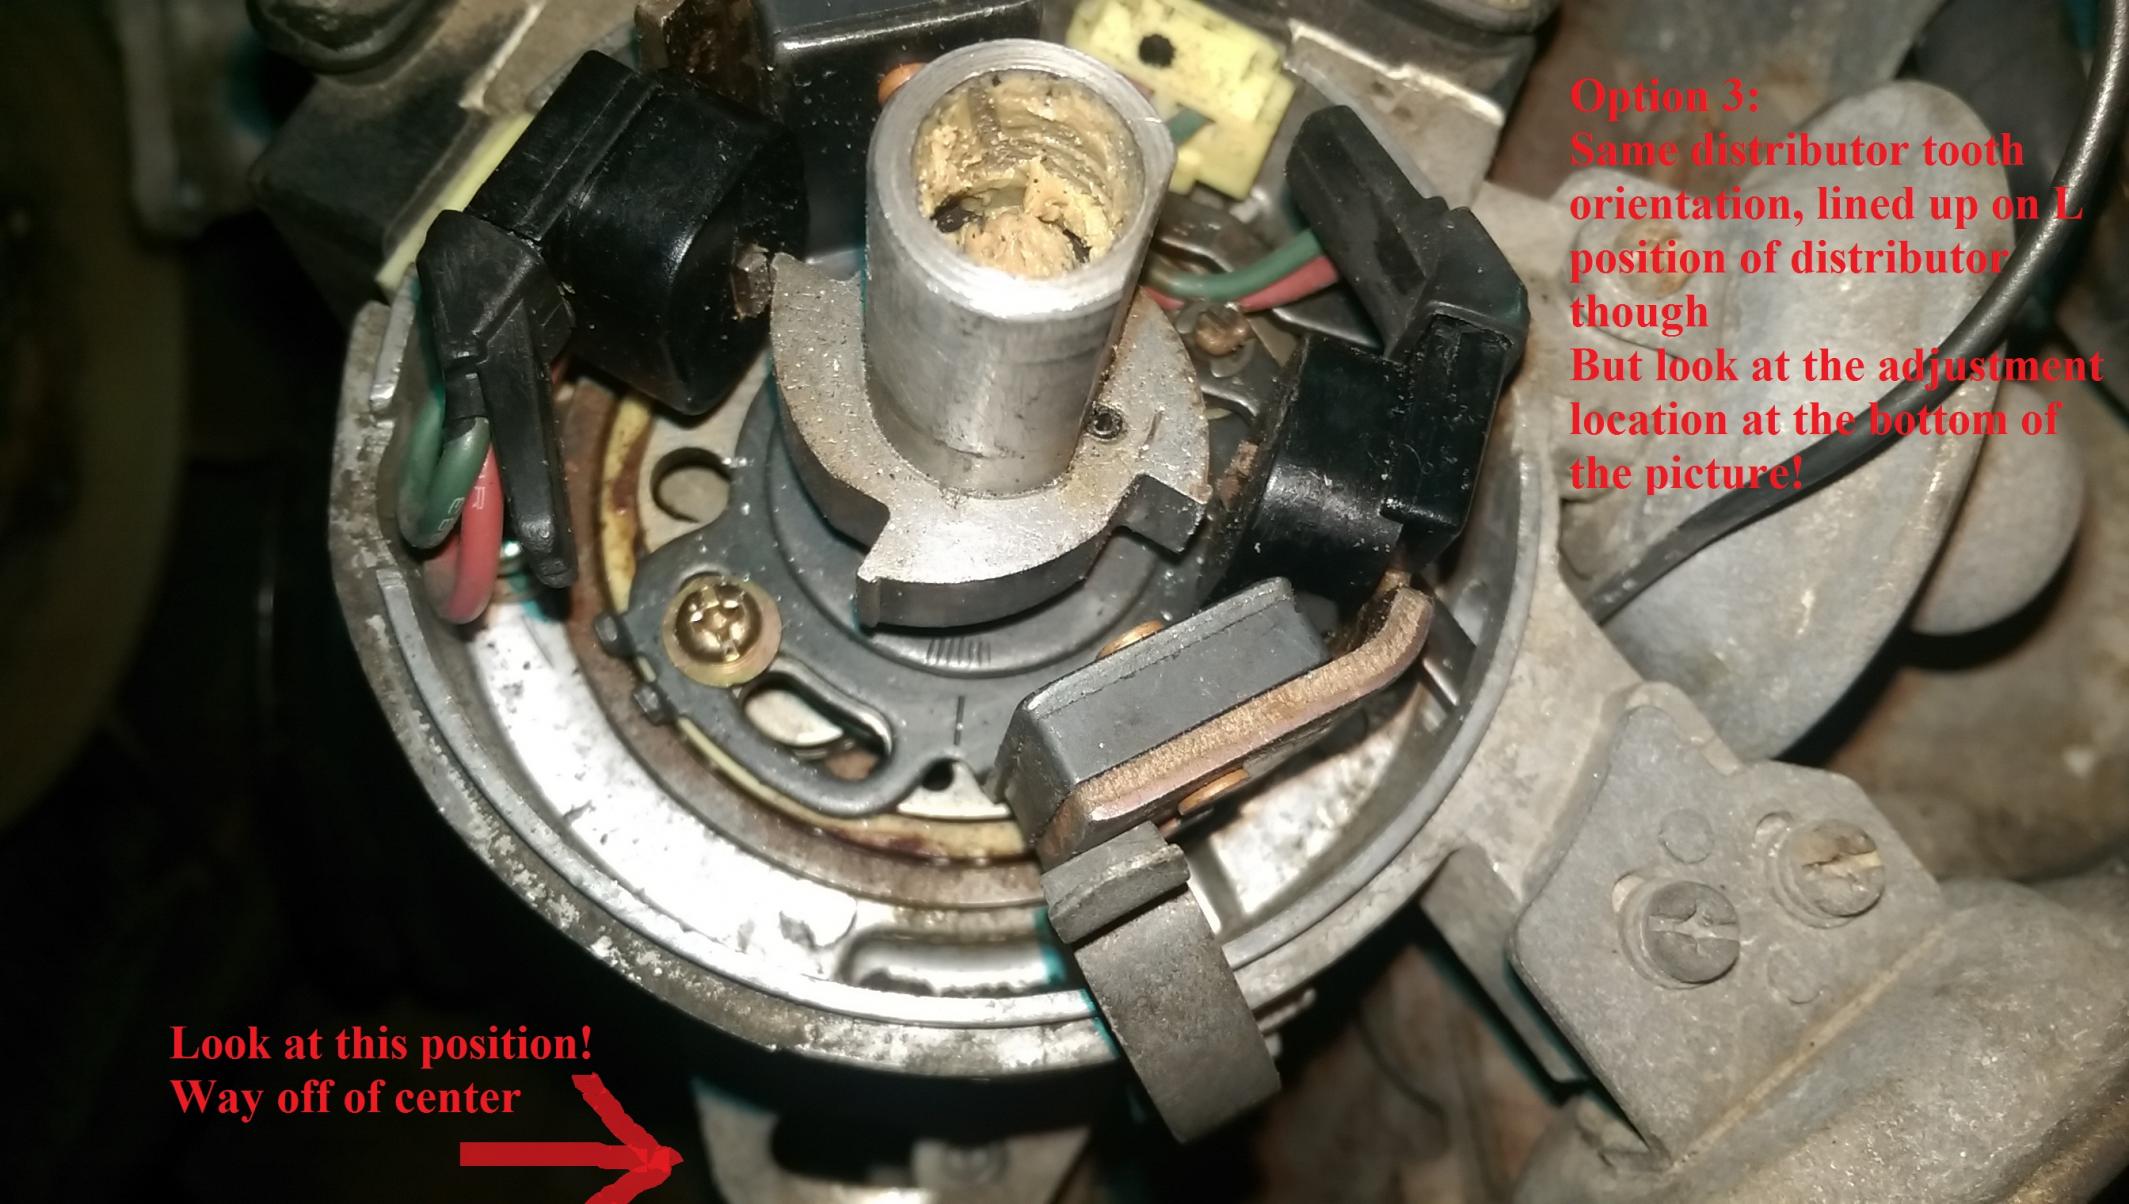
So I'm pretty confused with the timing right now...
2. Lost Key - I started a thread in the 1st Gen Technical Section and I'm just quoting this here:
I lost my only key (stupid me, I knew I should have made copies but never went and did it
) and need to figure out my next move for replacing it. I haven't even been able to start the stupid car yet and I'm coming closer towards that goal. Then I had to go and lose the only key for the car.I'd like to replace the following parts with a different key:
Ignition cylinder
Driver and passenger door cylinders
Glove box cylinder
Driver and passenger storage bin cylinders
Rear hatch cylinder
My idea is to get a full set from a part out - will any 81-85 set work? Is the ignition cylinder removable as in the YouTube video I'm posting?
Any help is greatly appreciated, need to keep moving forward on this build.