
Austin's FB TII Swap - Details and Pics Aplenty


Thread Starter
Joined: Aug 2011
Posts: 3,078
Likes: 42
From: Cambridge, Minnesota

Yeah, if you look at my first posts I spent a few months waiting on money for parts, parts themselves, and time to finish the engine to be ready for install. Always waiting on something...
Thanks guys!


Updates of the day:
1. Went and talked to the driveline shop today about getting the custom shaft made. Super cool guy that dealt with me and knew what he was talking about - makes me glad that I picked the right shop to do the work. Should be getting a call tomorrow sometime about getting a new 87 TII front yoke for the transmission in order to measure the shaft length correctly. Would like it to be done by Wednesday but we will have to wait and see.
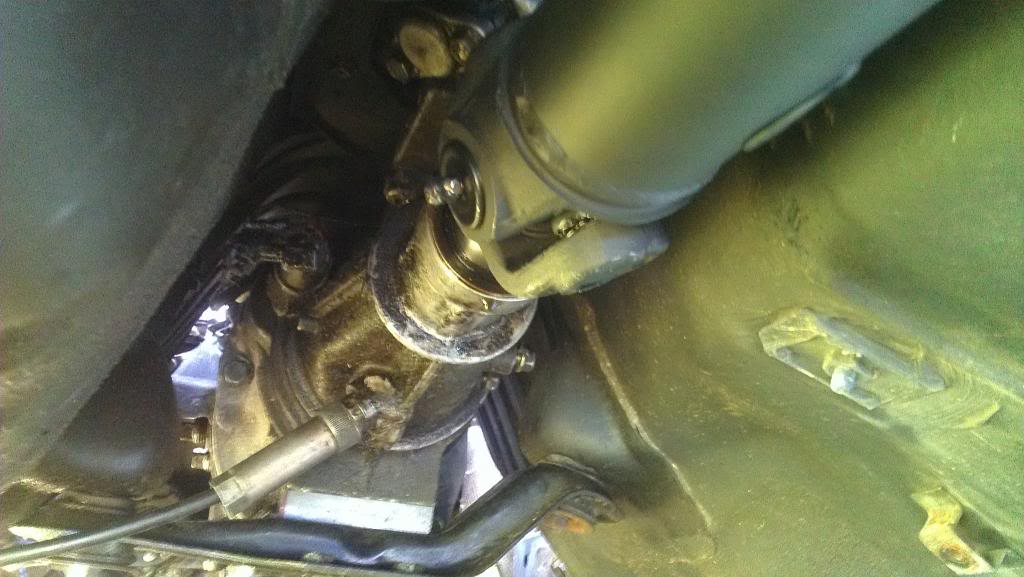
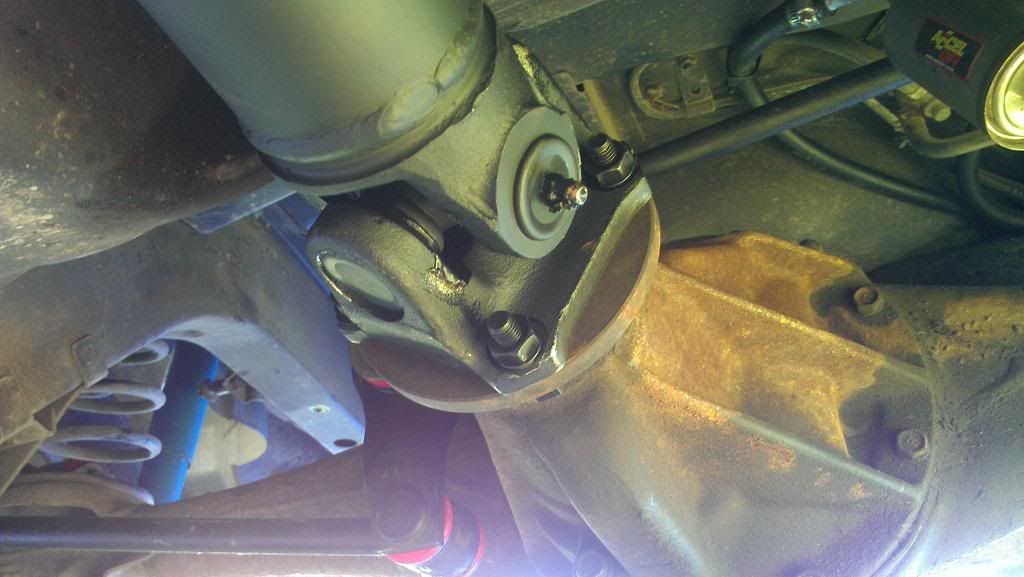
2. Got the control arms for the rear axle converted to full polyurethane bushings! Was a bit of a chore but I think it'll be worth it in the end. Also got my Tokico Blues installed so it'll be an almost entirely new rear end when it's finished. Have the Watts Linkage out now and ready to have the poly bushings installed but I didn't get around to it tonight. Will install everything 100% then tighten everything while there's no load so that the bushings always want to return to full expansion.
I'll post good pics tomorrow, phone died today before I could take any

Thread Starter
Joined: Aug 2011
Posts: 3,078
Likes: 42
From: Cambridge, Minnesota
Pics!
Some pics I shot over the last two days:
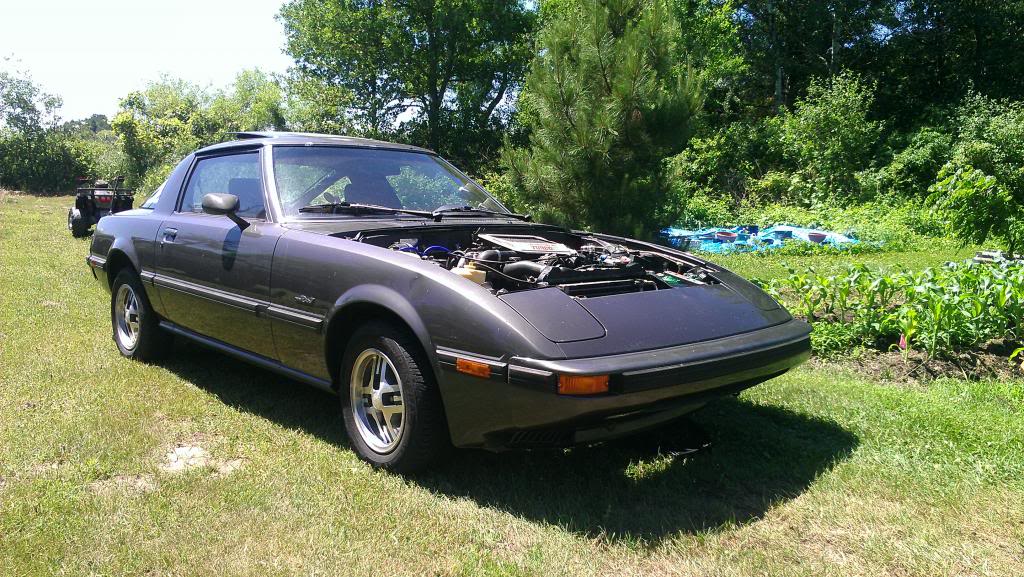
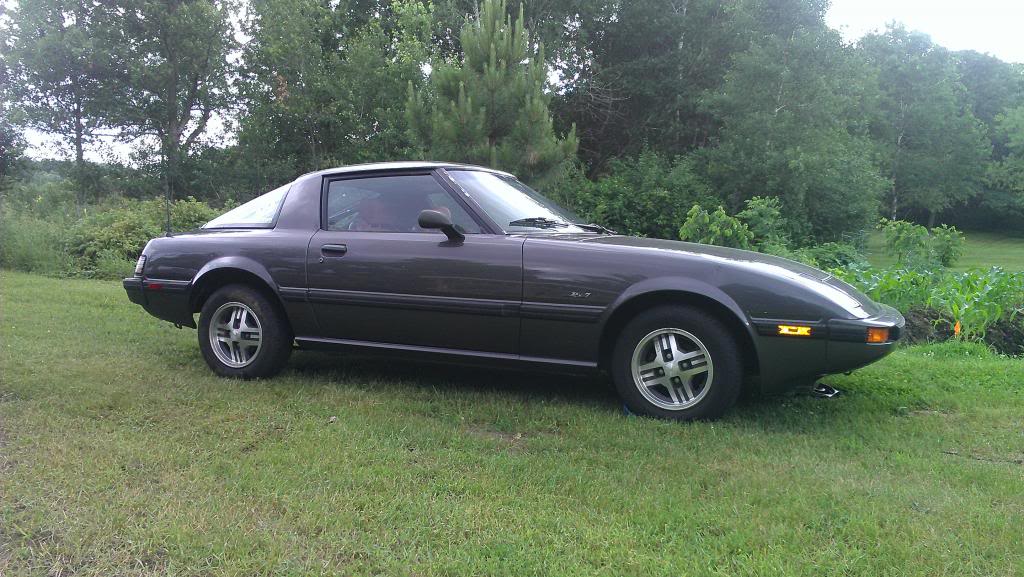
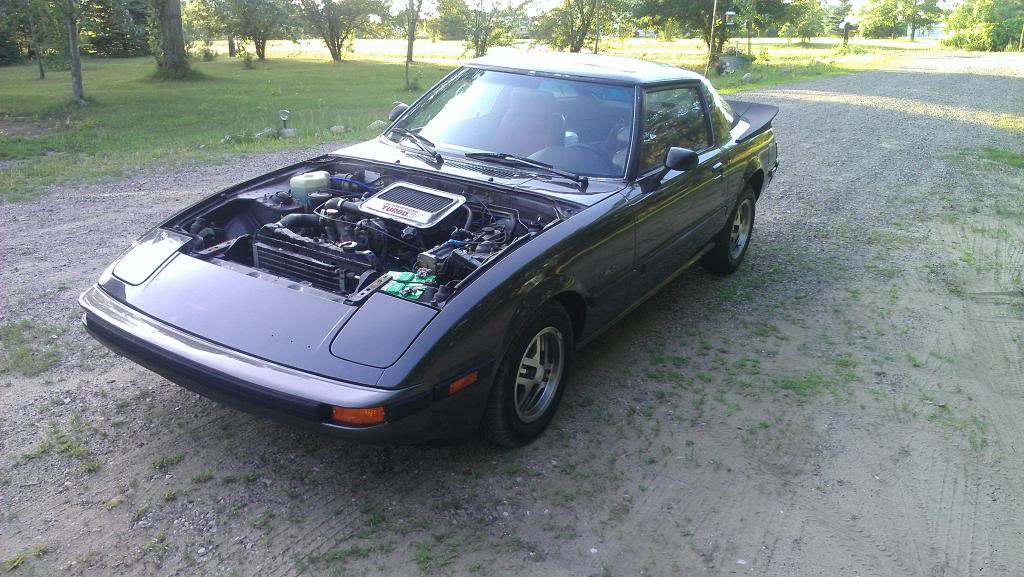
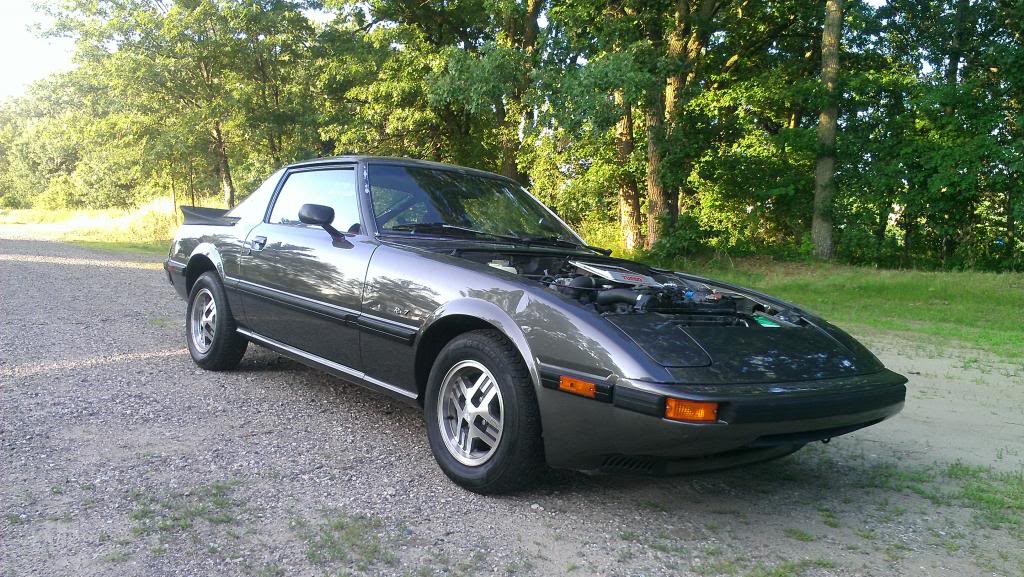
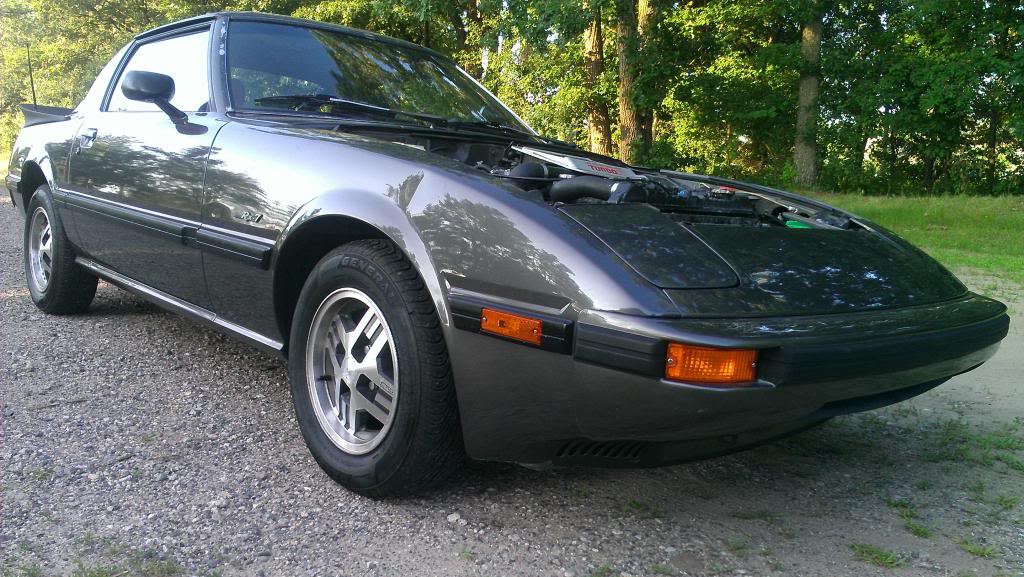
Front shot of car without hood on its own suspension
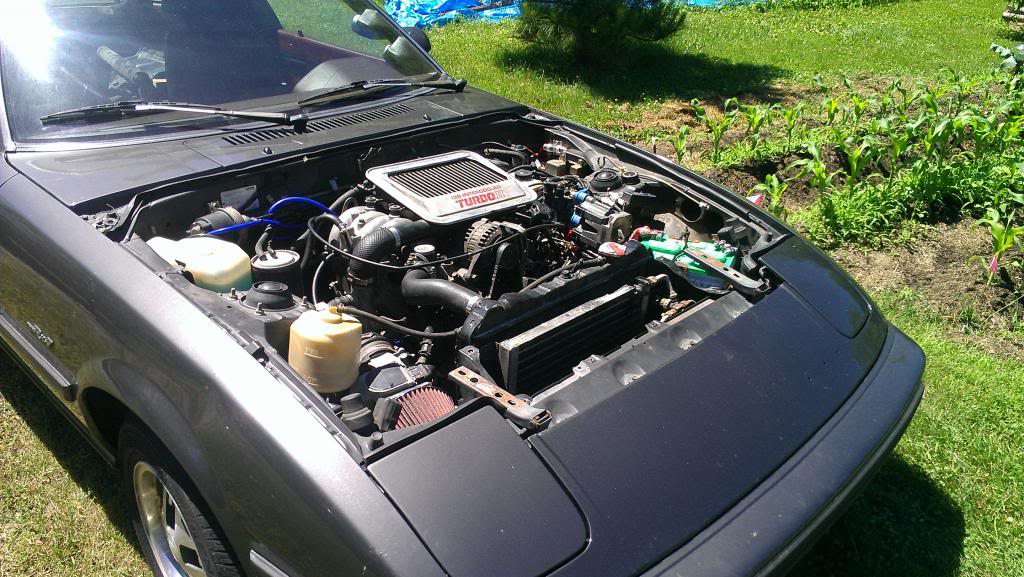
An almost completed engine shot
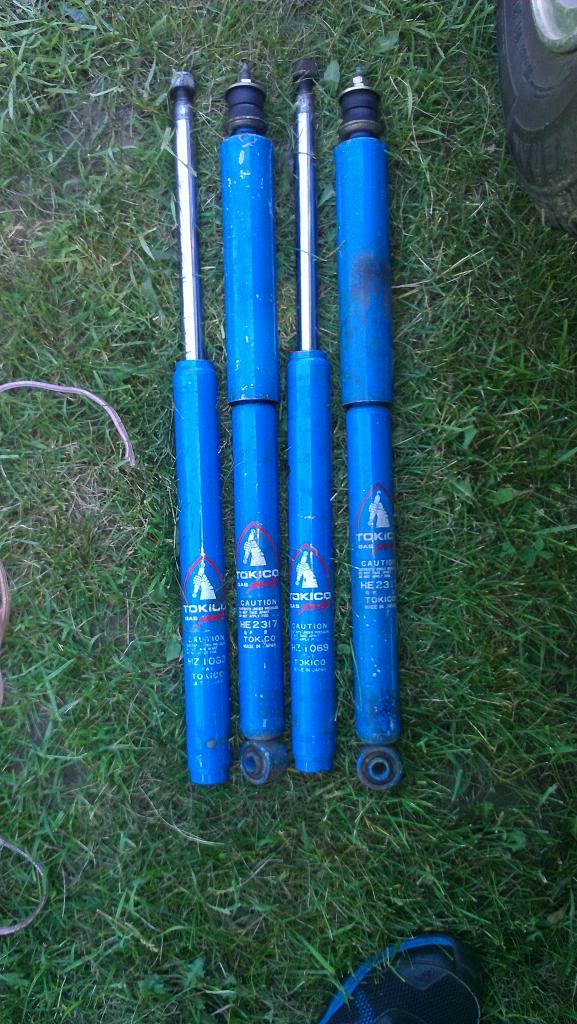
Tokico Blue shocks that'll replace the 30yr old stock ones
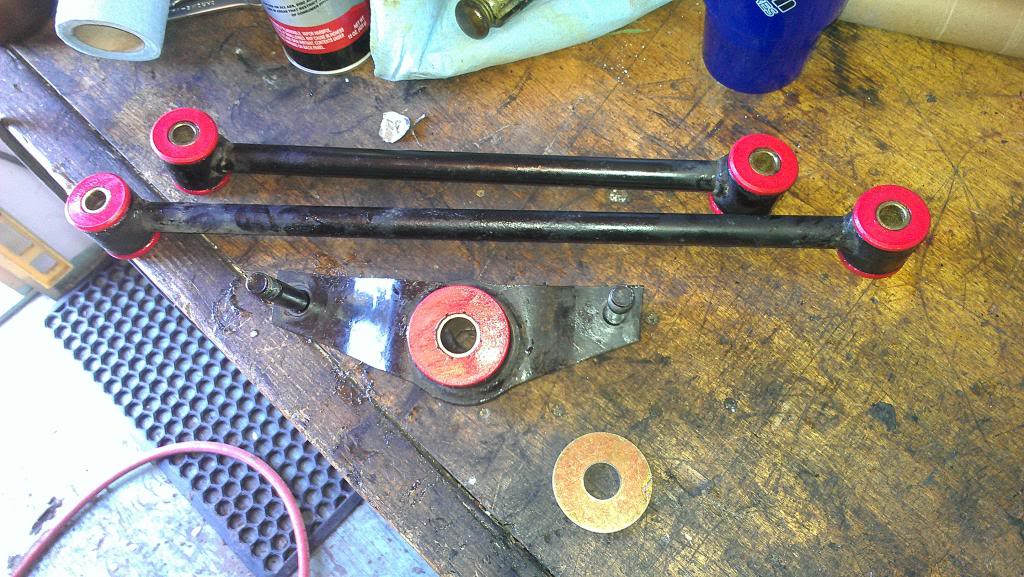
Old rubber bushings in the control arms
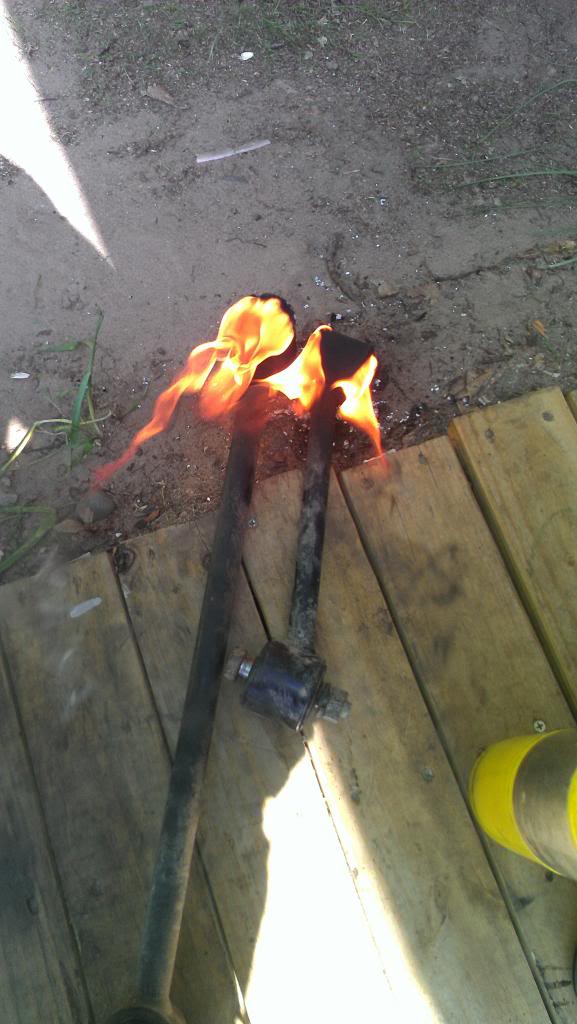
Rubber bushings being burned out
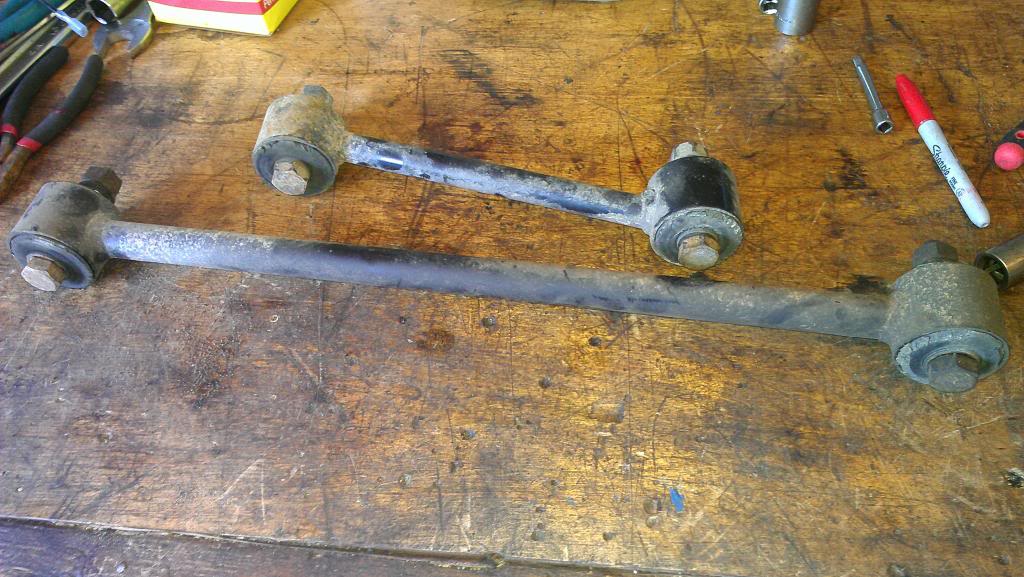
Watts Links bushings replaced (didn't get a shot of the rear control arms - woops )
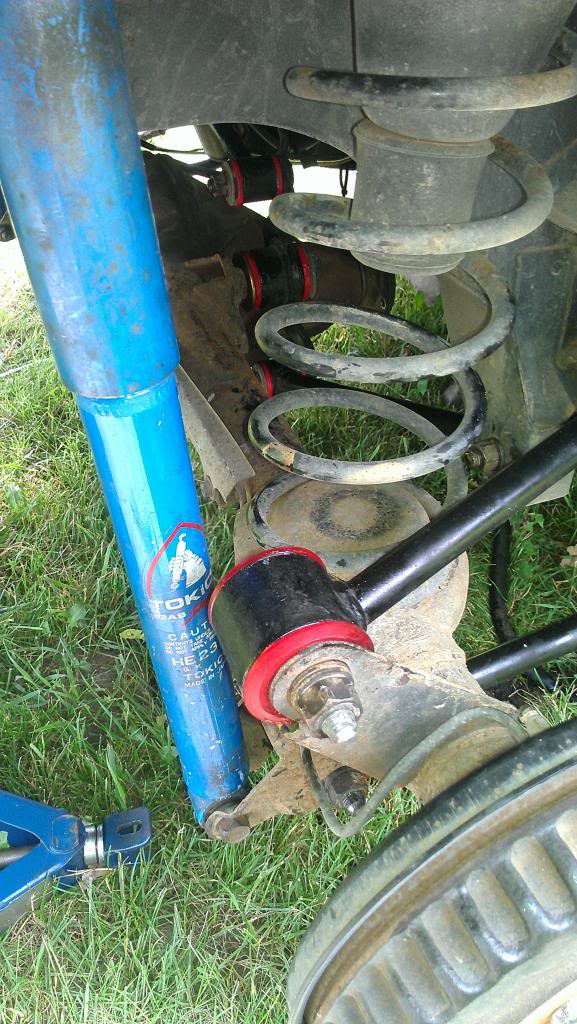
Driver's side shot of Blue shock and poly bushings
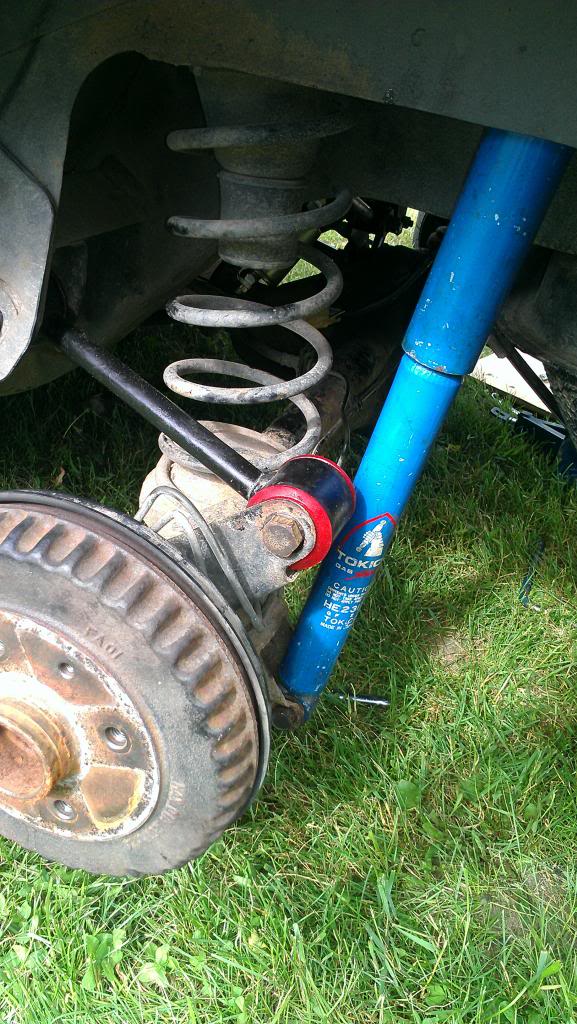
Pass side shot
Final shot of new rear end installed
So I now have a completely new rear end (to me at least)!
Now that all bushings and new shocks are installed I can get a completely accurate measurement on the driveshaft.
Really happy with the progress so far - getting close!
Front shot of car without hood on its own suspension

An almost completed engine shot

Tokico Blue shocks that'll replace the 30yr old stock ones

Old rubber bushings in the control arms

Rubber bushings being burned out

Watts Links bushings replaced (didn't get a shot of the rear control arms - woops
)
Driver's side shot of Blue shock and poly bushings

Pass side shot

Final shot of new rear end installed


So I now have a completely new rear end (to me at least)!
Now that all bushings and new shocks are installed I can get a completely accurate measurement on the driveshaft.
Really happy with the progress so far - getting close!
Stock wheels and ride height are beautiful. But after my drag racing conversion I need a full wheel well. Any plans to push the rims out a bit with spacers or lowering springs?
Thread Starter
Joined: Aug 2011
Posts: 3,078
Likes: 42
From: Cambridge, Minnesota
Eventually I really want to stuff 16 or 17in rims under there with the car incredibly stanced on full coilovers with an FC front subframe and all the FC front suspension upgrades it offers. That's a ways out though
Well here's a setback I wasn't expecting. Can't find someone to cut the shafts and weld them together - shops say it'll break at the spot of the weld and they don't want me coming back complaining about it. So I told that shop that has my shaft to go ahead and order the parts needed to make a fully custom, new, warrantied shaft that should be just shy of $400 when they're done. I really wanted to find someone to chop the shafts up and weld them together but I guess I can't complain about a 12mo warranty and a shaft that can carry up to 400+hp.
Ah well, now in the week or more it takes to get the shaft made I can completely finish the car. New thermostat gasket, UIM to turbo coolant gasket, cleaning up harness and putting interior back together, front shocks, all sorts of things to do while I wait on that. Goal is to have it ready to be driven as soon as I swap the shaft on and I can take it for a spin.
Junior Member
Joined: Jan 2009
Posts: 21
Likes: 0
From: St. Francis, Minnesota
Nice work on the swap  , the first gens are really starting to grow on me. Ive seen you driving around the cambridge/isanti area before maybe you've seen me in my red fc. I used to deliver pizzas around that area and i would always try to catch up to you but you always turned off before i needed to.
Enough creeping though lol, get her finished!!
, the first gens are really starting to grow on me. Ive seen you driving around the cambridge/isanti area before maybe you've seen me in my red fc. I used to deliver pizzas around that area and i would always try to catch up to you but you always turned off before i needed to.Enough creeping though lol, get her finished!!
Thread Starter
Joined: Aug 2011
Posts: 3,078
Likes: 42
From: Cambridge, Minnesota
Trust me, I was too! Sucks to not have a running driving Turbo FB for Independence Day but it's whatever. Hopefully it will be done towards the end of next week according to the driveshaft shop.
Yeah man! I almost broke my neck looking at your car thinking, "That sure looks like an FC that I see pictures of on the forum every day...that might just be one...I think it is...IT IS!..and he's gone." You worked at a certain place in Isanti that delivered pizzas that starts with a Ch - it was on your car and I saw your car there once 
Still have the FC? Will be cruising in the FB here shortly!
Updates as of yesterday:
Got new thermostat gasket and UIM to turbo gasket installed and RTVed, curing as we speak
All stock gauges are now working and wired in correctly
Finished the wiring 100% as far as routing, now just have to wrap it all up
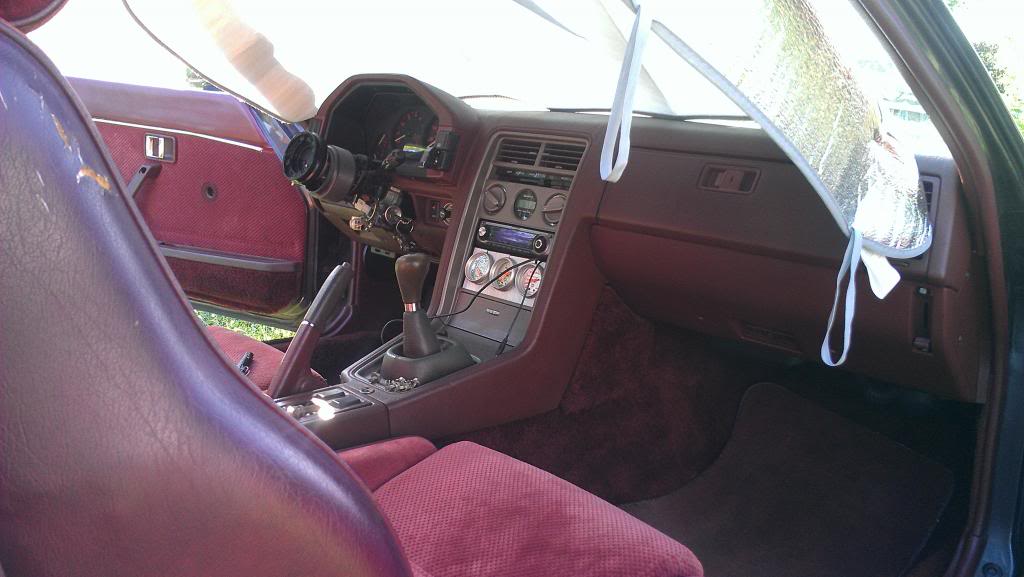
Got the interior put together almost completely - first time that's looked like it does in a very long time!

Nice work on the swap , the first gens are really starting to grow on me. Ive seen you driving around the cambridge/isanti area before maybe you've seen me in my red fc. I used to deliver pizzas around that area and i would always try to catch up to you but you always turned off before i needed to.
Enough creeping though lol, get her finished!!
, the first gens are really starting to grow on me. Ive seen you driving around the cambridge/isanti area before maybe you've seen me in my red fc. I used to deliver pizzas around that area and i would always try to catch up to you but you always turned off before i needed to.Enough creeping though lol, get her finished!!
Still have the FC? Will be cruising in the FB here shortly!
Updates as of yesterday:
Got new thermostat gasket and UIM to turbo gasket installed and RTVed, curing as we speak
All stock gauges are now working and wired in correctly
Finished the wiring 100% as far as routing, now just have to wrap it all up
Got the interior put together almost completely - first time that's looked like it does in a very long time!


Junior Member
Joined: Jan 2009
Posts: 21
Likes: 0
From: St. Francis, Minnesota
Yup that was me  . Funny how i just happend to find your build thread, small world i guess. Anyways i still have the fc and currently im doing a rebuild because it blew a coolant seal
  , but im also using the rebuild as a chance to swap it to a 5 speed. Just gotta track down the parts.
. Funny how i just happend to find your build thread, small world i guess. Anyways i still have the fc and currently im doing a rebuild because it blew a coolant seal , but im also using the rebuild as a chance to swap it to a 5 speed. Just gotta track down the parts.
Ready or not...
Joined: Dec 2009
Posts: 261
Likes: 0
From: Taos, NM
Thread Starter
Joined: Aug 2011
Posts: 3,078
Likes: 42
From: Cambridge, Minnesota
Yup that was me . Funny how i just happend to find your build thread, small world i guess. Anyways i still have the fc and currently im doing a rebuild because it blew a coolant seal , but im also using the rebuild as a chance to swap it to a 5 speed. Just gotta track down the parts.
. Funny how i just happend to find your build thread, small world i guess. Anyways i still have the fc and currently im doing a rebuild because it blew a coolant seal , but im also using the rebuild as a chance to swap it to a 5 speed. Just gotta track down the parts.I'll be doing a writeup on how I installed this with pics and instructions at a later point to help others out with getting it on.
Back of car before work


Masking tape to protect paint

Some install pics


Painting the spoiler

Well not too much work done other than these pics.
Got it started again and checked the gaskets - everything's sealed nice and tight. Looking pretty mint for its first drive!
Will be driving the car around on the 17th if everything else goes well. Need to grab the driveshaft and head on down there. Going down to the weekly meet with the other local MN guys in Bloomington at Sonic next Wednesday night

Thread Starter
Joined: Aug 2011
Posts: 3,078
Likes: 42
From: Cambridge, Minnesota
I'll be posting up a forum tutorial on how I did it. Will hopefully get others to contribute as well to help everyone else out on installing it. It's pretty daunting but is rewarding when done. I could throw it on the car now with a crappy paint job but I'm still deciding what to do here.
It's currently Rustoleum Gloss Black, yeah. I got a run in the center of the top of the center piece and I can't just leave it like that so I'm sanding down at least that whole part again. The gloss black with the black primer underneath it is definitely deep looking and pretty though.
And because of where they were hanging they bumped into each other and left small marks in the paint so I'm going to be stripping all the gloss paint off every part to do a respray on the whole thing. I definitely dig the look of the wing so far, I'm just being very **** about it since I plan on putting it on with the intention of never taking it back off unless absolutely necessary - so I figure I better do it right.
Goal is to put it on for next Wednesday when I can drive it around and it'll be gloss black. Then I'm going to order at least one can of Tornado Silver Metallic K8 paint from Automotivetouchup.com for like $20+s/h and make it match the body. They just look so much sleeker matched to the paint I think, and black would really stick out on the gray car I think. I do love yours though 82transam - the black on red with black interior does it for me
If I get some more work done with the wing tonight I'll be sure to take some pics.
Also, got promoted today so I get a little better paychecks and more hours so that's always a good thing for the car-part fund

Grats on the promotion bro!
Loving that wing - that's probably what I'll end up going with as well - factory IMSA front kit and rear spoiler.
Agreed on paint matching it to body color.
Loving that wing - that's probably what I'll end up going with as well - factory IMSA front kit and rear spoiler.
Agreed on paint matching it to body color.
Thread Starter
Joined: Aug 2011
Posts: 3,078
Likes: 42
From: Cambridge, Minnesota
Iii..uhh...washed it out with water.
I was able to get out anything that was of a floating nature in the tank itself after the modifications. It's as clean as I could possibly get in there and it has the splash cup, pump screen, and fuel filter protecting the engine from any debris so I feel pretty safe.I would looooove to find an original IMSA front air dam to accompany the wing. Find an 80's date on the piece with someone's initials and throw it on the car. I'm hunting them down right now but won't pull the trigger on the purchase for a while yet. The one on my car is pretty scuffed up from the PO and myself rubbing it on curbs and speed bumps.
For me, matching it to the gray is the only way to go. I just couldn't see it being any other color without seriously bothering me.
As far as an update on the night:
Not much has happened really for a while now. Been busy with work and life stuff so I haven't been getting whole lot done on the car recently. I had a few spots on the wing that were bothering me. So what did I do? I sanded down the entire wing and fixed the troubled spots and re-primed it now. Will put on at least 2-4 more primer coats so everything gets evened out and then I'll just leave it like that until I can get the K8 paint in two spray cans to make it match.
Need to go finalize everything from the TB elbow to UIM gasket before I want to drive it. Latest that I'd want all that done is on Tuesday night so that the RTV that'll hold the UIM to the LIM with the gasket can have time to cure.
Things to get done before Tuesday night:
Make sure turbo doesn't smoke anymore from any leaks or seals
Remove or engage the whole thermowax assembly (If I end up having to DD this thing through the winter I would probably prefer this being installed versus waiting for it to be fully warmed up
 )
)Re-check the primary and secondary fuel rails for any leaks or issues
Go over the whole rear end again and make sure that everything is tight and OK for driving after the shock install and poly bushings
Make sure the entire interior is together as it should be
Detail the car so it's all nice and clean and ready to be shown off
Reeeeeaaaaalllllyyyy getting anxious to drive the thing...
Thread Starter
Joined: Aug 2011
Posts: 3,078
Likes: 42
From: Cambridge, Minnesota
Car Now Drives!
No videos as of yet, sorry Will post some after the car has been tested working safely and broken in to my satisfaction.
Pictorial story of the day's progression:
Got off of work a little late but wasn't too terrible. Ran to get new bolts, nuts and lock washers from Menard's for the driveshaft rear flange then went and got cash out for the shaft itself.
Ran down to the shop making the shaft and was very pleased to get the new shaft, as well as the other two shafts I gave them for references. I'll try to sell these off to others that can use them more than I.
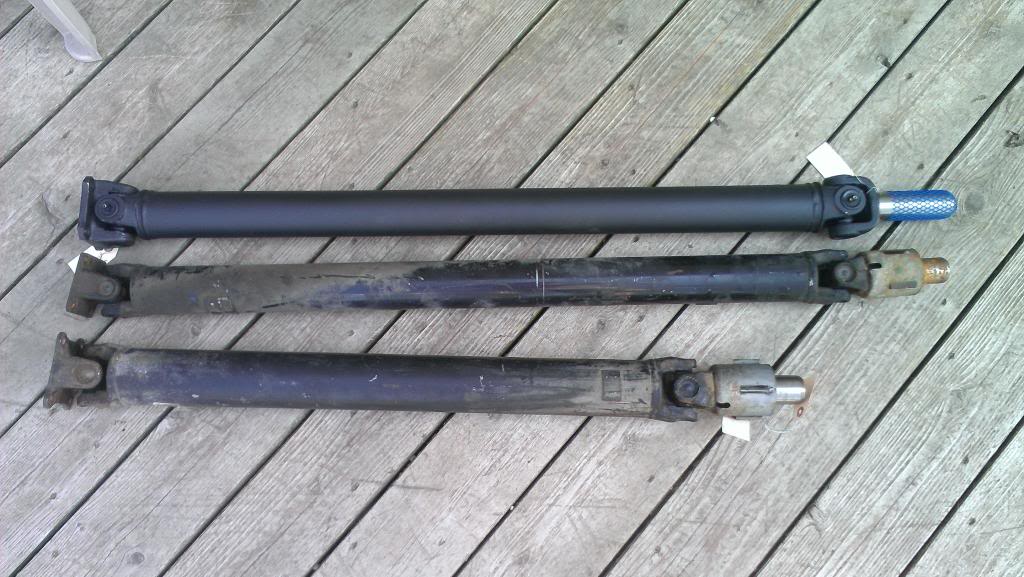
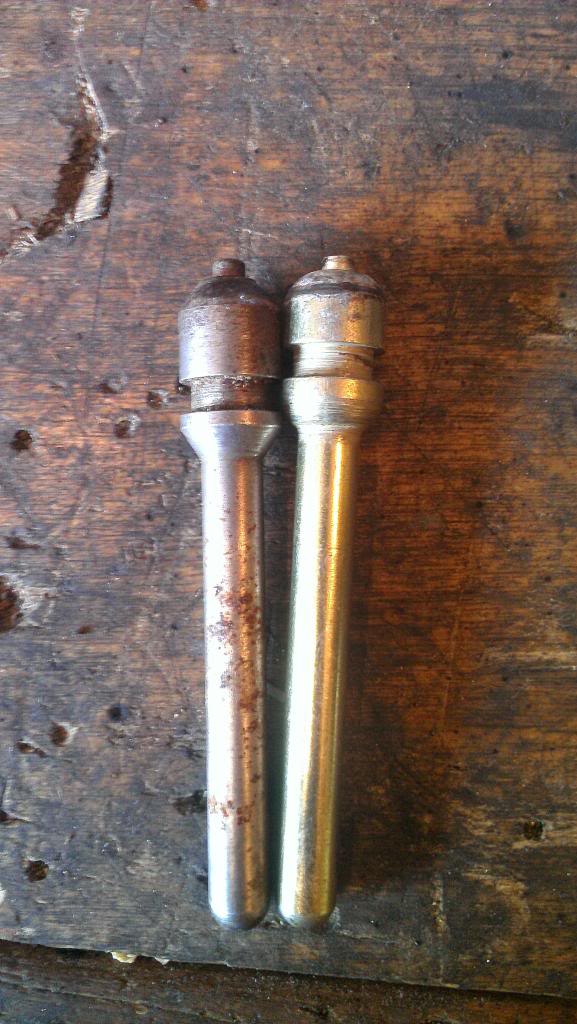
New driveshaft versus the old FB 12a shaft directly underneath it, and the FC 13bt shaft below that. Shaft has greasable and rebuldable u-joints with a 1 year warranty.
Slip yoke side of the new driveshaft
Rear flange side of the new driveshaft with new Grade 10 nuts, bolts and lock washers for the whole rear end.
Got home and verified that I could drive the car without forgetting anything that would drag on the ground or be a safety concern. Got the IMSA spoiler installed temporarily as well as you can see later.
After installing the shaft and cleaning out the entire car of all tools and hardware I decided to see if she'd go under her own power. I was ecstatic about the car being able to move itself I couldn't stand it!
Then I figured out that the shaft on the clutch slave cylinder of the new FB was too long and pushing the clutch in constantly. My heart dropped in hearing and feeling that I couldn't drive the car the way it was.
Until a thought crossed my mind...
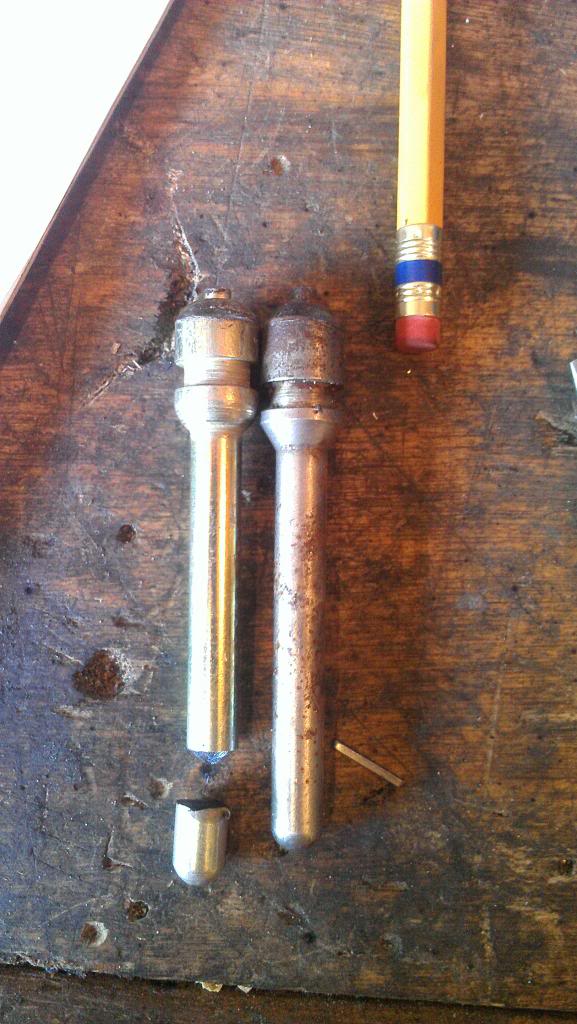
FB slave cylinder push rods side by side
Shaved off shaft that I'm using on the left in the car now. Has been shaved down even further by about 1/8" from this picture just with the feel in the car
So I put this in the car and wouldn't ya know it, she worked!!
Re-bled the clutch system with some help from my dad and took him for a ride he won't soon forget
I drove the car for a total of about 8 miles in 2 mile stints up and down a road that isn't patrolled 364 days in a year. Only boosted it twice and man does it RIP now! Couldn't be happier with its performance and I can't wait to see how it progresses from this point.
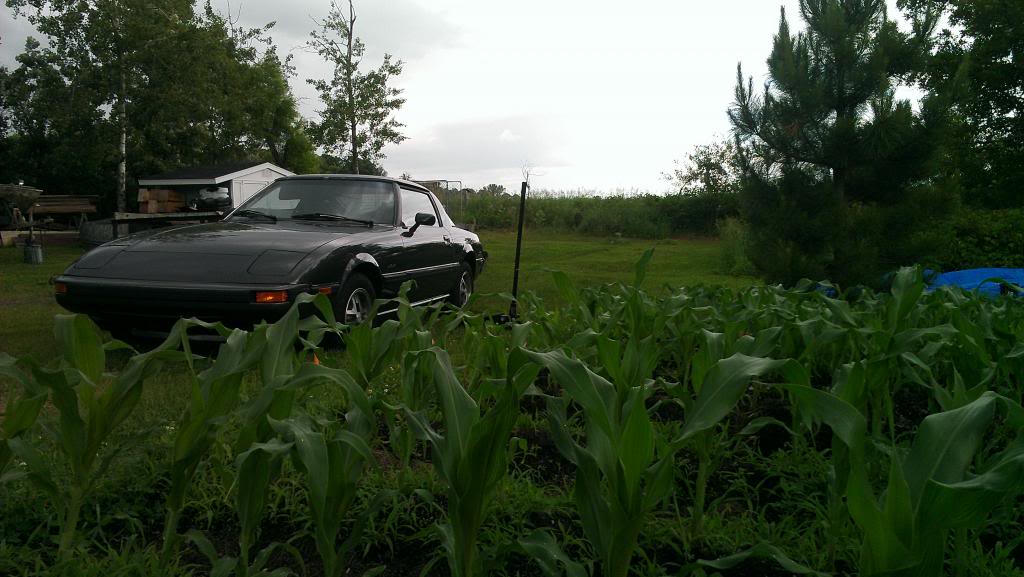
Driver's side view of the car after the night's activities
Passenger side shot
There's an end in site where I can reliably drive the car whenever I want.
Will post some after the car has been tested working safely and broken in to my satisfaction.Pictorial story of the day's progression:
Got off of work a little late but wasn't too terrible. Ran to get new bolts, nuts and lock washers from Menard's for the driveshaft rear flange then went and got cash out for the shaft itself.
Ran down to the shop making the shaft and was very pleased to get the new shaft, as well as the other two shafts I gave them for references. I'll try to sell these off to others that can use them more than I.
New driveshaft versus the old FB 12a shaft directly underneath it, and the FC 13bt shaft below that. Shaft has greasable and rebuldable u-joints with a 1 year warranty.

Slip yoke side of the new driveshaft

Rear flange side of the new driveshaft with new Grade 10 nuts, bolts and lock washers for the whole rear end.

Got home and verified that I could drive the car without forgetting anything that would drag on the ground or be a safety concern. Got the IMSA spoiler installed temporarily as well as you can see later.
After installing the shaft and cleaning out the entire car of all tools and hardware I decided to see if she'd go under her own power. I was ecstatic about the car being able to move itself I couldn't stand it!
Then I figured out that the shaft on the clutch slave cylinder of the new FB was too long and pushing the clutch in constantly. My heart dropped in hearing and feeling that I couldn't drive the car the way it was.
Until a thought crossed my mind...
FB slave cylinder push rods side by side

Shaved off shaft that I'm using on the left in the car now. Has been shaved down even further by about 1/8" from this picture just with the feel in the car

So I put this in the car and wouldn't ya know it, she worked!!
Re-bled the clutch system with some help from my dad and took him for a ride he won't soon forget
I drove the car for a total of about 8 miles in 2 mile stints up and down a road that isn't patrolled 364 days in a year. Only boosted it twice and man does it RIP now! Couldn't be happier with its performance and I can't wait to see how it progresses from this point.
Driver's side view of the car after the night's activities

Passenger side shot


There's an end in site where I can reliably drive the car whenever I want.
Thread Starter
Joined: Aug 2011
Posts: 3,078
Likes: 42
From: Cambridge, Minnesota
Low Oil Pressure on Partial Rebuild
Well I have low oil pressure in the car upon partial rebuild.
To get the TII engine to fit into the FB using the stock mounts I had to use a GSL-SE front cover and a GSL-SE oil pan. In doing this I removed the old TII front cover and oil pan and had to install a new gasket for the front cover, front cover o-ring, and FB pickup tube for the oil pan.
On March 8 of this year I made my big order for the parts I needed from Atkins Rotary to build the engine up to put it in the FB. The issue I have is:
1. I have an S4 engine (pretty obvious there)
2. But I ordered a big hole front cover gasket from Atkins with a teflon o-ring
3. The teflon o-ring didn't fit right so I just used a generic o-ring that we had in the shed at the time
According to Aaron Cake at this post (pretty good thread about the issue): (2nd Gen Specific) new rebuild has low oil pressure
"To clarify, using the Teflon ring has nothing to do with the front cover, it is dependant on the front iron you have. If there is room in the bore for the Teflon ring, you need to use it. If there is only room for the o-ring, then you don't use the Teflon ring. And you have to make sure to use the proper front cover gasket. The one with the big hole is to be used for the Teflon ring, but the small hole is for the o-ring only."
Got this confirmed by reading about the issue on the Mazdatrix FAQ page found here: Mazdatrix FAQ: 86-92 Front Cover "O"-Ring
So what I need to do is get a small hole front cover gasket or just use silicone (which seems to be the better, cheaper, more proven method on keeping the S4 o-rings in place), o-ring, and re-check everything in the front cover and oil pan again. Oh joy.
While I'm at it I should check the oil pickup tube as well. I used a 12a oil pickup tube in the 13bt engine since the original one wouldn't fit with a GSL-SE oil pan. In doing this I didn't use a gasket since there wasn't one on the 12a FB pickup tube so I thought nothing of it. This can cause air bubbles in the vacuum that the pickup tube creates to the oil pump and air in the system can cause low oil pressure and severe engine issues in the future. So I will be installing a gasket in that part.
So now it's lift the engine and take off the whole front cover again and redo it. Should have paid more attention to the order list, sucks to learn sometimes.
I have this Saturday off and with some severe will power I should be able to get the whole system redone and checked out. Of course I'll have to let the material dry for 24hrs+ to ensure proper adhesion.
The joys of learning..
Yeah man dont worry about it. I had the same issue on my first run of the turbo - my O-ring actually dropped out and i had no pressure.
Its just something you gotta do, you know exactly whats up, exactly how to do it, there's no mystery, so its an easy one. You can do it in a day! keep with it bro!
You're kicking my *** in terms of progress. I'm literally stuck at the paint-scraping phase of my build. 3/4 of the crappy paint flaked right off the engine block, but the last little bit is literally fused to the block.
Once its polished, THEN i'll plug in the EFI.
Post a video! maybe that will make me so jealous I just all go up and finnish it.

