When you click on links to various merchants on this site and make a purchase, this can result in this site earning a commission. Affiliate programs and affiliations include, but are not limited to, the eBay Partner Network.
This is my favorite part of doing any rebuild - tearing **** apart because you had a realization that you should have used a different part or an higher heat resistant part.
Well after installing the ZTE blue zip ties rated to 300F and showing a co-worker the website I got them from, I came across some hi temp wire loom rated at 300F.
Well since my harness was done with wire loom from Dale Hardware I called them and they said they did not have the temp specs... ok no problem. I cut off 3 sizes from my stock pile and heated it in the oven to 200F for 10 min. The wire looms still maintained their shape but were as soft as camp fire marshmallows. Hummmm ok - I turned up the heat to 250F and came back 15 m in later and all 3 wire looms were flat like a sema show car on pancake mode.
%^&* !!!!!!!!
Pulled the alternator and the front lift bracket off, un-bolted the oil filler neck and lifted out the vacuum chamber and pulled the harness off the engine and pulled all the wire loom off.
I left some of the electrical tape as place holders and I put a few ZTE blue zip ties to hold it together under new wire loom.
I went to the cable ties and more site and started to order the 300F wire loom. Prices were good at 1/4 x 100ft for $14, I think 1"x100ft was $40. Anyways I had the 4 sizes I wanted which came out to about $95 buck then I went to calculate shipping... which came out to $89 - a whaaat - a tiger shark....jaws meme.
I guess to ship 400ft of wire loom is expensive - so I ebay'd the stuff for $30... I just ended up getting 10ft each of the 4 sizes I wanted.
I also ordered some high temp PET harness tape (300F) and a 1.5 insulated clamp for all the silicone hoses that go from the engine to turbo stuff.
Enjoy your Labor Day weekend !!!!
Last edited by rotaryextreme; Sep 5, 2020 at 03:47 PM.
Today I got the engine harness re-wrapped and put back on and also re-assembled everything else.
I ordered some bigger 1.5 inch clamps to hold the vacuum lines going to the turbo side. I saw some cool red clamps so I said what the hell and used that to hold the vacuum lines.
The tape I used is really strong but not super sticky. Hopefully after it heat cycles it will stick to itself better. I compared the old roll to a new one and I barely used half, I would say 1 roll is enough for the engine harness.
I got my yellow HKS filters to match my oil catch can filter.
Last but not least I got the new plastic wire loom in. They all had a grey line painted on them and yes I heated them up in the oven to 300F for 10 minutes. They stayed round and were not soft to the touch. Definitely passed the heat test.
more rework - it's amazing the things we learn from our mistakes.
mistakes are made due to a lack of knowledge on something and a lack to do research on something.
1. TESA tape - oh you bastard !!!!!!!!
2. Transmission installed
3. Final Mock up with harness test fitted on transmission
1. TESA tape.
So a week later I went to do more work on the engine and as I was looking at the harness I noticed that pretty much all the ends of the TESA tape had unraveled. You know what this means right? Take off the alternator, oil filler tube, boost / vacuum chambers and the harness - UUGGGHHHHH !!!!!!
I finally came up with a way to prevent it. Burn the loose end and then press it down so that the melted fibers and glue stick to the wrap. When I did this it held down better but was more interesting was that it was more rigid and maintained the curve. To finish it off I put some high temp 500F black silicone over the edge to make sure it would not peel back up. Yeah buddy !!!! I hung the harness up and did this to every wrap and let it dry over night.
I re-installed everything and it all works out nice. No more unraveling of tape.
2. Transmission installed
I wanted to install the tranny with the engine that way mainly so I can have the harness issues all worked out. It is also easier to bolt it to the engine since they are both already out from the car.
I have a tranny jack from harbor freight and I love it. Damn....tranny and I love it in the same sentence...lol. It has to adjustment points and it makes installing the tranny a breeze. I was really surprised that once the tranny was on the engine did not tilt in any direction. I still want to play it safe and placed an engine stand undert the tranny for extra support.
I put the UIM, TB and Greddy elbow on so I can make sure I could secure the harness the way I wanted with the tranny on. The gas purge chamber did not fit due to the xcessive oil filler neck. I have to make 2 little arms with a spacer on them for clearance. The last solenoid I had to fit was the gas purge solenoid and I ended up using an L-bracket to secure it to the back of the UIM.
To secure the harness coming of the engine I added two clamps on the tranny. I used an existing bracket and added a clamp to it. The other clamp is the big red one to secure the bulk of the wires that are not used. Lastly I repurposed a harness connector that originally bolted to the LIM, I bolted it to a dust cover on the engine to hold the harness for unused connectors and the harness for the solenoid manifold assembly.
3. Mock up checks.
With everything bolted together its kind of a big mess. I did not take note of how much room was between the transmission and the tunnel - I just hope what I have will work out. I like how the harness goes on the tranny. For those open connectors I will put some kapton tape (rated for 500F and non-conductive) over the connectors and then secure the kapton with a thin layer of dow corning mil -spec clear silicone (rated for 350F and non-conductive).
The next fix deals with re-doing the back part of the harness and I should not have to take it back off of the engine. Im going to cut off all the unused rectangular rats nest solenoid connectors, all emission connectors and I will keep all the smaller round connectors which includes the 2 solenoids Im replacing with my boost controller.
You can see the mess with the solenoid manifold harness, connector X is ok but the E,F,H connector situation looks like a hot mess. I ordered a 6 pin connector pre-assembled and I'll splice the wires on both ends.
Hopefully all the parts arrive and Ill have this stuff done by Halloween.
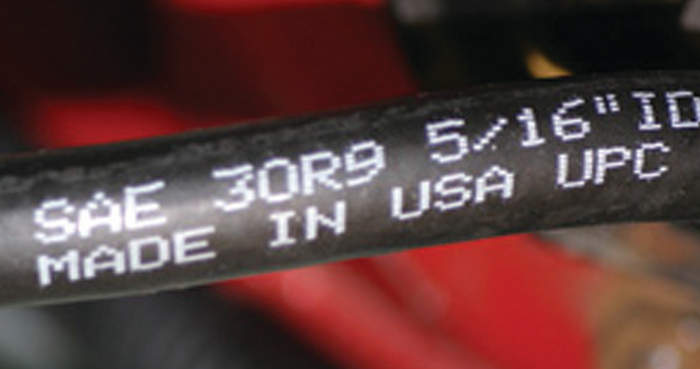
In one of the pics above, it shows the fuel line being bent so I went out to the garage and fixed it - it was then I noticed I had f$%ked up.
Its SAE 30R7 low pressure hose not for use with fuel injection - I just ordered some SAE 30R9 high pressure fuel line...... off comes the harness again, hopefully I can move it out of the way to get to the pri rail to sec rail section without removing the alt and yada yada yada.
I feel for you! I've literally redone my ENTIRE fuel system 4 times over the last two decades and each time it's be trailblazing stuff. There is a price for that innovative coolness... but in the end it's a small price from for the final satisfaction. Keep blazing the trail!!
I feel for you! I've literally redone my ENTIRE fuel system 4 times over the last two decades and each time it's be trailblazing stuff. There is a price for that innovative coolness... but in the end it's a small price from for the final satisfaction. Keep blazing the trail!!
Carlos,
Thank you so much for the comment. I still need to do my fuel pump too....hummm, what to get??
Well I think we are all a little bit of a trail blazer for the simple fact of owning an RX7...LOL
The Society of Automotive Engineers (SAE) is an industry group that creates standards for the automotive industry. When it develops a standard, it applies to all manufacturers in hopes of reducing engineering and testing costs.
SAE has more than 16 active and inactive J30 standards for fuel and oil hoses. If you look at the side of a fuel, oil or emissions hose you will see the letters “SAE” followed by the number 30 (some will have a J first). Next in the sequence will be the letter “R” followed by a number. The number after the “R” refers to the section of the performance standard it pertains to. The criteria are typically permeation, chemical resistance, construction, temperature range and kink resistance. The higher the standards go, the more criteria that must be met.
“R” numbers in some cases do not determine the pressure rating for the hose. Hose manufacturers typically print on the hose if it is intended for use on fuel injection systems. Also, you should check with the manufacturer of the hose to see if it is compatible with fuels like E85 or biodiesel. NOTE: IF A HOSE DOESN’T HAVE A SAE J30- STANDARD ON THE SIDE, DON’T INSTALL IT IN A FUEL SYSTEM.
SAE 30R6 hoses are designed for low-pressure applications like carburetors. These can also be used as an emissions hose.
SAE 30R7 hoses are designed for fuel. These can go under the hood and are typically used for low-pressure applications.
SAE 30R9 hoses are designed for high-pressure applications like fuel injection and oil. These are designed to stand up to the environment under the hood.
SAE 30R10 includes hoses that are submerged in fuel. This type of hose is used inside the fuel tank and typically on the fuel pump module. This type of hose uses a special layer on the inside and outside to prevent the core layers from being saturated in fuel. But, don’t use it under the hood. R10 hoses can’t stand the heat.
SAE J30R12 includes low-permeation fuel feed and return hoses.
SAE J30R14T1 is the standard for ultra-low permeation properties. This type of hose is typically approved for use with leaded and unleaded gasoline, diesel, biodiesel, E85, methanol, ethanol and gasohol fuels. These are typically used for low-pressure applications.
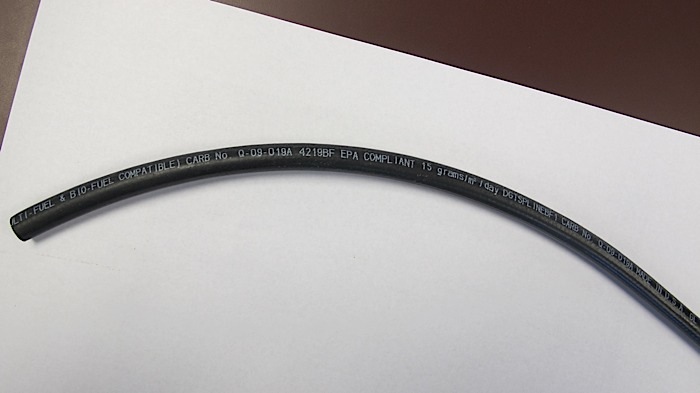
CARB-Approved Hoses
The California Air Resources Board (C.A.R.B. or ARB) is a governmental body in the state of California charged with the task of improving air quality. Started in 1967, it regulates certain emissions related parts. Some fuel hoses have “CARB No.” printed on the side. This will be followed by a sequence of letters and numbers that indicate the hose can be used in the state of California.
EPA-Approved Fuel Hoses
If you see “EPA COMPLIANT” on the side of a fuel hose, it indicates that it is approved for use on marine and powersport applications by the Environmental Protection Agency (EPA). This type of fuel hose has low-permeation properties to ensure fuel will not pollute the waterways.
Installation
Do not replace long runs of hard line with flexible fuel hose. Even the best fuel injection, low-permeation fuel line will have some amount of fuel vapor loss. Also, road debris can damage these lines. Making this mistake is very dangerous, and it also can be difficult to seal the connection between the metal line and the hose that could be under 50 psi or more of pressure. Fuel hose length should be kept to a minimum, not only for safety, but for permeation and fuel loss purposes as well.
Do not use braided stainless steel lines or AN fittings unless they are SAE approved. You may have a customer who thinks racing-style braided stainless steel hoses are the ultimate solution for leaking fuel lines. They make sense for some racecars and rock crawlers, but for a daily driver, the “improved” lines could be a headache.
Most of these hoses don’t have to meet EPA, SAE and CARB standards for permeation. Some performance hoses also will not stand up well to higher ethanol content fuels. Teflon-coated and other similar hoses are designed to stand up to modern gasoline, but they can be twice as expensive as a hard line.
Clamps
It is highly recommended when replacing fuel hoses that the clamps are also replaced. The first consideration is the size of the clamp. A clamp that is too large will not evenly seal the fuel hose to the line. The second consideration is the type of clamp. Worm gear clamps may work for low-pressure applications. But, for fuel injection applications, you need clamps that are specifically designed to handle the pressure and not damage the outer layer of the fuel hose.
Dale and others -> Ben, I told you so.
Ben - OK OK OK OK - Ill change out the worm clamps for the "specifically designed ones"
Good post. I feel your pain on the on again off agains. As for Dale, I’ve learned to just do what he says. It works 99% of the time and I’m still waiting for that 1%. Overall, your effort level on this project (documentation and modification) has worn me out. Impressive, especially lone wolfing it. Good stuff. Can’t wait to see it on the move.
Good post. I feel your pain on the on again off agains. As for Dale, I�ve learned to just do what he says. It works 99% of the time and I�m still waiting for that 1%. Overall, your effort level on this project (documentation and modification) has worn me out. Impressive, especially lone wolfing it. Good stuff. Can�t wait to see it on the move.
Yes I agree, Im worn out too. I would love to hide all my faults, but we learn from our mistakes and I would hate for some one to copy me and make the same mistake.
I want to see it on the move - and I think soon.
Once the engine is sorted out Im going to clean up the engine bay and relocate the fuse box.
All I need to buy now is the ign-a1 kit but I already have everything to make my vm kit.
Dyno Tune note 1 - make sure to set the turbo transition at the point DALE says to.
Finally the engine is ready for install - after I clean up the engine bay of course.
I started at 630am and finished around 6pm - with a 1 hour write up.
1. new parts and parts used
2. connectors cut off and kapton taped
3. added sensors to the oil pedestal
4. finally fixed the fuel lines
5. surprise short stud - my little tom cruise
6. securing the harness
7. all done with acorn nuts
1. new parts and parts used
I got in my high temp titanium fiberglass wrap for the down pipe. Ill wrap it after I figure out where to install the second bung for the EGT gauge. The wrap it rated to 1800F - its a downpipe so it should be fine.
I wrapped the connectors with just the kapton tape. It should keep the dirt out. I left it at that and didnt end up using the dowsil 3145 clear silicone I got.
My pre assembled 6 pin connector came in, the wirs were bigger than expected but I made it work.
I got the SAE J30R9 in - made by Continental but in the Czech Republic
I found my handy dandy stash of shrink tubing so I can color coat things a bit. I remember I bought a decent xacto knife set for trimming the leather seat repair but it didnt work so well for that. Well it worked great for cutting the fuel hose off in a hard to reach location. Clamps clamps clamps and more clamps - I like my things secured...lol
2. connectors cut off and kapton taped
I cut off all connectors that I know I would not use any more and kept certain ones like the waste gate solenoid connectors and OMP connector. I wrapped everything with Kapton. The wires I cut I folded back and put shrink tubing on them and while it was hot I pinched the end and the little hole sealed shut. I also used color matching for a quick reference if ever I needed to put it back together. For the solenoid harness I cut off the spades and put the 6 pin connector on it. Since there were 6 different color wires I'm confident I didn't mix anything up. And of course I had to re-wrap that section and I ended up with an amputated limb.
3. added sensors to the oil pedestal
This is the 3 reasons why I wanted to install the tranny. Make it easier to install into car, verify harness and verify locations for oil temp and pressure sensor. The Banzai oil pedestal is slick. The factory oil line bolts to it and it has holes taped for the sensors already and comes with plugs for the unused holes. Looking at the oil pedestal I ended up putting the oil temp sensor on the left side and the oil pressure sensor on the right side and plugged the remaining holes. I also verified the oil temp sensor would not hit anything on the inside. When I install the engine I'll take off the oil pressure sensor to be safe.
4. finally fixed the fuel lines
I was able to replace the fuel lines without removing the harness and I put the correct clamps on - Thanks Dale. I had the special hose pliers which made it possible. I cut a slit in the hard to reach hose going from the pri to sec rail which allowed me to pull it off. I noticed a sharp point near one of the fuel lines so I took a file to it. After an hour I went back to each fuel hose clamp and re-tightened them down as the rubber settled in. I left the other worm clamps on the coolant hoses - low pressure.
5. surprise short stud - my little tom cruise
I didn't catch it until now. My UIM to TB has 4 equal length studs but one needs to be longer for the TB coolant passage area. I ran to Dale Hardware to get the longer stud and was back to finish the job before dark.
6. securing the harness
I wanted to secure the harness so it would not flap around so I ended up using the vent port bolts. I was surprised to see they were machine screws but I was able to re-tap them for M6. I secured the new solenoid 6 pin connector to my re-purposed bracket which had 2 mounting locations. The other location secures the coiled up solenoid harness. The other big connector it sitting on top of the sec fuel rail. There is so much going on here - I don't even know what I'm looking at anymore. I turned one of the transmission wire holders for the harness around so it would hold part of the engine harness. Everything does fit nicer, it looks messy but it fits. I found the missing water temp to dash connector too!!
7. all done with acorn nuts
While I was buying the stud I also got some chrome acorn nuts. I put the UIM on and connected the remaining connectors and TB coolant hose. I like the way it sits and now I know I'm done for now. After the engine is installed that is when Ill finish the remaining vacuum lines, coolant lines and fuel lines. That is also when I will paint the UIM and Oil filler neck my silver glitter color. But first - now I need to address the engine bay.
Now she sits waiting for her home.
Now for pics
1. new parts and parts used
Last edited by rotaryextreme; Oct 17, 2020 at 10:20 PM.
Reason: added info


 SAE J30R Standards