
Randall's Magnum Opus - 93 VR Progression

Randall's Magnum Opus - 93 VR Progression
Not unlike many of you, I have looked at RX-7 with an unexplained attraction for as long as I have been aware of them. For a long time, I was not in a
position to consider ownership; little things like youth, starting a family, and getting educated kept that idea far at bay. I had some fun cars during that
period. I probably caused the most trouble in my Miata and I got my first taste of turbo in my MR2... the awesome one. Those cars sustained my fire
for autos while I waited to buy this one. My 93 VR.

I purchased the car in November of 2012. Here is my story so far...
position to consider ownership; little things like youth, starting a family, and getting educated kept that idea far at bay. I had some fun cars during that
period. I probably caused the most trouble in my Miata and I got my first taste of turbo in my MR2... the awesome one. Those cars sustained my fire
for autos while I waited to buy this one. My 93 VR.
I purchased the car in November of 2012. Here is my story so far...
It seems fitting to cap off the long wait with a legendary purchase experience. My story starts with a one way ticket to southern California from the
windy plains of Oklahoma. Some may call it a bold move to drive an untested rotary halfway across the country. I would agree.
It was my first trip to the west coast. I overflew the Pacific, even if it was just the shoreline. It was awesome. Looking out from the airplane, I was
amazed at the way the mountains suddenly erupted from the flatlands surrounding them.

My euphoria was enhanced with this view leaving the airport. The trip was just beginning.

windy plains of Oklahoma. Some may call it a bold move to drive an untested rotary halfway across the country. I would agree.
It was my first trip to the west coast. I overflew the Pacific, even if it was just the shoreline. It was awesome. Looking out from the airplane, I was
amazed at the way the mountains suddenly erupted from the flatlands surrounding them.
My euphoria was enhanced with this view leaving the airport. The trip was just beginning.
I chose the path less traveled, departing SO CAL through the desert on a series of two lane roads, eventually making my way into Flagstaff, AZ. It was
late, and snow started falling. I stayed there for the night.

I departed Flagstaff northbound. Adding to my list of firsts, I skirted the southern rim of the Grand Canyon eastbound before heading north to Four
Corners, where I stood four places at once . The scenery was breathtaking. I eventually wound my way back south into Albuquerque and followed the
freeway to Amarillo. Not long afterward, darkness took over and I arrived home, with my new toy.


More to come...
late, and snow started falling. I stayed there for the night.
I departed Flagstaff northbound. Adding to my list of firsts, I skirted the southern rim of the Grand Canyon eastbound before heading north to Four
Corners, where I stood four places at once
. The scenery was breathtaking. I eventually wound my way back south into Albuquerque and followed the freeway to Amarillo. Not long afterward, darkness took over and I arrived home, with my new toy.
More to come...

That's brave, buying an FD and driving it almost cross country. Granted, i've done it too on other cars but i'd be weary of doing it with an FD. Glad it all worked out though.
More pics!
More pics!
During the next few months, I was increasingly amazed that the car made the drive halfway across the country without an incident. Worn out rubber was the source of numerous problems (leaks and squeaks). To be positive, each repair results in a cleaner and more organized engine bay.
The car appeared to be reasonably sound at first glance and it probably was. The modification list was substantial enough to justify a little mismanagement in the installation of things. The fitment of the front bumper wasn't perfect (and still isn't where I'd like it to be, I just need to mess with it more). The stereo was all but non-existent. Nonetheless, it ran well and the price wasn't bad.
Short list of installed mods: Tien Flex coil overs, BNR stage 2s running non sequentially. KG works rails with 850/1680cc fuel injectors, FFE hall effect trigger kit, Haltech PS1000, Aluminum radiator, meth injection... the list goes on.
Shortly after bringing it home, I went to work. Most of my focus since the purchase has centered around the details of the car. I manipulated the bumper for better fitment, replaced the sunroof relay to get that going again and made substantial upgrade to the stereo.
I wanted to do a car pc. It gave this old car satnav, internet, entertainment, ability to tune/monitor the Haltech on the fly and expandability limited only by my ability and creativity. In order to accomplish, sourced a sweet DC to DC power supply which times the power to the PC based on the ignition state. The pc is a mini-itx and everything is solid state... really fast. I found a liliput display with a capacitive overlay and got it running on a bench. I'm not content with the install of the pc box, and will probably tweak it eventually, but it has held up fine over a year.

The PC

The Display

Installed PC

Installed Display
For audio, I decided on Infinity Reference speakers since they have a shallow mounting depth. These are powered by a 6x600watt amp. Oh yeah, I didn't mention I have true 5.1 surround sound in this thing.
I sourced some rear speaker brackets and purchased the covers (along with a host of other new interior pieces) from Mazda. The bins came out with ease and the covers popped right into the rear plastics. Easy. When I removed the door panels to do the fronts, I was greeted by whatever this is... I had no words.

WTF
I ended up ordering a set of adapters from car-speaker-adapters.com and was very pleased with the results... sorry, no picture atm. It looks pro though.
I capped off the install by building this box for an 8" kicker sub and made some trunk carpet to tidy things up (there wasn't any when I bought it). I also fixed a very poor rendering of a battery relocation. It wasn't safe before I fixed it. See below.

Neat
While all this was going on, I took advantage of the disassembly to accomplish a few other tasks.
- I cleaned and lubricated the window regulators and switches. Operates like new.
- The relocated battery installation was not safe. Seeing a standard battery venting into the cab raised a flag. I purchased a sealed battery box and an Optima Yellow-Top to address the hazards of this installation. During the installation of the battery box, I discovered that the origional battery was mounted to the floor pan by bolts without washers or any other device which would distribute load in the event of an accident. This was corrected by relocating the mounting point to catch some chassis cross bracing and using appropriate hardware.
- Organized a cluttered wire harness. I am still looking over things to ensure the removal of stray wires. I will be rebuilding the harness in the future.
- Repaired the driver�s door panel, which restored its rigidity and nearly eliminated any squeaking.
- Substantially improved the installation of an aftermarket door lock actuator in the driver�s side door. This will be used in my keyless entry system.
The car appeared to be reasonably sound at first glance and it probably was. The modification list was substantial enough to justify a little mismanagement in the installation of things. The fitment of the front bumper wasn't perfect (and still isn't where I'd like it to be, I just need to mess with it more). The stereo was all but non-existent. Nonetheless, it ran well and the price wasn't bad.
Short list of installed mods: Tien Flex coil overs, BNR stage 2s running non sequentially. KG works rails with 850/1680cc fuel injectors, FFE hall effect trigger kit, Haltech PS1000, Aluminum radiator, meth injection... the list goes on.
Shortly after bringing it home, I went to work. Most of my focus since the purchase has centered around the details of the car. I manipulated the bumper for better fitment, replaced the sunroof relay to get that going again and made substantial upgrade to the stereo.
I wanted to do a car pc. It gave this old car satnav, internet, entertainment, ability to tune/monitor the Haltech on the fly and expandability limited only by my ability and creativity. In order to accomplish, sourced a sweet DC to DC power supply which times the power to the PC based on the ignition state. The pc is a mini-itx and everything is solid state... really fast. I found a liliput display with a capacitive overlay and got it running on a bench. I'm not content with the install of the pc box, and will probably tweak it eventually, but it has held up fine over a year.
The PC
The Display
Installed PC
Installed Display
For audio, I decided on Infinity Reference speakers since they have a shallow mounting depth. These are powered by a 6x600watt amp. Oh yeah, I didn't mention I have true 5.1 surround sound in this thing.
I sourced some rear speaker brackets and purchased the covers (along with a host of other new interior pieces) from Mazda. The bins came out with ease and the covers popped right into the rear plastics. Easy. When I removed the door panels to do the fronts, I was greeted by whatever this is... I had no words.
WTF
I ended up ordering a set of adapters from car-speaker-adapters.com and was very pleased with the results... sorry, no picture atm. It looks pro though.
I capped off the install by building this box for an 8" kicker sub and made some trunk carpet to tidy things up (there wasn't any when I bought it). I also fixed a very poor rendering of a battery relocation. It wasn't safe before I fixed it. See below.
Neat
While all this was going on, I took advantage of the disassembly to accomplish a few other tasks.
- I cleaned and lubricated the window regulators and switches. Operates like new.
- The relocated battery installation was not safe. Seeing a standard battery venting into the cab raised a flag. I purchased a sealed battery box and an Optima Yellow-Top to address the hazards of this installation. During the installation of the battery box, I discovered that the origional battery was mounted to the floor pan by bolts without washers or any other device which would distribute load in the event of an accident. This was corrected by relocating the mounting point to catch some chassis cross bracing and using appropriate hardware.
- Organized a cluttered wire harness. I am still looking over things to ensure the removal of stray wires. I will be rebuilding the harness in the future.
- Repaired the driver�s door panel, which restored its rigidity and nearly eliminated any squeaking.
- Substantially improved the installation of an aftermarket door lock actuator in the driver�s side door. This will be used in my keyless entry system.
Trending Topics
Since I had the interior out, I decided to install this keyless entry system made by Advanced Keys. It has a proximity key fob, so I simply walk up to the car, and it unlocks for me. The system was simple to install after removing the finicky alarm installed previously. I placed the sensors behind the trim. I'm happy with the results.
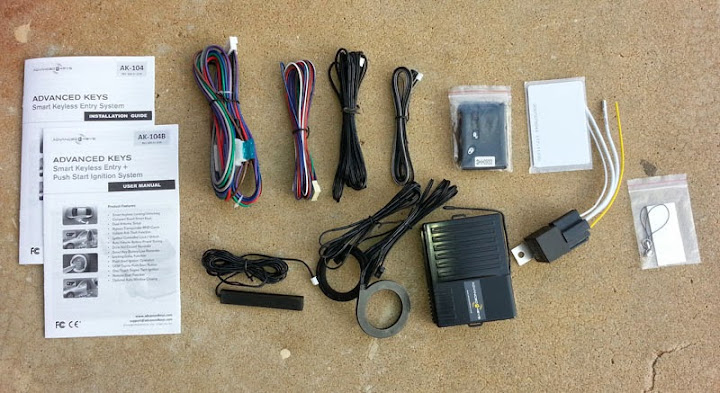
Components

Sensor Placement

Sensor Placement
Disregard the dirt
Components
Sensor Placement
Sensor Placement
Disregard the dirt
Shortly after completing this project, the pungent smell of fuel became noticeable in the cab. It was more pronounced with the windows open. It didn't take long for me to discover a pool of fuel on top of the engine block. The source turned out to be the electrical connector of one of my primary fuel injectors.
I replaced those and was rewarded with floppy O-rings that refused to seal in the KG works rail. Eventually, I found a thread on here addressing the issue and purchased a set of O-rings for a Chevy truck. Sealed it up and no leaks since.
I also chased down a few boost leaks. A plug blew out and I fabricated a plate to replace it. I also purchased an efini y-pipe to reduce the number of couplers.
Finally, I began tracking down oil leaks, replacing gaskets and o rings until the thing stopped bleeding.
I don't have any photos of these things, nor would they be very interesting. So, enjoy a few more photos from the trip.
After all of that, the car was happy. I drove it trouble free for several months and decided to get it out on the race track. Hallett Motor Racing circuit was a blast. The car performed very well and the Dunlop Direzza DZ101s were up to the task. I was able to post times just a few seconds slower than some of the more seasoned fellers.


This first few laps revealed a few things about the car. It really liked to understeer and surge was a real problem during left hand turns. I was getting it at about 5/8ths of a tank. I was also unhappy with the way that the factory leather seats allowed me to sway this way and that through all the cornering. I added a few things to my list of things to accomplish with the car that day. Fix the seats, get a square wheel setup and figure a solution to the surge.
This first few laps revealed a few things about the car. It really liked to understeer and surge was a real problem during left hand turns. I was getting it at about 5/8ths of a tank. I was also unhappy with the way that the factory leather seats allowed me to sway this way and that through all the cornering. I added a few things to my list of things to accomplish with the car that day. Fix the seats, get a square wheel setup and figure a solution to the surge.


The seats were a little battered... the driver's side more than the passenger's. I wanted to do something about it. After looking for a bit at aftermarket seats, I decided that I wasn't ready to commit to that yet.. (If I ever get around to it, seats, cage, and harnesses will come in one package).
I instead decided to recover the ones in the car, but I wanted them to be a bit stiffer and more aggressive. I found a local upholsterer who was up to the task. I asked him to remove some of the material in the center of the seats, and build up the bolsters a bit with stiffer material. I then had him update the stitch patterns to make the car a bit more current. This was the result:


Sorry for the cell phone pics. I'll get some better ones later. I realize they may not be everyone's favorite, but I really like them and at $600 for the pair, I doubt I could have done much better.
I instead decided to recover the ones in the car, but I wanted them to be a bit stiffer and more aggressive. I found a local upholsterer who was up to the task. I asked him to remove some of the material in the center of the seats, and build up the bolsters a bit with stiffer material. I then had him update the stitch patterns to make the car a bit more current. This was the result:
Sorry for the cell phone pics. I'll get some better ones later. I realize they may not be everyone's favorite, but I really like them and at $600 for the pair, I doubt I could have done much better.
The seats were completed just in time for another track day. I swapped out a couple of parts... BOV failed just days prior to the and TOY SPEED in Tulsa was able to come to the rescue on short notice. I also installed some HP+ pads, ATE Superblue brake fluid and a set of Stoptech slotted rotors. It was warmer and I had some fade during the last session that these should reduce or eliminate. I also got a little something extra for my helmet. I was ready to rock.


The track day didn't disappoint. The seats and brakes felt much better than they did during my previous event. But, it was late July in OK. The car was experiencing difficulty keeping the temps under control. And, unfortunately, the surge issue was still there.
During the fourth time out, the motor began losing power. I was only just able to limp it off of the track. I shut it down and was unsuccessful in starting it up again. I would later find out that I lost two of the three apex seals on the rear rotor.
Again, this is sort of a recap. That track day occurred at the same time training did for my new job. Consequently, the car sat in my garage for about three months before I considered doing anything with it. Eventually, one of my local rotary buddies volunteered to assist in the rebuild... the kick in the pants I needed to get the car running again. We were also planning to move across town in November, and that would be a heck of a lot easier of the RX was running.
The motor came out and was torn down in a day. Parts were ordered. Got most of the seals from Atkins Rotary, but the apex seals came from Goopy. Somehow, all of the primary parts were still in spec and I was able to reuse everything. When the parts arrived, the motor was reassembled and installed the following Saturday. It started right up and I was back in business. Good friends made that happen so quickly. Thanks Jeff, Nolan, and Camron.
This happened so fast that I didn't take any pictures... training and moving and such. My friends did. These are the ones I was able to scavenge. The apex seals were rocking in their channel which developed a prominent fracture across the length of it. Two of the three failed, and the last one was ready to. I suppose that the surge worked to accelerate their demise. The fronts looked a little better, but were not in the best shape either.

What we have here is a loss of compression


Events like this really make me appreciate the rotary community.
The motor came out and was torn down in a day. Parts were ordered. Got most of the seals from Atkins Rotary, but the apex seals came from Goopy. Somehow, all of the primary parts were still in spec and I was able to reuse everything. When the parts arrived, the motor was reassembled and installed the following Saturday. It started right up and I was back in business. Good friends made that happen so quickly. Thanks Jeff, Nolan, and Camron.
This happened so fast that I didn't take any pictures... training and moving and such. My friends did. These are the ones I was able to scavenge. The apex seals were rocking in their channel which developed a prominent fracture across the length of it. Two of the three failed, and the last one was ready to. I suppose that the surge worked to accelerate their demise. The fronts looked a little better, but were not in the best shape either.
What we have here is a loss of compression
Events like this really make me appreciate the rotary community.
The next several months, I just enjoyed the car. It is my weekend fun/had a crappy day/had an awesome day car. Training was ongoing and relentless. Holiday travels with the family consumed most of my down days. I was able to accomplish little things to tidy things up, such as relocate the once dangling ahead of the intake manifold Fuel Pressure Regulator to the rear side of the secondary fuel rail... out of sight and much more secure. I relocated the relays to the fans and worked at general cleanliness of the engine bay. Its no show car, but its coming along nicely.

This brings us more or less to the present. About a month and a half ago, I started a project which will eliminate my fuel surge issue. I tried the Hyperion fuel cover, and it didn't produce the results that I was hoping for. I looked at a couple of options. Surge tank and fuel cell.
At first, it appeared that both options would require me to sacrifice precious space in the back of the car. The fuel cell to a lesser degree, but the extensive modification of the car required to operate the cell with the same ease as the factory fuel tank was a huge negative (right now). Conversely, most of the surge tank installations I have seen require me to breach the cab and place the tank and/or the pump inside of it. Space under the car is limited (the meth injection pump is already under there). So I thought about it and ultimately ended up with a clever little product manufactured by 034motorsports.

It is a surge tank which encloses a Bosch 044 fuel pump and it fits inside of the oem fuel tank. Win!
I decided to give it a try. I also ordered a "duckfoot" pickup from ATL so that I could collect fuel from a rear center location inside of the fuel tank.

After some careful modification, I was able to secure the surge tank to the factory fuel tree and relocated the denso pump to a location inside of the oem fuel tank. This pump is the feed pump for the surge tank.

The user cohbra wrote up a nice how to for dual pump wiring here and the system came to life. Thanks for that, sir.
The system provides all of the anti-surge benefits and does not consume any additional space. I'll have a report about the system as time goes by. I'm very optimistic.
At first, it appeared that both options would require me to sacrifice precious space in the back of the car. The fuel cell to a lesser degree, but the extensive modification of the car required to operate the cell with the same ease as the factory fuel tank was a huge negative (right now). Conversely, most of the surge tank installations I have seen require me to breach the cab and place the tank and/or the pump inside of it. Space under the car is limited (the meth injection pump is already under there). So I thought about it and ultimately ended up with a clever little product manufactured by 034motorsports.
It is a surge tank which encloses a Bosch 044 fuel pump and it fits inside of the oem fuel tank. Win!
I decided to give it a try. I also ordered a "duckfoot" pickup from ATL so that I could collect fuel from a rear center location inside of the fuel tank.
After some careful modification, I was able to secure the surge tank to the factory fuel tree and relocated the denso pump to a location inside of the oem fuel tank. This pump is the feed pump for the surge tank.
The user cohbra wrote up a nice how to for dual pump wiring here and the system came to life. Thanks for that, sir.
The system provides all of the anti-surge benefits and does not consume any additional space. I'll have a report about the system as time goes by. I'm very optimistic.
Not very long after the system was completed and tested for basic function, my fuel injectors mysteriously stopped firing. I ran though every test I could think of prior to sending the EMS to Haltech for a look. The EMS has a crank signal and fires the ignition coils There is also good continuity in the injector wires and fuel pressure was fine, but the spark plugs are bone dry. So, I'm currently in limbo there.
During the wait, I decided to take care of that staggered setup and picked up a set of Enkei NT03s. 18x9.5 +40 all around. I also figured I would try out a set of Nitto NT01s in 275/35 and see how I like them. It took a minor pull to the front fender and a slight roll to the rears, but they look outstanding and I am sure they will drive even better. I am very much looking forward to getting the car going again. I also picked up a new cargo cover from Ray at Malloy and got rid of the stickers on the rear hatch. I'll settle for garage pictures until I can get the car out in the world again.


In the future, I'll pick up a set of poly bushings for the suspension. I'd also like to eliminate the twins in favor of a single setup or even perhaps NA. I will be replacing the body harness... probably with something like Motec's PDM or the ISIS Intelligent Multiplex System. Looking at drivetrain options as well. Training will be over in July (finally) and I'll also promote, which means (hopefully), I'll have a few more dollars and a bit more time to throw into this thing. Thanks for looking.
During the wait, I decided to take care of that staggered setup and picked up a set of Enkei NT03s. 18x9.5 +40 all around. I also figured I would try out a set of Nitto NT01s in 275/35 and see how I like them. It took a minor pull to the front fender and a slight roll to the rears, but they look outstanding and I am sure they will drive even better. I am very much looking forward to getting the car going again. I also picked up a new cargo cover from Ray at Malloy and got rid of the stickers on the rear hatch. I'll settle for garage pictures until I can get the car out in the world again.
In the future, I'll pick up a set of poly bushings for the suspension. I'd also like to eliminate the twins in favor of a single setup or even perhaps NA. I will be replacing the body harness... probably with something like Motec's PDM or the ISIS Intelligent Multiplex System. Looking at drivetrain options as well. Training will be over in July (finally) and I'll also promote, which means (hopefully), I'll have a few more dollars and a bit more time to throw into this thing. Thanks for looking.
Your build is coming along. I think its cool that its been a family affair. I can't get my wife to buy into it yet and my kiddos are just a little small to be real interested. One day... 

I'm not always patient. While Haltech was running diagnostics on my EMS, I felt the need to spend some time with the car. Since I couldn't drive it, I instead decided that replacing the suspension bushings would be a good way to do this.
I bought a 12 ton press from Harbor Freight and got an order with J-Auto. A few days later...

Gifts!
The job was annoying more than it was challenging. I gave my thumb a good slice and since I am not the cleanest in home mechanic, I got the bushing grease EVERY.WHERE. That stuff sucked... but, the results, I hope, will justify the hassles.


I also installed the Mazda pillow ball set that I've had sitting around for the last year. All of this was complemented by new rear wheel bearings and ARP wheel studs... so that my wheels don't fall off like that poor guy's did on youtube.

longer and harder... giggidy
Finally, the front came down 1/2" to match the rear in height. I always thought it looked off. I can't believe it took me as long as it did to measure it.


Unfortunately, Haltech gave my EMS a clean bill of health, forcing me to continue my hunt for the source of the no start condition. More on that in the time to come. I'll end this update with a view from my office...

I bought a 12 ton press from Harbor Freight and got an order with J-Auto. A few days later...
Gifts!
The job was annoying more than it was challenging. I gave my thumb a good slice and since I am not the cleanest in home mechanic, I got the bushing grease EVERY.WHERE. That stuff sucked... but, the results, I hope, will justify the hassles.
I also installed the Mazda pillow ball set that I've had sitting around for the last year. All of this was complemented by new rear wheel bearings and ARP wheel studs... so that my wheels don't fall off like that poor guy's did on youtube.
longer and harder... giggidy
Finally, the front came down 1/2" to match the rear in height. I always thought it looked off. I can't believe it took me as long as it did to measure it.
Unfortunately, Haltech gave my EMS a clean bill of health, forcing me to continue my hunt for the source of the no start condition. More on that in the time to come. I'll end this update with a view from my office...

