Build Threads The place to discuss complete builds

Project Clean CYM

Old Oct 9, 2016 | 12:12 PM
  #1  
1cleancym's Avatar
Thread Starter
Full Member
iTrader: (2)
 
Joined: Jul 2016
Posts: 50
Likes: 5
From: Old Bridge, NJ
Project Clean CYM

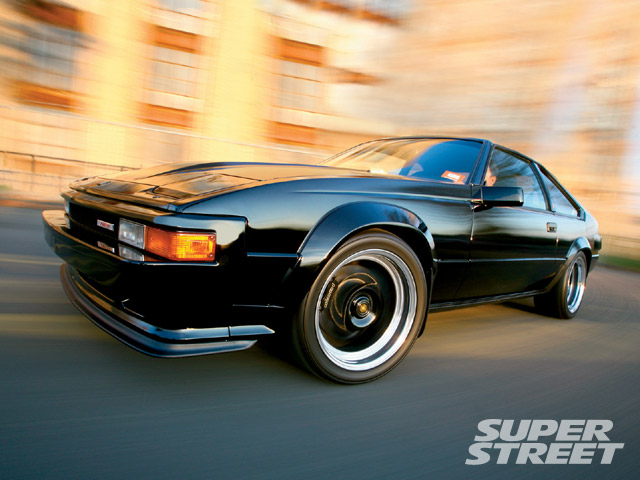
Starting my build thread to share my FD build and the transformation it has taken over the past 2 years. For some background, I’ve had a 1985 Supra that I’ve been restoring and tinkering with since 2000. I had an article on my car in April 2009 and has been my pride and joy since learning how to drive. My brother (Fourtyounce) has had his 93 FD for even longer. I’ve always loved the classic FD body styling and the uniqueness of the rotary platform so I jumped at the opportunity at owning and building an FD of my own when Jio (Amp) offered his CYM for sale privately about 2 years ago. At the time, I was in the process of doing a ground up restoration on a 72 Datsun 240z but the project was taking painstakingly too long and the rust repair was endless. When I heard that Jio had a clean CYM for sale, it didn’t take too much to convince me to sell my 240z project and scoop up his clean FD.

Name:  8C912A02-7B6B-4FC2-8060-78F89F7FDE4A_zps9g8d11fi.jpg
Views: 2992
Size:  86.5 KB
Article cover shot of my Supra
Name:  4F8EEB4C-889B-4E8C-8D40-241AE898AF74_zpse2exltap.jpg
Views: 3057
Size:  146.7 KB

Recent shot after taking a trophy home at WekFest East this year.
Here’s a link to the article for those who want the inside story behind the car.

Name:  FB0843BB-E8A6-473A-A51F-97D9F1FCC9F5_zpsgxncmobu.jpg
Views: 2977
Size:  141.2 KB

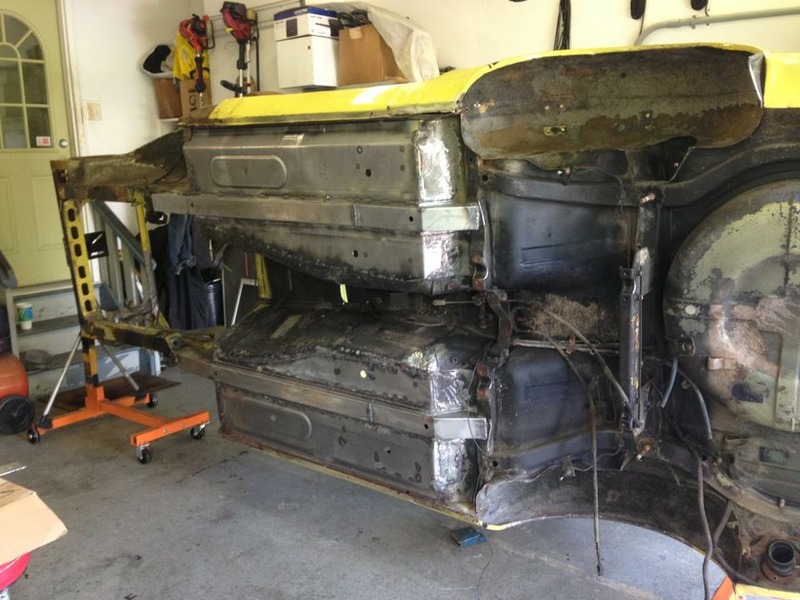
Shot of the 240z at the furthest point I got it to before selling it. Had it on a home-made rotisserie and had completed replacing the floor pans and welding in new beefier frame rails. One day I may take another shot at restoring one of these.

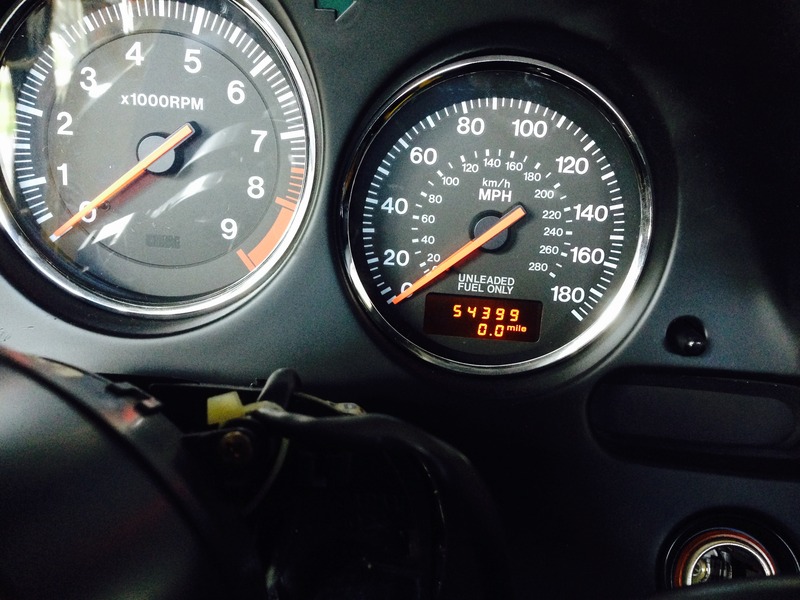
Onto the CYM. Car had 54k+ miles on it when I picked it up from Jio. VIN ends in 102. Production sticker states it was assembled in 12/1991. I was told that the first 100 FDs were not sold to the public and were used for promotion by Mazda. (I haven’t researched too much into this.) So if this holds true this car is the second FD imported into the US and might very well be the first CYM!
The car had all original paint and no reported accidents. Full interior and came with some mods such as mazdaspeed steering wheel, drilled rotors, Koni yellows/ground control coilovers, mavel manual steering rack. Jio was working on swapping in a 20b but at that point in time I was interested in putting a 13b back in as 20b build was not in the budget.

Name:  DDBCFD3C-725B-4424-ABF2-8DD96403365D_zpsfgc5s1n7.jpg
Views: 2958
Size:  132.5 KB

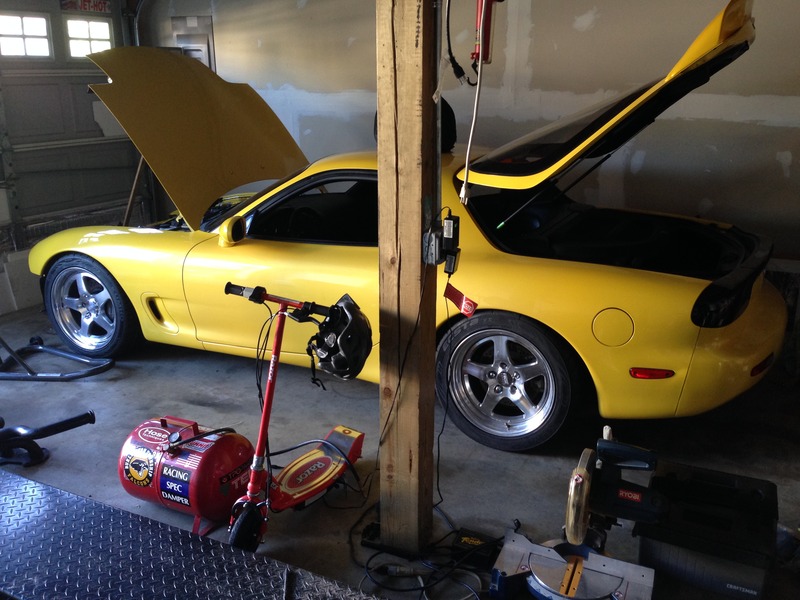
This is the car as it sat with 20b still inside. We helped Jio pull the motor that morning.

Name:  B5A37D91-6745-4A05-8AA8-A62361395011_zpsxe2spgob.jpg
Views: 2943
Size:  146.9 KB
Name:  6048847A-9A81-42C6-A472-B88F060FB927_zpsruyyjiii.jpg
Views: 2881
Size:  86.7 KB

On the trailer and ready to go to a new home. I think Jio was giving one last goodbye.

Name:  F3F258F3-6647-4EB7-B861-DEE3DBEAC372_zpsnb9aylsm.jpg
Views: 2884
Size:  124.3 KB

Mileage check once I got power hooked up.

Over the next 2 years I spent time researching, lurking the forums, and collecting parts for the build. I didn’t take many pics along the way because I wasn’t planning on making a build thread but I’ll post the pics I have of what was done along the way.

Jason
Reply
Old Oct 9, 2016 | 12:12 PM
  #2  
1cleancym's Avatar
Thread Starter
Full Member
iTrader: (2)
 
Joined: Jul 2016
Posts: 50
Likes: 5
From: Old Bridge, NJ
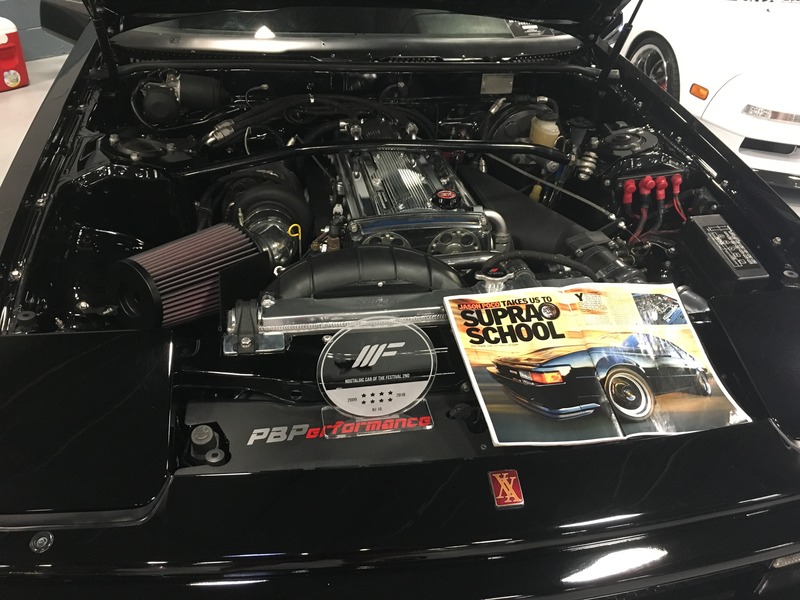
Overall, the major theme of my build along the way was to keep thing clean, simple, reliable, while upgrading parts along the way. I hope you all agree I’ve kept to this theme. As with my Supra I kept to the powder coated wrinkle black theme as it kept the engine bay looking simple yet easy to clean. All the powder coating was done in house with the use of a used electric oven and harbor freight powder coating machine.

Name:  EF2C3DE3-EBC6-48BA-B129-A8E5DE317403_zps2vtgzolp.jpg
Views: 2730
Size:  120.6 KB
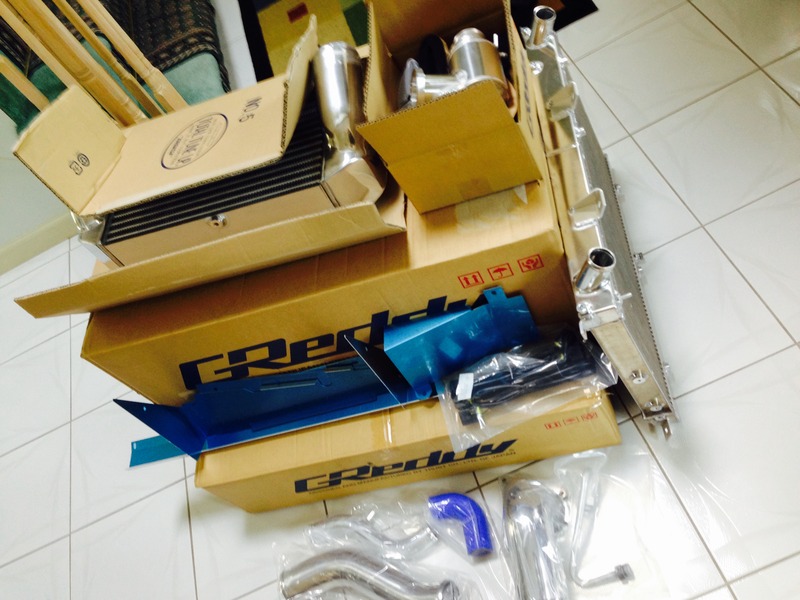
Greddy Vmount kit I bought off RHD Japan when the Yen was down and there was a sale.

Name:  41DC1F8F-82C5-4D47-93D6-9D170C9107DC_zpslx9wwjb4.png
Views: 2702
Size:  207.7 KB


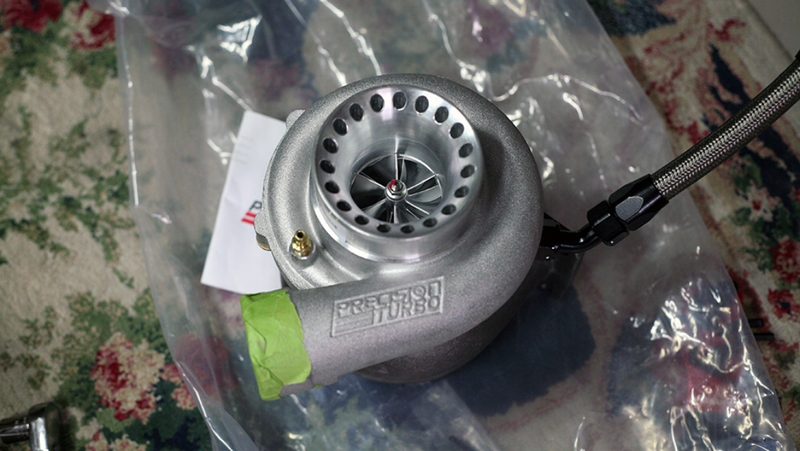
Picked up an Aspec Twin Scroll Precision 5866 Turbo Kit with Dual Tial 44mm WGs off the forum.

Name:  D753449C-50AC-47D8-AC83-4ED1DBD486C1_zps94pnxitn.jpg
Views: 2755
Size:  129.1 KB
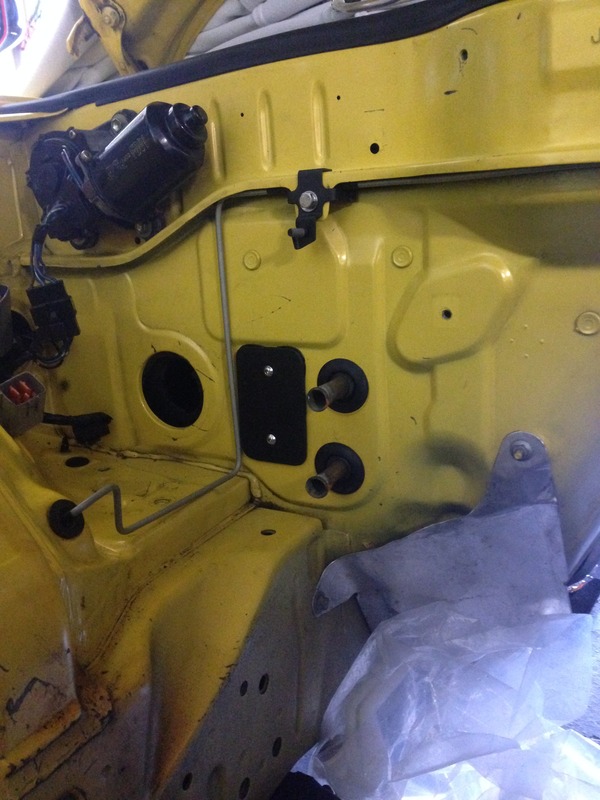
Shot of a part of the hardline ABS delete kit as it tucks under the firewall ledge and custom AC delete cover.

Name:  B9B564D9-4ADE-4DE7-AB12-83F1BA3E9A10_zpsr9hvbch1.jpg
Views: 2752
Size:  152.7 KB

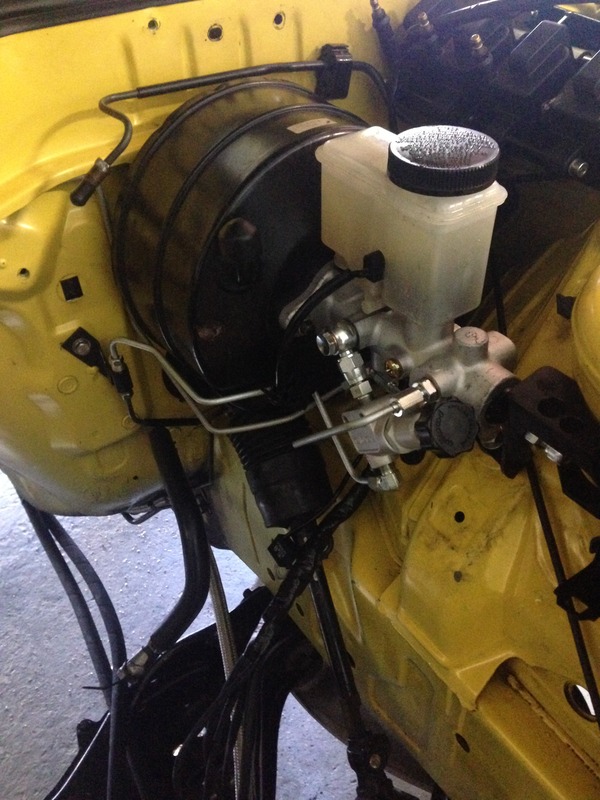
Shot of the hardlines at the driver side. Kit was made to fit the 929 Master cylinder mod. Very clean install. Kit was purchased from Robert at Rotary Shack.

Name:  C8A19244-695D-411F-8FC4-93947A66D3AC_zps4blpnjek.jpg
Views: 2715
Size:  150.3 KB

Name:  62C123B5-D58D-4C8B-99EF-A8B77C958C79_zpsnxtcsj8y.jpg
Views: 2717
Size:  108.6 KB

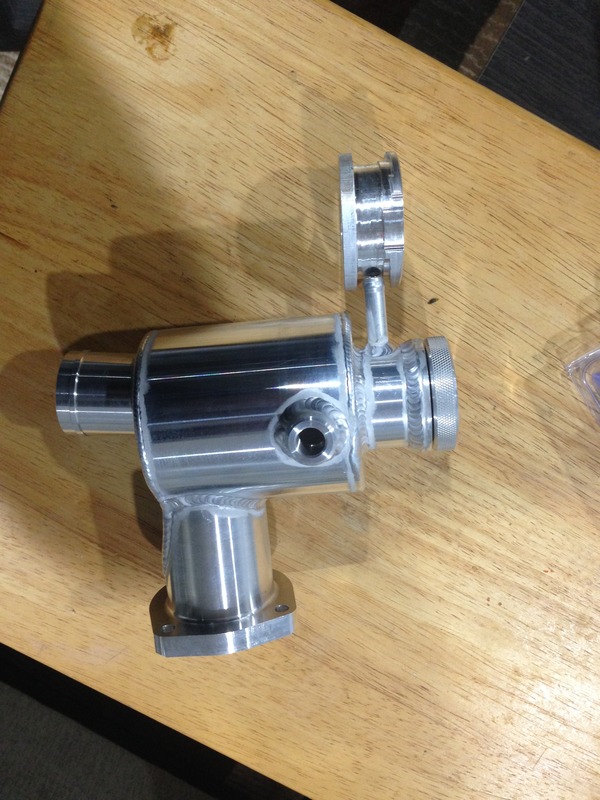
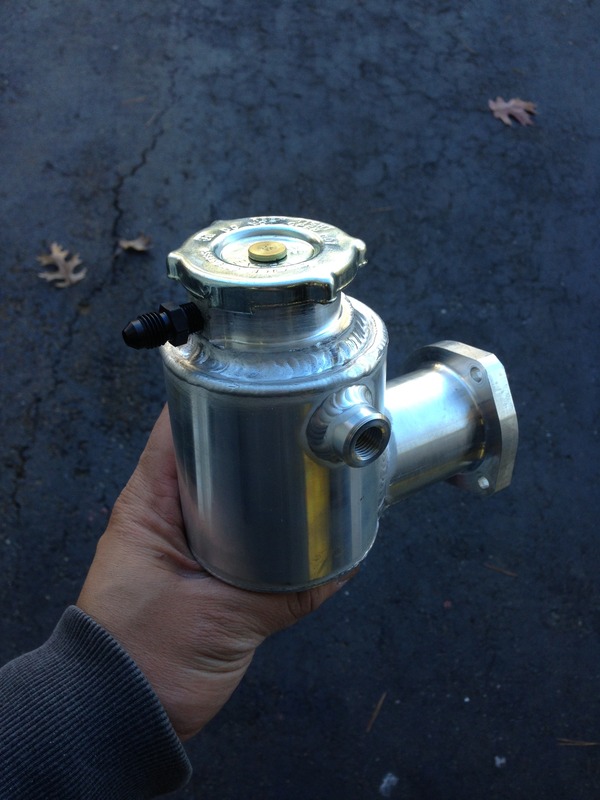
Revolution Thermostat reservoir modified. Had the non-pressurized cap removed and had pressurized cap adaptor welded on.

Name:  7258534A-A4AA-4959-8144-CA816B51BE1E_zpsskwyzusy.jpg
Views: 2780
Size:  87.1 KB

S2000 Antenna Mod

Name:  357A9580-BECD-4D51-8EF9-03BE5404F016_zpsqwii8e5g.jpg
Views: 2747
Size:  129.2 KB


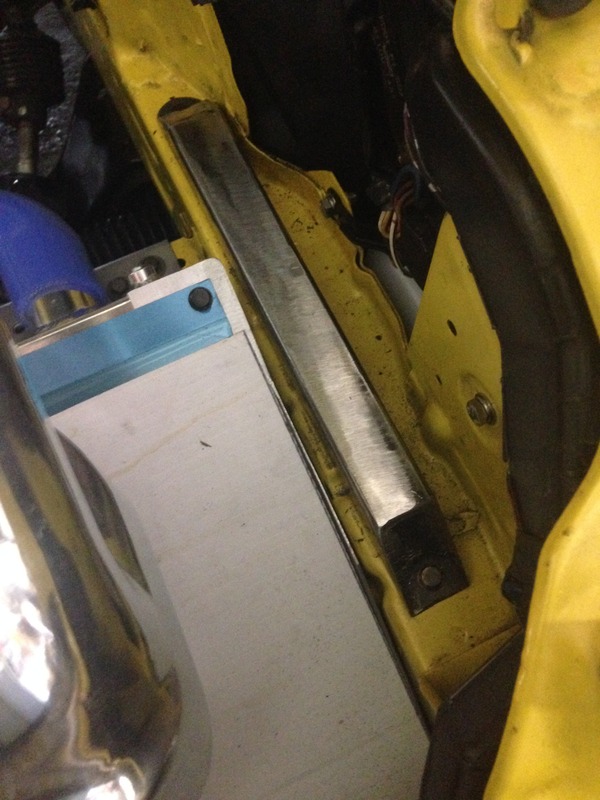
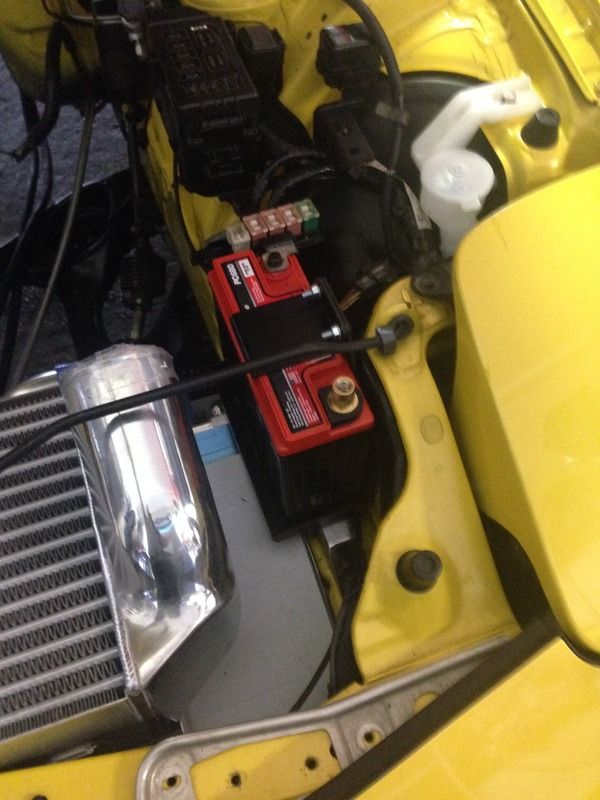
Vmount and battery placement mock up. Had to shift the vmount intercooler about 1” in order for the PC680 to fit. Made a custom mount to had the battery mount on the frame rail but clear the radiator. I wasn’t interested in relocating the battery and hacking into the rear bins.


Name:  94CAF514-B03F-45A8-9A18-971A33EEC2CE_zpsqqb63ust.jpg
Views: 2674
Size:  118.8 KB

Powder coated door sills with some 3m clear bra protector to prevent rubbing into the paint.

Last edited by 1cleancym; Oct 9, 2016 at 01:03 PM.
Reply
Old Oct 9, 2016 | 12:13 PM
  #3  
1cleancym's Avatar
Thread Starter
Full Member
iTrader: (2)
 
Joined: Jul 2016
Posts: 50
Likes: 5
From: Old Bridge, NJ
Name:  407659AE-D67F-42C0-BA0B-26BBCB846F15_zpsj8j314ae.jpg
Views: 2666
Size:  150.1 KB

Name:  27119FC6-B0DF-46A2-A331-093F5467351D_zpsmlv6tnvq.jpg
Views: 2691
Size:  145.0 KB

Name:  D28E732F-F329-489D-9420-39F42C2B0083_zpssyxr2iid.jpg
Views: 2665
Size:  144.0 KB

Powder coated throttle body reassembled.

Name:  84AC0983-B4FD-4D14-9C2C-F4848286EE5A_zpsrrqzyumf.jpg
Views: 2691
Size:  114.7 KB

Custom Marine ground distribution block mounted close to the battery. I ran one large 2/0 gauge wire directly from the battery to this block then all grounds from the block out. This kept the battery clean of numerous wires running directly to it.

Name:  E16CE378-2930-4285-A086-AD96218EC9FD_zpstsajvhb0.jpg
Views: 2730
Size:  123.5 KB

Sake Bomb head lights installed.

Name:  175EEAD1-9B90-4C6F-9C74-B966B337145F_zpsf85yvanf.jpg
Views: 2753
Size:  119.5 KB

The day Jehan picked up his second FD. 2 CYM’s in the family now.

Name:  B5C01F22-6E1F-4AB2-81A8-D2944EE75BBF_zpsgiea1z6g.jpg
Views: 2699
Size:  147.5 KB

Brand new core from Mazda Japan. Picked up from Ihor at IRP. I originally had intentions of having IRP build a motor and had irons redone by Chips Motorsports and housing resurfaced but couldn’t pass at the chance of having a new motor with all new components. I’ll keep the parts I had to build the motor and keep them as spare for now!

Name:  D0C5B873-1B24-41CA-AB7C-A3E5820D57CE_zps4lggndm4.jpg
Views: 2717
Size:  175.3 KB

Name:  7116EDA7-7AD5-490D-82A1-8B3222C66DC2_zps0nko8it9.jpg
Views: 2678
Size:  120.5 KB

Name:  EF038F5C-7449-4082-BC7C-45EA5084C5A1_zpshzruqcew.jpg
Views: 2677
Size:  147.4 KB

Oil pan removed and new Bacon oil pan installed! Also installed new ACT clutch and symmetric steel motor mount brackets to be used with IRP motor mounts.

Last edited by 1cleancym; Oct 9, 2016 at 01:05 PM.
Reply
Old Oct 9, 2016 | 01:06 PM
  #4  
1cleancym's Avatar
Thread Starter
Full Member
iTrader: (2)
 
Joined: Jul 2016
Posts: 50
Likes: 5
From: Old Bridge, NJ
Name:  ED9F2E84-5E5E-4294-9EB9-71447A2C0BC4_zpsstffkmuy.jpg
Views: 2677
Size:  167.8 KB

Name:  18FD479E-5367-4B63-AA43-7C097CB2AC9D_zpsvin4pymj.jpg
Views: 2747
Size:  166.8 KB

Name:  D6990D51-2C3D-4276-A84A-02A88C2CD281_zpsj9r77xk4.jpg
Views: 2711
Size:  135.8 KB

Motor coming together with all the powercoated components. Xcessive LIM, JDM UIM, banzai pulley kit, turbo and oil drain installed.

Name:  7998BE3D-CDF6-4083-9340-5D94B3853C0B_zpsj1eyawje.jpg
Views: 2676
Size:  105.9 KB

Name:  F2E29E03-D077-4406-89A8-4E16F88EA677_zpsisdf1n4d.jpg
Views: 2682
Size:  108.5 KB

Name:  6A7A5E08-B6C4-4AAC-A53A-128A477ED156_zps9lxlceps.jpg
Views: 2691
Size:  92.3 KB

Name:  A7AD2C96-636A-4B6F-9385-323B1EFCA662_zpsro6nwgdh.jpg
Views: 2700
Size:  109.6 KB

Custom AEM water injection pump mount. No drilling of the frame rail was needed. Had clearance since I was running without power steering and AC.

Name:  8DC4C623-2E74-4761-8485-34811A7937B3_zps2ot8a9f0.jpg
Views: 2725
Size:  132.5 KB

Name:  19D8F4A0-5600-4DD6-AFF3-8E7AF9F9FF46_zps8yavo71o.jpg
Views: 2688
Size:  98.5 KB

Sake bomb oil pedestal installed with Defi gauge sensors. Brand new coolant temp sensors installed.
Reply
Old Oct 9, 2016 | 01:06 PM
  #5  
1cleancym's Avatar
Thread Starter
Full Member
iTrader: (2)
 
Joined: Jul 2016
Posts: 50
Likes: 5
From: Old Bridge, NJ
Name:  2A1A939A-D7E0-4E64-8F91-2631E356E688_zpszw2gy0sd.jpg
Views: 2666
Size:  113.6 KB

Name:  5AD1B0B7-4208-4E46-87CE-E8D71B92FE41_zpsvtjel6hp.jpg
Views: 2638
Size:  106.4 KB

Name:  FB8540FA-E083-4F79-887C-22959E6F69F4_zpsfdjjktem.jpg
Views: 2654
Size:  71.6 KB

Name:  B3988457-E780-46DE-9D35-EA1AEE2B2EA8_zpsnjnnycgp.jpg
Views: 2698
Size:  106.8 KB

Racetronix electrical bulk head installed. Allow me to run thicker gauge wires to the fuel pump and bypass the oem bulkead which is known to cause issues.

Name:  64F99132-8C76-45BC-8A10-6B058F786DA7_zpsz7et9d2q.jpg
Views: 2676
Size:  128.8 KB

Name:  42DA7115-066A-495C-BB57-14DE4FAFBAA2_zpshmxp8zva.jpg
Views: 2690
Size:  150.6 KB

Tapped rear iron and removed coolant nipple to prevent leaking since I was not using it.

Name:  6369538C-8B2B-463D-9626-CDE1FCAD79F8_zps5qvotpo6.jpg
Views: 2655
Size:  164.4 KB

Name:  909B7EA9-A6FA-4EDF-A2B4-8731B2B97124_zps0s1ijmz6.jpg
Views: 2693
Size:  154.8 KB

Fuel rail, lines, and AFPR installed. Installed a line separator and mounted to the motor to keep the fuel lines from moving around.
Reply
Old Oct 9, 2016 | 01:07 PM
  #6  
1cleancym's Avatar
Thread Starter
Full Member
iTrader: (2)
 
Joined: Jul 2016
Posts: 50
Likes: 5
From: Old Bridge, NJ
Name:  C6D35643-C413-497D-B3BB-6AFA8568C518_zpsfdtueu65.jpg
Views: 2676
Size:  133.4 KB

Name:  468DDA16-415C-46DB-BC45-CD6A55D21C92_zpszdwnsmkr.jpg
Views: 2715
Size:  188.6 KB

Motor finally in. Used an extra UIM to save the powdercoated one from getting scratched during install.


Name:  658D1590-3EB7-442A-BD49-4C6AA9034DB2_zpsznclu0ej.jpg
Views: 2649
Size:  116.2 KB

Name:  A914094F-6812-4A75-9FF8-5F62DE9DCFCD_zpswkcswqz6.jpg
Views: 2676
Size:  100.8 KB

Feed anti sludge tank installed. Had to unmount the fuel level sending unit and mount the new tank. Makes installing the fuel hanger a breeze. Sorry for the crappy pics.

Name:  4F84B7C0-4A19-4036-8F17-96CEF52A2A33_zpswphf3ozc.jpg
Views: 2678
Size:  135.4 KB

Name:  8B8A5C0A-D5AE-483D-B2A2-885B639DFE15_zps0oy1mvlg.jpg
Views: 2672
Size:  152.1 KB

Name:  A6F25561-B5B3-47D1-ABD7-0C6E4092E184_zps53ftu4ls.jpg
Views: 2660
Size:  135.9 KB

Surprisingly was able to fit the Greddy intercooler into the electric oven with about ½ inch clearance on each side. Installed the custom splitter and I was not installing AC and using the AC condenser as the splitter. I made it so the splitter angle is adjustable but so far the car runs rock solid temps at the angle I set it which is about 50/50 with the radiator.
Name:  85AA65C3-C9C5-4BBA-894B-FD8DA306B54A_zpsardnznn0.jpg
Views: 2681
Size:  130.9 KB

Simplified Oem engine harness installed with fire sleeve to protect from the heat from the down pipe.

Name:  88F75F09-6E24-46D0-8420-2A0958749357_zpsru3b9ewj.jpg
Views: 2641
Size:  89.9 KB

Manual fuel pressure gauge installed for quick reading while in the engine bay.

Name:  98D087AB-A303-4F41-870B-C67EF1B5EAB8_zpsa3unnh5l.jpg
Views: 2668
Size:  105.4 KB

Plugged the oem booster nipple on the passenger side of the UIM and tapped a fitting next to the throttle body to eliminate the firewall hardline. Added a supra one way valve to use as a valve and extension as the oem hose is too short to make it to the booster.

Last edited by 1cleancym; Oct 9, 2016 at 01:18 PM.
Reply
Old Oct 9, 2016 | 01:08 PM
  #7  
1cleancym's Avatar
Thread Starter
Full Member
iTrader: (2)
 
Joined: Jul 2016
Posts: 50
Likes: 5
From: Old Bridge, NJ
Name:  12F68917-5A3A-4CD0-A5D7-F54961EC48B9_zpsxgk3byvy.jpg
Views: 2629
Size:  84.0 KB

Name:  2CC7AAD1-3A22-4371-BAFA-E1FB24180FB7_zpsmpv01sx2.jpg
Views: 2668
Size:  152.2 KB

Used a Devils own no leak drain fitting and used a VW windshield washer low level sensor instead of the AEM sensor. Both work the same way and use conduction through the fluid to detect low level. However, the AEM sensor uses a threaded fitting which makes leaks more prevalent when using the OEM tank since it’s so thin. The VW sensor uses a rubber grommet that sandwiches between the sensor and tank. Using a 1” hole saw, it allowed tight fitment of the sensor. I added FIPG for extra insurance. So far no leaks and works like a charm!!

Name:  EE8ED11B-5D36-4122-854A-4913B1F267A5_zpsfaxtfajy.jpg
Views: 2660
Size:  118.2 KB

Name:  8939E967-16CF-4713-94B6-3A1AAE720904_zps7vhgnolm.jpg
Views: 2666
Size:  105.2 KB

Defi multi-gauge installed. I didn’t like the look of having so many gauges displayed but yet wanted the functionality of being able to read the engine parameters. I felt the defi gauge met those requirements. I have oil pressure, oil temp, water temp, and fuel pressure hooked up. Boost is on the center column on the RE pod. The PF commander is mounted on the cigarette light using a custom mount I made.

Name:  72227951-9ED4-4473-AF0A-2611557D9544_zpspwpcmfdk.jpg
Views: 2666
Size:  92.0 KB

Red Alternator boot. I’m all about detail.

Name:  C50603D7-46FE-40BE-80A5-7F81C6805FE9_zpsykvaghoh.jpg
Views: 2613
Size:  158.9 KB

Tial BOV welded on and oil catch can installed.

Name:  441CD3E4-7212-48D0-AE67-E7090D7B799C_zps7tqkrug3.jpg
Views: 2711
Size:  163.9 KB

Name:  2B93FD50-A06C-4B1D-9825-79359D476A88_zpsuzkgybvl.jpg
Views: 2976
Size:  169.2 KB

Pics after I finally got the car up and running. Fired up on the first start!!

Name:  2DF92298-4790-49C4-B6D1-DFC378D7F174_zpsuyvggofy.jpg
Views: 2642
Size:  164.9 KB

Name:  515B01DB-DAC3-4CA7-AB48-7FD211EE8CC0_zpsm78qzndp.jpg
Views: 2655
Size:  149.4 KB

Custom LED turn signals. The entire housing lights up and then turn amber when the signals are used just like the Audi’s. Bought these off a member on the forum.

Last edited by 1cleancym; Oct 9, 2016 at 01:33 PM.
Reply
Old Oct 9, 2016 | 01:18 PM
  #8  
1cleancym's Avatar
Thread Starter
Full Member
iTrader: (2)
 
Joined: Jul 2016
Posts: 50
Likes: 5
From: Old Bridge, NJ
Name:  7F40F2B0-BBA6-456A-8063-24A3428EFCA9_zpskwc5amas.jpg
Views: 2639
Size:  135.5 KB

Name:  D70FEB88-9876-4596-9951-A8BB12F3D78C_zpsdglkkkii.jpg
Views: 2648
Size:  117.6 KB


Name:  942783D7-00F1-464C-9A6B-C8947F991F68_zpsbzgwxfyo.jpg
Views: 2641
Size:  131.9 KB

Name:  FA720854-C038-4F97-AF4B-E2B040F89BD6_zpsrjmoul4v.jpg
Views: 2634
Size:  142.0 KB

Name:  9654BCE2-E1B7-4DFF-8731-E50A9D250D71_zpsuo6bf2eg.jpg
Views: 2654
Size:  106.7 KB

Name:  44FBFF76-1342-47D6-B8B9-7BEBA72FBF11_zpsp0ljkold.jpg
Views: 2661
Size:  118.7 KB

Interior put back together!!

Name:  426B1186-91F4-468D-BE2F-570F4724F124_zpsczutr6os.jpg
Views: 2655
Size:  154.0 KB

Name:  068D1F1F-5388-4B75-82F2-C4862BD17502_zpsad7xwrfw.jpg
Views: 2658
Size:  155.3 KB

Name:  5652BB0B-026A-435A-8599-C4C8A24B92F1_zpsglphn3wr.jpg
Views: 2661
Size:  168.0 KB

Name:  37AC4C48-060E-4257-8C57-F580C90523E0_zpss6zupxpq.jpg
Views: 2648
Size:  140.6 KB

Name:  78890BFB-96A1-40DE-A774-3EABC19FCCEA_zps30y5cugh.jpg
Views: 2635
Size:  127.6 KB

More engine bay detail shots. Custom throttle body cable to eliminate the long travel and extra brackets. I think it cleans up the engine bay a bit more.

Last edited by 1cleancym; Oct 9, 2016 at 01:38 PM.
Reply
Old Oct 9, 2016 | 01:24 PM
  #9  
tomCTR's Avatar
Full Member
Tenured Member 10 Years
 
Joined: Jan 2010
Posts: 65
Likes: 4
From: Southend-On-Sea
Excellent work mate, some lovely parts going on!

Greedy v mount is naughty
Reply
Old Oct 9, 2016 | 01:48 PM
  #10  
1cleancym's Avatar
Thread Starter
Full Member
iTrader: (2)
 
Joined: Jul 2016
Posts: 50
Likes: 5
From: Old Bridge, NJ
Name:  69D90E43-E24B-4987-BAEB-CBF493E430EB_zpsvkmvgw3n.jpg
Views: 2651
Size:  102.6 KB

Pic of the Vmount splitter installed. Also used the side covers that come with the kit to direct air into the intercooler and prevent air escaping to the sides into the engine bay.


Installed 99 spec brakes but had to shave the Mazda emblem off to allow clearance for the Fikse wheels. Installed high temp Mazdaspeed decals to make up for the missing Mazda emblem.

Name:  B35412A1-EEB8-4CDB-99FD-586A8C8E84EC_zps9lj3rv3s.jpg
Views: 2750
Size:  166.5 KB

Name:  18AD9DD9-555B-4F87-A0C2-AB11FFC8A4E4_zpscpegarpj.jpg
Views: 2664
Size:  140.1 KB

Pics of the twins at the local Eat Sleep Race Warehouse Wednesdays a few months ago.

Name:  E85F11A3-9A72-4D64-8DC2-77DC0146E5A8_zpsnenbabrn.jpg
Views: 2648
Size:  152.5 KB

Installed a LIM heat shield and turbo blanket but ended up removing the blanket as it contacted the passenger fender wall and ended up transferring more heat there.

Name:  B116C258-D5A1-4105-94A5-88E5DE994D73_zps4apqqtlt.jpg
Views: 2622
Size:  99.8 KB

Installed Oem under tray after some trimming.


JDM spare that fits with the bigger brakes. Fits with the oem cover. Just raises the cover about ¼” which isn’t noticeable with the rear carpet in place.

Name:  E8A72C9D-5ACB-44C8-93ED-96B8F7C4A98C_zpsme6dd823.jpg
Views: 2681
Size:  96.0 KB


Name:  28E091F9-AD28-43C9-B849-8D853BE4BB7E_zpsm3i6mipc.jpg
Views: 2653
Size:  95.4 KB

Name:  DB21468E-E0A1-43F7-A077-CB85C77BDD02_zpsuqg6cmhe.jpg
Views: 2647
Size:  93.5 KB

Name:  113F5622-F7FF-4587-963A-E93FA2036C67_zps95gqi5ag.jpg
Views: 2645
Size:  102.6 KB

Bought new Mud guards from mazda but unfortunately they only come in red. Had these sprayed at a local body shop which took them several attempts to get the paint to match. In the end they may be a shade off when you see them in person but overall match pretty well. I’m happy with the result.
Reply
Old Oct 9, 2016 | 01:50 PM
  #11  
1cleancym's Avatar
Thread Starter
Full Member
iTrader: (2)
 
Joined: Jul 2016
Posts: 50
Likes: 5
From: Old Bridge, NJ
Name:  71140CFE-7871-4DDD-B397-CDF96BB88BE2_zps9gty2qki.jpg
Views: 2620
Size:  137.1 KB

Name:  51214D8B-DA0C-4794-9652-5AD6482FEBD6_zpshdkzgwme.jpg
Views: 2617
Size:  140.4 KB

Name:  DB6CDA7A-3F68-4BE4-8066-62B6B1EBCFCE_zpsydzne5to.jpg
Views: 2609
Size:  159.4 KB

Name:  DD967CBE-A353-4D99-AC8D-E62CD8F8AB91_zpsywdla2ug.jpg
Views: 2629
Size:  111.0 KB

Name:  6C1301B3-4DB0-4D2A-9D8D-6DFF8C46466C_zpsvx0x7qgh.jpg
Views: 2589
Size:  146.9 KB

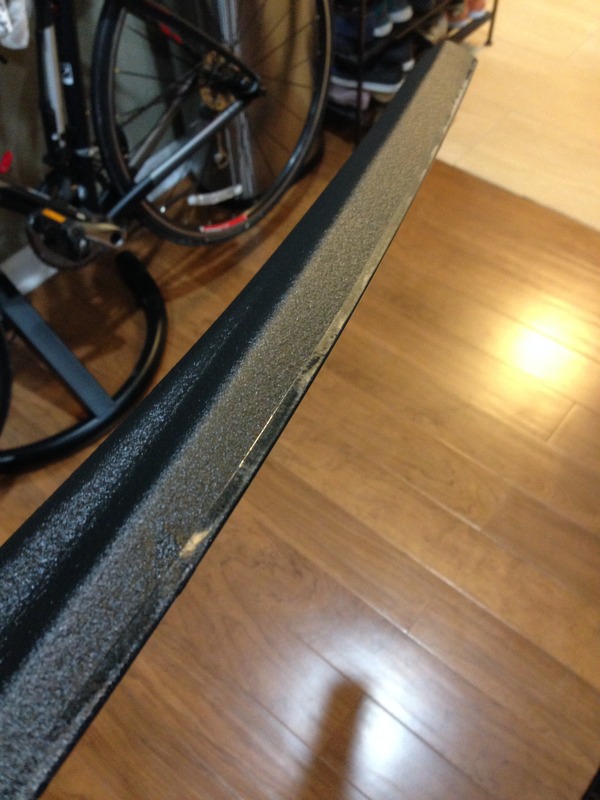
Bought a shield from LRB, made a cardboard template then trimmed to fit. Had to get this powder coated locally as it’s too big to fit in my oven. Overall it came out pretty slick and matches the rest of the powder coated parts.

Name:  35DC9844-01A5-4F22-B939-20EA7ED5EC9E_zpstay2lmft.jpg
Views: 2581
Size:  116.8 KB

Brand new hood insulator installed.

Name:  1ED03D93-C057-47F5-A618-65BA27AD8FE9_zpsdfhaetyt.jpg
Views: 2550
Size:  94.2 KB

Name:  B66F13E1-2EEE-47E0-BFEA-7D5672E929D3_zpsmprtnoxe.jpg
Views: 2574
Size:  100.3 KB

New fuel door decals installed.

Name:  E87A296B-FCD4-4D7E-A832-D6273BDCBE0A_zpssrt8zpbw.jpg
Views: 2554
Size:  94.0 KB

New body rail grommets installed. A few were missing so I ended up replacing all of them.

Name:  30FFC126-C2F8-404B-963E-BEB8C0A71906_zpsuo7cdgjq.jpg
Views: 2573
Size:  71.4 KB

Name:  BE111BA2-1E40-4C29-B597-B0383A67274C_zpsdpnrg0cy.jpg
Views: 2520
Size:  72.6 KB

More pics of the front bumper and me being able to retain the from opening plastics to keep the front bumper from sagging. Also I’m using the oem fog light corner clam shells. I think it finishes off the front opening pretty well.

Last edited by 1cleancym; Oct 9, 2016 at 02:01 PM.
Reply
Old Oct 9, 2016 | 01:55 PM
  #12  
1cleancym's Avatar
Thread Starter
Full Member
iTrader: (2)
 
Joined: Jul 2016
Posts: 50
Likes: 5
From: Old Bridge, NJ
Name:  E63FBBCA-A6D7-4EBD-8D41-20D1BF259DD6_zpsqnhy74md.jpg
Views: 2520
Size:  93.9 KB

Name:  B939F4ED-9F16-4C3A-9A96-C0ABD7B516B4_zpssfkbgt8r.jpg
Views: 2527
Size:  91.7 KB

New turn signal covers installed. That gouge under the passenger turn signal haunts me everyday!!

Name:  763E641F-EE0F-4678-8B0C-F35072487DBF_zpskgv5ynw0.jpg
Views: 2535
Size:  78.2 KB

Name:  25F9A808-C06D-4FA3-946B-3E5CC80478B0_zpsjzjcakfp.jpg
Views: 2543
Size:  91.8 KB

New R1 lip installed.

Name:  3A408D24-E895-4F46-ABC7-363F0E608FB7_zpspum17cc6.jpg
Views: 2522
Size:  74.8 KB

Name:  22316708-4DE8-419B-9E36-89B1E7F403E0_zpsaxtnbvzz.jpg
Views: 2508
Size:  74.1 KB

New door handles installed.

Name:  5229E523-6DAA-4056-A762-E13A4367B235_zps8vd8xmdf.jpg
Views: 2511
Size:  79.0 KB

Name:  04519EE7-8599-4670-BE02-788491AE2474_zpssszqhx7t.jpg
Views: 2494
Size:  61.7 KB

New under hood plastics installed. Mine were missing the little rubber/plastic piece at the corners.

Name:  D880D883-333F-4809-8D60-10D90743870E_zpselokkiwm.jpg
Views: 2543
Size:  89.6 KB

Name:  D17B1CD7-9F3E-4AE4-82E2-D2D33BDFDFAB_zps5zeawfsl.jpg
Views: 2536
Size:  98.8 KB

New tanks. Got rid of the ugly yellow ones. The windshield tank was modified with the water injection fittings for a stealth install.

Name:  C457C3E0-3DE6-4F3C-974D-08A643AB6AEB_zps87anono6.jpg
Views: 2545
Size:  115.4 KB

Pic of the thermostat reservoir that eliminates the AST. Found a nice black billet cap on jegs.

Name:  69189870-A2C0-4E4E-813C-F6415087890F_zps3hkmcii5.jpg
Views: 2542
Size:  110.6 KB

Catch can mounted.

Last edited by 1cleancym; Oct 9, 2016 at 02:06 PM.
Reply
Old Oct 9, 2016 | 02:04 PM
  #13  
1cleancym's Avatar
Thread Starter
Full Member
iTrader: (2)
 
Joined: Jul 2016
Posts: 50
Likes: 5
From: Old Bridge, NJ
Name:  8B11B27A-ECE9-4668-BCCE-5986FD0864A6_zpsx0a3r7d0.jpg
Views: 2528
Size:  130.8 KB

Clean firewall. New rubber installed as well.

Name:  6BA5B4FD-7527-46F1-A7EA-9C46515E5CA5_zpsu7cung3f.jpg
Views: 2517
Size:  84.9 KB

Name:  59B1BC61-8906-4A13-9265-ED89AA9214FC_zpsdzi4ogvu.jpg
Views: 2493
Size:  117.6 KB

New hood bumpers installed

Name:  84CCB213-C85C-466E-BFFC-8E8009FA3289_zpszfo7pq7k.jpg
Views: 2538
Size:  107.4 KB

Turbo with blanket removed.

Name:  8156338D-7D6D-4D9E-8A93-319AEA805B79_zpsgpqhse7x.jpg
Views: 2516
Size:  88.4 KB

LED center stop light

Name:  3A4926F4-9B65-4F90-987E-B43E5C2D4873_zpsq4loumew.jpg
Views: 2513
Size:  102.4 KB

Racing beat dual tip exhaust.

Name:  15683D67-D2A9-430A-A46F-37084CC91477_zpsaud7enxz.jpg
Views: 2501
Size:  104.7 KB

Mac valve boost control installed.

Name:  04BCA492-3063-4E05-9D49-8A87DCD7B86B_zpscvqrtjx0.jpg
Views: 2520
Size:  161.6 KB

Removed the supra pump and installed the Walbro 450 prior to tuning as the tuner recommended it to be more reliable for the mods I had. I had a 12 volt relay installed as well.

Name:  04BCA492-3063-4E05-9D49-8A87DCD7B86B_zpscvqrtjx0.jpg
Views: 2520
Size:  161.6 KB

Name:  F608C312-1027-4F02-9688-D73540F42FFA_zpsznyqhvhz.jpg
Views: 2508
Size:  132.9 KB

Racing Beat sway bars installed.
Attached Images

Last edited by 1cleancym; Oct 9, 2016 at 02:22 PM.
Reply
Old Oct 9, 2016 | 02:07 PM
  #14  
1cleancym's Avatar
Thread Starter
Full Member
iTrader: (2)
 
Joined: Jul 2016
Posts: 50
Likes: 5
From: Old Bridge, NJ
Name:  54CC5045-502A-40EF-ABA5-FB8E652B29F3_zpsuifybasy.jpg
Views: 2533
Size:  128.2 KB

Name:  9ED17214-3F69-42BF-ABA2-B4A9123E084E_zpsuorelyao.jpg
Views: 2499
Size:  125.1 KB

Name:  7F4D7181-6743-4C1E-88AA-C4EC264AD9B8_zps2n2z2gm8.jpg
Views: 2516
Size:  128.6 KB

Name:  7048793B-4EC9-4F14-9141-F1A0B79F3665_zpsrcrtm2lm.jpg
Views: 2519
Size:  122.1 KB

Under carriage shots. As you can tell I’m OCD for detail. I cleaned off the rubberized coated on most of the aluminum shields.

Name:  35E2386E-5A27-4C27-A3DB-0D1DB4120EFE_zps1nihgqlu.jpg
Views: 2507
Size:  184.3 KB

Name:  F108F6B7-C421-474D-B63F-40AC0422B643_zpsmmwvoq5t.jpg
Views: 2500
Size:  189.6 KB

Name:  25DA51BE-8302-456A-B469-08EB75771E7D_zpshxwsoz6h.jpg
Views: 2515
Size:  199.0 KB

Name:  6A87C6C6-EE77-4899-B1BB-EB36CB20342D_zpseicz7drs.jpg
Views: 2518
Size:  112.8 KB

New gas tank protector and straps. Also a shot of the new tank drain plug. Old stuff had rubberized undercoating all over it.

Name:  39E5A105-07FC-4A56-8641-4C13C75E4597_zpsfnc6mhvh.jpg
Views: 2488
Size:  108.3 KB

Name:  0EA121EE-51CD-4D92-9797-F50D2F969B57_zpsmabwyxwe.jpg
Views: 2483
Size:  111.7 KB

Picked up some ESH seat protectors for the Recaros. Protects exactly where I place my hands and arms when getting out of the car.

Name:  8DDDC6C6-3B5C-43D1-BC59-257821FB44DE_zpsxlx9fbt4.jpg
Views: 2489
Size:  137.5 KB

Name:  1CB37B20-BD5F-4D8C-9A52-AFD089283B51_zpsemqycxvs.jpg
Views: 2492
Size:  136.5 KB

New hood struts with CNC mounts.

Last edited by 1cleancym; Oct 9, 2016 at 02:18 PM.
Reply
Old Oct 9, 2016 | 02:22 PM
  #15  
1cleancym's Avatar
Thread Starter
Full Member
iTrader: (2)
 
Joined: Jul 2016
Posts: 50
Likes: 5
From: Old Bridge, NJ
Name:  496B29D9-E201-432B-AC7A-7CEB6C340AD8_zpsyyyusamj.jpg
Views: 2500
Size:  116.4 KB

Name:  403FDC8C-069B-4D58-B848-4A95C5682251_zpsyasoe4gv.jpg
Views: 2472
Size:  134.9 KB

On the dyno. Car made 382rwhp with 16lbs on pump gas. I’m really happy with the overall result of the car and just enjoying the car as much as I can at this point.

Name:  22672802-BE90-4C30-B19E-9F4D716AE4C4_zpsvvql4g5w.jpg
Views: 2501
Size:  110.6 KB


Name:  1744979A-72DF-43AC-8C64-40ACE721F85F_zps0bpqc8q5.jpg
Views: 2497
Size:  121.0 KB

Name:  45A94DC0-27A4-45DB-8761-09C06EECD9B5_zpsqdra4vt4.jpg
Views: 2475
Size:  111.6 KB

Name:  D468275A-71CE-415B-BC9B-8442B4DD2563_zpsoxa6dwb9.jpg
Views: 2469
Size:  96.4 KB

Name:  AFBF54E2-3982-44E2-BBCE-EAE125BBA9F3_zpsmhd4ypwt.jpg
Views: 2483
Size:  177.4 KB

Some recent shot of the car when I took it to the WekFest East Show. Unfortunately the CYM did not take home any trophies but got mad love especially from the FD community.

Last edited by 1cleancym; Oct 9, 2016 at 02:25 PM.
Reply
Old Oct 9, 2016 | 02:30 PM
  #16  
Narfle's Avatar
Rx7 Wagon
Tenured Member: 20 Years
Liked
Loved
Community Favorite
iTrader: (16)
 
Joined: Nov 2002
Posts: 6,978
Likes: 888
From: California
Wow, dude. Awesome attention to detail. This looks a lot like the single conversion I do in my mind!
Amp did you well by setting you up with '94+ interior plastics.

Do you have more info on the underbody grommets and fuel decal sourcing and/or PNs?
How was it splitting the turn signals? Looks like you took the orange out? Looks great, was it difficult?
Reply
Old Oct 9, 2016 | 02:46 PM
  #17  
1cleancym's Avatar
Thread Starter
Full Member
iTrader: (2)
 
Joined: Jul 2016
Posts: 50
Likes: 5
From: Old Bridge, NJ
Originally Posted by Narfle
Wow, dude. Awesome attention to detail. This looks a lot like the single conversion I do in my mind!
Amp did you well by setting you up with '94+ interior plastics.

Do you have more info on the underbody grommets and fuel decal sourcing and/or PNs?
How was it splitting the turn signals? Looks like you took the orange out? Looks great, was it difficult?
The car actually came with the oem 93 plastics but was able to convert to the 94+ plastics along the way.

As far as the grommets and decals I don't have the part numbers on hand. I usually search any of the online parts catalogs to find the part numbers. One I like to use is: Mazda Genuine Parts | Jim Ellis Mazda Parts You can also try contacting Ray Crowe directly as he can source any mazda part for you.

The turn signals I bought already modified by the person I bought them from. The internal amber was removed and LEDs were used to get the clear that change to amber effect.
Reply
Old Oct 9, 2016 | 02:56 PM
  #18  
ThunderSprinter's Avatar
has a Full Member
Tenured Member: 15 Years
 
Joined: Jan 2008
Posts: 88
Likes: 2
From: Southern California
Wow, super nice. Love how you preserved a rare CYM car by not cutting or drilling into things, yet upgraded where appropriate.
Reply
Old Oct 9, 2016 | 04:34 PM
  #19  
ZoomZoom's Avatar
SEMI-PRO
Tenured Member: 20 Years
Liked
Loved
Community Favorite
iTrader: (2)
 
Joined: Feb 2001
Posts: 2,865
Likes: 36
From: New Jersey
Nice work Jason. The first shot made me think you had the RX7'on the rotisserie.
Next we will have to do some shots of the car when I head up there next weekend weather permitting.
Reply
Old Oct 9, 2016 | 06:26 PM
  #20  
1cleancym's Avatar
Thread Starter
Full Member
iTrader: (2)
 
Joined: Jul 2016
Posts: 50
Likes: 5
From: Old Bridge, NJ
Thanks ZoomZoom. Can't wait to show you the car in person!
Reply
Old Oct 9, 2016 | 07:38 PM
  #21  
caredden's Avatar
Super Moderator
Veteran: Marine Corp
Tenured Member: 20 Years
iTrader: (148)
 
Joined: Jul 2002
Posts: 2,277
Likes: 31
From: Okinawa
Very nice attention to detail! Cost some additional money but the results are outstanding! Well done!
Reply
Old Oct 16, 2016 | 01:43 AM
  #22  
cr-rex's Avatar
half ass 2 or whole ass 1
Tenured Member 10 Years
iTrader: (114)
 
Joined: Nov 2011
Posts: 3,425
Likes: 489
From: okinawa to tampa
amazing work here with how clean the installs are with everything. if you dont mind i would like to do what you did with the brake booster line. that single hard line running across the top of the firewall kills me. what size fitting did you use for that?
Reply
Old Oct 16, 2016 | 06:25 AM
  #23  
1cleancym's Avatar
Thread Starter
Full Member
iTrader: (2)
 
Joined: Jul 2016
Posts: 50
Likes: 5
From: Old Bridge, NJ
Originally Posted by cr-rex
amazing work here with how clean the installs are with everything. if you dont mind i would like to do what you did with the brake booster line. that single hard line running across the top of the firewall kills me. what size fitting did you use for that?
I took the butterfly valves out of the UIM and tapped the existing opening to fit a -6an fitting. Definitely clean up the firewall!
Reply
Old Oct 17, 2016 | 05:57 AM
  #24  
ZoomZoom's Avatar
SEMI-PRO
Tenured Member: 20 Years
Liked
Loved
Community Favorite
iTrader: (2)
 
Joined: Feb 2001
Posts: 2,865
Likes: 36
From: New Jersey
We shot some pics this weekend of the car after Jason helped me with my own CYM project. I will post up his efforts in my thread later today. Jason picked a great location for a Photoshoot. Look forward to him posting a few of his favorite shots. Thanks for the hard work you did all weekend for me. I owe you.

Mike
Reply
Old Oct 17, 2016 | 06:06 PM
  #25  
TomU's Avatar
It Just Feels Right
Tenured Member 05 Years
iTrader: (11)
 
Joined: Feb 2014
Posts: 2,238
Likes: 349
From: Arlington, VA
Very clean CYM

The FEED slosh tank pics are great. Plan to do that soon and they should help figure out how it fits.

And food for thought on the AEM filter. You may want to support it by the filter and not the plastic tubing. I really don't trust those push-lock fittings and the weight of the filter may pull it out

Originally Posted by 1cleancym


FWIW, I took a piece of aluminum and cut a hole that was slightly larger than the filter for it to rest on. I then mounted to the cross member and I can reach the filter from the top

Reply

Thread Tools
Search this Thread

All times are GMT -5. The time now is 09:53 AM.