
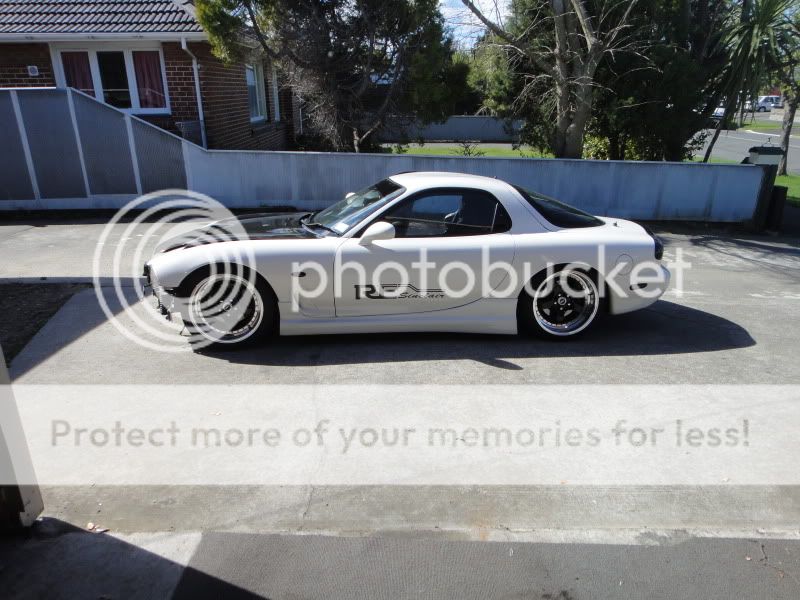
My '96 FD build/upgrade

Thread Starter
Full Member
Joined: May 2011
Posts: 79
Likes: 0
From: NZ
My '96 FD build/upgrade
Basically I've been having coolant troubles for some time now which narrowed down to coolant seals.
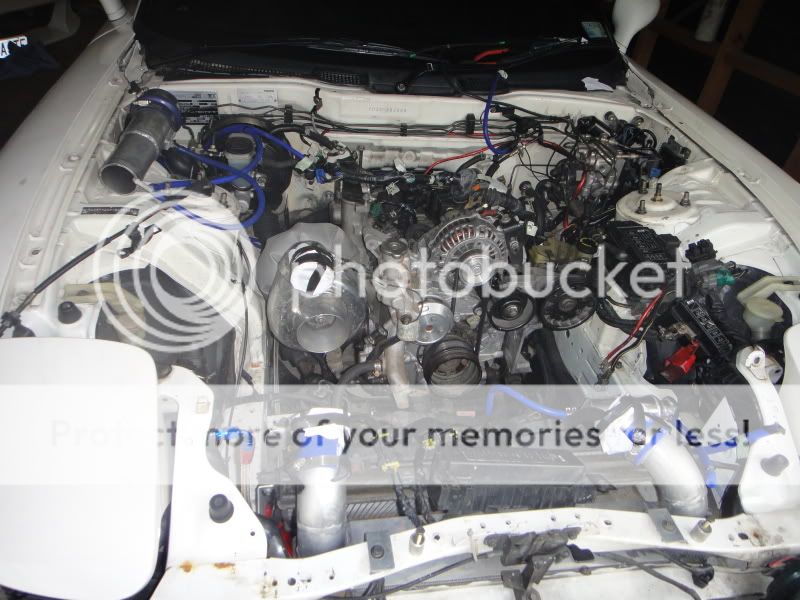
Had a couple days off work this week so have pulled the motor and box. Motor's coolant seals were on their way out and although the motor still had some life in it, the clutch was almost done for, as was 5th gear, so bit the bullet and am doing the lot at once.
It all started on a sunny Monday afternoon...
Pretty much the motor as just getting started
Everything disconnected
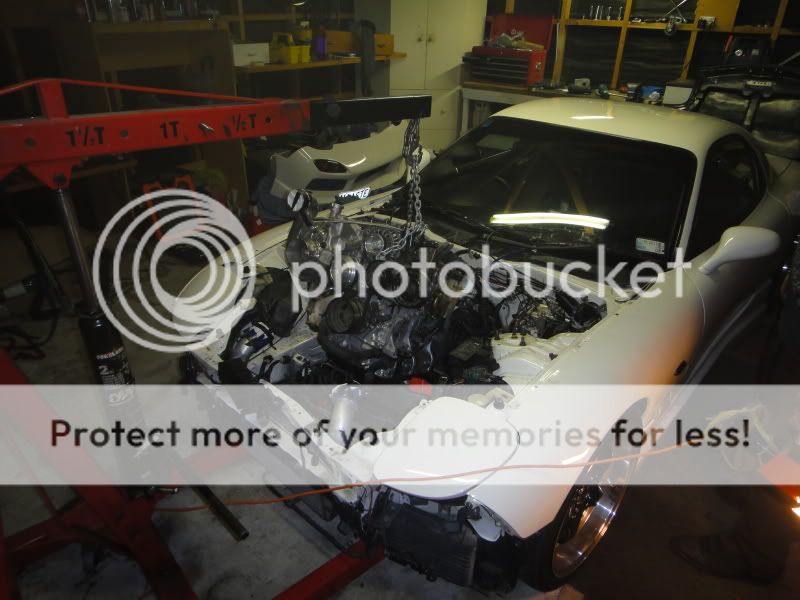
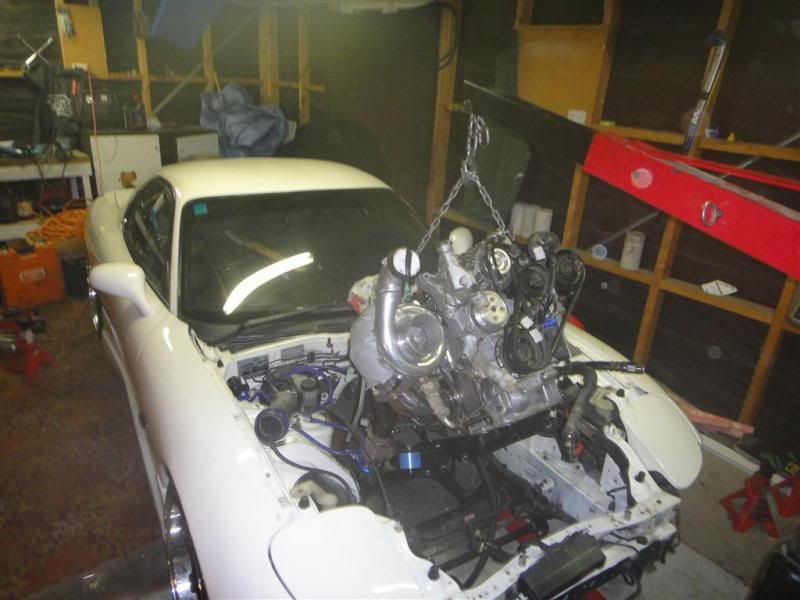
Borrow a engine crane and out it comes
Motor out and gearbox removed, will strip motor back to a bare block tomorrow
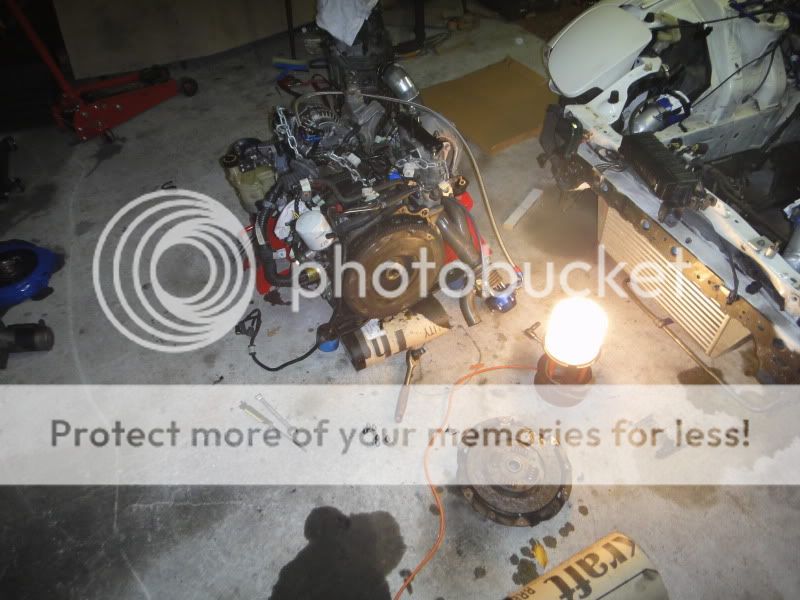
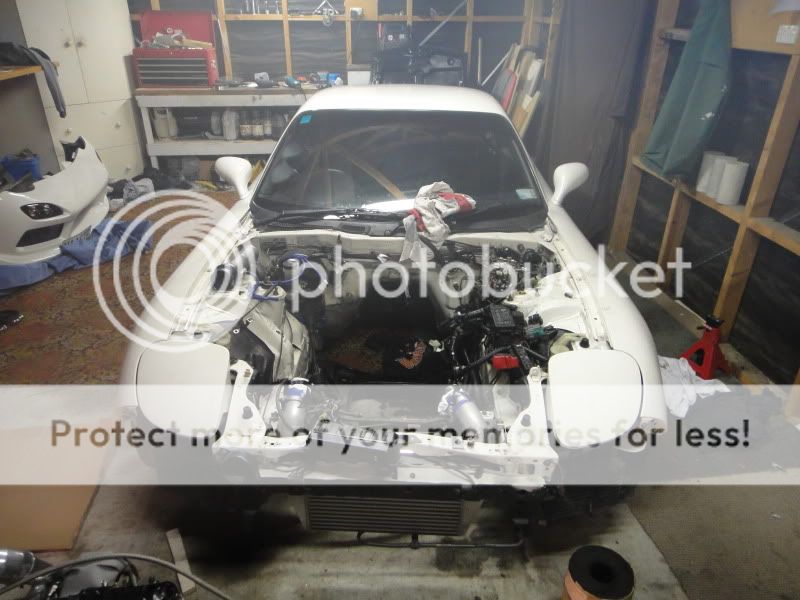
Equals a rather empty engine bay
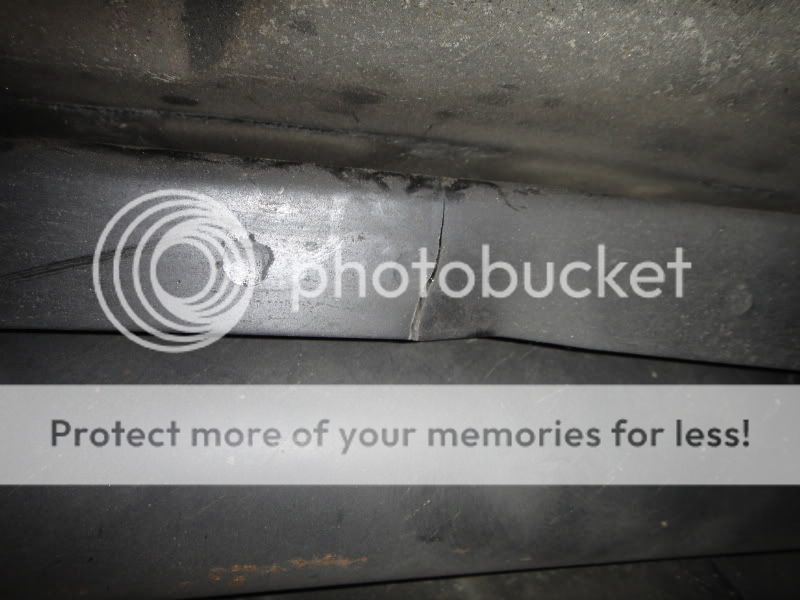
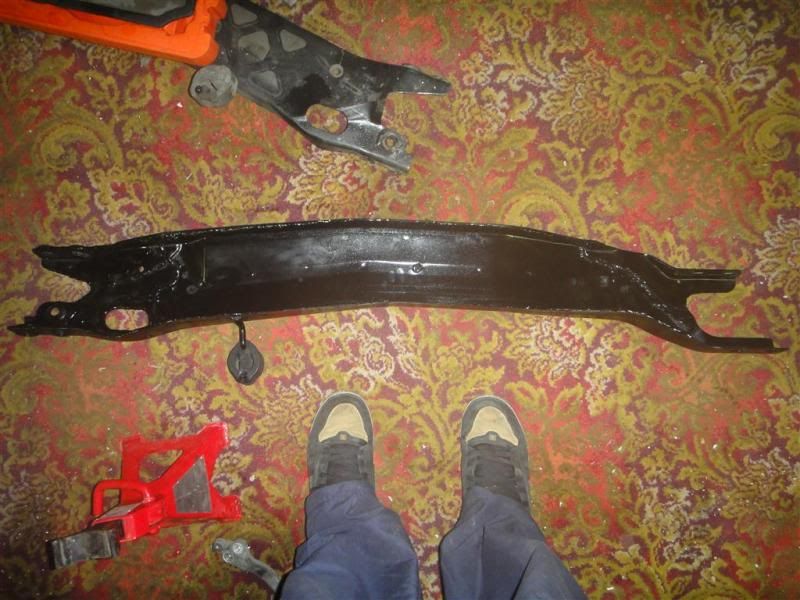
This is what I found just after I unbolted the mid pipe...a pretty badly cracked power plant frame, going to have to unbolt it all now and have it welded up and perhaps look into strengthening ideas.
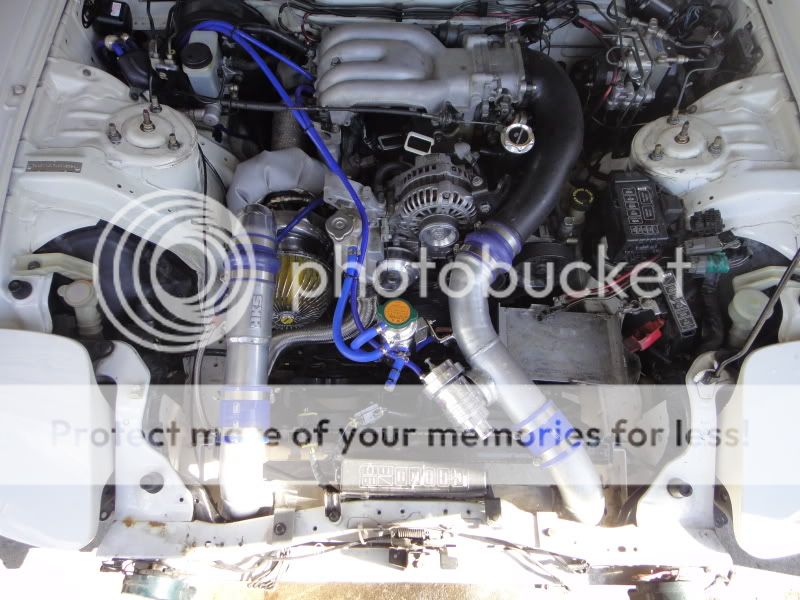
That's it so far, once the motor is stripped back the plan is to extend port it and a rebuild, probably dowelling also, looking for 4-450hp which should be very achievable, makes around 360hp at the moment.
I will order a alloy radiator while this is getting done. I have a nice new 6 puk clutch with sprung centre hub to try keep some drivability and a light aftermarket chromoly flywheel to join the rebuilt motor when it goes back in. And will look into if I want to fix this 5th gear prob myself.
Highly recommend this site http://www.rotaryresurrection.com/3r...eng_remov.html for engine removal guide, this is my first time doing the removal of a FD and it all went pretty smooth. I labelled everything and took a ton of pics.
Had a couple days off work this week so have pulled the motor and box. Motor's coolant seals were on their way out and although the motor still had some life in it, the clutch was almost done for, as was 5th gear, so bit the bullet and am doing the lot at once.
It all started on a sunny Monday afternoon...
Pretty much the motor as just getting started
Everything disconnected
Borrow a engine crane and out it comes
Motor out and gearbox removed, will strip motor back to a bare block tomorrow
Equals a rather empty engine bay
This is what I found just after I unbolted the mid pipe...a pretty badly cracked power plant frame, going to have to unbolt it all now and have it welded up and perhaps look into strengthening ideas.
That's it so far, once the motor is stripped back the plan is to extend port it and a rebuild, probably dowelling also, looking for 4-450hp which should be very achievable, makes around 360hp at the moment.
I will order a alloy radiator while this is getting done. I have a nice new 6 puk clutch with sprung centre hub to try keep some drivability and a light aftermarket chromoly flywheel to join the rebuilt motor when it goes back in. And will look into if I want to fix this 5th gear prob myself.
Highly recommend this site http://www.rotaryresurrection.com/3r...eng_remov.html for engine removal guide, this is my first time doing the removal of a FD and it all went pretty smooth. I labelled everything and took a ton of pics.
Nice, I'm rebuilding my engine as well. I have rebuilt a manual transmission before. Main tools needed are a bearing splitter and a hydraulic press. Bought a real nice otc bearing splitter off of amazon.com
Thread Starter
Full Member
Joined: May 2011
Posts: 79
Likes: 0
From: NZ
I haven't been sure what to do with the motor for a while now, rebuild myself, have a shop rebuild it, or buy a new block already built.
I came across a built block that had done the 1000k's run in (but has sat for a year) and made 290kw on 7psi run in tune on a HKS TO4Z. I run a HKS TA45 which is smaller than a TO4Z, but I don't plan on wanting 650 odd hp either. My aim is 450hp.
The motor should be here this week, sorting out the 5th gear crunch this week and hope to have it all in this weekend, going to plan.
A little about the motor:
Mint condition S7 block to start with
R magic stage 2 porting design
3mm PTS seals
Loads of extra dowelling
Port matched exhaust
New housings/rotors/seals
Still need to acquire a alloy radiator, will get some new hoses for it also. I have a sweet light flywheel waiting and a 6 puk clutch and pressure plate waiting to be bolted on.
Thread Starter
Full Member
Joined: May 2011
Posts: 79
Likes: 0
From: NZ
Also upon removing my PPF completely I found another bad crack on one of the fingers on the diff end. I sourced a new PPF and am having it seam welded and such at the moment, in hope to strengthen it up a bit for the new power level.
Thread Starter
Full Member
Joined: May 2011
Posts: 79
Likes: 0
From: NZ
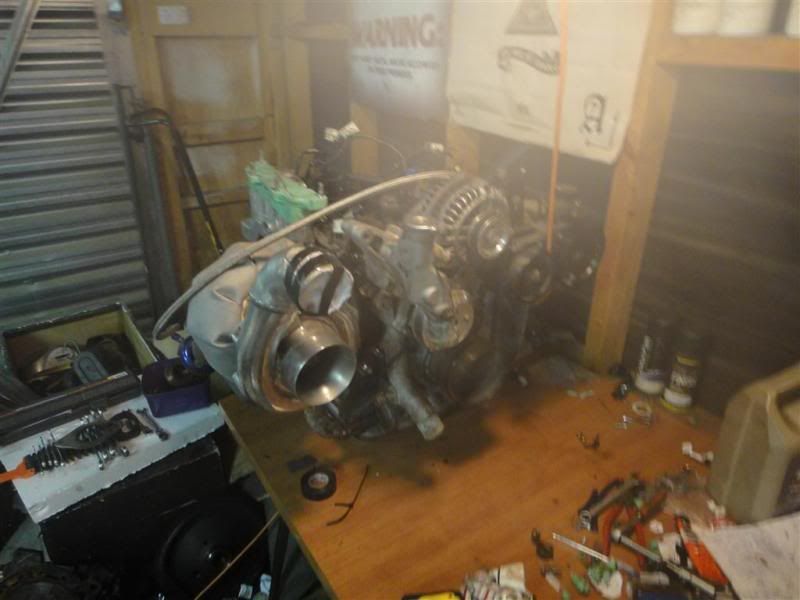
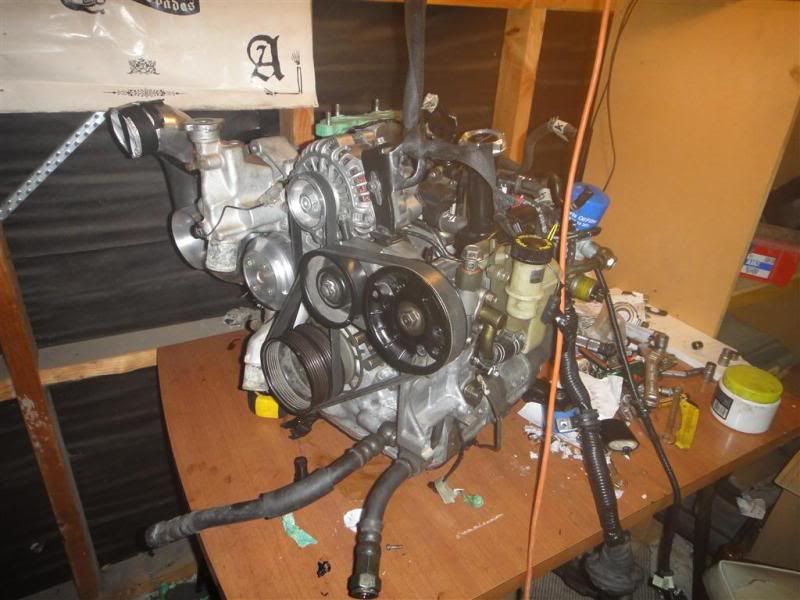
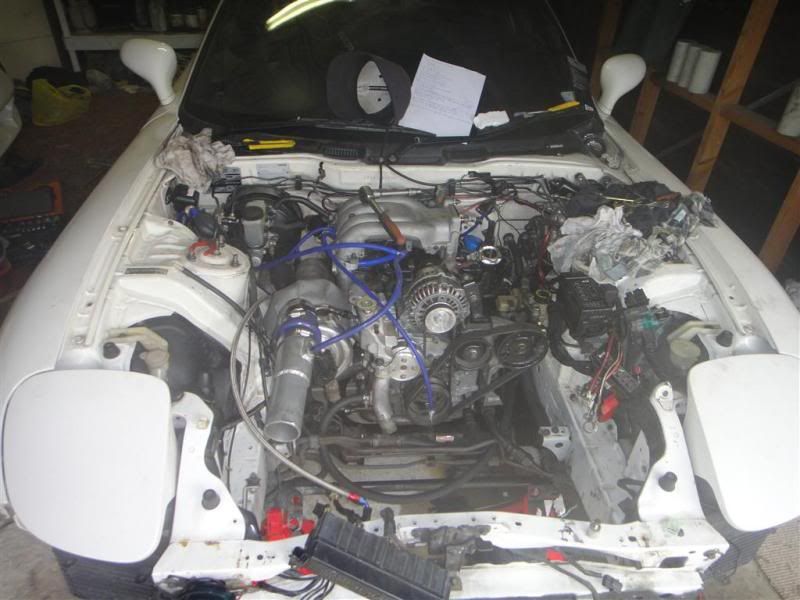
My new motor arrived the other day so I got to work assembling it 
I ran into 2 problems so far, and one I know is coming up.
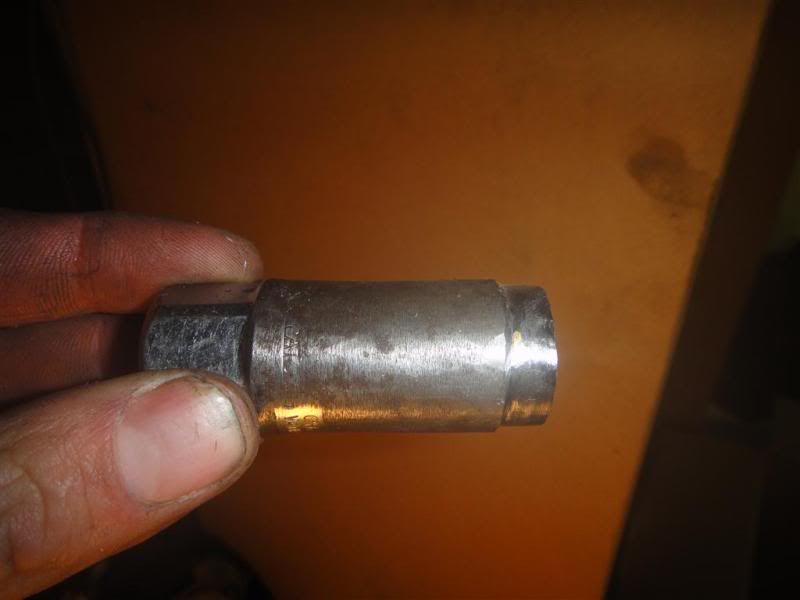
First problem was not having a stupidly thin walled socket for the spark plugs, so got to grinding one up to suit...perfect!
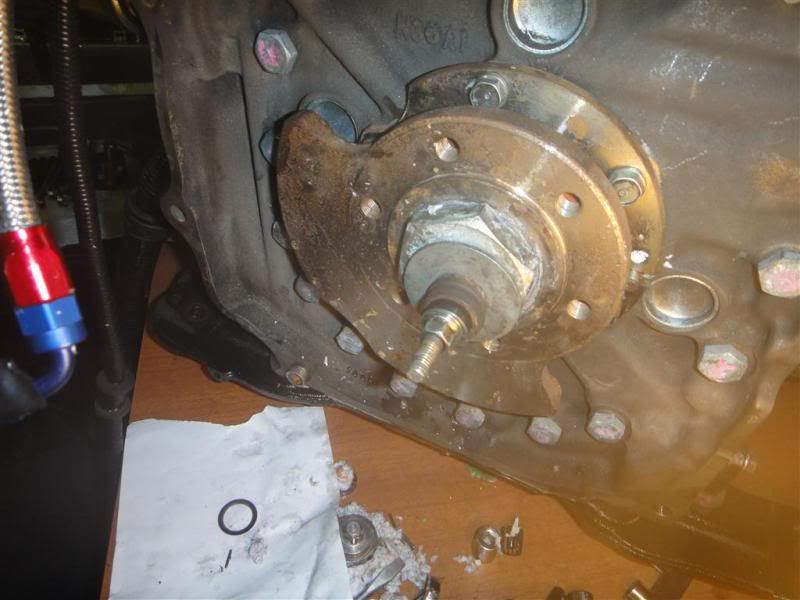
Next problem I ran into did my head in for half the afternoon, the F&%king pilot bearing! I couldn't find a pulling tool, 1. anywhere today 2. for a reasonable price for something that will only get used once.
So basically got a bolt, and hooked it over the back of the pilot bearing housing and wedged it in place with another couple of smaller screws so it wouldn't jump over the small lip.
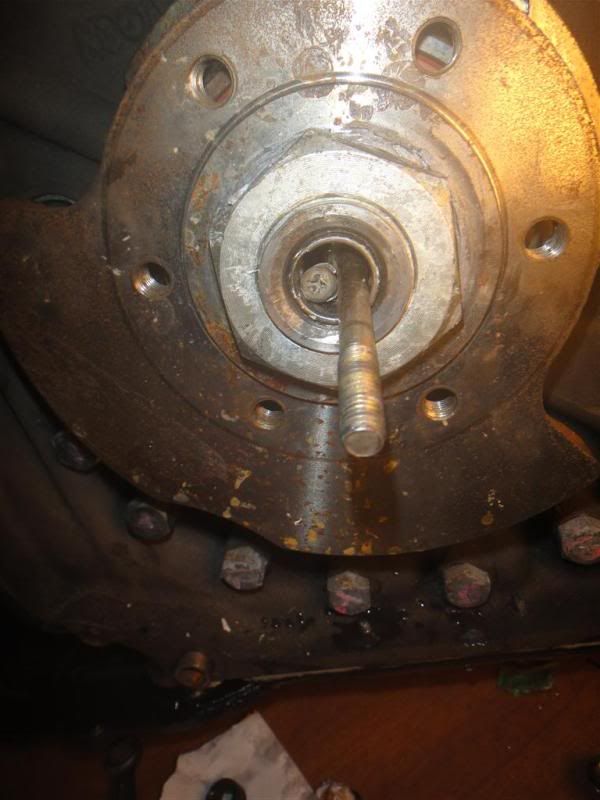
Then got a big washer and some small washers and wound on a nut and slowly pulled it out, to my surprise, it worked! Once the bearing shell got to the end of the e-shaft, put a socket between the e-shaft and first washer so the bearing case could slide out of the e-shaft...done!
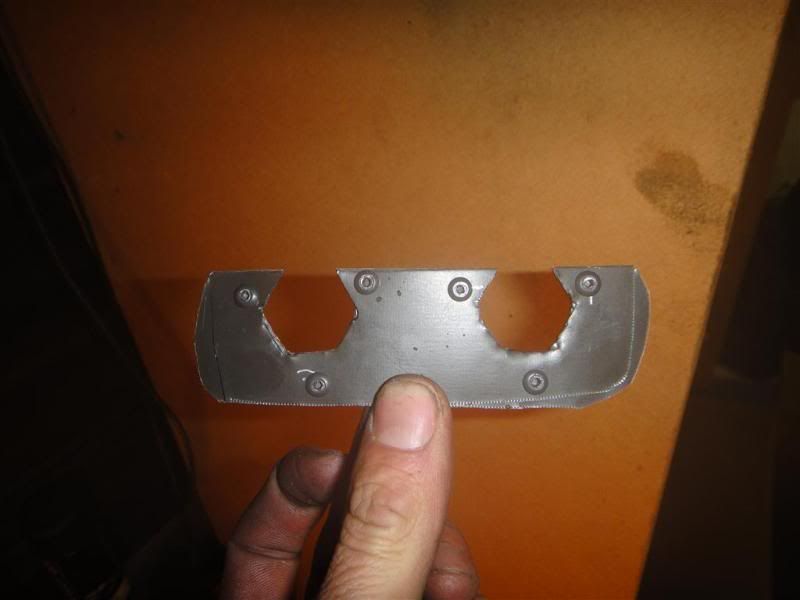
Third problem I knew was coming was the two top gearbox bolts on the PPF. I had a hell of a time fumbling round blindly trying to stop the bolts spinning as I undid them, so before it goes back in a whacked together my own bolt holder, should make refitting it alot easier!
And finally, my seam welded PPF, will be interesting to see if having it all welded together stops it cracking this time.
That's all for now, I pick up my new pilot bearing and seal tomorrow, then can get to fitting flywheel, clutch, p/plate then finally the gearbox and get the motor back in the hole!
I ran into 2 problems so far, and one I know is coming up.
First problem was not having a stupidly thin walled socket for the spark plugs, so got to grinding one up to suit...perfect!
Next problem I ran into did my head in for half the afternoon, the F&%king pilot bearing! I couldn't find a pulling tool, 1. anywhere today 2. for a reasonable price for something that will only get used once.
So basically got a bolt, and hooked it over the back of the pilot bearing housing and wedged it in place with another couple of smaller screws so it wouldn't jump over the small lip.
Then got a big washer and some small washers and wound on a nut and slowly pulled it out, to my surprise, it worked! Once the bearing shell got to the end of the e-shaft, put a socket between the e-shaft and first washer so the bearing case could slide out of the e-shaft...done!
Third problem I knew was coming was the two top gearbox bolts on the PPF. I had a hell of a time fumbling round blindly trying to stop the bolts spinning as I undid them, so before it goes back in a whacked together my own bolt holder, should make refitting it alot easier!
And finally, my seam welded PPF, will be interesting to see if having it all welded together stops it cracking this time.
That's all for now, I pick up my new pilot bearing and seal tomorrow, then can get to fitting flywheel, clutch, p/plate then finally the gearbox and get the motor back in the hole!
Thread Starter
Full Member
Joined: May 2011
Posts: 79
Likes: 0
From: NZ
Ok so inbetween having my daily driver stolen and sorting everything out for that I managed to pretty much finish work on the 7.
So how about that pilot bearing, what a mission! I blew one out incorrectly installing it, however next one and seal went in nicely. Glad to have that out of the way for sure.
In and done!
Motor assembled and ready for the gearbox attachment
Off the working bench/table awaiting gearbox
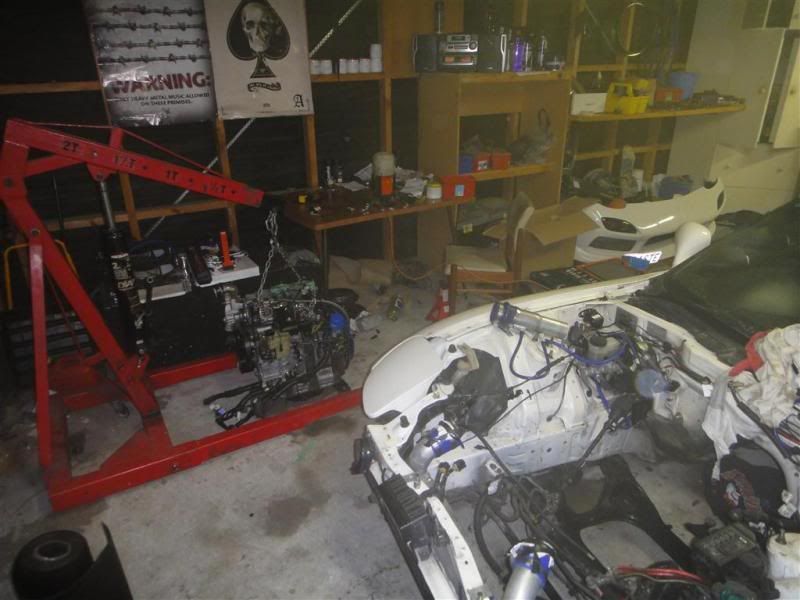
In the hole it goes, took a bit of maneuvering to get it in there
And then I set to work to connect the lot all back up
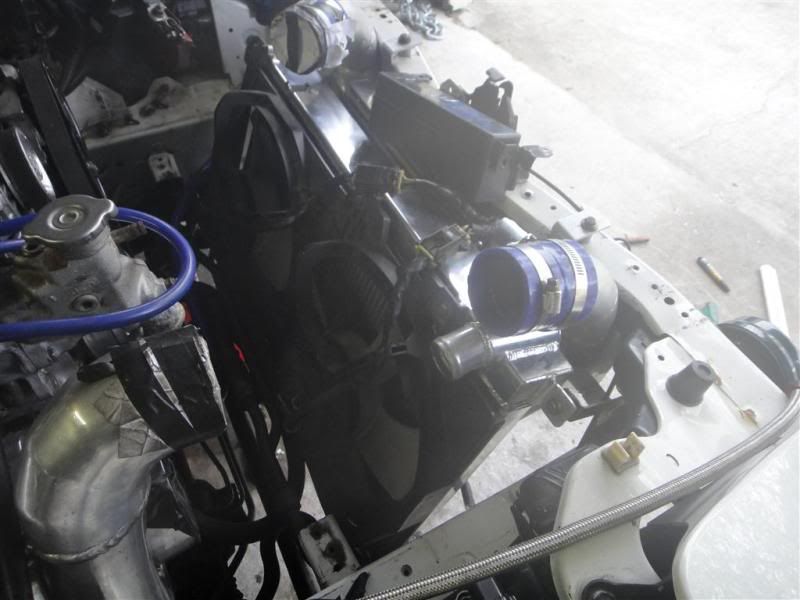
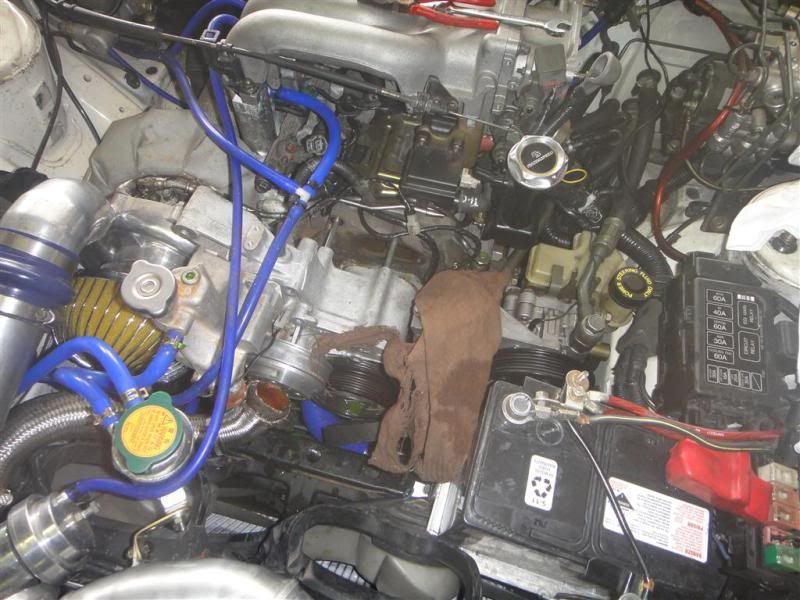
New alloy radiator. This was supposed to be a "bolt in replacement", where bolt in means "we made everything between 5-10mm out for your fitting pleasure, oh we also left some things off too". So I had some additions made to it by a friends then mounted it where it will call home
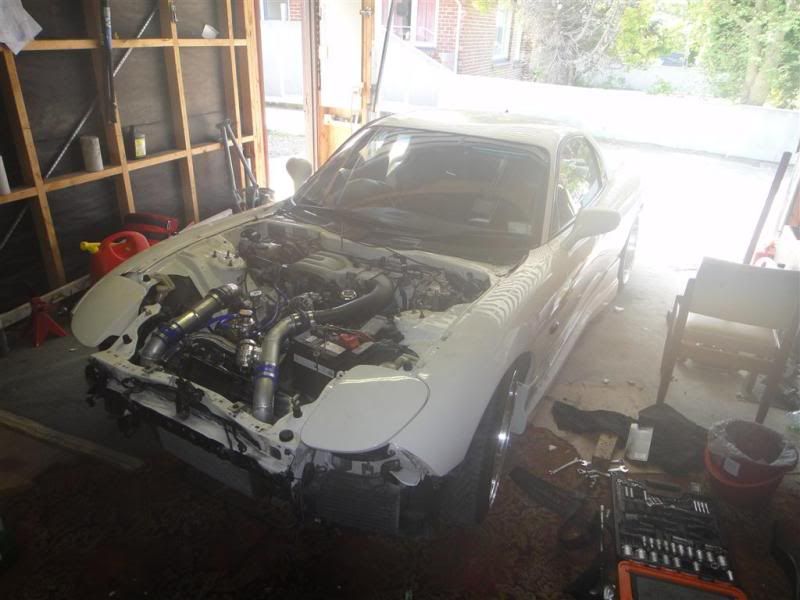
Everything connected and plumbed up, fluids all in and ready for it's first start
Unfortunately the sealant I used on the water pump blew out and it started squirting coolant everywhere. So set to pulling things off so I could reseal it
Brought some new gasket sealer more specific for the task and fired it up and after keeping an eye on things while it warmed up, things seemed fine. Stoked! Even took it for a small drive down the street to feel out the lightweight flywheel and new 6puk clutch, staying well off boost of course until I can get it in for a re-tune.
Here's a small video of the first start up (well second actually after I sorted the WP issue)
http://vimeo.com/31412359
So how about that pilot bearing, what a mission! I blew one out incorrectly installing it, however next one and seal went in nicely. Glad to have that out of the way for sure.
In and done!
Motor assembled and ready for the gearbox attachment
Off the working bench/table awaiting gearbox
In the hole it goes, took a bit of maneuvering to get it in there
And then I set to work to connect the lot all back up
New alloy radiator. This was supposed to be a "bolt in replacement", where bolt in means "we made everything between 5-10mm out for your fitting pleasure, oh we also left some things off too". So I had some additions made to it by a friends then mounted it where it will call home
Everything connected and plumbed up, fluids all in and ready for it's first start
Unfortunately the sealant I used on the water pump blew out and it started squirting coolant everywhere. So set to pulling things off so I could reseal it
Brought some new gasket sealer more specific for the task and fired it up and after keeping an eye on things while it warmed up, things seemed fine. Stoked! Even took it for a small drive down the street to feel out the lightweight flywheel and new 6puk clutch, staying well off boost of course until I can get it in for a re-tune.
Here's a small video of the first start up (well second actually after I sorted the WP issue)
http://vimeo.com/31412359
Trending Topics
Thread Starter
Full Member
Joined: May 2011
Posts: 79
Likes: 0
From: NZ
Previously ran a 12.5 quarter on 360hp.
Ran a 12.1 tonight at 128mph on 3rd and final run, was to many people there to get another run. Will definitely get into the high 11s next time, was still sussing out the new setup. This is on street tires. Poor 60ft of 2.150, traction was hard to gain.
Interestingly enough a supra beside me making 465wkw on slicks had the same trap speed as me and was running flat 11s on his first time out, which makes me want to get some rims with slicks, but I fear for the life of my drive train.
Also had a photoshoot for a magazine for xmas feature.
Thread Starter
Full Member
Joined: May 2011
Posts: 79
Likes: 0
From: NZ
Went and played with a gopro yesterday, small edit I whacked together of car
http://www.youtube.com/watch?v=YROp07ya8Y0
http://www.youtube.com/watch?v=YROp07ya8Y0
Thread Starter
Full Member
Joined: May 2011
Posts: 79
Likes: 0
From: NZ
Unfortunately today was the last day this car saw the road. Wrote it off  Car in oppo lane over the centreline, I got sucked into massive gutter at speed and shot into a cliff then thrown across the road spinning and down a bank. Car is a wreck but I guess being alive is better...
Car in oppo lane over the centreline, I got sucked into massive gutter at speed and shot into a cliff then thrown across the road spinning and down a bank. Car is a wreck but I guess being alive is better...
Thread Starter
Full Member
Joined: May 2011
Posts: 79
Likes: 0
From: NZ
Some pics now it's back home, this is one less FD on the road.
The rim from hitting a nasty grate on a driveway from where I got sucked in by a car on wrong side of road

The front is pretty much a wreck, bumper is in a million pieces, oil coolers were squashed to nothing

This side hit the cliff first and sent it across the road and down a bank, stopped by a small lip and tree

Whole car is literally twisted :S
The rim from hitting a nasty grate on a driveway from where I got sucked in by a car on wrong side of road
The front is pretty much a wreck, bumper is in a million pieces, oil coolers were squashed to nothing
This side hit the cliff first and sent it across the road and down a bank, stopped by a small lip and tree
Whole car is literally twisted :S


Thread Starter
Full Member
Joined: May 2011
Posts: 79
Likes: 0
From: NZ
Well, perhaps this is not the end of this FD just yet. Just finishing up on insurance at the moment, and managed get a cash settlement having me end up with the wreck. I'm going to pull the motor when i get it back and then have a panel beater friend come round for a look at the rear end and see if it is very badly damaged/twisted.
Reason being is to build a zombie like FD for the track. Cut the front off and tube frame and thrash.
Hoping to make a decision before xmas on the fate of this car. Failing it being able to be used, I'll either find a new shell, or sell off my entire setup.
Reason being is to build a zombie like FD for the track. Cut the front off and tube frame and thrash.
Hoping to make a decision before xmas on the fate of this car. Failing it being able to be used, I'll either find a new shell, or sell off my entire setup.
Thread Starter
Full Member
Joined: May 2011
Posts: 79
Likes: 0
From: NZ
Took to the front of the car with a grinder to remove intercooler/radiator etc.

And here is the video again slightly edited, another one of final moments to come...
http://www.youtube.com/user/boostedcapri?feature=mhee
And here is the video again slightly edited, another one of final moments to come...
http://www.youtube.com/user/boostedcapri?feature=mhee
Junior Member
Joined: Nov 2011
Posts: 21
Likes: 0
From: Vernon, NJ
Reading this thread was awesome until midway. Poor car! Good your okay though.
Also it's great that your still optimistic and wanting to take your unfortunate luck to build it bigger and better.
Matt
Also it's great that your still optimistic and wanting to take your unfortunate luck to build it bigger and better.
Matt
