
my 5 speed swap and eventual build thread

Figured that since I was able to get most of the information I needed to do the swap, I owed a clean tutorial on how I did it. Most of the information I found on the 3 main threads were really diluted, hopefully this thread will help out someone else with this swap.
Parts I used for the swap.
5spd tranny
Clutch
Man driveline
Dash from a 5spd including gauge cluster
Shifter
Clutch and Brake pedal assembly
Slave Cyl.
5 spd diff to tranny support
5spd Starter
5spd Flywheel
Might be a part or two I forgot to post here, but it should be in the install instructions.
Additional Parts
Master Cylinder and clutch lines
Throwout bearing
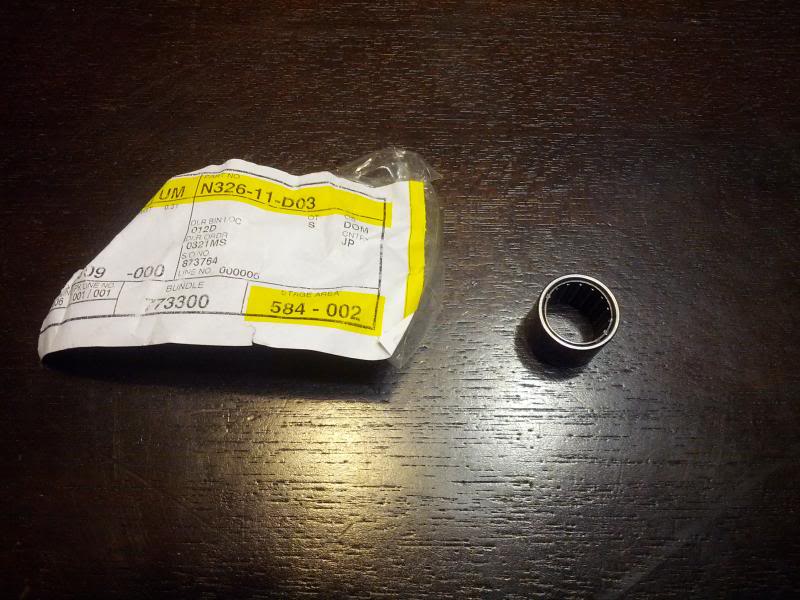
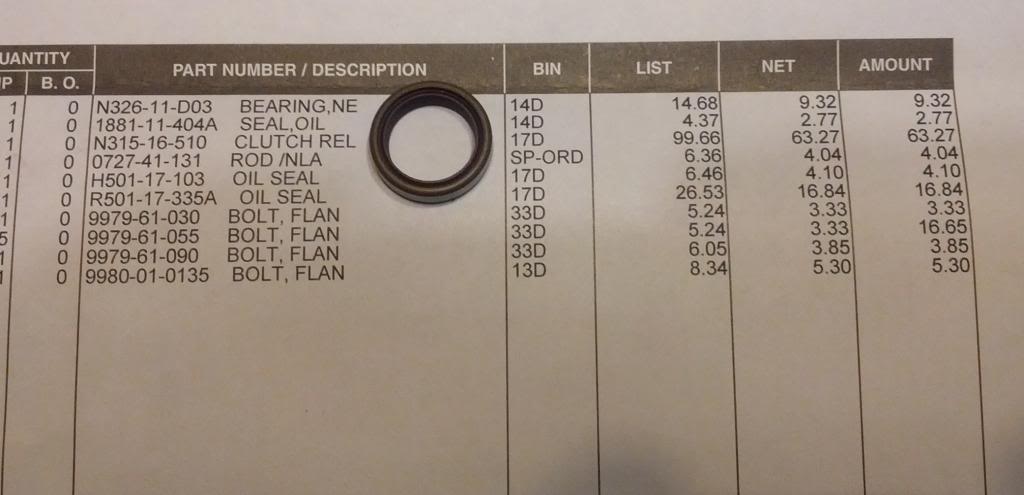
Pilot bearing and seal
Manual bell housing bolts
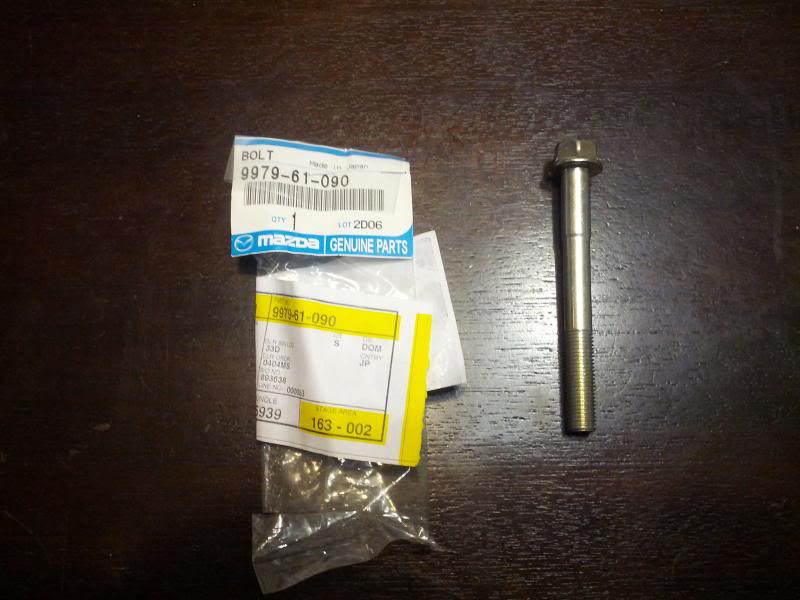
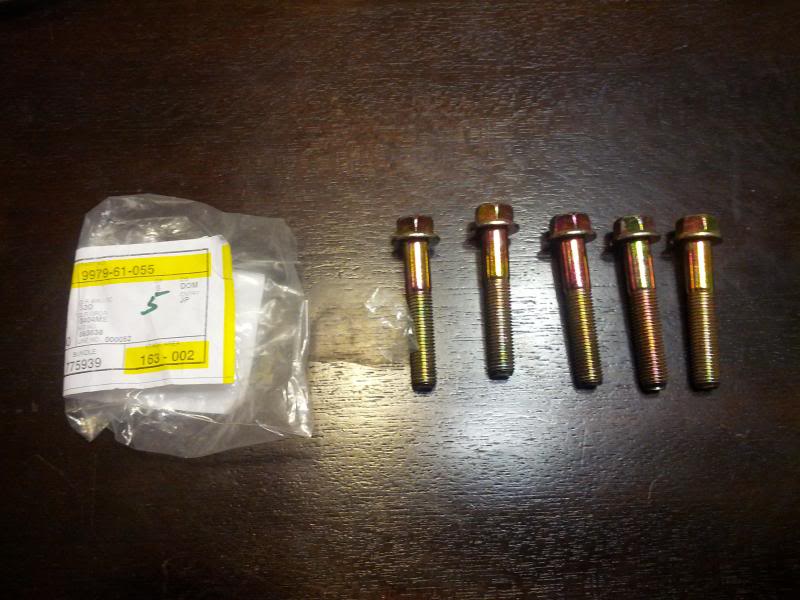
New flywheel bolts
3 Piece Rubber Boot
Leather shift boot and plastic surround
5 speed companion flange from diff, or drill out bolt pattern
Disconnect the battery, while you are there unbolt the breather hose from the auto transmission located on the back of the engine intake manifold. Remove the 2 14mm bellhousing bolts now, you will be glad you did when its up in the air.
If your hands don't fit like mine, it helps to jack up the back of the trans a little which angles the engine forward to allow for more space between the firewall and the engine. Makes it much easier to get your hands and tools down there.
In the interior of the vehicle, remove the center consol, unbolt the 4 10mm bolts from the shifter and unplug the one cable that attach's to the auto shifter. After you remove the driveline you will be able to pull the cotter pin from the shifter, then remove shifter.
Put the FD3S up in the air. Spray down the exhaust bolts where the DP and the Cat meet up.
A 50/50 mix of acetone and power steering fluid is the best solution, try it!
Remove said bolts. Factory Cat has two connections, one is a temp sensor, the other is the EGR BS tube, remove said connections.
With WD40 (50/50 solution as previously described), spray down the exhaust hangers, then pry out the posts with a flat head screw driver. Exhaust should be removed at this point.
There are a couple aluminum braces under the vehicle that need to be removed, keep the brace under the transmission for now, but remove the rear brace that goes thru the support beam.
remove the transmission / diff suport beam by unbolting the 4 21mm bolts off the tranmission, have someone hold the beam, remove the 5 bolts that attach the beam to the diff. With a little jiggling you should be able to remove the beam.
Place a tranny jack under the rear diff, then unbolt the 4 14mm driveline bolts. find a piece of metal to wedge under the diff to keep it from providing too much pressure on the diff mounts.
Pull the driveline.
If your tranny is level you should not leak any fluid when you pull the driveline.
Pull the cotter pin that attaches the shift linkage to the auto shifter, remove the shifter.
There is no drain bolt for the auto trannywhy mazda!?!?, remove the pleuthora of bolts holding the pan on from the rear and sides, keep the front bolts on, just loosen them up a little. Pry the pan and drain the fluid.Get a big cooking tray or something to catch the oil as this can get messy. Keep a few rags handy as well Once its drained enough remove the final bolts and drop the pan, drain and reinstall the pan.
Remove the starter by disconnecting the wires and removing the 3 14mm bolts and 1 14mm nut. This thing is a pain to get out, just leave it in, unbolted, and remove once the trans is out
remove the electrical connections from the auto tranny and push the wiring harness into the engine bay, out of the way.
On the left side of the tranny you will see the oil lines for the tranny cooler, remove the rubber connections and drain any remaining fluid out of the lines.
At this point the tranny should not have anything else connecting to it, verify.
remove the access pannel from the bottom of the bell housing, this is where you will unbolt the torque converter from the flexplate/flywheel. It is important to note this step, there isnt a whole lot of room to work under the car, leaving the torque converter on the flywheel will keep you from dropping the tranny.
To pull the torque converter you will need a large straight screwdriver to hold the flywheel, there is a notch in the bell housing to faciliate this. Position the first bolt where you have access to it and connect a 14mm wrench to it, with a breaker bar you will be able to remove this bolt. spin the flywheel till you get to the next bolt. There are 4 bolts holding it on, and they are torqued to about 150ft lbs or so. repeat until all bolts are removed.
These bolts are torqued down quite a bit as mentioned. Make sure the wrench is straight on so you dont strip the bolts. I stripped the last one and spent too many hours with a dremel in that small area grinding the head off
Tranny is now ready to be pulled place the tranny jack under the transmission, remove the 4 remaining 14 mm bolts from the bell housing (you will have to use a wobbler and a shitton of extentions to get two of them off, have fun). Again you can create some space by jacking certain parts of the engine or tranny
Once the tranny is unbolted it should easily pull from the engine, you will need to finess it around the DP. lower and place it out of the work area. I removed the DP since the gasket was garbage and had to replace the o2 sensor as well. You can get a single wire bosch sensor for autozone for $17, so don't waste your money on other ones
To pull the flexplate and you are going to need a 54mm socket and a hell of an impact gun (ImaKethings hooked me up in a big way letting me borrow his BFIG, surge tank, and socket. Thanks bro. If you dont have an impact gun you will need to figure out a way to lock down your flexplate. Don't waste your time with something other than an air impact gun
After the bolt is out I unbolted the flexplate (6 14mm bolts) and placed a pully puller to remove the counter balance. If you have a lightweight flywheel like I did, leave the counter balance on, theres no reason to remove it.
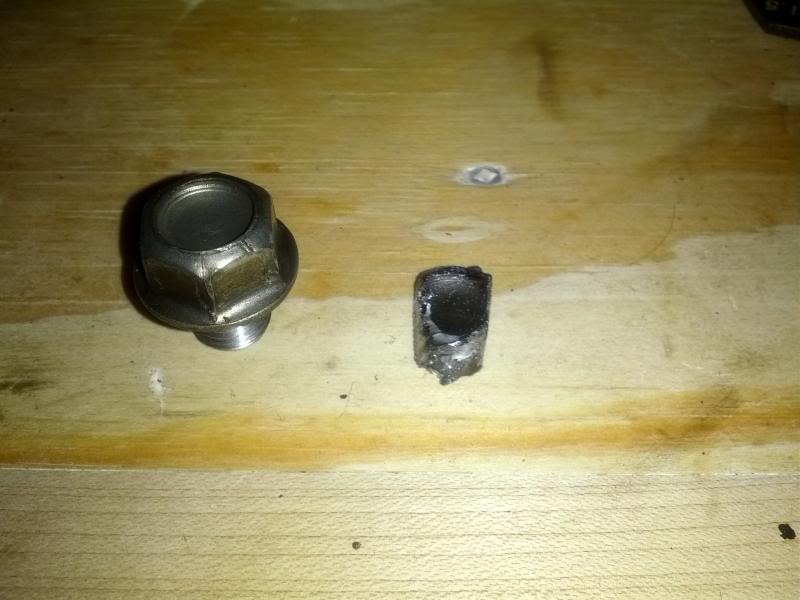
A quick inspection showed me that the rear main seal was starting to go bad, after a phone call Justin showed up with a new seal, and the pilot bearing. HUGE THANKS TO JUSTIN. Mine didn't have a rear main seal or pilot bearing, just ordered them from Ray Crowe, they're only a few bucks
The seal will press in by hand with a little lithium grease. Take your time and keep it centered. The pilot bearing takes a little work but easily slides into position with a few light taps of a hammer, and a socket.
While I was there I made a blockoff plate for the exhaust gas return with a little aluminum and copper RTV, wont be needing that anymore. Also found my stock catalytic converter was toast, good thing I had picked up a new midpipe. I just cut the EGR pipe and welded the end to seal, then bolted it back on
You are now ready to install your flywheel, place some lithium grease on the main seal and the inside of the flywheel. You will also need to slab a little lube on where the key will sit, that will hold the key into the groove so your not F'ing with it. The flywheel should slide on easily, if it doesnt recheck the key to make sure it didnt slide off the groove. Torque down the 54mm nut to 350ft lbs.
Now its time to install your clutch. You have a clutch alignment tool right? I didnt, so I used an extension and electrical tape. works for me. center the clutch disk and install the pressure plate on the guide pins (Once again ImaKethings came thru for me. I didnt pick any up, so he kindly lathed 3 of them out for me. I owe you big time bro.). My lightweight flywheel had these pins on it already finger tighten down the 6 14mm clutch bolts. Then tighten down the bolts 1 then 4, 2 then 5, 3 then 6. Tighten down a little at a time to keep everything equal. eventually it should be tight. I dont know the exact spec for the flywheel, but I can tell you its not 150lbs. All 150lbs will do is give you a broken bolt. Yea, I was pissed. I torqued them down to 36ft lbs after I extracted the stud and replaced the bolt. Have the FSM on hand and check torque specs for all bolts before putting them on
Take your new throwout bearing lock ring and attach it to the pressure plate, once the tranny is installed all you need to do is actuate the clutch to have it lock into position.
Now its time to mount the tranny, make sure there are no obstructions or wiring harness's in the way. The 5spd tranny is significantly lighter then the auto, so its a lot easier to manhandle. Once its in postition and the input shaft is aligned with the clutch disk start to move it forward. Attach a driveline and rotate to help get the splines aligned. You may need to take a prybar and lift the front of the engine to give it the proper angle. slide on without using bolts to tighten it up. Attach your bell housing bolts and your ready to go. This was kind of a pain. Have at least 2 jacks and a buddy to help out
Now its time to work the driveline. I kept my factory diff instead of buying a 5spd one. You can also remove the companion flange from the 5 spd diff and install on your auto diff, or you can do what I did. I pressed out the driveline flange U joints and swapped them from the auto to the 5 spd. Now I can use the 5 spd driveline and the auto diff. I'm not sure how he pressed out these U joints on the driveline as they are not replaceable. I just re-used the companion flange from the diff, and drilled out the bolt pattern from the new manual diff. There is also some trimming needed with a dremel for this to work.
Reinstall the DP if you removed
Install the Tranny / Diff support Beam.
Install all of the aluminum braces, except for the middle one, you will need to do that after the exhaust is installed.
I installed an aftermarket midpipe due to the poor condition of the Cat. Install the rest of your exhaust.
Install the center aluminum brace.
Connect the exhaust gas return hose and the temp sensor on the Cat.
Feed down the clutch actuator and install on the transmission, leave the upper hose laying in the engine compartment. I dropped the clutch line and slave down prior to installing the trans, there was a little more room, and I just kept it off to the side
Install and wire your starter (If you have one, I am still looking for one).
This is where getting those new 5 speed bell housing bolts comes in as you will need them for the starter. You will also need to get 1 nut from the hardware store for the long bolt
Lower the vehicle, we will do wiring at a later time, with pictures.
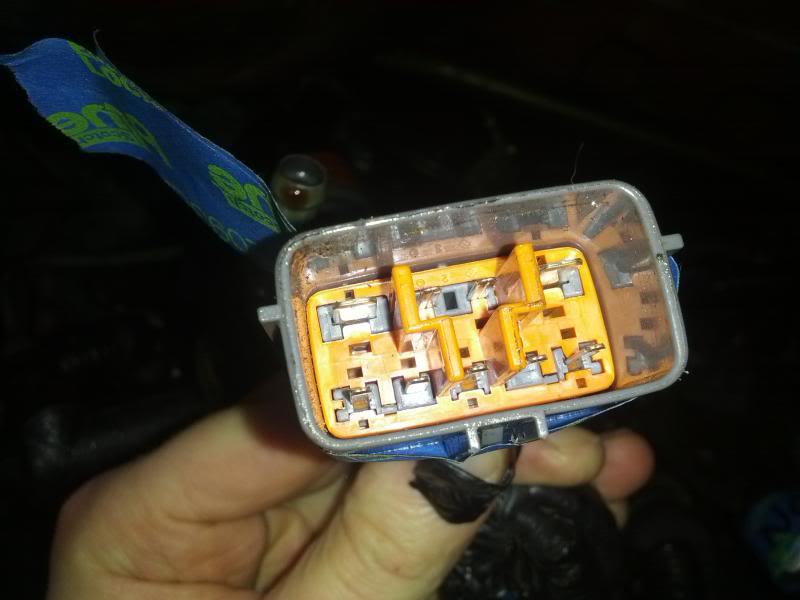
Wiring is actually easy. I kept the auto harness and ECU. If you do not wan't a clutch switch ie you don't need to depress the clutch to start the car, you just need to jump the 2 largest wires on the biggest auto harness plug.
For the reverse lights, on the same big plug, you want to cut the TOP LEFT 2 wires when you are looking AT THE PLUG END with the large wires on the bottom. Just connect these two wires with male/female spade connectors to the 2 wires from the sensor on the trans. If you leave the auto cluster or auto tach face, it will light up R still when you shift into reverse.
From the driverside interior unbolt the clutch mount block off plate, 2 12MM bolts and remove the block off plate. Place the slave cyl into the mount holes and prop it from behind to keep it from pushing back when you install the clutch pedal.
Remove the brake petal assembly ( or trim down your factory brake pedal ) by removing a cotter pin and brake plunger retention pin, remove the 7 12MM bolts (4 on the face of the mount 1 above, 2 on the steering column). Replace with your new brake petal assembly.
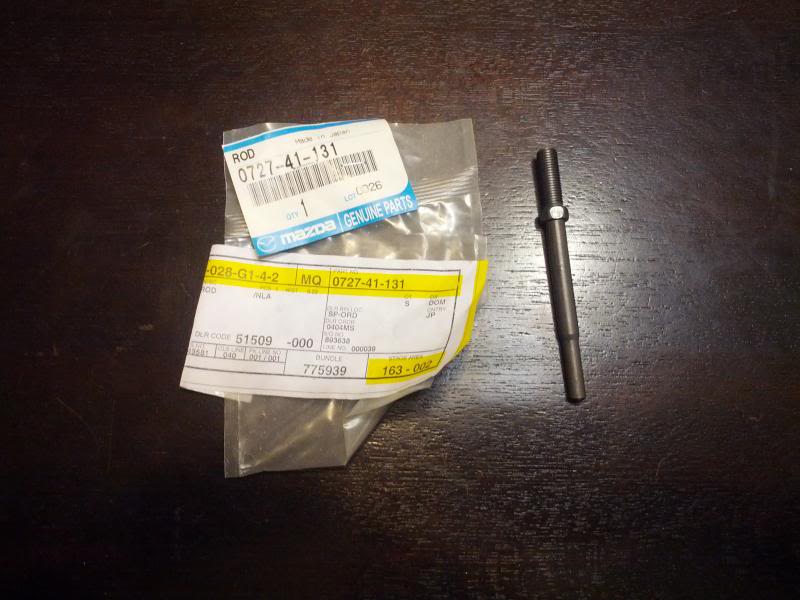
Install the Clutch petal assembly 3 12MM bolts (2 on the face, 1 above) Make sure to align the plunger into the slave cyl. Make sure your clutch pedal comes with this rod, mine didn't unfortunately. I just ordered one from Ray Crowe for about 5 bucks. To remove the brake pedal you need to drop the steering column.
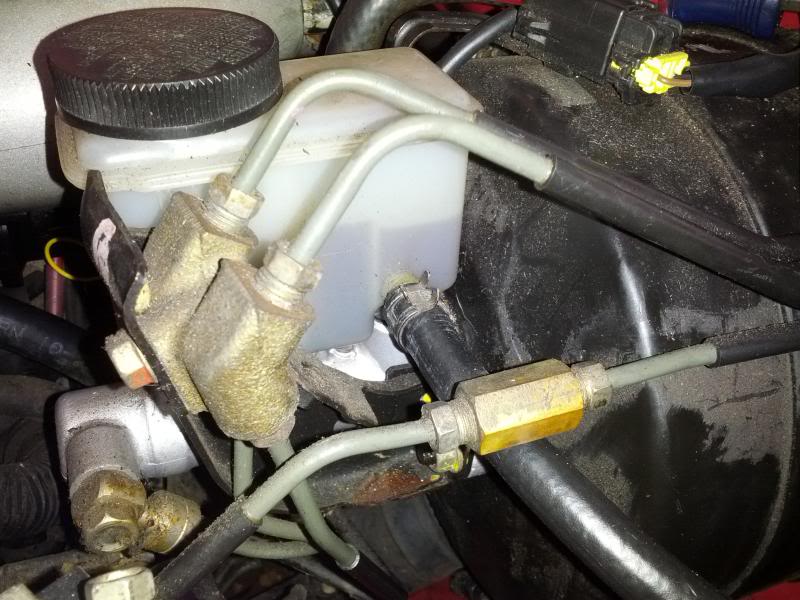
Install the actuator hose assembly with the slave cyl. Remove the blockoff cap on your master cyl and quickly plug in the hose to the slave cyl. ensure all connections are tight. (There is no reason to replace your brake booster and master cyl, they are identical from the 5 spd to the Auto).
At this point I removed the dash, there are a metric **** ton of plastic interior pieces that need to be removed to do this, have fun and take your time. The only bolts that hold on the dash are 1 12mm bolt center dash by the defrost vent, remove access panel and remove bolt. 2 12MM bolts located driver side behind the door vent panel. 2 12MM bolts on the pass side same location. and 4 12MM bolts center console behind the leg rest panel and the opposite panel, you will need to remove the carpet panel to get to them (they are designed to be moved). Slowly pull the dash to find the plethora of cables that will need to be unplugged. Then remove dash. No need to do any of this if you keep the auto harness. The wiring part is already done.
Install the starter, the factory Auto harness will be used for the rest of the install. The starter harness installs the same from the auto to the man starter.
Fill the transmission with gear oil, check the service manual for factory recommended. I ran with Redline 90weight. Should take 2.5Q to fill.
The starter inhibitor can be bypassed by wiring the two larger wires on the big grey connector together. The connector should be located near the starter, it was the main harness connector to the auto tranny.
On the same harness you need to connect wire 2 and wire 7 to the reverse switch on the tranny. This will get your reverse lights to function. If you are looking at the connector, and the larger gauge wires are on the bottom, it is the top left wires. They are located right next to each other. (sorry no pics).
I changed out the entire dash rather than rewire the dash harness. Install you new harness, rewire your factory harness, or install your 5spd dash. Wire your gauge cluster, bolt up the steering column recheck all wiring harness's.
Fill the transmission shifter location with 90 weight and install the shifter center console and shift boot. Check your wiring harness connectors again.
You can run the factory automatic ECU with this setup. I picked up a PFC for my install but have yet to install it.
Test for your reverse lights, ensure your clutch line is bled, and your wiring harness's are connected properly. Start your car and break in that new clutch.
When you bleed the clutch, make sure the slave cylinder rod is properly engaged with the clutch fork. You can manually move the fork through an access port on the trans to ensure its good. Then just bleed the slave like a brake caliper
Parts I used for the swap.
5spd tranny
Clutch
Man driveline
Dash from a 5spd including gauge cluster
Shifter
Clutch and Brake pedal assembly
Slave Cyl.
5 spd diff to tranny support
5spd Starter
5spd Flywheel
Might be a part or two I forgot to post here, but it should be in the install instructions.
Additional Parts
Master Cylinder and clutch lines
Throwout bearing
Pilot bearing and seal
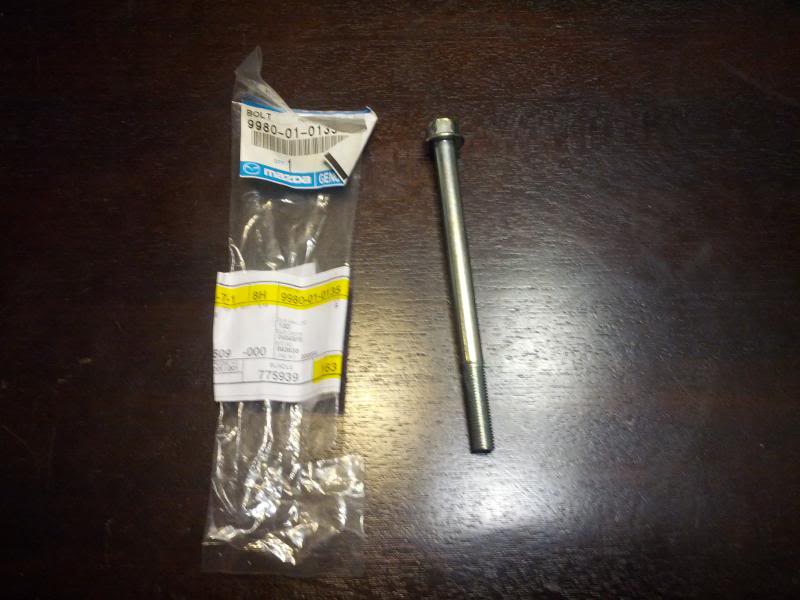
Manual bell housing bolts
New flywheel bolts
3 Piece Rubber Boot
Leather shift boot and plastic surround
5 speed companion flange from diff, or drill out bolt pattern
Disconnect the battery, while you are there unbolt the breather hose from the auto transmission located on the back of the engine intake manifold. Remove the 2 14mm bellhousing bolts now, you will be glad you did when its up in the air.
If your hands don't fit like mine, it helps to jack up the back of the trans a little which angles the engine forward to allow for more space between the firewall and the engine. Makes it much easier to get your hands and tools down there.
In the interior of the vehicle, remove the center consol, unbolt the 4 10mm bolts from the shifter and unplug the one cable that attach's to the auto shifter. After you remove the driveline you will be able to pull the cotter pin from the shifter, then remove shifter.
Put the FD3S up in the air. Spray down the exhaust bolts where the DP and the Cat meet up.
A 50/50 mix of acetone and power steering fluid is the best solution, try it!
Remove said bolts. Factory Cat has two connections, one is a temp sensor, the other is the EGR BS tube, remove said connections.
With WD40 (50/50 solution as previously described), spray down the exhaust hangers, then pry out the posts with a flat head screw driver. Exhaust should be removed at this point.
There are a couple aluminum braces under the vehicle that need to be removed, keep the brace under the transmission for now, but remove the rear brace that goes thru the support beam.
remove the transmission / diff suport beam by unbolting the 4 21mm bolts off the tranmission, have someone hold the beam, remove the 5 bolts that attach the beam to the diff. With a little jiggling you should be able to remove the beam.
Place a tranny jack under the rear diff, then unbolt the 4 14mm driveline bolts. find a piece of metal to wedge under the diff to keep it from providing too much pressure on the diff mounts.
Pull the driveline.
If your tranny is level you should not leak any fluid when you pull the driveline.
Pull the cotter pin that attaches the shift linkage to the auto shifter, remove the shifter.
There is no drain bolt for the auto trannywhy mazda!?!?, remove the pleuthora of bolts holding the pan on from the rear and sides, keep the front bolts on, just loosen them up a little. Pry the pan and drain the fluid.Get a big cooking tray or something to catch the oil as this can get messy. Keep a few rags handy as well Once its drained enough remove the final bolts and drop the pan, drain and reinstall the pan.
Remove the starter by disconnecting the wires and removing the 3 14mm bolts and 1 14mm nut. This thing is a pain to get out, just leave it in, unbolted, and remove once the trans is out
remove the electrical connections from the auto tranny and push the wiring harness into the engine bay, out of the way.
On the left side of the tranny you will see the oil lines for the tranny cooler, remove the rubber connections and drain any remaining fluid out of the lines.
At this point the tranny should not have anything else connecting to it, verify.
remove the access pannel from the bottom of the bell housing, this is where you will unbolt the torque converter from the flexplate/flywheel. It is important to note this step, there isnt a whole lot of room to work under the car, leaving the torque converter on the flywheel will keep you from dropping the tranny.
To pull the torque converter you will need a large straight screwdriver to hold the flywheel, there is a notch in the bell housing to faciliate this. Position the first bolt where you have access to it and connect a 14mm wrench to it, with a breaker bar you will be able to remove this bolt. spin the flywheel till you get to the next bolt. There are 4 bolts holding it on, and they are torqued to about 150ft lbs or so. repeat until all bolts are removed.
These bolts are torqued down quite a bit as mentioned. Make sure the wrench is straight on so you dont strip the bolts. I stripped the last one and spent too many hours with a dremel in that small area grinding the head off
Tranny is now ready to be pulled place the tranny jack under the transmission, remove the 4 remaining 14 mm bolts from the bell housing (you will have to use a wobbler and a shitton of extentions to get two of them off, have fun). Again you can create some space by jacking certain parts of the engine or tranny
Once the tranny is unbolted it should easily pull from the engine, you will need to finess it around the DP. lower and place it out of the work area. I removed the DP since the gasket was garbage and had to replace the o2 sensor as well. You can get a single wire bosch sensor for autozone for $17, so don't waste your money on other ones
To pull the flexplate and you are going to need a 54mm socket and a hell of an impact gun (ImaKethings hooked me up in a big way letting me borrow his BFIG, surge tank, and socket. Thanks bro. If you dont have an impact gun you will need to figure out a way to lock down your flexplate. Don't waste your time with something other than an air impact gun
After the bolt is out I unbolted the flexplate (6 14mm bolts) and placed a pully puller to remove the counter balance. If you have a lightweight flywheel like I did, leave the counter balance on, theres no reason to remove it.
A quick inspection showed me that the rear main seal was starting to go bad, after a phone call Justin showed up with a new seal, and the pilot bearing. HUGE THANKS TO JUSTIN. Mine didn't have a rear main seal or pilot bearing, just ordered them from Ray Crowe, they're only a few bucks
The seal will press in by hand with a little lithium grease. Take your time and keep it centered. The pilot bearing takes a little work but easily slides into position with a few light taps of a hammer, and a socket.
While I was there I made a blockoff plate for the exhaust gas return with a little aluminum and copper RTV, wont be needing that anymore. Also found my stock catalytic converter was toast, good thing I had picked up a new midpipe. I just cut the EGR pipe and welded the end to seal, then bolted it back on
You are now ready to install your flywheel, place some lithium grease on the main seal and the inside of the flywheel. You will also need to slab a little lube on where the key will sit, that will hold the key into the groove so your not F'ing with it. The flywheel should slide on easily, if it doesnt recheck the key to make sure it didnt slide off the groove. Torque down the 54mm nut to 350ft lbs.
Now its time to install your clutch. You have a clutch alignment tool right? I didnt, so I used an extension and electrical tape. works for me. center the clutch disk and install the pressure plate on the guide pins (Once again ImaKethings came thru for me. I didnt pick any up, so he kindly lathed 3 of them out for me. I owe you big time bro.). My lightweight flywheel had these pins on it already finger tighten down the 6 14mm clutch bolts. Then tighten down the bolts 1 then 4, 2 then 5, 3 then 6. Tighten down a little at a time to keep everything equal. eventually it should be tight. I dont know the exact spec for the flywheel, but I can tell you its not 150lbs. All 150lbs will do is give you a broken bolt. Yea, I was pissed. I torqued them down to 36ft lbs after I extracted the stud and replaced the bolt. Have the FSM on hand and check torque specs for all bolts before putting them on
Take your new throwout bearing lock ring and attach it to the pressure plate, once the tranny is installed all you need to do is actuate the clutch to have it lock into position.
Now its time to mount the tranny, make sure there are no obstructions or wiring harness's in the way. The 5spd tranny is significantly lighter then the auto, so its a lot easier to manhandle. Once its in postition and the input shaft is aligned with the clutch disk start to move it forward. Attach a driveline and rotate to help get the splines aligned. You may need to take a prybar and lift the front of the engine to give it the proper angle. slide on without using bolts to tighten it up. Attach your bell housing bolts and your ready to go. This was kind of a pain. Have at least 2 jacks and a buddy to help out
Now its time to work the driveline. I kept my factory diff instead of buying a 5spd one. You can also remove the companion flange from the 5 spd diff and install on your auto diff, or you can do what I did. I pressed out the driveline flange U joints and swapped them from the auto to the 5 spd. Now I can use the 5 spd driveline and the auto diff. I'm not sure how he pressed out these U joints on the driveline as they are not replaceable. I just re-used the companion flange from the diff, and drilled out the bolt pattern from the new manual diff. There is also some trimming needed with a dremel for this to work.
Reinstall the DP if you removed
Install the Tranny / Diff support Beam.
Install all of the aluminum braces, except for the middle one, you will need to do that after the exhaust is installed.
I installed an aftermarket midpipe due to the poor condition of the Cat. Install the rest of your exhaust.
Install the center aluminum brace.
Connect the exhaust gas return hose and the temp sensor on the Cat.
Feed down the clutch actuator and install on the transmission, leave the upper hose laying in the engine compartment. I dropped the clutch line and slave down prior to installing the trans, there was a little more room, and I just kept it off to the side
Install and wire your starter (If you have one, I am still looking for one).
This is where getting those new 5 speed bell housing bolts comes in as you will need them for the starter. You will also need to get 1 nut from the hardware store for the long bolt
Lower the vehicle, we will do wiring at a later time, with pictures.
Wiring is actually easy. I kept the auto harness and ECU. If you do not wan't a clutch switch ie you don't need to depress the clutch to start the car, you just need to jump the 2 largest wires on the biggest auto harness plug.
For the reverse lights, on the same big plug, you want to cut the TOP LEFT 2 wires when you are looking AT THE PLUG END with the large wires on the bottom. Just connect these two wires with male/female spade connectors to the 2 wires from the sensor on the trans. If you leave the auto cluster or auto tach face, it will light up R still when you shift into reverse.
From the driverside interior unbolt the clutch mount block off plate, 2 12MM bolts and remove the block off plate. Place the slave cyl into the mount holes and prop it from behind to keep it from pushing back when you install the clutch pedal.
Remove the brake petal assembly ( or trim down your factory brake pedal ) by removing a cotter pin and brake plunger retention pin, remove the 7 12MM bolts (4 on the face of the mount 1 above, 2 on the steering column). Replace with your new brake petal assembly.
Install the Clutch petal assembly 3 12MM bolts (2 on the face, 1 above) Make sure to align the plunger into the slave cyl. Make sure your clutch pedal comes with this rod, mine didn't unfortunately. I just ordered one from Ray Crowe for about 5 bucks. To remove the brake pedal you need to drop the steering column.
Install the actuator hose assembly with the slave cyl. Remove the blockoff cap on your master cyl and quickly plug in the hose to the slave cyl. ensure all connections are tight. (There is no reason to replace your brake booster and master cyl, they are identical from the 5 spd to the Auto).
At this point I removed the dash, there are a metric **** ton of plastic interior pieces that need to be removed to do this, have fun and take your time. The only bolts that hold on the dash are 1 12mm bolt center dash by the defrost vent, remove access panel and remove bolt. 2 12MM bolts located driver side behind the door vent panel. 2 12MM bolts on the pass side same location. and 4 12MM bolts center console behind the leg rest panel and the opposite panel, you will need to remove the carpet panel to get to them (they are designed to be moved). Slowly pull the dash to find the plethora of cables that will need to be unplugged. Then remove dash. No need to do any of this if you keep the auto harness. The wiring part is already done.
Install the starter, the factory Auto harness will be used for the rest of the install. The starter harness installs the same from the auto to the man starter.
Fill the transmission with gear oil, check the service manual for factory recommended. I ran with Redline 90weight. Should take 2.5Q to fill.
The starter inhibitor can be bypassed by wiring the two larger wires on the big grey connector together. The connector should be located near the starter, it was the main harness connector to the auto tranny.
On the same harness you need to connect wire 2 and wire 7 to the reverse switch on the tranny. This will get your reverse lights to function. If you are looking at the connector, and the larger gauge wires are on the bottom, it is the top left wires. They are located right next to each other. (sorry no pics).
I changed out the entire dash rather than rewire the dash harness. Install you new harness, rewire your factory harness, or install your 5spd dash. Wire your gauge cluster, bolt up the steering column recheck all wiring harness's.
Fill the transmission shifter location with 90 weight and install the shifter center console and shift boot. Check your wiring harness connectors again.
You can run the factory automatic ECU with this setup. I picked up a PFC for my install but have yet to install it.
Test for your reverse lights, ensure your clutch line is bled, and your wiring harness's are connected properly. Start your car and break in that new clutch.
When you bleed the clutch, make sure the slave cylinder rod is properly engaged with the clutch fork. You can manually move the fork through an access port on the trans to ensure its good. Then just bleed the slave like a brake caliper
So I tried to edit with pictures and it took over 30 minutes and it has too many pics, so here's the updated post. Can a mod please combine the posts, or just leave them all as separate?
So I purchased my FD in December 2012. It was an auto and was definitely a project, but I've always wanted an FD and got it for a great price so here we are! First things first, get rid of that auto! I mainly used this swap thread https://www.rx7club.com/3rd-generati...p-step-925872/ along with the FSM. I've added my comments in bold below that will hopefully help others.
While the 5 speed was out, I also replaced the 5th gear synchro and some other parts, which I will write up later.
Figured that since I was able to get most of the information I needed to do the swap, I owed a clean tutorial on how I did it. Most of the information I found on the 3 main threads were really diluted, hopefully this thread will help out someone else with this swap.
Parts I used for the swap.
5spd tranny
Clutch
Man driveline
Dash from a 5spd including gauge cluster
Shifter
Clutch and Brake pedal assembly
Slave Cyl.
5 spd diff to tranny support
5spd Starter
5spd Flywheel
Might be a part or two I forgot to post here, but it should be in the install instructions.
Additional Parts
Master Cylinder and clutch lines
Throwout bearing
Pilot bearing and seal
Manual bell housing bolts
New flywheel bolts
3 Piece Rubber Boot
Leather shift boot and plastic surround
5 speed companion flange from diff, or drill out bolt pattern
Disconnect the battery, while you are there unbolt the breather hose from the auto transmission located on the back of the engine intake manifold. Remove the 2 14mm bellhousing bolts now, you will be glad you did when its up in the air.
If your hands don't fit like mine, it helps to jack up the back of the trans a little which angles the engine forward to allow for more space between the firewall and the engine. Makes it much easier to get your hands and tools down there.
In the interior of the vehicle, remove the center consol, unbolt the 4 10mm bolts from the shifter and unplug the one cable that attach's to the auto shifter. After you remove the driveline you will be able to pull the cotter pin from the shifter, then remove shifter.
Put the FD3S up in the air. Spray down the exhaust bolts where the DP and the Cat meet up.
A 50/50 mix of acetone and power steering fluid is the best solution, try it!
Remove said bolts. Factory Cat has two connections, one is a temp sensor, the other is the EGR BS tube, remove said connections.
With WD40 (50/50 solution as previously described), spray down the exhaust hangers, then pry out the posts with a flat head screw driver. Exhaust should be removed at this point.
There are a couple aluminum braces under the vehicle that need to be removed, keep the brace under the transmission for now, but remove the rear brace that goes thru the support beam.
remove the transmission / diff suport beam by unbolting the 4 21mm bolts off the tranmission, have someone hold the beam, remove the 5 bolts that attach the beam to the diff. With a little jiggling you should be able to remove the beam.
Place a tranny jack under the rear diff, then unbolt the 4 14mm driveline bolts. find a piece of metal to wedge under the diff to keep it from providing too much pressure on the diff mounts.
Pull the driveline.
If your tranny is level you should not leak any fluid when you pull the driveline.
Pull the cotter pin that attaches the shift linkage to the auto shifter, remove the shifter.
There is no drain bolt for the auto trannywhy mazda!?!?, remove the pleuthora of bolts holding the pan on from the rear and sides, keep the front bolts on, just loosen them up a little. Pry the pan and drain the fluid.Get a big cooking tray or something to catch the oil as this can get messy. Keep a few rags handy as well Once its drained enough remove the final bolts and drop the pan, drain and reinstall the pan.
Remove the starter by disconnecting the wires and removing the 3 14mm bolts and 1 14mm nut. This thing is a pain to get out, just leave it in, unbolted, and remove once the trans is out
remove the electrical connections from the auto tranny and push the wiring harness into the engine bay, out of the way.
On the left side of the tranny you will see the oil lines for the tranny cooler, remove the rubber connections and drain any remaining fluid out of the lines.
You can leave the oil cooler assembly in, and just cap these 2 ends, or remove everything
At this point the tranny should not have anything else connecting to it, verify.
remove the access pannel from the bottom of the bell housing, this is where you will unbolt the torque converter from the flexplate/flywheel. It is important to note this step, there isnt a whole lot of room to work under the car, leaving the torque converter on the flywheel will keep you from dropping the tranny.
To pull the torque converter you will need a large straight screwdriver to hold the flywheel, there is a notch in the bell housing to faciliate this. Position the first bolt where you have access to it and connect a 14mm wrench to it, with a breaker bar you will be able to remove this bolt. spin the flywheel till you get to the next bolt. There are 4 bolts holding it on, and they are torqued to about 150ft lbs or so. repeat until all bolts are removed.
These bolts are torqued down quite a bit as mentioned. Make sure the wrench is straight on so you dont strip the bolts. I stripped the last one and spent too many hours with a dremel in that small area grinding the head off
Tranny is now ready to be pulled place the tranny jack under the transmission, remove the 4 remaining 14 mm bolts from the bell housing (you will have to use a wobbler and a shitton of extentions to get two of them off, have fun). Again you can create some space by jacking certain parts of the engine or tranny
Once the tranny is unbolted it should easily pull from the engine, you will need to finess it around the DP. lower and place it out of the work area. I removed the DP since the gasket was garbage and had to replace the o2 sensor as well. You can get a single wire bosch sensor for autozone for $17, so don't waste your money on other ones
To pull the flexplate and you are going to need a 54mm socket and a hell of an impact gun (ImaKethings hooked me up in a big way letting me borrow his BFIG, surge tank, and socket. Thanks bro. If you dont have an impact gun you will need to figure out a way to lock down your flexplate. Don't waste your time with something other than an air impact gun
After the bolt is out I unbolted the flexplate (6 14mm bolts) and placed a pully puller to remove the counter balance. If you have a lightweight flywheel like I did, leave the counter balance on, theres no reason to remove it.
A quick inspection showed me that the rear main seal was starting to go bad, after a phone call Justin showed up with a new seal, and the pilot bearing. HUGE THANKS TO JUSTIN. Mine didn't have a rear main seal or pilot bearing, just ordered them from Ray Crowe, they're only a few bucks
The seal will press in by hand with a little lithium grease. Take your time and keep it centered. The pilot bearing takes a little work but easily slides into position with a few light taps of a hammer, and a socket.
While I was there I made a blockoff plate for the exhaust gas return with a little aluminum and copper RTV, wont be needing that anymore. Also found my stock catalytic converter was toast, good thing I had picked up a new midpipe. I just cut the EGR pipe and welded the end to seal, painted, then bolted it back on
You are now ready to install your flywheel, place some lithium grease on the main seal and the inside of the flywheel. You will also need to slab a little lube on where the key will sit, that will hold the key into the groove so your not F'ing with it. The flywheel should slide on easily, if it doesnt recheck the key to make sure it didnt slide off the groove. Torque down the 54mm nut to 350ft lbs.
Now its time to install your clutch. You have a clutch alignment tool right? I didnt, so I used an extension and electrical tape. works for me. center the clutch disk and install the pressure plate on the guide pins (Once again ImaKethings came thru for me. I didnt pick any up, so he kindly lathed 3 of them out for me. I owe you big time bro.). My lightweight flywheel had these pins on it already finger tighten down the 6 14mm clutch bolts. Then tighten down the bolts 1 then 4, 2 then 5, 3 then 6. Tighten down a little at a time to keep everything equal. eventually it should be tight. I dont know the exact spec for the flywheel, but I can tell you its not 150lbs. All 150lbs will do is give you a broken bolt. Yea, I was pissed. I torqued them down to 36ft lbs after I extracted the stud and replaced the bolt. Have the FSM on hand and check torque specs for all bolts before putting them on
Take your new throwout bearing lock ring and attach it to the pressure plate, once the tranny is installed all you need to do is actuate the clutch to have it lock into position.
I installed mine directly to the trans while it was out of the car
So I purchased my FD in December 2012. It was an auto and was definitely a project, but I've always wanted an FD and got it for a great price so here we are! First things first, get rid of that auto! I mainly used this swap thread https://www.rx7club.com/3rd-generati...p-step-925872/ along with the FSM. I've added my comments in bold below that will hopefully help others.
While the 5 speed was out, I also replaced the 5th gear synchro and some other parts, which I will write up later.
Figured that since I was able to get most of the information I needed to do the swap, I owed a clean tutorial on how I did it. Most of the information I found on the 3 main threads were really diluted, hopefully this thread will help out someone else with this swap.
Parts I used for the swap.
5spd tranny
Clutch
Man driveline
Dash from a 5spd including gauge cluster
Shifter
Clutch and Brake pedal assembly
Slave Cyl.
5 spd diff to tranny support
5spd Starter
5spd Flywheel
Might be a part or two I forgot to post here, but it should be in the install instructions.
Additional Parts
Master Cylinder and clutch lines
Throwout bearing
Pilot bearing and seal
Manual bell housing bolts
New flywheel bolts
3 Piece Rubber Boot
Leather shift boot and plastic surround
5 speed companion flange from diff, or drill out bolt pattern
Disconnect the battery, while you are there unbolt the breather hose from the auto transmission located on the back of the engine intake manifold. Remove the 2 14mm bellhousing bolts now, you will be glad you did when its up in the air.
If your hands don't fit like mine, it helps to jack up the back of the trans a little which angles the engine forward to allow for more space between the firewall and the engine. Makes it much easier to get your hands and tools down there.
In the interior of the vehicle, remove the center consol, unbolt the 4 10mm bolts from the shifter and unplug the one cable that attach's to the auto shifter. After you remove the driveline you will be able to pull the cotter pin from the shifter, then remove shifter.
Put the FD3S up in the air. Spray down the exhaust bolts where the DP and the Cat meet up.
A 50/50 mix of acetone and power steering fluid is the best solution, try it!
Remove said bolts. Factory Cat has two connections, one is a temp sensor, the other is the EGR BS tube, remove said connections.
With WD40 (50/50 solution as previously described), spray down the exhaust hangers, then pry out the posts with a flat head screw driver. Exhaust should be removed at this point.
There are a couple aluminum braces under the vehicle that need to be removed, keep the brace under the transmission for now, but remove the rear brace that goes thru the support beam.
remove the transmission / diff suport beam by unbolting the 4 21mm bolts off the tranmission, have someone hold the beam, remove the 5 bolts that attach the beam to the diff. With a little jiggling you should be able to remove the beam.
Place a tranny jack under the rear diff, then unbolt the 4 14mm driveline bolts. find a piece of metal to wedge under the diff to keep it from providing too much pressure on the diff mounts.
Pull the driveline.
If your tranny is level you should not leak any fluid when you pull the driveline.
Pull the cotter pin that attaches the shift linkage to the auto shifter, remove the shifter.
There is no drain bolt for the auto trannywhy mazda!?!?, remove the pleuthora of bolts holding the pan on from the rear and sides, keep the front bolts on, just loosen them up a little. Pry the pan and drain the fluid.Get a big cooking tray or something to catch the oil as this can get messy. Keep a few rags handy as well Once its drained enough remove the final bolts and drop the pan, drain and reinstall the pan.
Remove the starter by disconnecting the wires and removing the 3 14mm bolts and 1 14mm nut. This thing is a pain to get out, just leave it in, unbolted, and remove once the trans is out
remove the electrical connections from the auto tranny and push the wiring harness into the engine bay, out of the way.
On the left side of the tranny you will see the oil lines for the tranny cooler, remove the rubber connections and drain any remaining fluid out of the lines.
You can leave the oil cooler assembly in, and just cap these 2 ends, or remove everything
At this point the tranny should not have anything else connecting to it, verify.
remove the access pannel from the bottom of the bell housing, this is where you will unbolt the torque converter from the flexplate/flywheel. It is important to note this step, there isnt a whole lot of room to work under the car, leaving the torque converter on the flywheel will keep you from dropping the tranny.
To pull the torque converter you will need a large straight screwdriver to hold the flywheel, there is a notch in the bell housing to faciliate this. Position the first bolt where you have access to it and connect a 14mm wrench to it, with a breaker bar you will be able to remove this bolt. spin the flywheel till you get to the next bolt. There are 4 bolts holding it on, and they are torqued to about 150ft lbs or so. repeat until all bolts are removed.
These bolts are torqued down quite a bit as mentioned. Make sure the wrench is straight on so you dont strip the bolts. I stripped the last one and spent too many hours with a dremel in that small area grinding the head off

Tranny is now ready to be pulled place the tranny jack under the transmission, remove the 4 remaining 14 mm bolts from the bell housing (you will have to use a wobbler and a shitton of extentions to get two of them off, have fun). Again you can create some space by jacking certain parts of the engine or tranny
Once the tranny is unbolted it should easily pull from the engine, you will need to finess it around the DP. lower and place it out of the work area. I removed the DP since the gasket was garbage and had to replace the o2 sensor as well. You can get a single wire bosch sensor for autozone for $17, so don't waste your money on other ones
To pull the flexplate and you are going to need a 54mm socket and a hell of an impact gun (ImaKethings hooked me up in a big way letting me borrow his BFIG, surge tank, and socket. Thanks bro. If you dont have an impact gun you will need to figure out a way to lock down your flexplate. Don't waste your time with something other than an air impact gun
After the bolt is out I unbolted the flexplate (6 14mm bolts) and placed a pully puller to remove the counter balance. If you have a lightweight flywheel like I did, leave the counter balance on, theres no reason to remove it.
A quick inspection showed me that the rear main seal was starting to go bad, after a phone call Justin showed up with a new seal, and the pilot bearing. HUGE THANKS TO JUSTIN. Mine didn't have a rear main seal or pilot bearing, just ordered them from Ray Crowe, they're only a few bucks


The seal will press in by hand with a little lithium grease. Take your time and keep it centered. The pilot bearing takes a little work but easily slides into position with a few light taps of a hammer, and a socket.
While I was there I made a blockoff plate for the exhaust gas return with a little aluminum and copper RTV, wont be needing that anymore. Also found my stock catalytic converter was toast, good thing I had picked up a new midpipe. I just cut the EGR pipe and welded the end to seal, painted, then bolted it back on


You are now ready to install your flywheel, place some lithium grease on the main seal and the inside of the flywheel. You will also need to slab a little lube on where the key will sit, that will hold the key into the groove so your not F'ing with it. The flywheel should slide on easily, if it doesnt recheck the key to make sure it didnt slide off the groove. Torque down the 54mm nut to 350ft lbs.
Now its time to install your clutch. You have a clutch alignment tool right? I didnt, so I used an extension and electrical tape. works for me. center the clutch disk and install the pressure plate on the guide pins (Once again ImaKethings came thru for me. I didnt pick any up, so he kindly lathed 3 of them out for me. I owe you big time bro.). My lightweight flywheel had these pins on it already finger tighten down the 6 14mm clutch bolts. Then tighten down the bolts 1 then 4, 2 then 5, 3 then 6. Tighten down a little at a time to keep everything equal. eventually it should be tight. I dont know the exact spec for the flywheel, but I can tell you its not 150lbs. All 150lbs will do is give you a broken bolt. Yea, I was pissed. I torqued them down to 36ft lbs after I extracted the stud and replaced the bolt. Have the FSM on hand and check torque specs for all bolts before putting them on
Take your new throwout bearing lock ring and attach it to the pressure plate, once the tranny is installed all you need to do is actuate the clutch to have it lock into position.

I installed mine directly to the trans while it was out of the car


Last edited by airjordan223; May 27, 2013 at 11:36 AM.
Now its time to mount the tranny, make sure there are no obstructions or wiring harness's in the way. The 5spd tranny is significantly lighter then the auto, so its a lot easier to manhandle. Once its in postition and the input shaft is aligned with the clutch disk start to move it forward. Attach a driveline and rotate to help get the splines aligned. You may need to take a prybar and lift the front of the engine to give it the proper angle. slide on without using bolts to tighten it up. Attach your bell housing bolts and your ready to go. This was kind of a pain. Have at least 2 jacks and a buddy to help out
Now its time to work the driveline. I kept my factory diff instead of buying a 5spd one. You can also remove the companion flange from the 5 spd diff and install on your auto diff, or you can do what I did. I pressed out the driveline flange U joints and swapped them from the auto to the 5 spd. Now I can use the 5 spd driveline and the auto diff. I'm not sure how he pressed out these U joints on the driveline as they are not replaceable. I just re-used the companion flange from the diff, and drilled out the bolt pattern from the new manual diff. There is also some trimming needed with a dremel for this to work.
Reinstall the DP if you removed
Install the Tranny / Diff support Beam.
Install all of the aluminum braces, except for the middle one, you will need to do that after the exhaust is installed.
I installed an aftermarket midpipe due to the poor condition of the Cat. Install the rest of your exhaust.
Install the center aluminum brace.
Connect the exhaust gas return hose and the temp sensor on the Cat.
Feed down the clutch actuator and install on the transmission, leave the upper hose laying in the engine compartment. I dropped the clutch line and slave down prior to installing the trans, there was a little more room, and I just kept it off to the side
Now its time to work the driveline. I kept my factory diff instead of buying a 5spd one. You can also remove the companion flange from the 5 spd diff and install on your auto diff, or you can do what I did. I pressed out the driveline flange U joints and swapped them from the auto to the 5 spd. Now I can use the 5 spd driveline and the auto diff. I'm not sure how he pressed out these U joints on the driveline as they are not replaceable. I just re-used the companion flange from the diff, and drilled out the bolt pattern from the new manual diff. There is also some trimming needed with a dremel for this to work.


Reinstall the DP if you removed
Install the Tranny / Diff support Beam.
Install all of the aluminum braces, except for the middle one, you will need to do that after the exhaust is installed.
I installed an aftermarket midpipe due to the poor condition of the Cat. Install the rest of your exhaust.
Install the center aluminum brace.
Connect the exhaust gas return hose and the temp sensor on the Cat.
Feed down the clutch actuator and install on the transmission, leave the upper hose laying in the engine compartment. I dropped the clutch line and slave down prior to installing the trans, there was a little more room, and I just kept it off to the side
Install and wire your starter (If you have one, I am still looking for one).
This is where getting those new 5 speed bell housing bolts comes in as you will need them for the starter. You will also need to get 1 nut from the hardware store for the long bolt

Lower the vehicle, we will do wiring at a later time, with pictures.
Wiring is actually easy. I kept the auto harness and ECU. If you do not wan't a clutch switch ie you don't need to depress the clutch to start the car, you just need to jump the 2 largest wires on the biggest auto harness plug.
This is the connector you need for reverse and starter
Make a jumper wire out of 10 gauge
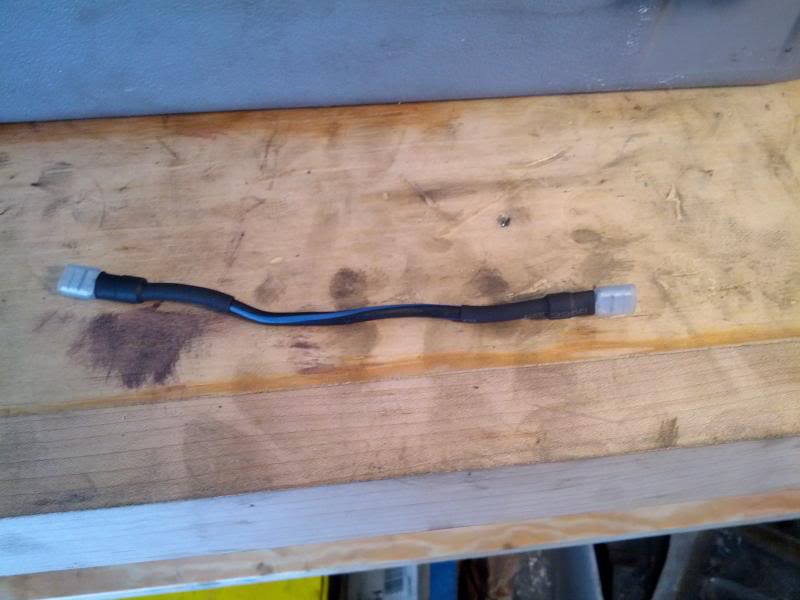
Do it right with good FEMALE spade connectors and heat shrink

And connect the larger terminals corresponding to the large wires on the harness
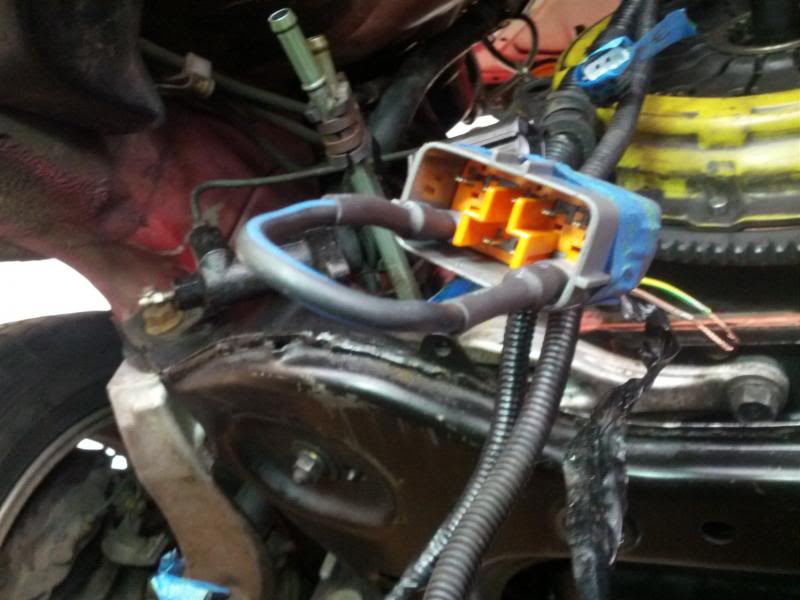
For the reverse lights, on the same big plug, you want to cut the TOP LEFT 2 wires when you are looking AT THE PLUG END with the large wires on the bottom. Just connect these two wires with male/female spade connectors to the 2 wires from the sensor on the trans. If you leave the auto cluster or auto tach face, it will light up R still when you shift into reverse. It's good to label the connectors before the trans goes in so you're not fishing around under the car
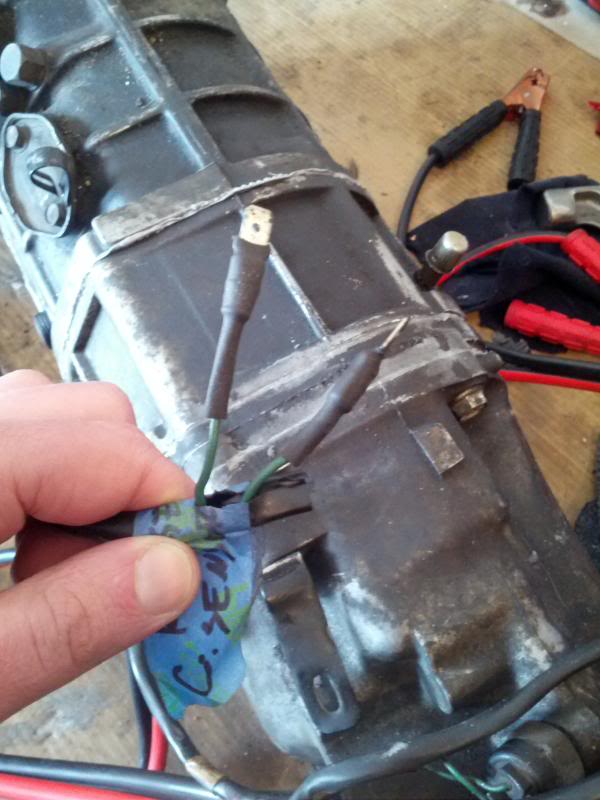
On the trans, cut the plug and add MALE spade connectors to the two green wires. These will connect to the the two wires on the TOP LEFT of the large plug previously used in the step above
From the driverside interior unbolt the clutch mount block off plate, 2 12MM bolts and remove the block off plate. Place the slave cyl into the mount holes and prop it from behind to keep it from pushing back when you install the clutch pedal.
Remove the brake petal assembly ( or trim down your factory brake pedal ) by removing a cotter pin and brake plunger retention pin, remove the 7 12MM bolts (4 on the face of the mount 1 above, 2 on the steering column). Replace with your new brake petal assembly.
Install the Clutch petal assembly 3 12MM bolts (2 on the face, 1 above) Make sure to align the plunger into the slave cyl. Make sure your clutch pedal comes with this rod, mine didn't unfortunately. I just ordered one from Ray Crowe for about 5 bucks. To remove the brake pedal you need to drop the steering column.
Install the actuator hose assembly with the slave cyl. Remove the blockoff cap on your master cyl and quickly plug in the hose to the slave cyl. ensure all connections are tight. (There is no reason to replace your brake booster and master cyl, they are identical from the 5 spd to the Auto).
Unbolt your cruise control unit and move it out of the way for this step. You'll need to buy some hose to do this. Use a clamp to keep it sealed. Leave the cruise out of the way until the clutch is in and bled
At this point I removed the dash, there are a metric **** ton of plastic interior pieces that need to be removed to do this, have fun and take your time. The only bolts that hold on the dash are 1 12mm bolt center dash by the defrost vent, remove access panel and remove bolt. 2 12MM bolts located driver side behind the door vent panel. 2 12MM bolts on the pass side same location. and 4 12MM bolts center console behind the leg rest panel and the opposite panel, you will need to remove the carpet panel to get to them (they are designed to be moved). Slowly pull the dash to find the plethora of cables that will need to be unplugged. Then remove dash. No need to do any of this if you keep the auto harness. The wiring part is already done.
Install the starter, the factory Auto harness will be used for the rest of the install. The starter harness installs the same from the auto to the man starter.
Fill the transmission with gear oil, check the service manual for factory recommended. I ran with Redline 90weight. Should take 2.5Q to fill.
The starter inhibitor can be bypassed by wiring the two larger wires on the big grey connector together. The connector should be located near the starter, it was the main harness connector to the auto tranny.
On the same harness you need to connect wire 2 and wire 7 to the reverse switch on the tranny. This will get your reverse lights to function. If you are looking at the connector, and the larger gauge wires are on the bottom, it is the top left wires. They are located right next to each other. (sorry no pics).
I changed out the entire dash rather than rewire the dash harness. Install you new harness, rewire your factory harness, or install your 5spd dash. Wire your gauge cluster, bolt up the steering column recheck all wiring harness's.
Fill the transmission shifter location with 90 weight and install the shifter center console and shift boot. Check your wiring harness connectors again.
You can run the factory automatic ECU with this setup. I picked up a PFC for my install but have yet to install it.
Test for your reverse lights, ensure your clutch line is bled, and your wiring harness's are connected properly. Start your car and break in that new clutch.
When you bleed the clutch, make sure the slave cylinder rod is properly engaged with the clutch fork. You can manually move the fork through an access port on the trans to ensure its good. Then just bleed the slave like a brake caliper
Install the 3 piece rubber boot. This keeps all the heat and road noise out of the cabin. Then in stall your leather boot and shift ****
This is where getting those new 5 speed bell housing bolts comes in as you will need them for the starter. You will also need to get 1 nut from the hardware store for the long bolt


Lower the vehicle, we will do wiring at a later time, with pictures.
Wiring is actually easy. I kept the auto harness and ECU. If you do not wan't a clutch switch ie you don't need to depress the clutch to start the car, you just need to jump the 2 largest wires on the biggest auto harness plug.
This is the connector you need for reverse and starter

Make a jumper wire out of 10 gauge

Do it right with good FEMALE spade connectors and heat shrink

And connect the larger terminals corresponding to the large wires on the harness

For the reverse lights, on the same big plug, you want to cut the TOP LEFT 2 wires when you are looking AT THE PLUG END with the large wires on the bottom. Just connect these two wires with male/female spade connectors to the 2 wires from the sensor on the trans. If you leave the auto cluster or auto tach face, it will light up R still when you shift into reverse. It's good to label the connectors before the trans goes in so you're not fishing around under the car
On the trans, cut the plug and add MALE spade connectors to the two green wires. These will connect to the the two wires on the TOP LEFT of the large plug previously used in the step above

From the driverside interior unbolt the clutch mount block off plate, 2 12MM bolts and remove the block off plate. Place the slave cyl into the mount holes and prop it from behind to keep it from pushing back when you install the clutch pedal.
Remove the brake petal assembly ( or trim down your factory brake pedal ) by removing a cotter pin and brake plunger retention pin, remove the 7 12MM bolts (4 on the face of the mount 1 above, 2 on the steering column). Replace with your new brake petal assembly.
Install the Clutch petal assembly 3 12MM bolts (2 on the face, 1 above) Make sure to align the plunger into the slave cyl. Make sure your clutch pedal comes with this rod, mine didn't unfortunately. I just ordered one from Ray Crowe for about 5 bucks. To remove the brake pedal you need to drop the steering column.

Install the actuator hose assembly with the slave cyl. Remove the blockoff cap on your master cyl and quickly plug in the hose to the slave cyl. ensure all connections are tight. (There is no reason to replace your brake booster and master cyl, they are identical from the 5 spd to the Auto).
Unbolt your cruise control unit and move it out of the way for this step. You'll need to buy some hose to do this. Use a clamp to keep it sealed. Leave the cruise out of the way until the clutch is in and bled

At this point I removed the dash, there are a metric **** ton of plastic interior pieces that need to be removed to do this, have fun and take your time. The only bolts that hold on the dash are 1 12mm bolt center dash by the defrost vent, remove access panel and remove bolt. 2 12MM bolts located driver side behind the door vent panel. 2 12MM bolts on the pass side same location. and 4 12MM bolts center console behind the leg rest panel and the opposite panel, you will need to remove the carpet panel to get to them (they are designed to be moved). Slowly pull the dash to find the plethora of cables that will need to be unplugged. Then remove dash. No need to do any of this if you keep the auto harness. The wiring part is already done.
Install the starter, the factory Auto harness will be used for the rest of the install. The starter harness installs the same from the auto to the man starter.
Fill the transmission with gear oil, check the service manual for factory recommended. I ran with Redline 90weight. Should take 2.5Q to fill.
The starter inhibitor can be bypassed by wiring the two larger wires on the big grey connector together. The connector should be located near the starter, it was the main harness connector to the auto tranny.
On the same harness you need to connect wire 2 and wire 7 to the reverse switch on the tranny. This will get your reverse lights to function. If you are looking at the connector, and the larger gauge wires are on the bottom, it is the top left wires. They are located right next to each other. (sorry no pics).
I changed out the entire dash rather than rewire the dash harness. Install you new harness, rewire your factory harness, or install your 5spd dash. Wire your gauge cluster, bolt up the steering column recheck all wiring harness's.
Fill the transmission shifter location with 90 weight and install the shifter center console and shift boot. Check your wiring harness connectors again.
You can run the factory automatic ECU with this setup. I picked up a PFC for my install but have yet to install it.
Test for your reverse lights, ensure your clutch line is bled, and your wiring harness's are connected properly. Start your car and break in that new clutch.
When you bleed the clutch, make sure the slave cylinder rod is properly engaged with the clutch fork. You can manually move the fork through an access port on the trans to ensure its good. Then just bleed the slave like a brake caliper
Install the 3 piece rubber boot. This keeps all the heat and road noise out of the cabin. Then in stall your leather boot and shift ****

Thread
Thread Starter
Forum
Replies
Last Post
Azevedo
Other Engine Conversions - non V-8
26
Mar 1, 2019 09:19 PM