
Let the fun begin

ELO will lift the paint off without much effort and not damage the plastics. It's well worth getting some and keeping it around.  If the hobby shop doesn't carry it any longer, see if they have something comparable. Models will have the same requirements (i.e. remove paint but keep plastic safe).
If the hobby shop doesn't carry it any longer, see if they have something comparable. Models will have the same requirements (i.e. remove paint but keep plastic safe).

I used black Duplicolor sandable primer fallowed with 100grit wet and then finished it off with Duplicolor vinyl die spray paint in semi gloss.
Wow, that factory finish sure is strong. Finally "cut" through it tonight. I ended up using EasyOff Oven Cleaner (Blue Can), and some steel wool. I was worried about the cleaner eating the plastic so I sprayed it and immediately started scrubbing. After I got done I rinsed it with the garden hose and examined. A few spots where it didn't do good enough, so I sprayed again, let it sit for a minute and scrubbed. Rinsed it off, couldn't see anymore gunk on it. Scuffed it with some 220 sandpaper and then washed it with soap & water. Let it dry for awhile with the aid of my wifes hairdryer and then put down a basecoat. Looks better already IMO.
Here's what it looked liked starting off. Keep in mind this is hours after soaking in goo gone & probably an hour of scrubbing with scotch pads:

Now after first coat:

Here's what it looked liked starting off. Keep in mind this is hours after soaking in goo gone & probably an hour of scrubbing with scotch pads:
Now after first coat:

Supposedly this stuff is the sh*t.
http://www.medsproducts.com/renufinish.html
I ordered some and will be trying it out on my weather beaten exterior plastic parts soon.
http://www.medsproducts.com/renufinish.html
I ordered some and will be trying it out on my weather beaten exterior plastic parts soon.
Supposedly this stuff is the sh*t.
http://www.medsproducts.com/renufinish.html
http://www.medsproducts.com/renufinish.html
Step 2 - Application
• Apply a small amount of stain to application pad.
• Clean drips or spills around trim and on painted surfaces with soapy solution or window cleaner and included towel. (If stain is left on painted surface for over 1 hour it will be difficult to remove.)
Depending on climate and exposure to the elements, treatment will last up to 12 months.
Ok, so I've got my fourth coat dried. It's hard to take a good picture of this inside because the flash shines it up. I don't know if I'm being too picky, so kinda needs some opinions/help. I found a couple spots after looking this over and found some nicks within the plastic. I'm guessing that they are there from someone using a screwdriver to pry out the other parts..I know it wasn't me because I used a soft cake spatula. Should I sand these down further or just leave as is? I don't know if it's worth the added trouble. Secondly, there are a few random dark spots in the paint. It was hard to get a good picture of it but it almost looks like it was dotted with a sharpie in a couple spots. I'm not very experienced with spray painting so I don't know if I did something wrong, if so what can I do differently? Should I try to repaint over these with a 5th coat or sand them out and repaint again?
nick on upper left, dark spot lower right.

Overall view for now:

nick on upper left, dark spot lower right.
Overall view for now:

Yep, planning to do the gauge cluster/hood, console, a/c panel, passenger door, and windshield wipers. My A/C panel and guage cluster is NASTY! I really like how this finish coat appears so I will probably redo my windshield plastic piece, intake box, and intake elbow. I'm also going fix try to fix the passenger handle (cracked at upper end), before I repaint it. I also find some reinforcing ideas I want to try. I would like to get a solid sakebomb handle, but $400 for a handle (that might be used 10 times a year) just doesn't make sense in my mind.
I started with the driver door because on Easter Sunday I wanted to drive my car to up to my parents for dinner. Well the day before that I took off the door skins to install the speakers and they were still off Sunday morning, and my wife wouldn't ride in the FD if I didn't put the door skin back on her side. Being the generous husband I am, I obliged and put the passenger door skin back on. So instead of taking the passengers side off again just to start testing this painting process I started with the driver door plastics.
I started with the driver door because on Easter Sunday I wanted to drive my car to up to my parents for dinner. Well the day before that I took off the door skins to install the speakers and they were still off Sunday morning, and my wife wouldn't ride in the FD if I didn't put the door skin back on her side. Being the generous husband I am, I obliged and put the passenger door skin back on.
So instead of taking the passengers side off again just to start testing this painting process I started with the driver door plastics.
Yep, planning to do the gauge cluster/hood, console, a/c panel, passenger door, and windshield wipers. My A/C panel & gauge cluster are NASTY! I really like how this finish coat appears so I will probably redo my windshield plastic piece, intake box, and intake elbow. I'm also going fix try to fix the passenger handle (cracked at upper end), before I repaint it. I also find some reinforcing ideas I want to try. I would like to get a solid sakebomb handle, but $400 for a handle (that might be used 10 times a year) just doesn't make sense in my mind.
I started with the driver door because on Easter Sunday I wanted to drive my car to up to my parents for dinner. Well the day before that I took off the door skins to install the speakers and they were still off Sunday morning, and my wife wouldn't ride in the FD if I didn't put the door skin back on her side. Being the generous husband I am, I obliged and put the passenger door skin back on. So instead of taking the passengers side off again just to start testing this painting process I started with the driver door plastics.
My biggest problem at the moment is time/energy. Between work (50-60hrs/week) and 2 nights of classes per week, I just don't feel like I have enough time/energy to put into the car at the moment. I can't wait for this semester to be over.
OK, finally was able to finish putting the driver door together this morning. Too much stuff to do and too little time.
Before:
Typical sticky finish from '93. Speaker grill had a few rust spots.

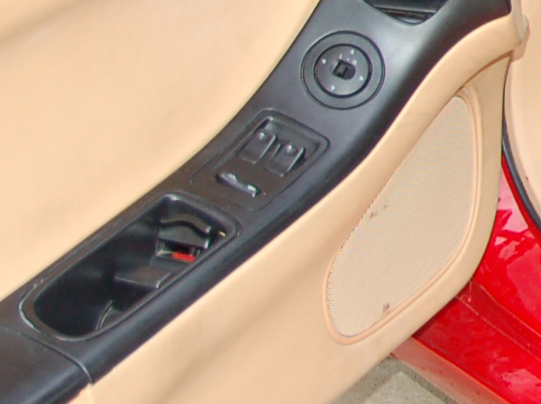
Now:
1st picture came out a little lighter than actual, I think the flash went off. I hard a hard time finding a paint to match the factory finish for the grill cover. It's a little lighter than factory, but I'd rather have it a little lighter than have rust spots.


Before:
Typical sticky finish from '93. Speaker grill had a few rust spots.
Now:
1st picture came out a little lighter than actual, I think the flash went off. I hard a hard time finding a paint to match the factory finish for the grill cover. It's a little lighter than factory, but I'd rather have it a little lighter than have rust spots.

Thread
Thread Starter
Forum
Replies
Last Post