Anthony's Build Thread
 04-19-15, 08:32 PM
#76
Working on my car.
Thread Starter
iTrader: (7)
Join Date: May 2006
Location: Los Angeles, CA
Posts: 594
Likes: 0
Received 0 Likes
on
0 Posts
Another update:
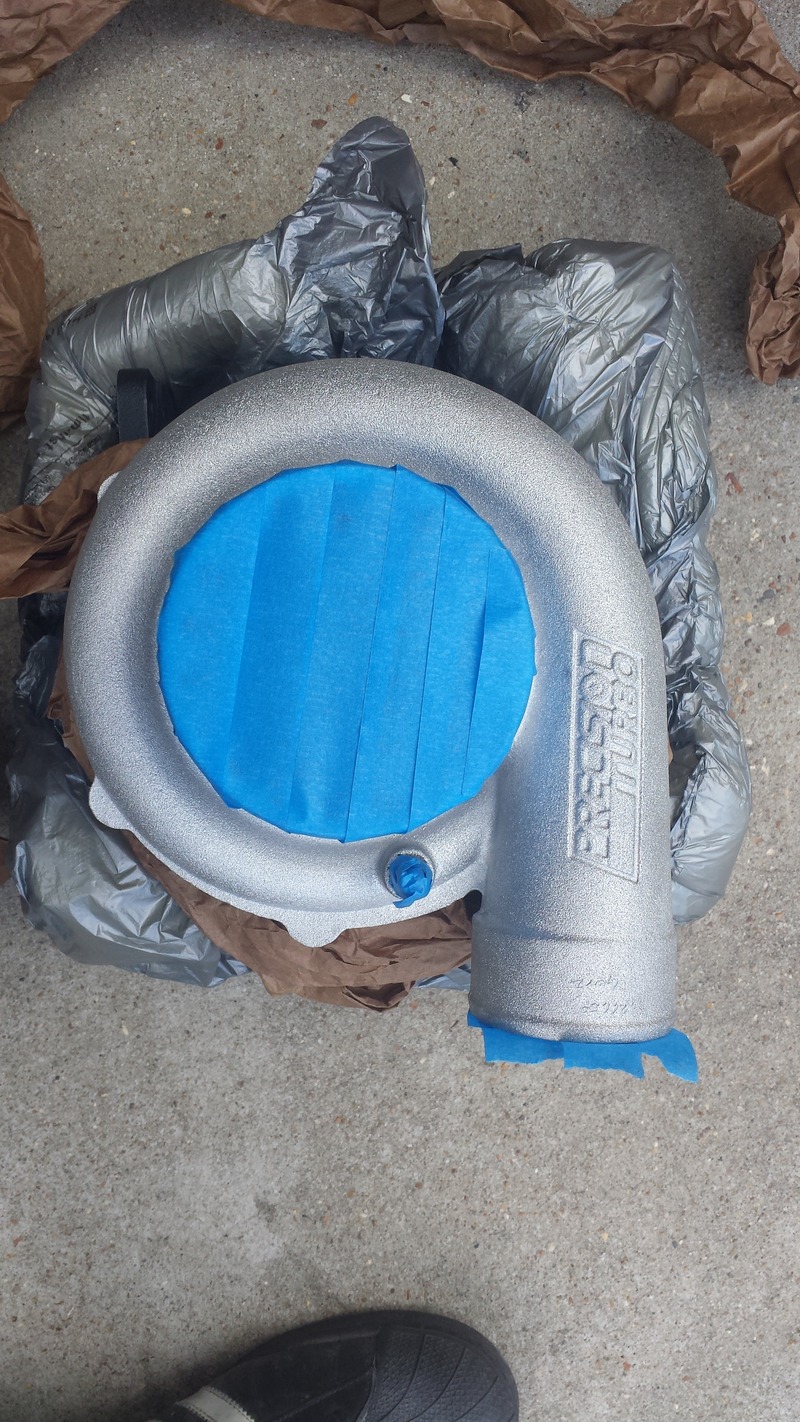
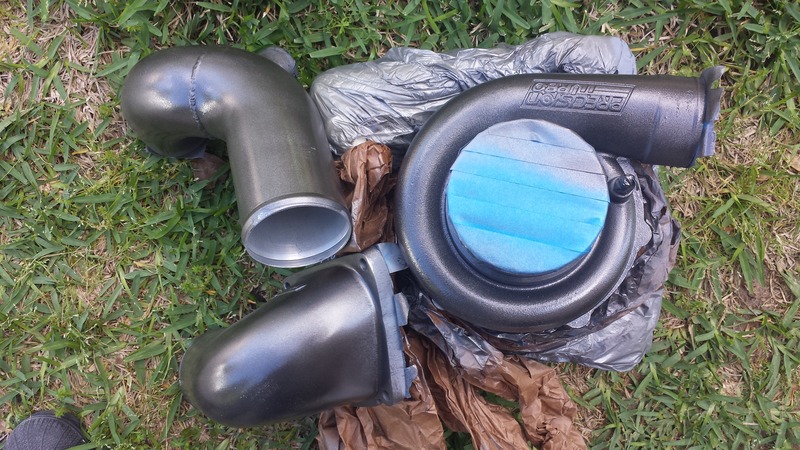
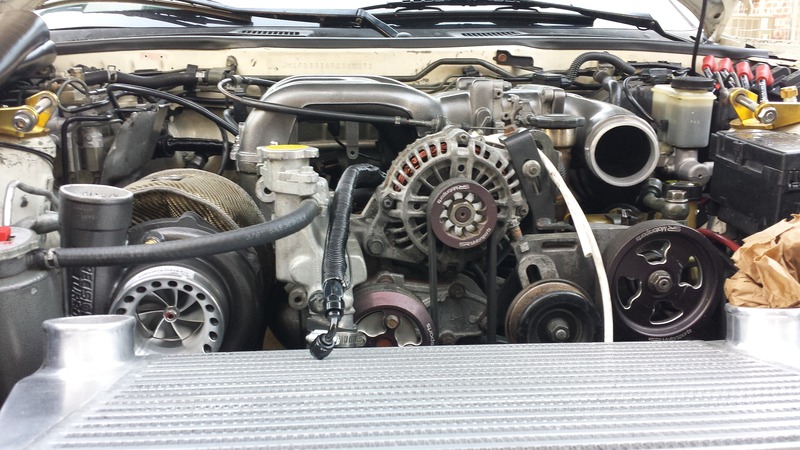
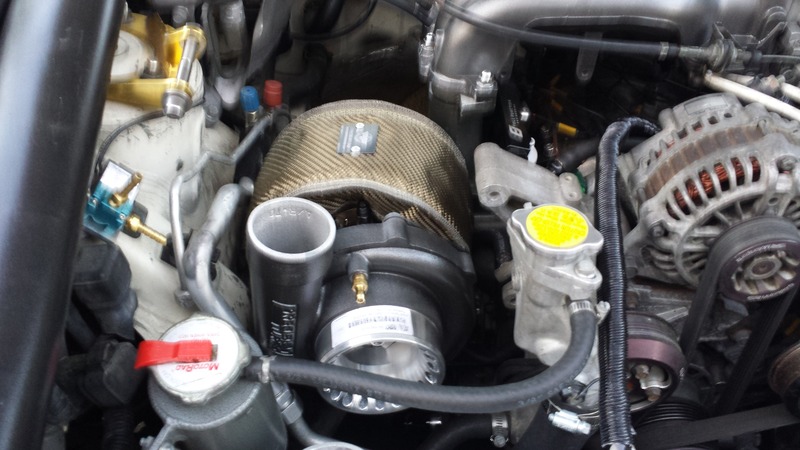
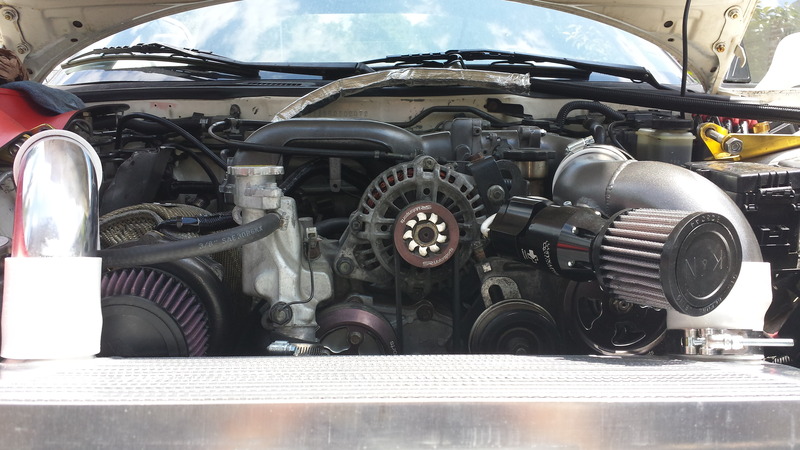
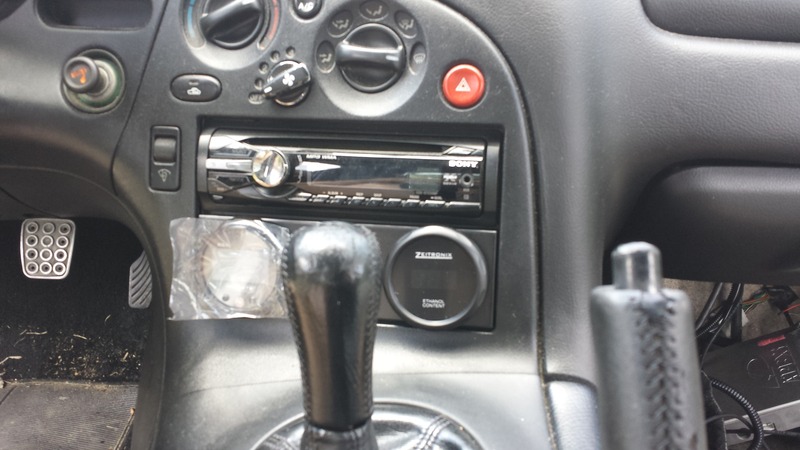
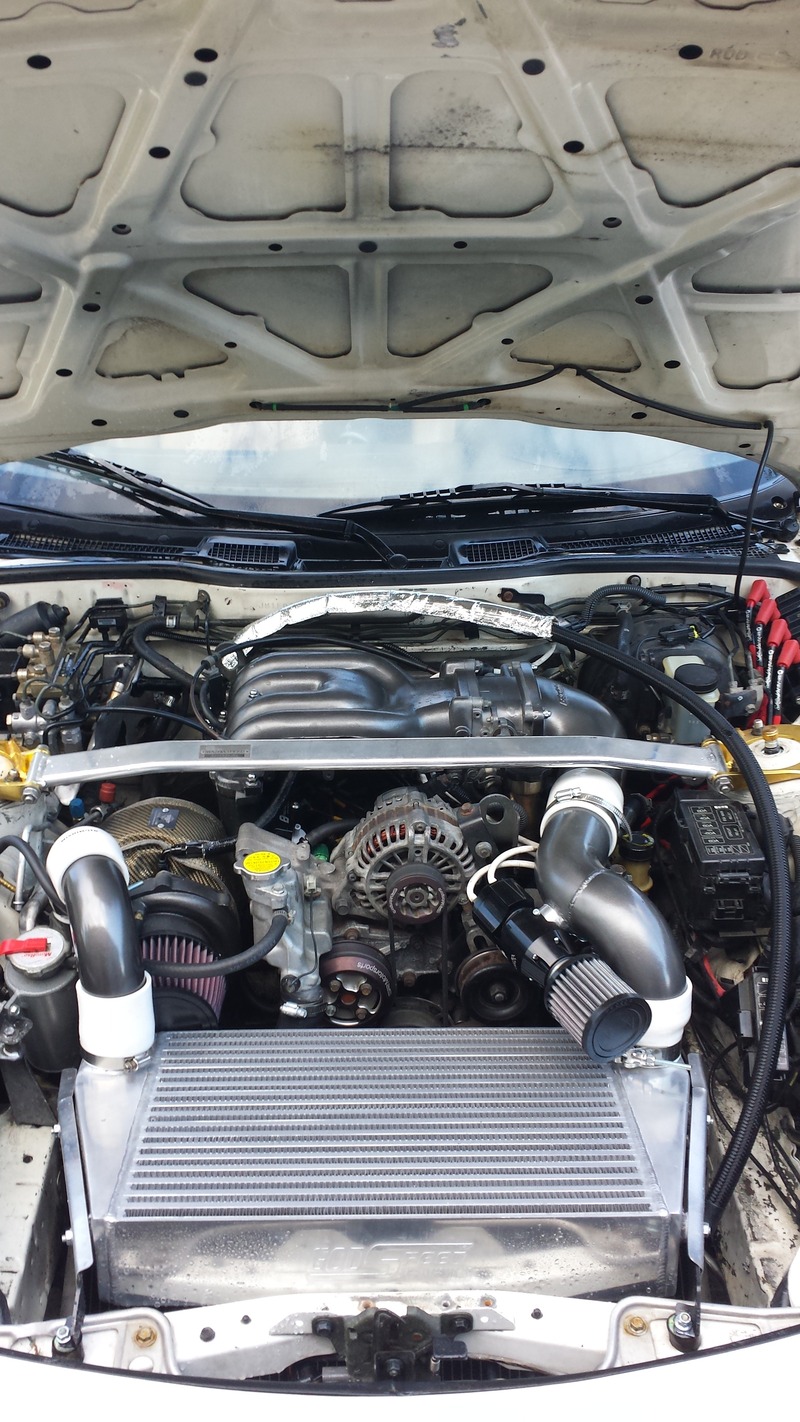
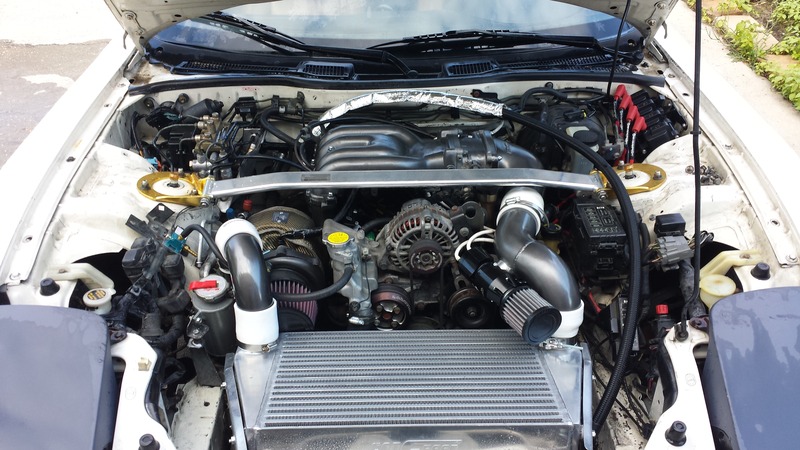
Did a sort of mock-up with the turbo today to see where it would sit relative to the intercooler and other things. Long story short, I'm going to need to find some interesting ways to pipe the the turbo to the intercooler. Also, the compressor inlet is quite close to the intercooler so I'm going to need a very short intake filter. I installed and ran the wires into the cabin for my Ethanol content analyzer and for my Innovate SGC1 (boost controller/gauge, AFR controller/gauge), it's a pretty neat piece. I figured I would get as many things as I could on as few gauges as I could. I dont like the "7 gauge cluster bomb" that people set off in their cars as soon as they get all kinds of bells and whistles. I want my interior to be slightly minimalistic but have all the right things. I've got one spot left in my gauge panel and I think I'm going to put an oil temp gauge in it, I haven't really decided yet.
I spent most of my time today running those wires and finding places to route all kinds of stuff. I also painted the compressor housing, intercooler pipe, greddy elbow and my UIM. They are all the same color and I'm going to get white couplers for contrast. Eventually when I repaint my engine bay, they will probably look really nice with everything being painted the way I want it.
On to pics!
Next week, my manifold, downpipe and the rest of my fittings and such should be here. All that's left is my catch can. I have no idea where I'm going to mount it but there are a few possibilities I am looking at right now. Next time, pics of my interior and hopefully everything installed and ready for start up!
Did a sort of mock-up with the turbo today to see where it would sit relative to the intercooler and other things. Long story short, I'm going to need to find some interesting ways to pipe the the turbo to the intercooler. Also, the compressor inlet is quite close to the intercooler so I'm going to need a very short intake filter. I installed and ran the wires into the cabin for my Ethanol content analyzer and for my Innovate SGC1 (boost controller/gauge, AFR controller/gauge), it's a pretty neat piece. I figured I would get as many things as I could on as few gauges as I could. I dont like the "7 gauge cluster bomb" that people set off in their cars as soon as they get all kinds of bells and whistles. I want my interior to be slightly minimalistic but have all the right things. I've got one spot left in my gauge panel and I think I'm going to put an oil temp gauge in it, I haven't really decided yet.
I spent most of my time today running those wires and finding places to route all kinds of stuff. I also painted the compressor housing, intercooler pipe, greddy elbow and my UIM. They are all the same color and I'm going to get white couplers for contrast. Eventually when I repaint my engine bay, they will probably look really nice with everything being painted the way I want it.
On to pics!


Next week, my manifold, downpipe and the rest of my fittings and such should be here. All that's left is my catch can. I have no idea where I'm going to mount it but there are a few possibilities I am looking at right now. Next time, pics of my interior and hopefully everything installed and ready for start up!
 05-03-15, 06:54 PM
#77
Working on my car.
Thread Starter
iTrader: (7)
Join Date: May 2006
Location: Los Angeles, CA
Posts: 594
Likes: 0
Received 0 Likes
on
0 Posts
Update with a bunch of pics!
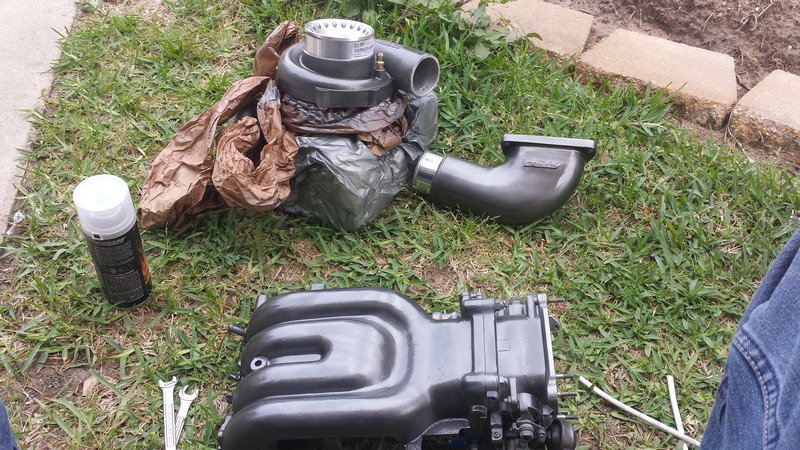
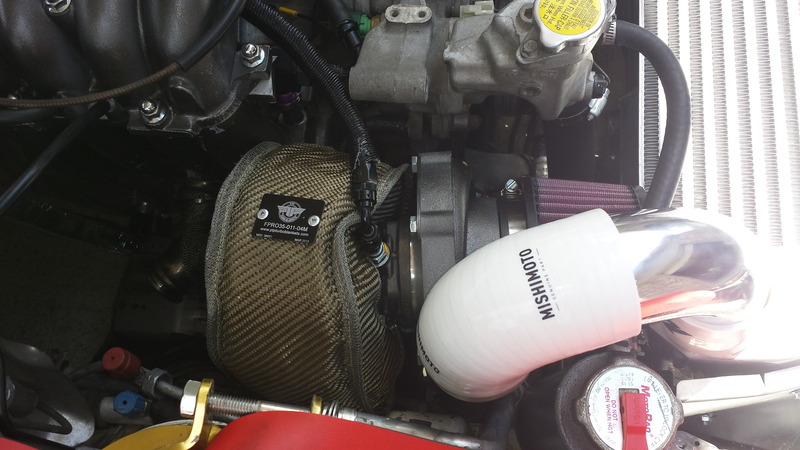
Yesterday I got to work pretty heavy on my turbo components. My manifold came in along with 8 other boxes that each had like one item in. Summit racing likes to just ship whatever they have in stock instead of waiting for it all to get there and send it all out in one box. Needless to say, there were about 9 boxes sitting in Tony's living room. 2 couplers in one, clamps in another, spark plugs, manifold...etc. After getting all the boxes opened up and organized, my order of events was planned out:
-Put heat wrap on manifold
-Lava blanket on turbo
-install manifold
-install turbo
Well it seemed that easy to start with but I had problems getting hardware into the holes so Tony recommended that I take the turbo and manifold out, bolt them together then reinstall it all into the car at the same time as one unit. I did, and it worked.
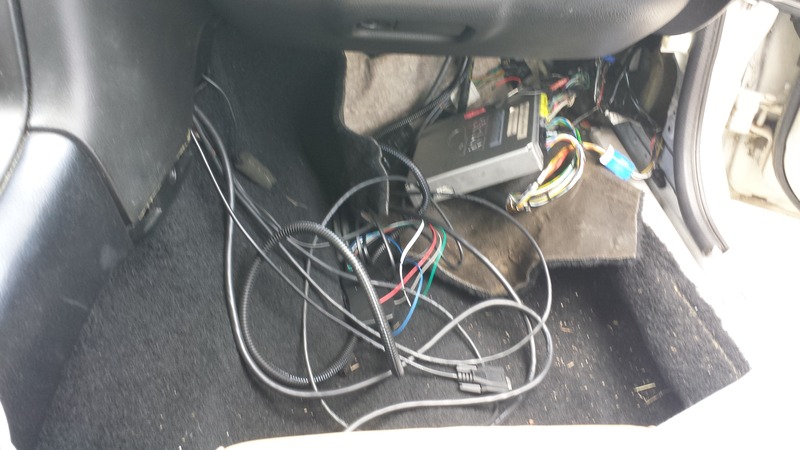
I also got to work on the interior. I installed my Innovage SCG 1 and my Zeitronics Ethanol analyzer. The directions were easy to read and all the wiring made sense. I got a ecu pinout pic from one of the threads floating around on here somewhere and got to work. Burned myself once with a soldering iron and once with a heat gun...
Anyway, here are the pics:
Good quality wrap, but I dont really like the metal tie clamps that I bought with them. I think I'm going to change those out for actual hose clamps some day...
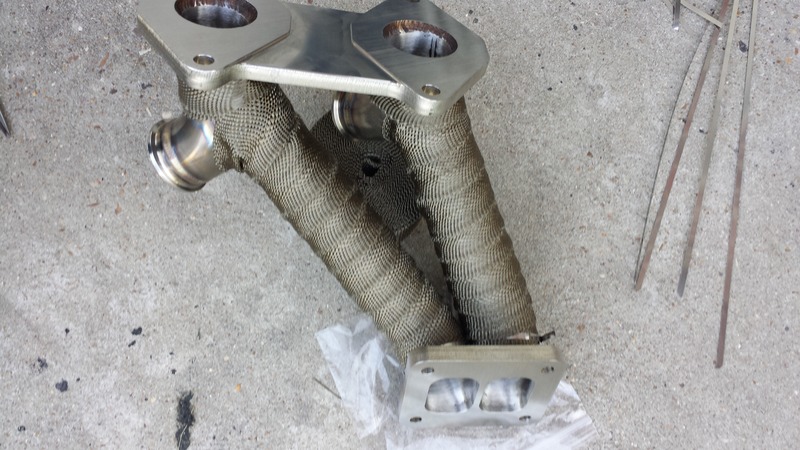
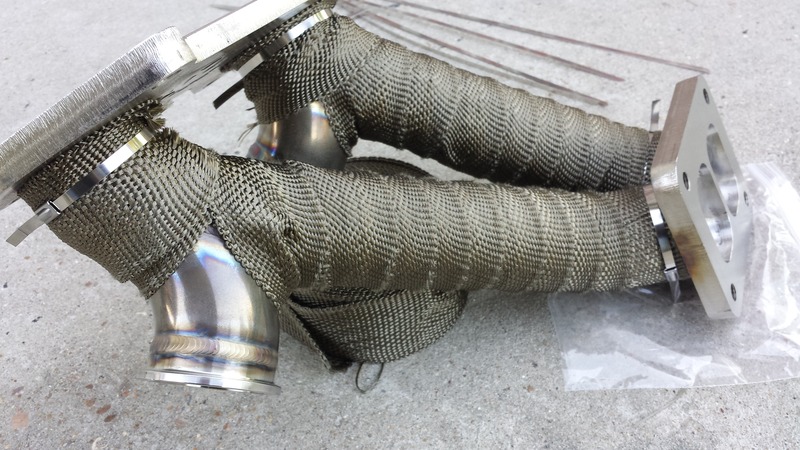
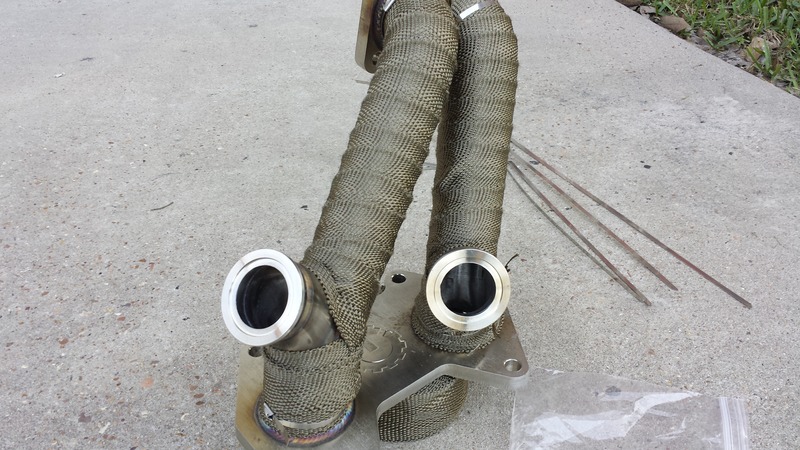
Did a test fit with just the turbo
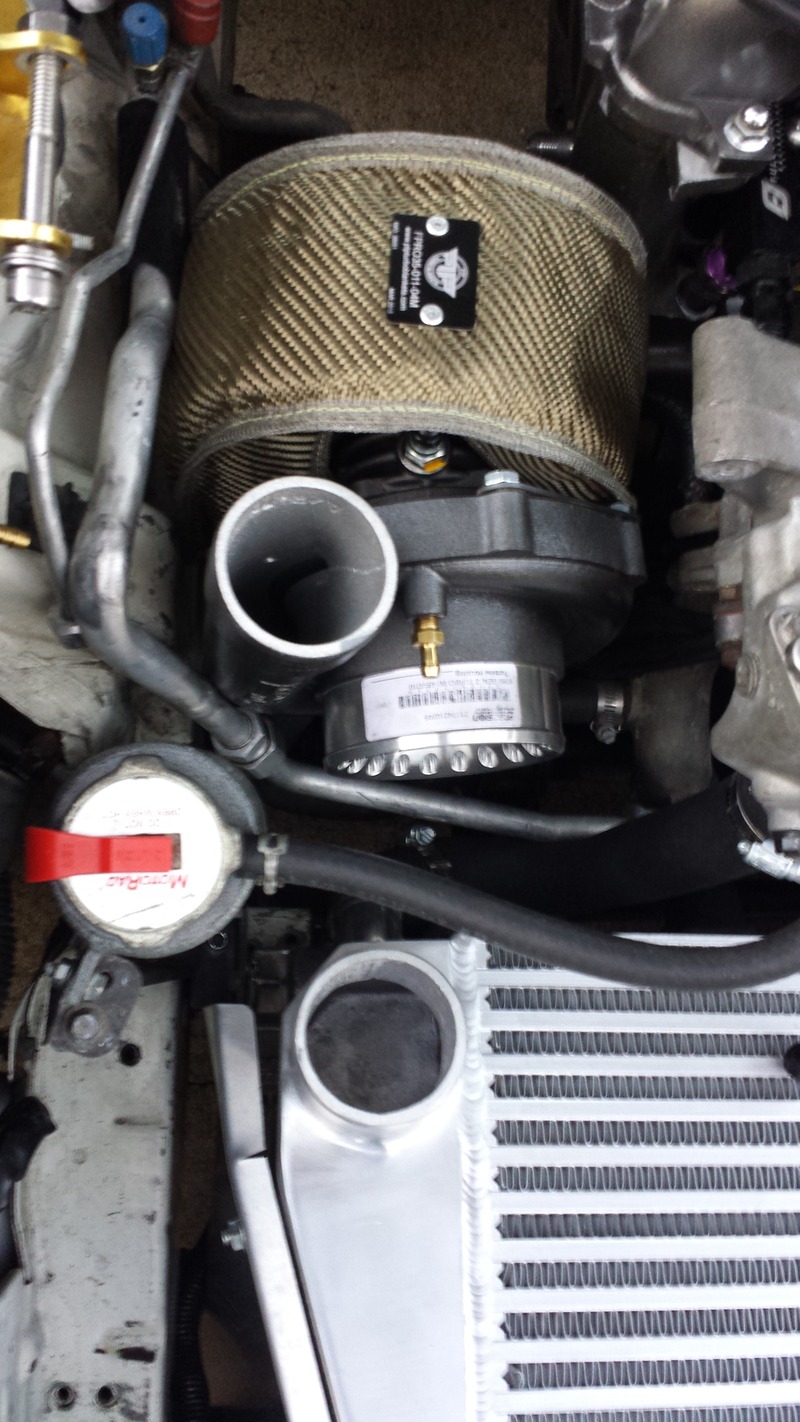
Once the test fit was complete and I was satisfied, I installed the manifold, turbo, blanket and hooked up all the lines, which included stabbing my fingers twice while installing the oil drain line on the bottom. That braided steel line frayed and poked the crap out of my fingers. I was test fitting the compressor outlet pipe in these pics.
Once I got through all that I started working on the interior a little bit. I installed my two gauges and did the wiring. I haven't routed it all yet but I will make sure to make it look nice fairly soon. I also have a mouse problem. I expect that I may have one living in my passenger seat because I found some mouse poop on the seat and well...the car has been sitting for a while.
Yesterday I got to work pretty heavy on my turbo components. My manifold came in along with 8 other boxes that each had like one item in. Summit racing likes to just ship whatever they have in stock instead of waiting for it all to get there and send it all out in one box. Needless to say, there were about 9 boxes sitting in Tony's living room. 2 couplers in one, clamps in another, spark plugs, manifold...etc. After getting all the boxes opened up and organized, my order of events was planned out:
-Put heat wrap on manifold
-Lava blanket on turbo
-install manifold
-install turbo
Well it seemed that easy to start with but I had problems getting hardware into the holes so Tony recommended that I take the turbo and manifold out, bolt them together then reinstall it all into the car at the same time as one unit. I did, and it worked.
I also got to work on the interior. I installed my Innovage SCG 1 and my Zeitronics Ethanol analyzer. The directions were easy to read and all the wiring made sense. I got a ecu pinout pic from one of the threads floating around on here somewhere and got to work. Burned myself once with a soldering iron and once with a heat gun...
Anyway, here are the pics:
Good quality wrap, but I dont really like the metal tie clamps that I bought with them. I think I'm going to change those out for actual hose clamps some day...


Did a test fit with just the turbo


Once the test fit was complete and I was satisfied, I installed the manifold, turbo, blanket and hooked up all the lines, which included stabbing my fingers twice while installing the oil drain line on the bottom. That braided steel line frayed and poked the crap out of my fingers. I was test fitting the compressor outlet pipe in these pics.


Once I got through all that I started working on the interior a little bit. I installed my two gauges and did the wiring. I haven't routed it all yet but I will make sure to make it look nice fairly soon. I also have a mouse problem. I expect that I may have one living in my passenger seat because I found some mouse poop on the seat and well...the car has been sitting for a while.

 05-03-15, 06:56 PM
#78
Working on my car.
Thread Starter
iTrader: (7)
Join Date: May 2006
Location: Los Angeles, CA
Posts: 594
Likes: 0
Received 0 Likes
on
0 Posts
Sorry, pics are limited to 12 per post.
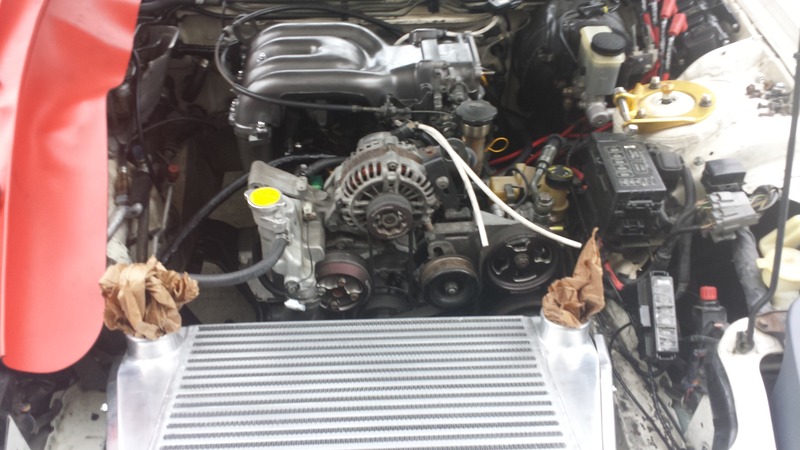
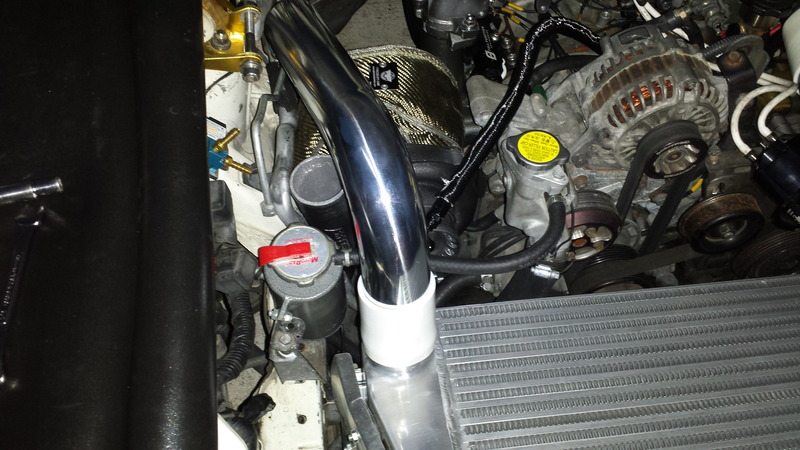
At the end of the day, I painted that pipe and put everything together. I ran a line from the rear turbo oil return over the top of the transmission. I suspect that will be the place that I am going to have my catch can. If not there then maybe above the downpipe. I havent decided for sure yet. All that's missing is the downpipe, wastegates and the catch can. I will update as soon as all that is in.
At the end of the day, I painted that pipe and put everything together. I ran a line from the rear turbo oil return over the top of the transmission. I suspect that will be the place that I am going to have my catch can. If not there then maybe above the downpipe. I havent decided for sure yet. All that's missing is the downpipe, wastegates and the catch can. I will update as soon as all that is in.


 05-04-15, 08:58 AM
#80
Working on my car.
Thread Starter
iTrader: (7)
Join Date: May 2006
Location: Los Angeles, CA
Posts: 594
Likes: 0
Received 0 Likes
on
0 Posts
Yeah, I've already had to clean them once right out of the package. The heat will probably turn them yellow eventually. Only time will tell though.
05-04-15, 06:01 PM
#82
Working on my car.
Thread Starter
iTrader: (7)
Join Date: May 2006
Location: Los Angeles, CA
Posts: 594
Likes: 0
Received 0 Likes
on
0 Posts
Ruff,
The reason I have a filter on my bov is because it's a syncronic BOV designed by synapse engineering. This means that it does not work by way of spring and diaphragm. The actual valve is open under vacuum and thus it sucks in a small amount of air when you are not at boost. The reason why I went with this one is because, first of all, it's different from the standard stuff you see around the forums but, also because it actuates faster than a standard spring and diaphragm design and I also liked the design and the sound. I don't need to put a spring in it based off of what kind of vacuum pressure I'm running either. It kind of just seemed like an all around better choice. Time will tell if it was a wise one.
The reason I have a filter on my bov is because it's a syncronic BOV designed by synapse engineering. This means that it does not work by way of spring and diaphragm. The actual valve is open under vacuum and thus it sucks in a small amount of air when you are not at boost. The reason why I went with this one is because, first of all, it's different from the standard stuff you see around the forums but, also because it actuates faster than a standard spring and diaphragm design and I also liked the design and the sound. I don't need to put a spring in it based off of what kind of vacuum pressure I'm running either. It kind of just seemed like an all around better choice. Time will tell if it was a wise one.
05-05-15, 02:48 AM
#83
Senior Member
Join Date: May 2013
Location: Johannesburg, South Africa
Posts: 301
Likes: 0
Received 0 Likes
on
0 Posts
Ruff,
The reason I have a filter on my bov is because it's a syncronic BOV designed by synapse engineering. This means that it does not work by way of spring and diaphragm. The actual valve is open under vacuum and thus it sucks in a small amount of air when you are not at boost. The reason why I went with this one is because, first of all, it's different from the standard stuff you see around the forums but, also because it actuates faster than a standard spring and diaphragm design and I also liked the design and the sound. I don't need to put a spring in it based off of what kind of vacuum pressure I'm running either. It kind of just seemed like an all around better choice. Time will tell if it was a wise one.
The reason I have a filter on my bov is because it's a syncronic BOV designed by synapse engineering. This means that it does not work by way of spring and diaphragm. The actual valve is open under vacuum and thus it sucks in a small amount of air when you are not at boost. The reason why I went with this one is because, first of all, it's different from the standard stuff you see around the forums but, also because it actuates faster than a standard spring and diaphragm design and I also liked the design and the sound. I don't need to put a spring in it based off of what kind of vacuum pressure I'm running either. It kind of just seemed like an all around better choice. Time will tell if it was a wise one.
Good thinking!
05-05-15, 05:22 PM
#85
Working on my car.
Thread Starter
iTrader: (7)
Join Date: May 2006
Location: Los Angeles, CA
Posts: 594
Likes: 0
Received 0 Likes
on
0 Posts
Thanks dlek! Stay tuned because I have more updates coming soon, including downpipe and wastegate install, first startup and some rear end work coming.
05-07-15, 08:17 PM
#88
Exhaust leak fixed
iTrader: (2)

Join Date: May 2014
Location: Wichita ks
Posts: 68
Likes: 0
Received 0 Likes
on
0 Posts
Do you have OCD? Lol I like your attention to detail. I almost asked about the filter on your BOV but then I read that some one else beat me to it. Have people with the same BOV done that filter or is it something you thought of? Great build man!
05-08-15, 11:58 PM
#89
Working on my car.
Thread Starter
iTrader: (7)
Join Date: May 2006
Location: Los Angeles, CA
Posts: 594
Likes: 0
Received 0 Likes
on
0 Posts
Mraxg7,
I'm definitely not the first person to do this, it actually says in the BOV manual that came with it that you should indeed put a filter on it if you are not using their anti-stall kit. Tony was kind enough to supply me with a filter that he had laying around.
Also, an update:
Today I re-verified that I had the ignition coils wired and plugged in correctly...and I did, but it pays to make sure. We had previously started the car up last week but it ran like crap. My thoughts were that since it had been sitting it had to burn off all the stuff sitting around in the fuel rail and engine. Gave it a little gas and it started firing normally, although without a downpipe or waste gates, its loud as all hell and sounds like WW1 prop plane. Anyway, here's the video:

I still have yet to get to the correct level of coolant but, due to the way the new radiator sits (v-mount) it is difficult to fill so I have to go very slowly. I've got about a gallon of juice already in it, just gotta let it run a little to let the pump circulate the stuff. Once I get my DP and WG's I will do a better job at filling it up, it's just too loud and I dont want to melt my engine bay. Next week my catch can comes in too, so I will be installing that. I've also got to call Elliot over at Turblown to see how far away my DP and WG's are.
If you guys are having trouble seeing that video, let me know and I will find a way to repost it.
I'm definitely not the first person to do this, it actually says in the BOV manual that came with it that you should indeed put a filter on it if you are not using their anti-stall kit. Tony was kind enough to supply me with a filter that he had laying around.
Also, an update:
Today I re-verified that I had the ignition coils wired and plugged in correctly...and I did, but it pays to make sure. We had previously started the car up last week but it ran like crap. My thoughts were that since it had been sitting it had to burn off all the stuff sitting around in the fuel rail and engine. Gave it a little gas and it started firing normally, although without a downpipe or waste gates, its loud as all hell and sounds like WW1 prop plane. Anyway, here's the video:
I still have yet to get to the correct level of coolant but, due to the way the new radiator sits (v-mount) it is difficult to fill so I have to go very slowly. I've got about a gallon of juice already in it, just gotta let it run a little to let the pump circulate the stuff. Once I get my DP and WG's I will do a better job at filling it up, it's just too loud and I dont want to melt my engine bay. Next week my catch can comes in too, so I will be installing that. I've also got to call Elliot over at Turblown to see how far away my DP and WG's are.
If you guys are having trouble seeing that video, let me know and I will find a way to repost it.
07-17-16, 05:22 PM
#90
Working on my car.
Thread Starter
iTrader: (7)
Join Date: May 2006
Location: Los Angeles, CA
Posts: 594
Likes: 0
Received 0 Likes
on
0 Posts
Alright guys, it's been a long time since I've posted an update mostly due to having to pick up a lot of slack at work and I had to go out and do some schools and training. Anyway, I have a couple of updates:
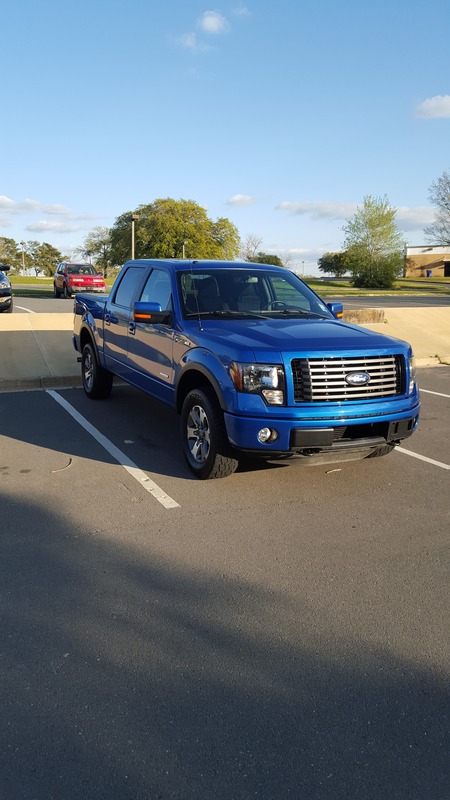
First, I bought another vehicle because as many of us know, daily driving an Rx7 can be difficult, especially when that Rx7 is the vehicle that you are currently using as your project. So, I bought a truck.
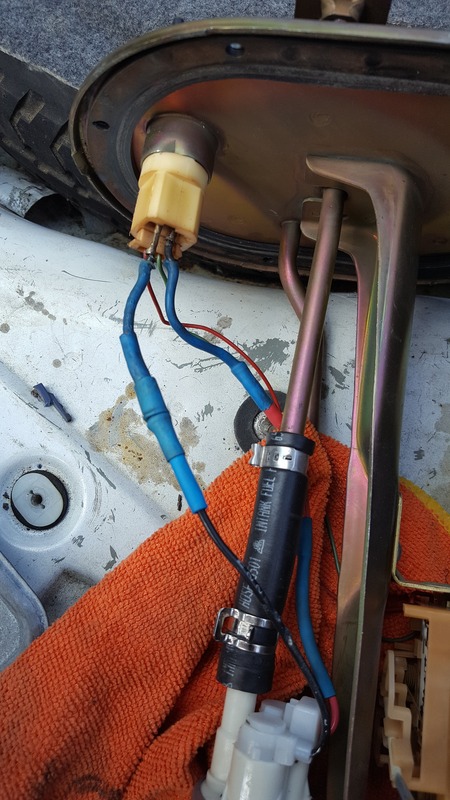
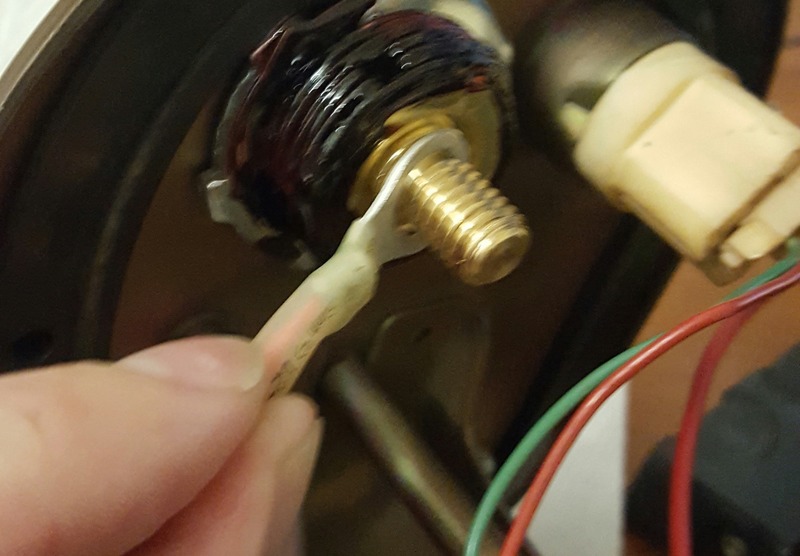
Next update: I was having some fuel issues recently so I decided to dig into this problem and get it fixed. I would start the car, drive it some place and then when I tried to start the car again to come back home, the fuel pump wouldn't come on. I read through the forums and found all the answers I needed.
https://www.rx7club.com/3rd-generati...ics%5D-921896/
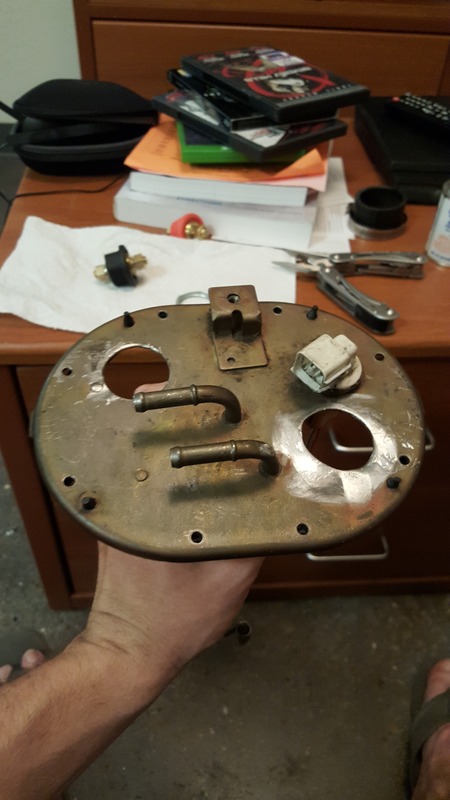
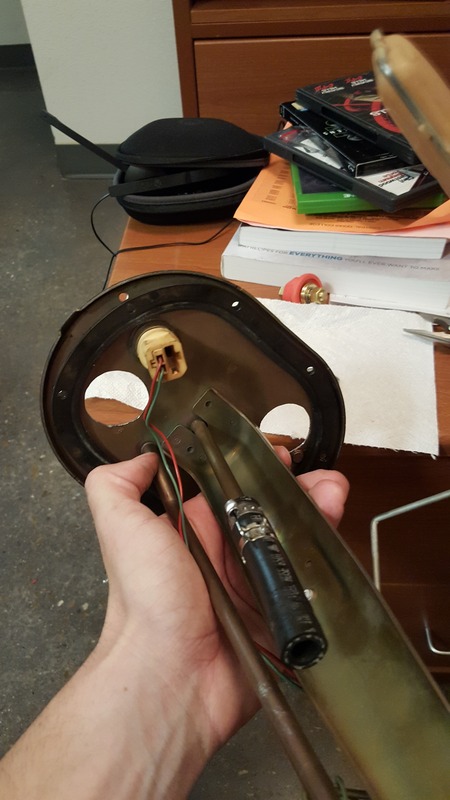
So basically, the leads melted the plug and became sort of fused together and it wouldnt let the fuel pump run, so every time I wanted to start the car, I had to tear apart the trunk so that I could wiggle the plug around a little bit so the car would start. You can see where the two leads are black and crispy. The connector basically fell apart in my hands when I was try to see what was going on.
Anyway, I looked through the forum and decided to do the mod that I found in the thread linked above. So I went to work:
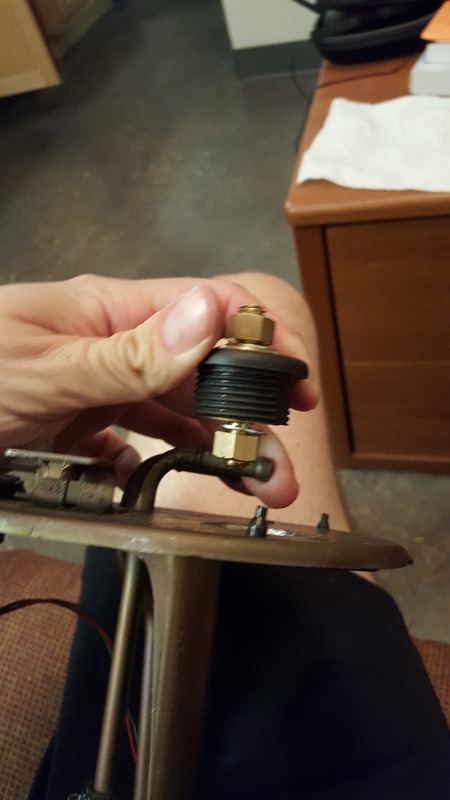
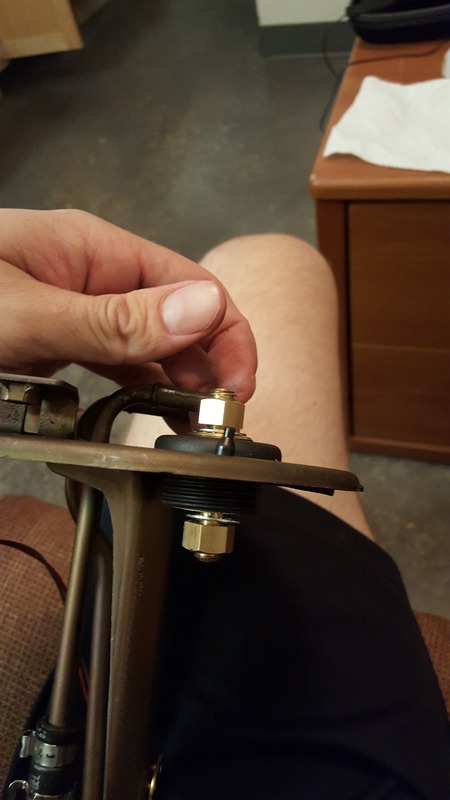
I had to take this to a machine shop because I dont have any types of tools to do this kind of stuff. The fittings are 1 1/8" and its difficult to find drill bits for a press out here, so the shop used a hole saw. Not the way I would have done it, but it worked. The holes aren't perfect but it got the job done.
Fittings: https://www.summitracing.com/parts/m...FYgAaQodOx8D2w
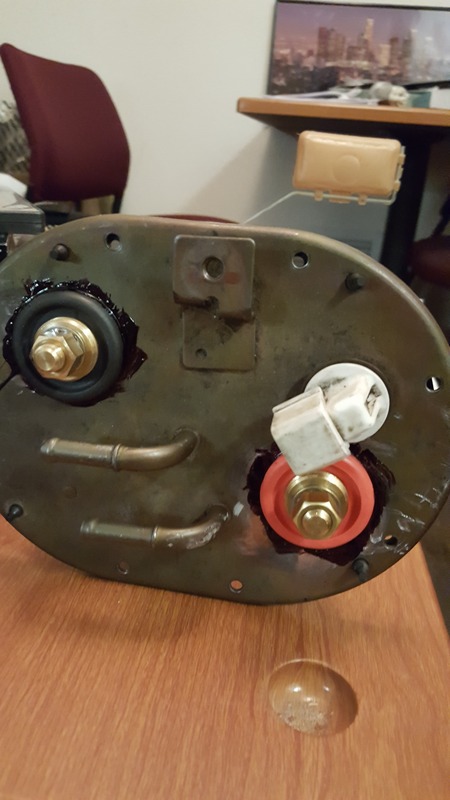
I also ended up having to buy a new fuel pump. The wires on my old fuel pump had some gashes and gouges in them and while trying to find a way to replace them, I learned that with the Walbro 415 E85 safe pump, the wires are not replaceable on their own...so basically I ruined the pump trying to figure out how the wires were attached.
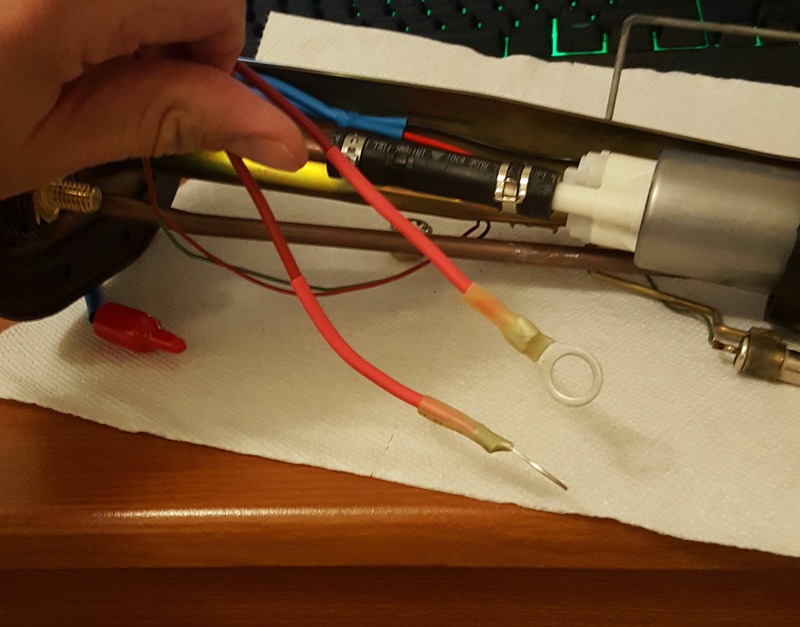
The gigantic terminals on the bulkhead fittings are awesome.
First, I bought another vehicle because as many of us know, daily driving an Rx7 can be difficult, especially when that Rx7 is the vehicle that you are currently using as your project. So, I bought a truck.

Next update: I was having some fuel issues recently so I decided to dig into this problem and get it fixed. I would start the car, drive it some place and then when I tried to start the car again to come back home, the fuel pump wouldn't come on. I read through the forums and found all the answers I needed.
https://www.rx7club.com/3rd-generati...ics%5D-921896/
So basically, the leads melted the plug and became sort of fused together and it wouldnt let the fuel pump run, so every time I wanted to start the car, I had to tear apart the trunk so that I could wiggle the plug around a little bit so the car would start. You can see where the two leads are black and crispy. The connector basically fell apart in my hands when I was try to see what was going on.

Anyway, I looked through the forum and decided to do the mod that I found in the thread linked above. So I went to work:

I had to take this to a machine shop because I dont have any types of tools to do this kind of stuff. The fittings are 1 1/8" and its difficult to find drill bits for a press out here, so the shop used a hole saw. Not the way I would have done it, but it worked. The holes aren't perfect but it got the job done.

Fittings: https://www.summitracing.com/parts/m...FYgAaQodOx8D2w


I also ended up having to buy a new fuel pump. The wires on my old fuel pump had some gashes and gouges in them and while trying to find a way to replace them, I learned that with the Walbro 415 E85 safe pump, the wires are not replaceable on their own...so basically I ruined the pump trying to figure out how the wires were attached.

The gigantic terminals on the bulkhead fittings are awesome.
 07-17-16, 05:30 PM
#91
Working on my car.
Thread Starter
iTrader: (7)
Join Date: May 2006
Location: Los Angeles, CA
Posts: 594
Likes: 0
Received 0 Likes
on
0 Posts
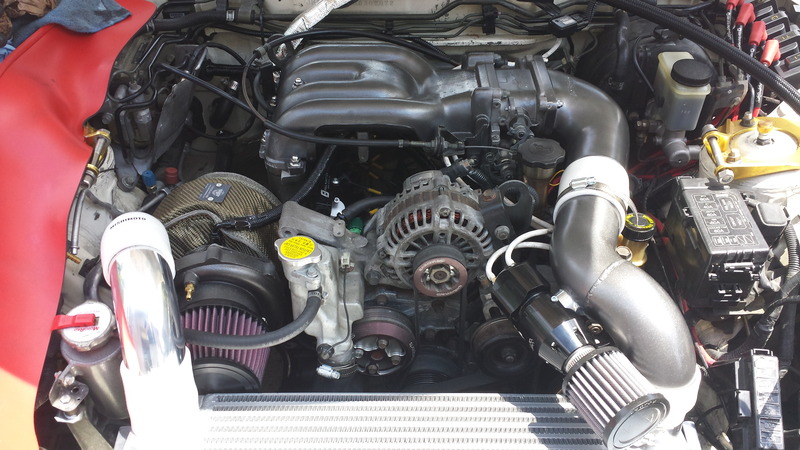
Next: The engine bay is still a mess, but I'm slowly getting it back into shape.

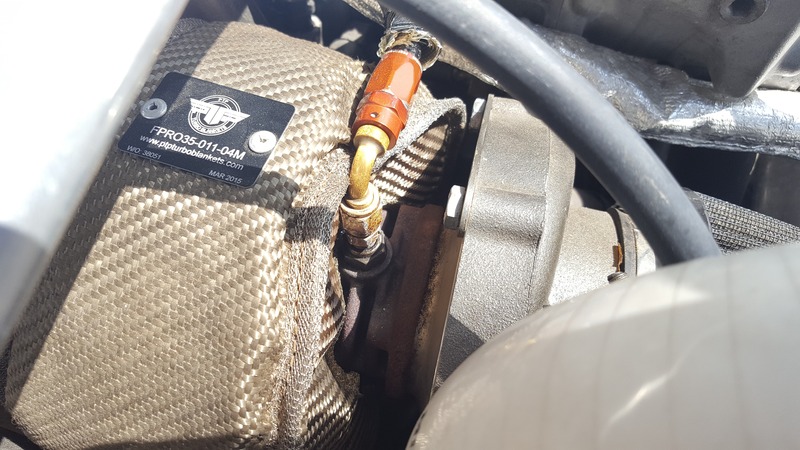
And I'm having trouble trying to tighten down the oil line fitting on my turbocharger. I've tried everything I can think of and I can't get any tools in the small spot to torque this damn thing down!!! I can get it just tight enough so the oil stops leaking, but after driving it a couple hundred miles, the fitting loosens up and it leaks again.
Anyway, the next mods on my list are: Oil coolers, Clutch and I have to redo some of the fuel and catch can lines in my engine bay. They are looking pretty rough. I've also got a little rust between the top of my rear hatch and the roof of my car. I have no idea how I'm going to fix that but it looks like I'm going to have to take the hatch off which is a pain in the *** from what I hear.

And I'm having trouble trying to tighten down the oil line fitting on my turbocharger. I've tried everything I can think of and I can't get any tools in the small spot to torque this damn thing down!!! I can get it just tight enough so the oil stops leaking, but after driving it a couple hundred miles, the fitting loosens up and it leaks again.

Anyway, the next mods on my list are: Oil coolers, Clutch and I have to redo some of the fuel and catch can lines in my engine bay. They are looking pretty rough. I've also got a little rust between the top of my rear hatch and the roof of my car. I have no idea how I'm going to fix that but it looks like I'm going to have to take the hatch off which is a pain in the *** from what I hear.
12-06-16, 11:36 AM
#93
Do they make fitting extenders? Kind of like an adapter, however, it would be the same size on both ends. That way you can use a long socket to tighten the extender fitting first and then the oil like fitting might sit higher than the turbo housing and you can tighten it easily. Idk, just a thought.

Thread
Thread Starter
Forum
Replies
Last Post
rx8volks
Canadian Forum
0
09-01-15 11:02 PM