When you click on links to various merchants on this site and make a purchase, this can result in this site earning a commission. Affiliate programs and affiliations include, but are not limited to, the eBay Partner Network.
An addiction to learning * an FD RX7 = Limitless learning experience
After hanging out with @SETaylor, he convinced me to start my own build thread. I plan on posting a lot of pictures + descriptions in order of when everything happened. I document most of my build through video but it will be nice having everything documented on the forums since I'm usually here lurking and usually taking notes. Just some background info before we start with the cool ****, I got into cars about 5 years ago because I was living in Vermont for my 1st semester of college (Majoring in Computer science) all the friends I made in Vermont were heavily into cars. I was heavily influenced by them and couldn't stop watching educational content about combustion engines. I ended up dropping out of school because I hated programming and moved back to PA. My addiction to learning about cars continued even when I moved back and I would constantly be learning new things. I settled with a 2016 WRX STI that eventually got totaled while parked because of a flood. Then I got a 2011 WRX STI that I started tinkering with and doing all the work myself; this helped me get my hands dirty and get more hand-on experience. My best friend here in PA got me addicted to rotaries to the point where I was falling asleep watching videos about rotaries. Alright this is where the cool **** begins:
May of 2021 My best friend and I flew to Florida to pick up my dream Fd RX7 (15 hour drive back), We actually made it back home with a few issues.
Issues we ran into while driving it back from Florida: was overheating constantly even during cruising conditions, when we were an hour away from arriving home low coolant light came on. Good thing we were close to a gas station and was able to just add more coolant and get home. A week later, after getting it home, we checked the thermostat and found that the thermostat seal melted and wouldn't allow the thermostat to open. I have no idea how that happened but if someone does please chime in. I do believe this is why the car over heated because as soon as I put a new thermostat the car was running perfect even when driving it aggressive.
I ended up financing a garage so my friends and I would have the space to work on all our cars. Where I live in PA, has almost no space so it just made sense to have a place where we could all work on our cars.
We actually completed a pretty big hemi build in the garage, I definitely learned I do not like v8s and will stick to rotaries.
Back to rotary stuff, the car was very fun to drive in but I wanted more and I felt uneasy because I have no history of who owned it and no history of what the car has gone through so I decided to pretty much build this car to what I want it to be. And plus I really wanted to tear into this car and build it,
So the goal of the build:
-Build an FD Rx7 with a 13b-REW
-Build a single turbo 13b-REW that makes 550rwhp that can handle abuse *RELIABLY* for street, auto cross, and touge.
-Learn how to disassemble a 13b-REW *completed*
-Learn how to paint *completed*
-Learn how to make a wiring harness (this idea changes later I will explain)
-Learn how to assemble a 13b-REW *completed x2*
-Learn about fuel systems
-Learn how to tune my own car
So the first part is stripping the car of everything, I decided to start with the dash (Yes I cracked the cluster hood while taking it out (I cried inside a little))
Then I decided to pull the engine and the trans:
Started pulling stuff off and *trying* to label everything in its own separate bags. It is difficult to remember to label things when you're getting frustrated while taking things off. Highly recommend keeping different sized ziploc bags and a sharpie near you. Separated the trans and the engine then prepped the bloc for disassembly.
Last edited by spintowinrx7; Dec 29, 2023 at 08:38 PM.
Reason: Needed to add more
Taking off the flywheel without damaging it was *fun*, if you see a video online of a girl barely hitting it and coming off easily do not believe it. I had to bang the crap out of that flywheel with a dead blow to get it off. I did keep the flywheel nut attached to not have the flywheel smash my foot. Some pics of the engine disassembled.
Around March 2023, family and I bought a house that came with a garage. I was planning on going to school to finish my engineering degree, so I decided to insulate the new garage and drywall it. I was also planning on renting the garage out that I previously bought to finish building the FD faster.
I was busy moving and getting situated at the new house so wasn't able to consistently work on it until July of 2023 where I started making big progress. I dropped the 13b-REW off at a shop in NJ, to have the parts cleaned, balanced, and ported. I bought a rebuild kit from Ray Crowe and picked it up in New Castle, Delaware. For the Apex Seals I'm going with E&J. While the engine was getting work done, I was going to focus on dropping the front sub frame, prepping the sub frame for paint, stripping the engine bay completely, and prepping the engine bay for paint.
After getting the engine bay completely clean to the point where I could wipe a white cloth and not get any dust, I was ready to paint. I was very nervous for this as I never touched a paint gun. Prepping the car was probably the worse part; the cleaning, taping, and more cleaning. I did 2 base coats and 2 layers of clear. It didn't come out perfect, had a few spots of over spray but I'm happy with the end result and learned from that experience.
Last edited by spintowinrx7; Dec 29, 2023 at 03:41 PM.
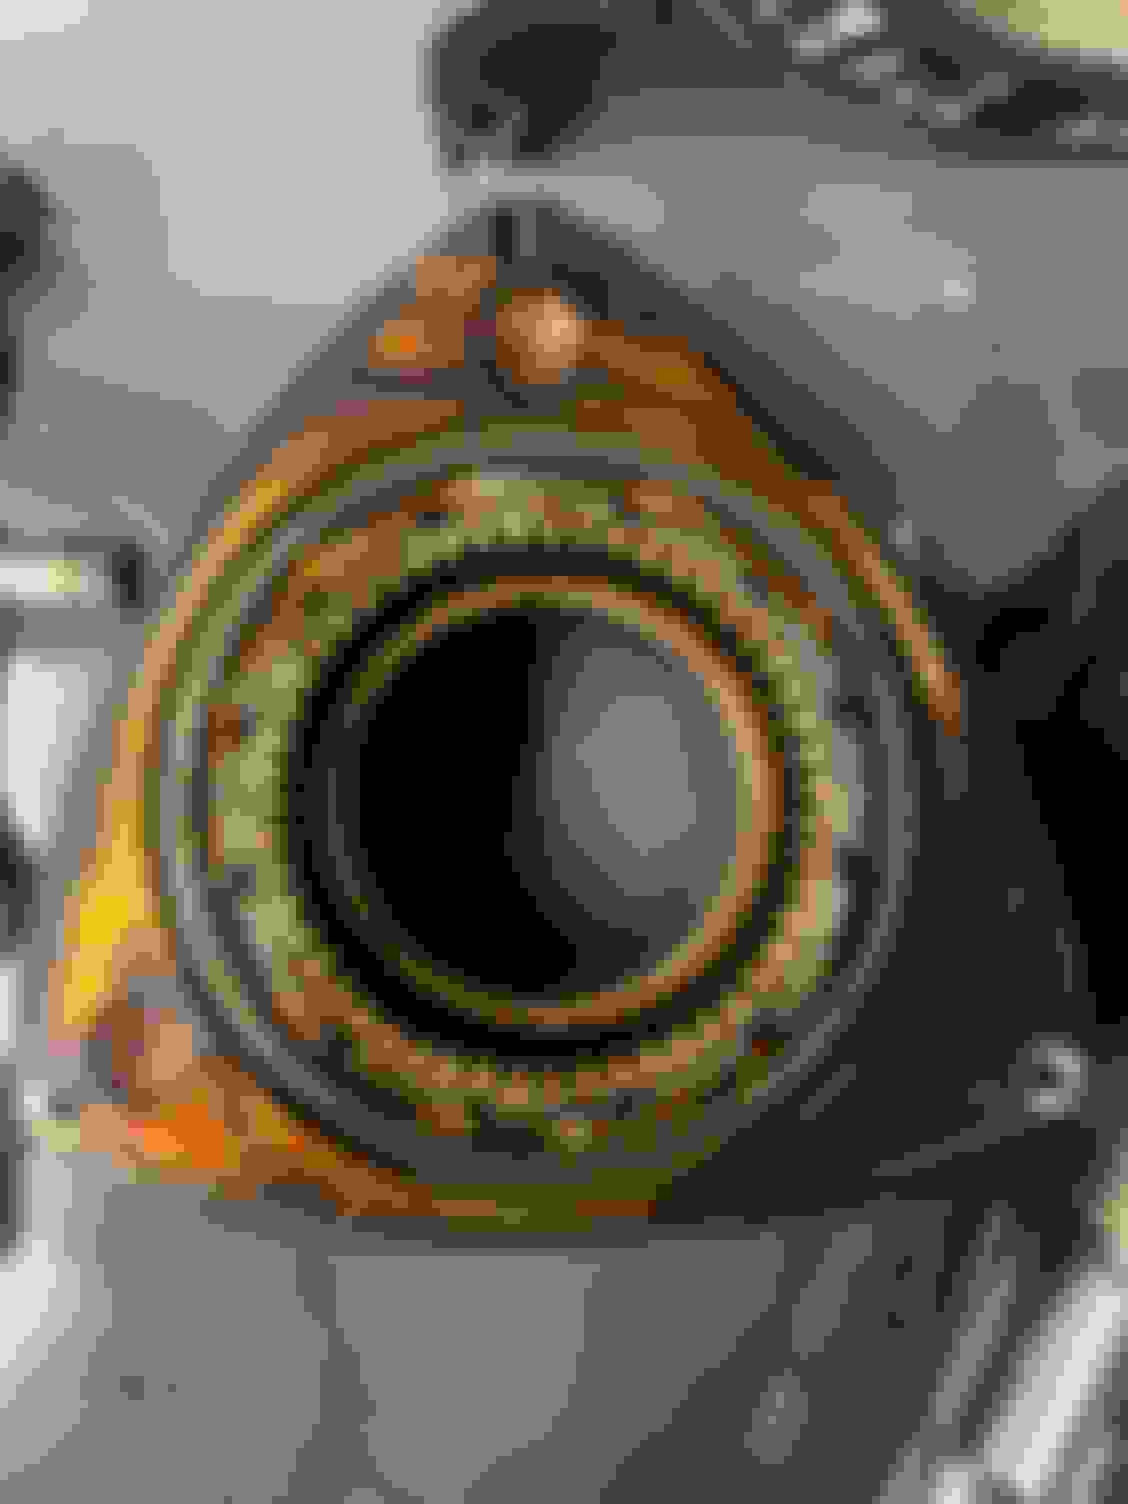
I was able to pick up the engine from NJ on October 7th 2023, and start assembling the rotors. Everything on the rotor side was pretty easy to install; only thing I struggled was the side seal clearance. It took me about a week and 24 side seals to get it all clearanced. I measured the clearance a total of 2 times a day to make sure nothing changed randomly (I wanted to be certain I was doing everything correctly). After the rotors were completely assembled now it was time to stack. My strategy was to assemble the rotors, glue apex seals, make sure everything was clean and start stacking. I did order some specialized tools since I knew I was planning on building more rotaries.
After assembling the engine I realized I needed to improve when it comes to installing apex seals and the center iron. I started to get better at installing the apex seals on the rear iron. My strategy was to glue the apex seals, install the longer outer spring with the apex seal just enough to have some tension in it, then you install the inner spring in between and push them down all together. For the center Iron, I just need more practice. Its awkward trying to lift the center iron and lifting the e-shaft with a knee.
Now that the engine is complete, it needed to pass 2 tests so hopefully it studied😂😂. The first test is turning e-shaft and seeing how many ft lbs of torque it requires to turn, a correctly built engine should require less than 15 ft lbs. 2nd test was a coolant pressure test where it would have to hold 20 PSI of air for an hour and 30 minutes. The engine spun very smoothly and only required about 8-9 ft lbs to turn. For the 2nd test I installed the coolant pressure tester and put 20 PSI of air. I started cleaning the garage and after 10 minutes it dropped to 16 PSI. Huh?? Something isn�t right; maybe I didn�t tighten something enough, so i retighten both coolant block off ports and tighten the coolant drain plug. I got it to 20 PSI waited another 10 minutes but it dropped to 16 PSI after 10 minutes. Alright something isn�t right. I spray soapy water in those main areas but no bubbling.I contact impalervlad (huge shoutout to him for helping keep so much when I have questions and can�t find an answer or need a suggestion. Vlad makes amazing content on Instagram and TikTok. I highly recommend his content). Vlad tells me to spray the soapy water on the entire engine. Come to find out, it was leaking from both semi peripheral ports.
Last edited by spintowinrx7; Dec 29, 2023 at 02:34 PM.
Alright so here is the entire issue I went through with these housings. In October of 2023 I contacted the shop in NJ that sold me both these housings with the semi PP that were already done; the semi was not done by this shop it was done by someone else (they told me it was most likely done by Chips Motorsports but I can't confirm this). I contacted the shop that sold me the housings and told them the issue I was having with the semi PPs leaking, they told me "those semi PPs take an o-ring and that I should be good to run it". That did not sit right with me because I don't think they should be leaking at all even without an o-ring. I contacted three reputable rotary shops in the west/south and they pretty much all explained, an o-ring would be a temporary fix but after a while it will eventually fail and to not run those housings. I was pretty upset about this because the shop I got most of the work done suggested me to run those housings. ImpalerVlad contacted his machinist in Virginia to see if he could fix my housings; he said yes and on October 28 of 2023 I drove 7 hours to Virginia to drop off my engine for bigger through studs and to fix both housings.
November 4th of 2023, I contacted the shop in NJ and explained to them how I spoke with 3 separate reputable rotary shops that all said to not run those housings they are going to fail. I asked the NJ shop why they would suggest me to run those housings after I told them the Semi PP was leaking, their response: "It was miscommunication, I wanted you to test if that would fix the leak" after hearing that it still didn't make sense to me why not explain that to begin with and it wouldn't even make sense to do that because it's already leaking so the o-ring test would be useless. My assumption, I obviously can't confirm this, is that they knew I was new and still learning and wouldn't think of questioning the leaking semi PP so if the engine failed it would be easy to blame on my novice experience; good thing I have some critical thinking skills . So I learned a lesson, lost some money and time but I was able to figure it out.
While the engine was getting work done in Virginia, I started working with Cluadio from TunningTechnology for the wiring harness. I did start some of the wiring but decided to not risk it and rather have it done by a professional and not risk burning the car down in a electrical fire (I think its a skill to realize your current limits and abilities). So I decided to just hold off on this and learn to do this on the LHD Fd I'm planning on getting. Claudio started working on the wiring harness and I started installing the new radium surge tank. Running 2 Walbro hellcat 525 as the main fuel pumps and 1 walbro 525 as the lift pump so 3 pumps in total.
Learned a good lesson, never install the surge tank through the trunk, the best way is to drop the the entire gas tank and then install it.
I was trying to figure out what to do for the drive train. The entire goal is to build a very reliable Fd that can handle abuse from the engine to the drive train. I decided to to go with a 8.8 rear diff and a ronin 8.8 kit. I drove 9 hours to Detroit, Michigan with some friends to drop off the stock trans to liberty gears. It's going to get completely built and I'm leaning towards straight cut gears. I dropped it off Saturday December 2nd 2023, and I'm still currently waiting to hear back from them. Detroit was fun, it was rainy and gloomy over there for the three days we spent, but we had some amazing middle eastern food.
After I got back form Detroit, I immediately started working on the suspension components, super pro bushing set, SBG Pillow *****, and Ohlins DFV Coilovers. The worse thing I done on this car by far, bushings. It took about 3 full Saturdays and I cheated because my best friend who works as a tech in a dealership helped me. It was awful for both of us, almost a 30 year old car with the original bushings; this does not make for a fun time.
After the car being on jack stands for 3 months, it's finally back on the ground and suspension is all done besides the 8.8 diff and Ronin kit. It feels good to finally see parts going back on the car instead of just removing (garage is a mess don't judge).
Engine arrived from Virginia 2 weeks after we completed the bushings, December 12th 2023. Simon and I build the engine together and got some experience in assembling and also taught me some things. Really fun time meeting people who have the same level of passion towards a hobby. After we assembled the engine it passed both tests, took 8 ft lbs to turn the e-shaft and we put 25 PSI for the coolant pressure tester and let it sit for 16 hours and only dropped to 24.5. The engine is ready to be completed just waiting for a spacer to arrive because end play is out of spec. The day Simon and I assembled the engine, we realized the outer coolant seals were stretched so we called up Ray Crow to pick up in New Castle right before they closed.
Last edited by spintowinrx7; Dec 29, 2023 at 10:22 PM.
Yeah that Radium Surge tank is a nice piece but a huge PITA to install
Steve
Thank you!! Will make sure to post whenever I make some progress. Hopefully the end play spacer comes in. In the meantime, I'll be finally cleaning/organizing the garage.
The worse part is the instructional installation video, makes it seem like it's a perfect drop in fit. Dropping the tank is definitely the way to go (Thank you seTaylor for the suggestion).
Last edited by spintowinrx7; Dec 30, 2023 at 05:58 PM.
Cool thread! We have a lot in common - I live in VT now, went to school in PA, regularly fell asleep to rotary videos, and now need to do most of the work you've done lol.
I have all the bushings sitting in my garage ready to go. What'd you end up using for tools for install? I'll be putting the same Ohlins on, too.
I used two different bushing kits from Harbor freight and had to use some random sockets I had laying around. Highly recommend having a 2nd person and having vise. It was a struggle but take your time and try to divide it throughout days.
Finished up my very rough semester, calc 2 is no joke, and then went to Japan with my friends for 3 weeks. Amazing experience I highly recommend visiting Japan. I sadly couldn't rent an FD and drive it (I cried inside). Here's a few pics I took:
Got back recently to the states, now time to lock in! Installed a brand new oil pan and banzai brace using Hondabond RTV as Howard Coleman recommends. The install wasn't too bad, we (my friends and I) just took our time to not **** anything up, we had to drill the brace and oil pan for the extra studs. I also installed with it the FFE Fd engine mounts.
I ended up buying a spare transmission because liberty gears still has my transmission and I'm not sure when I will be receiving it. Paul from liberty gears did explain to me though that he's going through some personal life stuff, I do appreciate communication so thank you Paul for explaining the situation and being honest. I installed the spare transmission I got off Facebook marketplace to at least mock everything up and maybe even run the car until I got the transmission back from Liberty gears. The only issue we had installing the transmission was, how air tight the fitment is for the pilot bearing that it wouldn't allow the transmission to sit flush ,so we used gravity.
Gravity for the win
Dropping the engine & trans into the car was fairly easy especially with a engine hoist that has an air line *chef's kiss* never pumping that engine hoist up again. Seeing the engine finally in brings a sense of completion (still so much ******* work left to do) but it does still feel nice seeing parts going back on the car especially the engine, this is both scary and exciting.
I've started working on the front brakes running ap 5200 calipers with the M2 bracket kit. I've been having a lot of issues trying to get these to work. I sent out an old rotor from the kit to Coleman Racing and having them take the measurements. Might make a separate thread on this if I can't figure the issue out. I ordered rotors from Coleman Racing 2 months ago with the measurements off a thread I found but I might've put something wrong when I filled out the measurement because I'm having issues with the AP 5200 caliper lining up with the M2 bracket when the rotor is installed. So a lot of troubleshooting left to do, but hopefully I can figure it out I really want to run this brake kit.
Nice update. Glad to see you are still making progress and traveling while doing school. On the Calc note, now that you got 2 done, don't be afraid of Calc 3, its just Calc 2 adding the third dimension, as long as you understand 2, 3 will be super easy.
I was actually thinking of taking Diff-eq this upcoming semester and then taking calc 3. Not 100% sure though, heard people saying Diff-eq is a continuation of Calc 2.
Cut the power steering bracket to make the oil loop fitting for solid dowels work. Currently looking for a way to side mount the alternator keep power steering, and delete the water pump housing. Ran into an issue where the rotor hat wasn't completely sitting flush with the wheel hub, turns out it was because there was a little bit of surface rust on the wheel hub that wasn't allowing it to completely mate to the wheel hub. Now to fix problem 2, The M2 bracket for the AP 5200 calipers keep hitting the rotors, I'm going to remeasure the brackets, recreate them in solidworks, then 3d print it and see if I can get the the caliper to sit correctly on the rotor.
Started cutting the ford 8.8 diff for the ronin kit. Still need to re do the axle part of the ronin kit. Cutting it was awkward, really helped having a 2nd person.
Almost time to drop off the FD at the fabricator, I've been playing around with the engine bay and planning out where certain things will be located. Man it feels great finally seeing the turbo in the engine bay.
Cool thread! We have a lot in common - I live in VT now, went to school in PA, regularly fell asleep to rotary videos, and now need to do most of the work you've done lol.
I have all the bushings sitting in my garage ready to go. What'd you end up using for tools for install? I'll be putting the same Ohlins on, too.


 . So I learned a lesson, lost some money and time but I was able to figure it out.

 Lots of good stuff in here!


 . Thanks Simon!


