When you click on links to various merchants on this site and make a purchase, this can result in this site earning a commission. Affiliate programs and affiliations include, but are not limited to, the eBay Partner Network.
This thread is to journal my '95 RX7 and my vain attempts at keeping it roadworthy.
This November (2023) marks the fifth year that I've owned this car. At the time, I had been helping around the garage of an uncle who turns wrenches pretty regularly. I had been borrowing my dad's '05 Acura TL and was getting enough self confidence "working" on cars that I could buy myself the dream FD for my first car. (I'm usually not this brave/reckless, I think)
I purchased it 5 years ago in Nov 2018 from Roseville, CA, for $25,000. I am the fourth owner. The car was running and driving, with a full interior, 99 spec twins, water injection, and larger secondaries off a PowerFC. The car also had a thicker radiator, which pushed the trust SMIC and ARC intake way out of alignment. As far as I can tell, the '99 spec twins must have a ported WG. I won't go into detail about how very stock my emissions are, but I don't believe it could hold the 10PSI it does without the WG ported.
When I bought the car, I didn't even know how to drive stick, and my mechanic uncle had to drive it home for me. I just had to stare at it while my brother, who did know stick, took it around the neighborhood to keep it rolling.
From there it was just learning the basics. My relative is a very tenured mechanic for UPS and avid Honda/Mustang guy, and I would spend a lot of weekends going over and either wrenching on CRXs, Civics, or on the RX7.
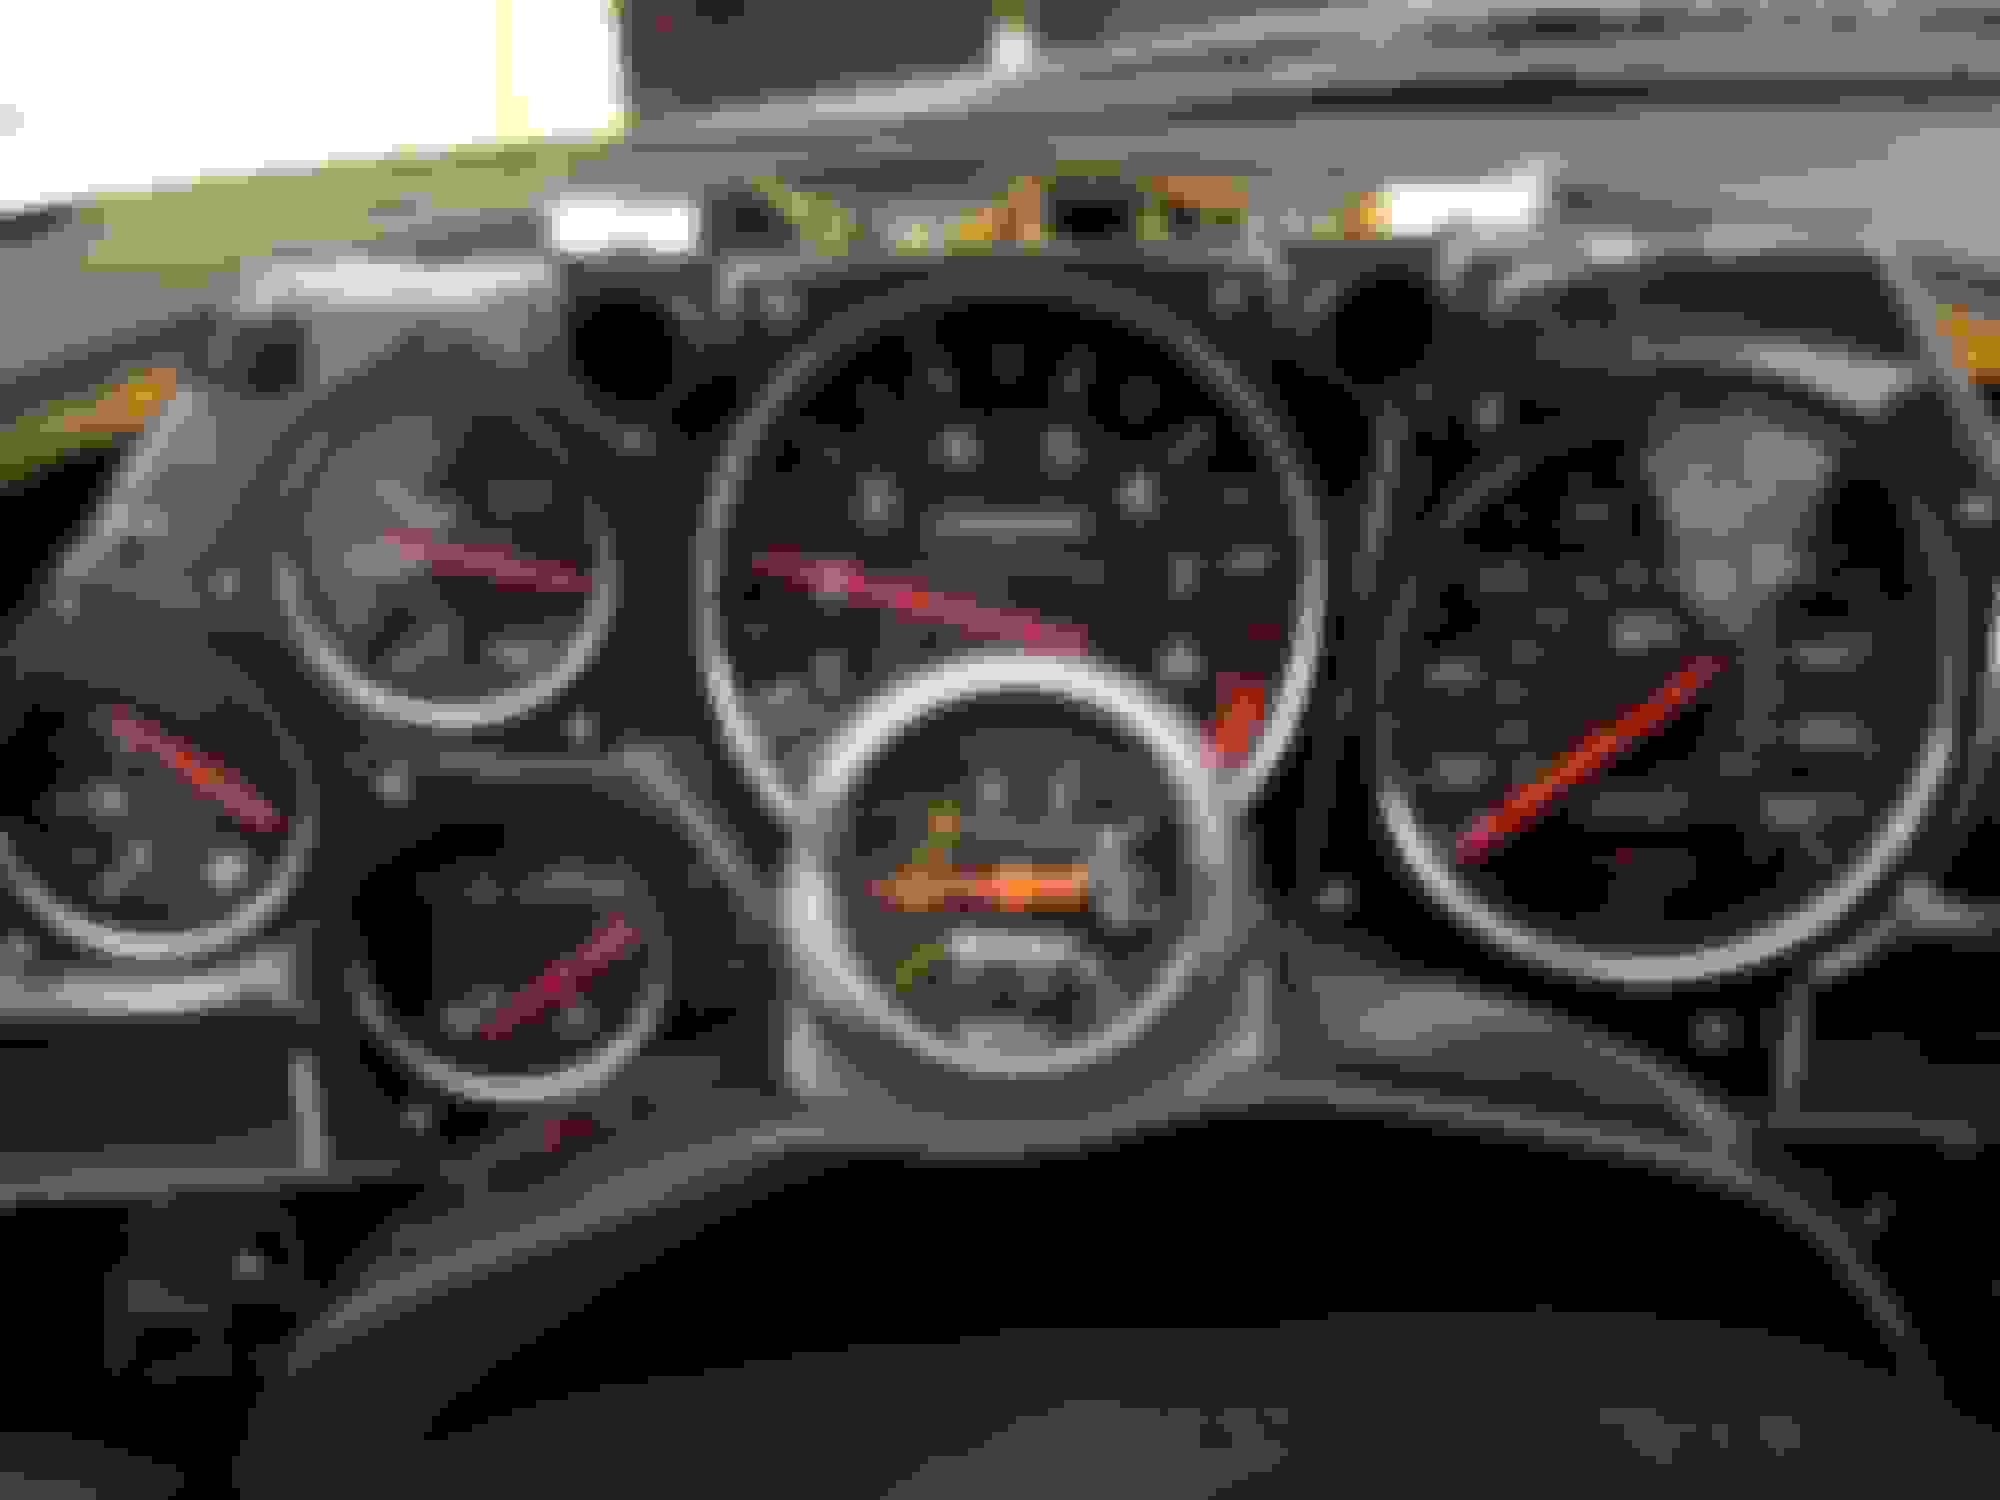
Basic maintenance turned into more involved repairs, replacing pillowball bushings, resoldering IC1 to bring my dead tachometer back to life (thank you again, Gen2M3!), and some visual updates to the car to make it look like my gran turismo 2 car.
Fast forward to today, the car is still on the same basic drivetrain. She now has Ohlins coilovers 10k front/8k rear, and FEED Type 2 wing from RHDJapan that I learned how to rattlecan on, and staggered Enkei PF05s.
This past weekend, after probably 4 years of solid running, the car started spitting coolant at me out of the exhaust. This is something that I had been kinda tracking for a few months, so it's time to take the tired motor out and put a mazda crate engine back in. When I bought the car 4 years ago, it had 101,XXX miles on the chassis, and likely 40,XXXmi on the engine. As of this thread the chassis has 122,xxx miles on it, and the motor a tick over 60,000 for my best guess.
Earlier this year, I bought a crate engine "just in case" from Ray. I figure I have the money sitting in a bank account for buying an engine, it would be better off just as an engine in my garage. Fortunately (or unfortunately) my intuition was right, and I managed to dodge the huge price jump Mazda put on our engines in October. I honestly don't know what I'd be doing now if I'd waited.
The goal for the car is pretty tame - just get it back on the road. I won't be looking to do any major changes while the engine is being replaced, I just want it out and in and back on the road as soon as possible. At 29 now, I feel like my next battle as a car guy is to keep the car even as my priorities might change in my 30's and 40's. To that end, while I'd love to do a whole pull and rebuild, I know that the longer the car is off the road, the higher the chance I fall out of love with it and consider selling it. Instead, I figure I can spend a month just replacing my bad motor with a known good motor, and putz around with the car again while I take my time refreshing the old motor on weekends and after work.
I'm hoping by documenting myself replacing the engine in this car, I can:
1) Have a journal to go back on to put the engine back together, and then to mount and connect that engine back into the car.
2) Have a place to get help and ask questions if/when I get stuck.
3) Provide a reference for other owners who get just as overwhelmed at "Engine replacement" as I do
4) Hopefully incentivize other "part-time" car people like myself that you can have a dayjob and still own an RX7.
Disassembly
I'm going to be devoting about an hour a day after work to taking this car apart. I'm always scared sitting in my room that I have to work on the car only on the weekends, and for the whole day, and that I have to accomplish some super big things before the end of that weekend. Instead, I'd like to be able to prove to myself that I can go slowly, work on the RX7 in at a tame pace and still have time during the week for work and for some of my other hobbies.
I loved Daleclark's engine rebuild thread, I've taken to his post about removing the engine as simply as possible and I'm going to tackle the engine removal in systems:
Intake Box
Intercooler
Battery/Battery Tray
UIM ports (brake booster, air bypass, yadda yadda)
Cooling System
Oil System
Power Steering System
A/C System
Engine Harness
Charging Harness
Exhaust (Downpipe)
Transmission
Fuel System
My car thankfully came with a little 1995 Factory Service Manual in print. For the longest time, I've been kind of dreading the day I'd have to do something as complicated as "pulling an engine". When you take the time to read the section (C-14 thru C-20) of the FSM, it's funny how easily and simply the book makes pulling the engine seem. That, in addition to all the forum research. For anyone without a copy of the manual, I'll post some of the big pages here.
Battery Tray
Simple uninstall. I have my own battery tray than I had bent from Send Cut Send. Maybe I'll make a thread about it when I'm done designing it. 5 bolts, 2 tie downs, and 2 battery post terminals and it's out.
I put the tray, the bracket to the crossmember, and the tie down in a "Battery" cardboard box. I put the 5 bolts, tie downs, hooks, and wingnuts in a baggy and also put that in the box.
Intake
My car has an ARC Intake Box, but I imagine it's pretty similar to the stock airbox in terms of removal.
I use a driver to loosen all the hose clamps. The top pipe for the secondary turbo comes out first, followed by the Airpump & ACV hoses.
On the far passenger side are two thinner hoses, the top (I think?) for the recirculation valve. The book calls this the Charge Relief Valve.
I disconnect the hose to this right before the brown valve, and leave it on the Y pipe.
Underneath that is the hose that goes to the Air Bypass Valve. I think this guy dumps the secondary turbo's pre-spooled air back into the airbox until it comes online. Maybe I have that switched with charge relief.
This valve has input from the secondary turbo and from a port at the top of the UIM. I get some masking tape and fold it over the hose and vacuum line, and note where it goes to.
On the UIM, I put a bit of masking tape over the ABV port and note that it feeds the ABC vacuum line.
The last pipe is the primary turbo pipe, which is just a hose clamp. I disconnect it from the black plastic elbow before the turbo. I assume I'll take it off out of the car.
With all those hoses disconnected, the airbox comes out with a 10mm bolt on the passenger side. I plug all the hoses back into the airbox and put it in an "Airbox" box, with a baggy of the one bolt and a few spacers that came out of it. I use the gun to tighten the hose clamps back over the silicon fitting.
Intercooler
The intercooler itself is mounted to the battery crossmember by a 10mm bolt on the passenger side of the I/C (3). That and the silicone couplers for the IC piping (1 and 2) and the I/C is free from the car.
I'll want to keep a reminder for how the AST hoses weave around the SMIC pipework, I've noted that in blue.
I haven't drained the coolant yet, so I use a 10mm wrench and ratchet to take the AST off the SMIC. The AST Is left floating in the bay. I have to route the AST lines around the upper I/C pipe to free the I/C.
With the SMIC, battery, and airbox out, I take out the 4xBolts (10mm) on either side of the engine bay to free and remove the battery cross member. I am taking note of which hoses go over and which under this cross member.
I take the SMIC and crossmember and its duct shroud and put it in an "Intercooler" box
I pull on the throttle body cam and release the throttle cable from it.
I remove the first bracket, above the pressure chamber, which is held in by 2x 10mm bolts. The throttle cable comes free but the 10mm bolts are threaded back into the UIM.
I go to the passenger side of the UIM and remove the capped nut holding the second throttle cable bracket. While I'm there, I also remove the brake booster hose, and the little blue silicone line for the Boost Gauge in my car. I have the Air Bypass Valve line mistakenly tagged as BOV, but that gets corrected.
The Brake and Boost gauge hoses are retained on the firewall on their pipes. The nut holding the throttle cable bracket onto the UIM is threaded back onto the UIM.
I also remove a grounding strap from the UIM to the firewall. I label it and the grounding bracket GRND (B)
On the drivers side of the car, I remove the last throttle body clip from the cable and rest the cable on my windshield.
I take the MAP sensor line and filter off the MAP senser (not off the UIM).
Nice scoring a clean 95 before the massive price jump as well as obtaining a crate motor before the hike as well. I'm kicking myself for not buying one before like I was on the fence about.
One recommendation I would make is since you are starting with a complete fresh setup is to convert to Evans coolant. Lifetime coolant that you can also run pressureless. I've been running it for 20+ years with great results. A fresh engine swap is prime time to do this since the system will be dry aside from the heater core.
Thank you, boostin. How many miles are on your motor since switching to coolant? Your suggestion comes at a convenient time as I'm torn about it myself. As a creature of habit, I like to stick with what I know, which is yearly coolant changes with Zerex. I've gotten pretty used to doing it and take it as an opportunity to get under the car and give it a once over. On the other hand, I have a feeling my coolant seal failure might be corrosion related, Evans being waterless has definitely piqued my interest.
I'll write some more in depth notes later since it's late in the evening, but Ive hit a few snags.
Day 2
Coolant - Block and Rad drained, upper and lower rad hoses removed, front heater hose and driver side heater hose removed, AST and associated hoses removes
Oil - Oil drained, 2x fittings to oil cooler disconnected
P/S - reservoir drained, high pressure line banjo bolt disconnected from pump, low pressure line hose clamp disconnected from pump
TB Elbow - Has a water injection line, and it grants access to the fuel hoses so this was removed Questions
Charging Harness - I was originally only going to do the coolant and the charging harness, but looking at the charging harness, i think removing it with the engine is not going to go as smoothly as i expected. The positive terminal has a connection to the harness running under the fender, and a bolted connection to the relay box. Would it not be easier to leave the charging harness in the car and just undo the connections it has to the engine? I hear people pull this with the engine and to me that seems like more work.
Downpipe - I started removing this but I'm stuck on the two nuts (actually one nut and one bolt on my unit) that are beginning to round. I've gotten the two front bolts/nuts out, but I ended up removing my air pump and Y pipe to get to it. Does it make more sense to take out the secondary feed/charge pipe to get to the back upper nut? Or does it make more sense to leave it and buzz the nut off with the engine out of the car?
Fuel - I forgot to relieve fuel pressure before taking the engine apart. Is there a way to still do this or am I just going to have to take a gasoline showered when these lines come off?
Thanks ZE - I woke up with some more patience to look into it but I think I'll leave the harness in the car as well.
My AC has never worked and I have never bothered to check where all my freon has leaked out from, but I went ahead and just undid the four A/C compressor bolts from its bracket. It's suspended by its lines and I intend to pull the engine out without the A/C attached.
I am not taking the trans out. After work today I am going to tackle getting to the service ports and undoing the collar. I've got that video of the dude explaining it with the pressure plate and retaining ring on his kitchen table, I think I'm ready! I just hope I don't bend it.
My wife's S14 has had Evans in it for around 20 years. My daily for about 5 years and I've converted many customer cars as well as other cars in my collection throughout the years. I'll be converting my fairly new to me FD after I restore the fuel system. You don't have to worry about corrosion when it is waterless and never have to change it. Now this coolant does not cool any better than your typical water/coolant mixture. It just does not have any corrosive properties and has a higher boiling point which makes it much safer to run and allows you to run a pressureless system if you want. This is huge with the 90/early 2000's bmw crowd because everything in their cooling system is junk plastic that ruptures or falls apart. If you aren't running high pressure in your cooling system, it is much more reliable. Being Evan's coolant doesn't boil at a low temp like water, you won't get hot spots surrounding your combustion areas in your engine which lead to damage. I've had this coolant save my butt on a few occasions strictly due to this property. Recently on the S14 when a fan relay went out and temps sky rocketed. After going checking the cooling system on that car with this incident, I still have the 20 year old coolant in it, just topped off what came out of the overflow from expansion when it overheated.
Downpipe - I started removing this but I'm stuck on the two nuts (actually one nut and one bolt on my unit) that are beginning to round. I've gotten the two front bolts/nuts out, but I ended up removing my air pump and Y pipe to get to it. Does it make more sense to take out the secondary feed/charge pipe to get to the back upper nut? Or does it make more sense to leave it and buzz the nut off with the engine out of the car?
You may be able to pull the whole motor/trans with the downpipe attached and may be easier to remove when the engine is outside of the car if the nuts are damaged. If you are leaving the trans in the car, I can't remember if you can clear the bellhousing but should be able to with some wiggling.
Fuel - I forgot to relieve fuel pressure before taking the engine apart. Is there a way to still do this or am I just going to have to take a gasoline showered when these lines come off?
If the car has been sitting for a bit, Fuel pressure has probably dropped, it usually won't hold at 40spi very long. You may get a dribble but you should loosen you fuel cap so your tank is vented otherwise the rise of temp will create pressure in your tank and you will get intermittent fuel coming our of your lines if you don't block them off.
+1 on removing removing the downpipe after the engine has been removed. Just be mindful of the extra length during removal. Same recommendation with the transmission if you need to do anything to it (like 5th gear synchro & spindle).
Good job on breaking the process into smaller, more manageable sections of work.
Thanks ZE - I woke up with some more patience to look into it but I think I'll leave the harness in the car as well.
My AC has never worked and I have never bothered to check where all my freon has leaked out from, but I went ahead and just undid the four A/C compressor bolts from its bracket. It's suspended by its lines and I intend to pull the engine out without the A/C attached.
I am not taking the trans out. After work today I am going to tackle getting to the service ports and undoing the collar. I've got that video of the dude explaining it with the pressure plate and retaining ring on his kitchen table, I think I'm ready! I just hope I don't bend it.
A/C line do kinda get in the way during engine removal, you'll have to bend things a bit to get the engine out if you are not pulling the trans with it. I would remove them if the system is already drained, and if the threads aren't seized.
The PP collar shouldn't be too bad, the more room you have under the car the easier it is to apply the proper "press and twist".
I'm still writing up my bigger journals, I find going through my own photos and annotating them helps me remember all the steps I took.
More abbreviated notes, though -
Day 3
ECU Harness - Pulled this guy through the firewall today.
Took the doorsill trim, kick panel + 2 clips, harness pipe (plate?) +2 nuts out of the car and into an "interior parts" box. I left the doorsill screws in the car
Undid 2x connections to the ECU, 1x black connector to some control module, 1x white connector to the chassis. Also undid 1x chassis GRND.
I left the black control module in the car. I bolted the chassis ground bolt back into the interior.
I used my clutch/steering wheel lock bar to push on the rubber boot inside the car and it freed the harness thru the firewall.
I undid 4x bolts and loosened the wiper motor so I could clock it out of the way. I undid 1x bolt nut (10mm) on the firewall to undo a harness retainer. The retainer stayed on the harness, I returned the bolt nut to the stud on the firewall.
The ECU harness is now resting on the motor.
Motor Mounts - 2x Nuts and Bolts impact gun'd into a plastic baggy. These are pretty nasty, should I look to replace these? Or just clean them up a bit.
Downpipe (Partial)-
I undid 2x bolts from the bottom of the car on the downpipe. The one on the inside of the elbow was pretty mangled up, I used 2 different bleeder screw wrenches to finnagle it out. It ran into the DP before the bolt fully unscrewed.
I figured I would have to walk the DP out with the bolt. I undid the airpump, crossover pipe, and Y pipe from the car
Airpump - Used an impact gun, I undid 1x really long bolt (12mm) from the housing with the water filler neck. I undid the bolt for the Airpump swinging bracket. I undid the hose going to the ACV and gave it a masking tape label "To AirPump". I undid a disturbingly loose and mangled up connector and likewise labelled it. I took the whole airpump and bracket out and put all the bolts on the airpump.
Crossover Pipe - Undid 2x 12mm nuts on the Y pipe, freeing the crossover pipe. I put the nuts back on the Y pipe.
Y Pipe - I undid 2x 10mm nuts from the Y pipe to the turbo. I returned the nuts to the turbo studs. I labelled the two vacuum hoses from the Y pipe fittings to the engine "To Y Pipe Fitting" and disconnected them. The Y Pipe, Airpump, and Crossover pipe went into my "Airpump" box.
This gave me access to the front DP nut. Some PB Blaster and it came off. I saw the rearward top DP nut was already semi-rounded, and with the secondary turbo piping in the way I could not get a wrench or socket to get a good grip on it. I've left the DP there for now. I might return to undo the secondary turbo piping and try again in the car, I may just remove the engine with it. I'm considering undoing it as we lift the engine out, when it's a little higher up the bay.
I'm also thinking about how I'm going to get this guy back in? I'm likely going to get new, maybe longer nuts (maybe more surface area will keep it from rounding - more area to spread the force out onto). I am considering, as the engine is being lowered, maybe snaking the DP around the bellhousing and screwing it in during engine installation.
Pull-Type Clutch
I am stuck. The retaining ring on my pull type clutch refuses to press into the pressure plate.
Here is a video of what I'm doing - not exactly this since I have a hand on my phone camera. It seems like it wants to go in but it's taking a lot of force and it won't stay seated in the retracted position, it comes back up in the locked position.
I've put a little dab of PB blaster on a rag and dabbed it around up in there.
I've tried doing the screwdriver twist method, I've tried using two screwdrivers to push each end of the ring, using the inspection plate as a fulcrum. I've tried actuating the clutch a bit to get things reset/moving. Nothing seems to do it, and at the force it's taking I'm scared of deforming it. What's the trick here? Or should I just consider undoing the Pressure Plate bolts?
(Actually looking at the video it looks a little deformed from my prying already. Pushing the clutch pedal in with my hand doesn't seem to pop the release bearing out, at least.)
I'm going to take a break from this today and return tomorrow to work on some other stuff.
Goals for day 4:
Fuel System (3 hoses afaik) Charging Harness (Find all the connections and grounds on the engine to the harness, label and remove them. I will probably find more connections as the engine comes up, I'll be careful and remove those at that point) Transmission Harness, Transmission Bolts, Starter (The transmission won't fall on me, will it?)
EDIT : I got the downpipe out and I'm feeling pretty good about myself.
Cooling System
Separating the block from the cooling system involves
I started by taking out the undertray. There are 12 total 10mm bolts and washers. Bring an extension with you for the ones near the swaybar
I put all 12 washers and bolts in a baggy and brought that and the undertray away together.
Drain the coolant thru the radiator drain plug and the little bolt on the driver side of the center iron. The block drain plug gets all over the subframe and makes a mess. I returned both drain plugs back on the rad/motor so I wouldn't lose them.
You might as well also drain your oil down here, too.
Upper and lower radiator hoses are easy now with the front of the car exposed. Four clamps and these come out.
With all the coolant drained the AST can come out - there are three lines in total.
Undo the clamp at the filler neck that goes to the AST - I took this line with the clamp on it off with the AST.
Undo the clamp at the lower radiator tank that goes to the AST - I similarly took this line, with the clamp on it, off with the AST.
Take the hose that goes to the overflow off at the AST. It’s easier than doing it out of the tank. Before you store it, empty the residual coolant in the line into your pan and then coil it around the fan relays out of the way..
The first heater hose is at the front of the car, from the lower coolant hose inlet to a pipe. I took the clamp out on the elbow up to the block. My hose was stubborn, a pick with a gentle curve lets you rake around the inside of the hose and break the seal. I put a little masking tape label on this line and wrote "Block lower coolant inlet".
I took the rear heater hose off later, after I took off my throttle body elbow. With the throttle body elbow off, looking straight down, you can see the connection onto the block. Long needle nose pliers make short work of it.
Throttle Body Elbow
I needed to separate mine because my water injection nozzle threads into the bottom wall of the elbow. I would remove this regardless for the access it gives.
I remove these 4x nuts (10mm). I broke the bottom two nuts loose with a ratchet and extension, and slide two fingers under to finish unthreading them by hand. I would’ve lost them if I fully loosened them with the ratchet.
Removing the TB Elbow also removed this catch tank for the fuel evap system. I put this back on the TB studs along with the nuts. With that loose, I swizzelled my water injection fitting out of the elbow and labeled it.
Spark Plug Wires
I have Sakebomb Garage’s chassis mounted ignition coils. If you have stock ignition coils, you don’t need to do this. 4x spark plug wires wiggle out of the block and rest on the fender.
Oil System
The only thing holding the oil system to the chassis is the oil cooler, so disconnecting those lines free it. There are two of them. Pretty neat!
Open the oil fill neck cap. Under the car again, drain oil from the oil drain plug if you haven’t already.
I located the two oil cooler lines on the front driver side of the car. Using a pick, I lift the leg of the oil cooler clip out of both fittings. Back over the car, I use a pick to hook the now-exposed clips out of the oil cooler lines. Can I re-use these?
I move my oil drain pan underneath these two fittings. The longer oil cooler hose twisted and slid right out of its fitting. '
The shorter oil cooler hose gave me some trouble.
I squirt some WD40 into the fitting, into the holes the clips slot into. From the driver side front wheel well, you can see the hose fitting onto the oil cooler line head-on. Using a broad screwdriver and a mallet, I gently tap on the body of the fitting. Working all the way around the circumference of the fitting, I hear more oil dripping into my pan and this line is free.
P/S System
I am keeping my PS pump on my block as I remove it. The only thing holding it to the chassis is the PS cooler, so removing two lines off of it frees it from the car.
I use one of those hand pumps to syphon fluid out of the reservoir, to keep the back hose from leaking when I remove it. (Spoiler: It still leaked on me)
From the top of the PS pump, I use a breaker bar and a 17mm socket to remove the banjo bolt. I am careful not to lose the upper and lower crush washers as I remove the banjo fitting on the hose. I thread the banjo bolt, and its two crush washers, back on the PS pump.
From the back of the PS pump, using some pliers, I undo the clamp from the hose. A good twist breaks the seal and the hose comes free. I should take a mental note of how that back hose curves around the charging harness to get to the reservoir when I re-assemble this.
My wife's S14 has had Evans in it for around 20 years. My daily for about 5 years and I've converted many customer cars as well as other cars in my collection throughout the years. I'll be converting my fairly new to me FD after I restore the fuel system. You don't have to worry about corrosion when it is waterless and never have to change it. Now this coolant does not cool any better than your typical water/coolant mixture. It just does not have any corrosive properties and has a higher boiling point which makes it much safer to run and allows you to run a pressureless system if you want. This is huge with the 90/early 2000's bmw crowd because everything in their cooling system is junk plastic that ruptures or falls apart. If you aren't running high pressure in your cooling system, it is much more reliable. Being Evan's coolant doesn't boil at a low temp like water, you won't get hot spots surrounding your combustion areas in your engine which lead to damage. I've had this coolant save my butt on a few occasions strictly due to this property. Recently on the S14 when a fan relay went out and temps sky rocketed. After going checking the cooling system on that car with this incident, I still have the 20 year old coolant in it, just topped off what came out of the overflow from expansion when it overheated.
Thanks for the info! I'm actually heavily considering using this now. I have found I am checking my coolant filler neck more and more as I've owned the car for longer just to make sure it's burping/not losing coolant. It'll be nice to actually have a set-and-forget cooling system for once.
Originally Posted by SETaylor
+1 on removing removing the downpipe after the engine has been removed. Just be mindful of the extra length during removal. Same recommendation with the transmission if you need to do anything to it (like 5th gear synchro & spindle).
Good job on breaking the process into smaller, more manageable sections of work.
Thanks! The extra length and the thought of weaving it around the bell housing was enough to scare me into taking apart my intake piping just to get to it. I don't like doing more than one complicated thing at once, and I have never separated an engine and transmission or removed an engine from its engine mounts before. I figure I'd save future me the hassle and take the downpipe out now.
Originally Posted by ZE Power MX6
A/C line do kinda get in the way during engine removal, you'll have to bend things a bit to get the engine out if you are not pulling the trans with it. I would remove them if the system is already drained, and if the threads aren't seized.
The PP collar shouldn't be too bad, the more room you have under the car the easier it is to apply the proper "press and twist".
Thanks for the heads up, ZE Power. I actually jumped back into the garage after reading this and bent my oil cooler lines over my AC lines in preparation. I'm wondering if there's even a point to keeping the lines in there. I live in CA bay area where hot is 74deg. F. and I never use my AC.
I did actually figure out my pull type clutch. I thought I had it figured out before, but I didn't realize you needed to push the release bearing in to free the wedge collar. With the release bearing up, it locks the wedge collar out. I feel like it's probably small beans to a lot of the veterans on the forum, but with the downpipe out yesterday and my pull-type clutch out today, I am feeling prettttyyy darnned accomplished.
I am removing my ECU harness with the engine, which involves:
Removing the passenger side door sill trim and kick panel, exposing the ECU
Removing 2x connectors from the ECU
Removing 1x connectors from the E/L Load Module (I think?)
Removing 1x chassis ground
Removing 2x connectors from the harness to the interior, one white and one blue
Passenger door open, I unscrew the two door sill screws holding the door sill trim in. I took mine out before I took this picture. I put the screws back into the door sill.
This frees the passenger kick panel, hiding the ECU. This is held by just two clips. I use a flathead screwdriver to pry the heads out of the clips and they come out.
There is a plate holding the ECU harness to the passenger footwell, held with 2x 10mm, nuts. Using every extension I own, I gun these two nuts out and remove the plate. I return the two nuts to the footwell studs.
I move the plate, kick panel, and doorsill trim to an “Interior parts” box. I also put the two kick panel clips in a baggy and label them, and then also put this into the “Interior Parts” box.
Find the ECU harness as it exits the firewall and start tracing it down to its connections. I found 2x ECU connectors (yellow), 1x E/L module connector (black), 1x connector near the ECU to some interior harness (blue), 1x chassis ground. I did not immediately find the final connector, in white. That is way up in the dash, near where the harness exits the firewall. Slide your head in facing up, you’ll see it.
The chassis ground is removed with a 10mm bolt. I put the bolt back into the chassis. I undid the rest of the harness connectors. For the ECU connectors, pressing the tab and inserting a screwdriver in the gap between the ECU body and connector, then twisting, pulled it out easily. All the other connectors came apart just with one hand. Do not forget that white hidden connector!
With the harness all separated, from the inside of the car, I use a long rod to push the rubber boot on the firewall. It goes through pretty easily. Push the harness through the firewall as much as you can.
Back in the engine bay, the harness is held into this clip on the firewall. Undo 1x nut (10mm) to free the harness. Return the nut to the stud on the firewall.
I needed extra room, so I undid the four bolts on the wiper motor and rotated it counter-clockwise, exposing the harness entrance into the firewall. You can fit a thin ratchet and 10mm socket between the ABS unit and wiper motor body to undo the bottom right bolt. I cycled going into and out of the car, pushing and tugging the harness until it was free. The harness should be separated from the car now, and laying on the engine.
Motor Mounts
For whatever reason, I thought the motor mounts were going to be the hard part today and the ECU harness the easy part. I chucked some PB Blaster into the two motor mount nuts underneath the car. These are towards the rear-end of the front subframe. While I’m under there with the PB Blaster, I shoot some into the downpipe bolts that I intend to get to next.
By the time I’m done with that, I use an impact gun and 14mm socket to remove the motor mount nuts and washers. 2x nuts and 2x washers go into a “motor mounts” baggy.
Downpipe Disclaimer: This is the first time I’m doing this. I have no idea how to do this properly.
I think, just skip all this and take the DP out with the block. I'm going to tear apart all the piping to and from the turbo to the crossover pipe, which you probably want to do out of the car.
I would consider how much space you have to pull your engine. I have a washer/dryer in front of my car so space is critical, I didn't think I'd have the space to pull the engine with the downpipe and all.
In hindsight it would've been easier to just move my washer dryer than to remove my downpipe, probably.
There are 2 bolts at the bottom and 2 nuts on studs at the top holding the downpipe to the hot side of the turbo.
I’m underneath the car now with a bunch of 10mm wrenches. The two bolts at the bottom are easy to get to, but the one on the inside of the bend of the elbow is tricky to get a wrench on, and mine was rounded slightly. The one on the outside of the elbow comes out easily with a 10mm wrench. For the difficult bolt on the inside of the elbow, I managed to finesse a bleeder wrench onto the bolt head and turn it ever so slightly. The bleeder wrench was important for the hex shape, to get force applied to as much of the broad side of the bolt head as possible. (A wrench with a shallower jaw would continue to round it.) I turn this bolt 1/8th a rotation at a time for about 45 min until it’s finally hand loose. For my downpipe, the head of this inside bolt runs into the downpipe before it can fully unthread. So freaking annoying. I leave it where it is and move onto the other downpipe fasteners. If I can get the downpipe loose, I can move it further away from the turbo, buying more space for the bolt to come out.
Back on top of the car now, there are two nuts on two studs hidden underneath all this intake piping. I’m sure more experienced members can get to these without removing anything, I cannot.
Upper, Front Downpipe Nut
- Airpump - Used an impact gun, I undid 1x really long bolt (12mm) from the housing with the water filler neck. I undid the bolt for the Airpump swinging bracket. I undid the hose going to the ACV and gave it a masking tape label "To AirPump". I undid a disturbingly loose and mangled up connector and likewise labelled it. I took the whole airpump and bracket out and put all the bolts on the airpump. Crossover Pipe, Y pipe - I undid 2x 10mm nuts from the Y pipe to the turbo. I returned the nuts to the turbo studs. The Y pipe just slides out of the secondary turbo charge pipe. I labelled the two vacuum hoses from the Y pipe fittings to the engine "To Y Pipe Fitting" and disconnected them. The Y Pipe, Airpump, and Crossover pipe went into my "Airpump" box.
This exposed the first downpipe nut on top of the car. Using a long wrench, I get this nut off the stud. I make a”downpipe hardware” baggy and put the first bolt and first nut into it.
At this point I am frustrated and take a shower and go to bed.
Awake with more stamina, I see the rear downpipe nut through the intake piping, already slightly rounded. If you’re able to get this nut with the remaining intake piping in place, I am very jealous of you. A ratchet with an impact socket (for the hex shape) continues to round it. Here we go again.
(I didn’t get images of this because I am still frustrated by this pipe. I should’ve taken this as a sign to take a longer break)
Secondary Turbo Intake Piping - From above the car, on the passenger side, undo 2x nuts on studs to remove this pipng from the secondary turbo. My nut was taking its stud with it, but no worries - the stud comes out before it hits the turbo piping. Remove this pipe.
Secondary Turbo Charge Piping - With the intake piping removed, remove 2x nuts (10mm) on the turbo outlet. Attached to this charge piping are two valve bodies (1 valve and 1 actuator for a butterfly valve). I believe these are the valves that push my secondary charge air back to my airbox between 3500RPM-4500RPM. There are three vacuum lines to my LIM. I remove them at the LIM, and leave a label on the LIM next to these ports, and label them 1, 2, and 3. On the vacuum lines I removed, I add a label “To LIM” and number them 1 thru 3. The secondary turbo charge piping comes out.
With this off I can see the last downpipe nut, and have the necessary clearance to remove it. Thankfully it isn’t totally rounded, I use the tightest wrench I can find and take this nut off the stud.
Lower, Inner-Elbow Downpipe Bolt
With the rest of the hardware removed, I slide the downpipe as far off the turbos as I can. This buys enough room to get under the car and undo the original troublesome bolt all the way (the one at the inside of the DP elbow that tops out before unthreading). With the bolt loosened, there’s no more resistance for a regular wrench to round it any more. Thank goodness. While I’m under the car, I PB-Blaster, and then remove the Downpipe-Midpipe bolts and nuts. There is a gasket there that I take with me.
All four pieces of downpipe/turbo hardware are moved into a “downpipe” baggy. All four pieces of downpipe/midpipe hardware, and 1x gasket, are moved into this same “downpipe baggy.
Downpipe Removal
With all the hardware off, the downpipe can come out of the car. It seems like there’s just not enough room at first, but by jiggling it around it comes out without too much struggle. I don’t remember how I finagled it out, sadly - at this point I just wanted this thing out.
The downpipe is smelly, I move it somewhere safe outdoors where it won’t stink up my garage.
Just pull the downpipe with the motor this sucked.
This should wrap up all the stuff that ties the engine to the car.
This includes the pull-type clutch, transmission housing bolts, fuel lines, and charging harness. Also the split air pipe, and weirdly one silicone line on my evap system that isn�t in the FSM?
Starter Motor
I have to take this out to get to a transmission housing bolt that�s captive under it. I remove it now since it makes it easier to get to the inspection plate for the clutch, too. Bring a mask and eye protection, stuff�s going to come out of the starter hole.
I undo a nut and a spade connector to disconnect the starter motor from the charging harness.
Then I undo these two long bolts. The top bolt is a bolt and a nut, don�t endlessly spin just the bolt around like I did for 15 minutes. Bring a wrench.
The starter motor should come out. You might need to tap it a bit.
I put the 2x bolts and 1x nut back on the transmission.
Pull Type Clutch
It took me a few days to figure this out, but the FSM does the best job of explaining it.
Strategy - Using the clutch fork, I am going to push the TOB into the pressure plate, which will also push the wedge collar into the pressure plate. Holding the TOB and wedge collar there,the TOB is now �released� from the wedge collar. Using a screwdriver, I move the TOB away from the pressure plate while keeping the wedge collar fully inserted. With the TOB pushed away from the wedge, collar, the transmission input shaft should be free to slide in and out of the clutch assembly.
I�m going to bring with me a long flathead screwdriver, a long 10mm wrench, and a 10mm socket and ratchet. Visibility is going to be a challenge - the inspection hole is big enough to get a flashlight to shine through, or to get a tool into, but not both. I had success just turning my phone flashlight on and laying my phone on my chest, right under the inspection hole, and inserting my tool slightly to the right of the light beam.
My car doesn�t have an undershield so I don�t know how to remove it. If yours does, remove that first.
Under the car now, there are two inspection panels that I remove. One is obvious, right at the bottom of the bell housing with a neat sticker on it. Two 10mm bolts and the plate come out and go into a �transmission� baggy.
I shift my body so my head is under my starter. The next inspection plate is above the starter, in front of the slave cylinder. I use the long 10mm wrench and put the two bolts and inspection plate into the same �transmission� baggy as before.
I shift back to my original position, laying down in the middle of the car looking into the center inspection hole. Using my left hand, I feel my way into the slave cylinder inspection plate for the clutch fork - you�ll feel it towards the back of the inspection hole with your thumb. Push this end of the clutch fork towards the back of the car, away from the engine and towards the clutch slave. The TOB should be pressed into the pressure plate now.
My TOB was a little gummed up and I couldn�t get my TOB pushed in all the way with just my thumb. While holding the clutch fork down as much as I can with my left hand, I use my right hand to insert a screwdriver into the bottom inspection hole and push the other end of the clutch fork towards the engine. Once the ring of the wedge collar was seated against the PP, I can take my screwdriver out and hold the whole clutch fork assembly in position with my left hand.
Still holding the clutch fork with my left hand, I put my screwdriver back into the inspection hole and wedge it between the TOB and the wedge collar. With my screwdriver now holding the wedge collar against the pressure plate, I release my left hand off the clutch fork, and the TOB disengages.
Split Air Pipe
If you didn�t remove your secondary turbo intake piping, you can probably get at these two 10mm nuts from under the car. Since I did, I am over the car on the passenger side of the engine bay. I use a wrench to remove these two nuts and the split air pipe falls onto the subframe. One of the nuts takes a stud with it, I move this to a �split air pipe� baggy
Transmission Housing Bolts
There are five 14mm bolts. Two under the car are easy, one by the starter and the other near the bottom inspection plate. The one by the starter is really long. There is a third bolt on the drivers side of the transmission above where the slave cylinder inspection port is, you can double-wrench this off from under the car.
Still under the car, over to the passenger side of the transmission. There is a bolt all the way up here. I�m starting to appreciate yesterday�s me removing the downpipe, this area gives me a lot of swing to remove this bolt.
Last bolt, I�m above the car now, looking behind the UIM on the drivers� side of the car. The bolt is very visible at the top of the transmission.
I undo the coolant hose and vacuum line to the UIM behind the engine to make room for two wrenches. There is enough room here to double wrench this bolt off.
When it�s loose enough, I go back under the car and arch my hand around the passenger side of the transmission bell housing. I can get two fingers on this now loose bolt and unthread it the rest of the way. These five bolts go into a �Transmission housing� baggy.
I reconnect the coolant hose and vacuum line after I'm done. These are engine to engine, so it doesn't matter whether they are on or off - more critically I don't trust myself to remember where these go.
I plan on leaving this in my car. This is probably the part of the car I�m least familiar with - my cars� wiring is a bit spaghetti and I�ve just always kinda let it do its own thing.
This harness travels from the battery terminals backwards to the main relay box. From this, a large loom of wires travels back towards the drivers compartment, downwards towards the center of the block coolant drain plug, and then finally back to the starter.
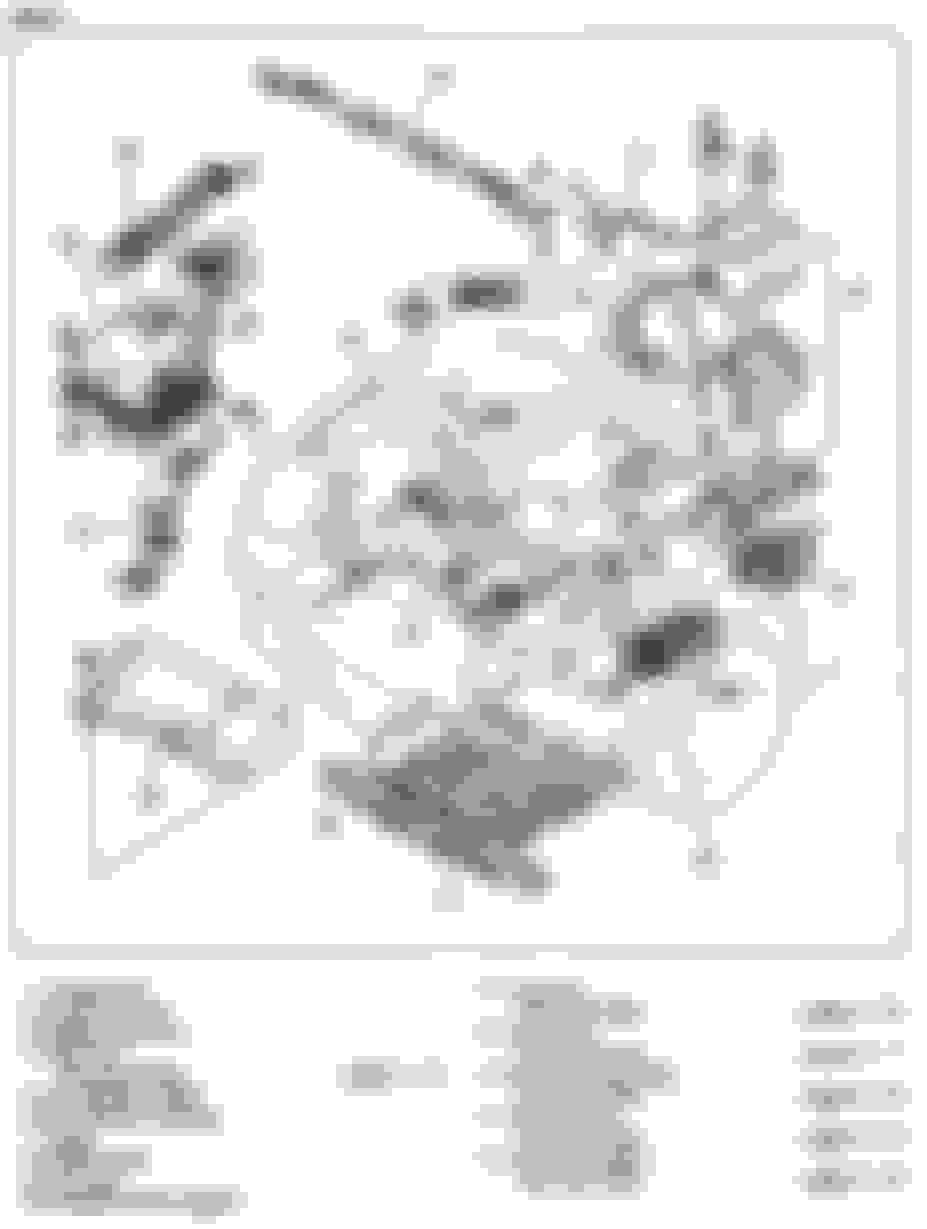
I follow this diagram to trace how many connections I�m removing.
Starting at the top of the car, right behind the relay box, I unclip this black connector on the PS pump. I label both ends �P/S�.
On the alternator, there is a 12mm nut holding the wiring to the casing.
Next to it is a basic connector. There�s a lot of stuff in the way of this one - the engine bracket and the oil filler neck. I was able to finagle my left hand around the engine hoist bracket, onto the body of the connector, to pull. I used a long flat head and, using the oil fill neck as a fulcrum, pry the connector clip open. (Towards the body of the connector). It�s a bit of a fight but it comes out. I label these �ALTERNATOR�.
A little further down from the P/S connector is another black connector that seems to go to something under the UIM. I�m not sure what this is. I disconnect it and label it �To Engine Harness�
Below the P/S Pump is the A/C connector. I leave mine on - my A/C is staying in the car.
Underneath the car now, there is a white connector going to a sensor in the oil pan. I disconnect this and label it �Oil pan�.
Next to this is an engine ground. My car also has an E.GRND from my Sakebomb ignition kit. I remove the 10mm ground out of the block and remove both grounds. I replace the bolt onto the block.
The starter harness should already be removed, but through the same viewport, I can see the oil pressure sender underneath the pedestal. This is a single spade connector and comes out easily.
A quick jiggle confirms that the harness is free from the engine. My harness had a lot of clips already disconnected - I�m not sure if there�s a clip holding it to the engine normally.
Fuel Lines and Evap Line
I haven't done these yet. It's just three hoses, and one vacuum line from a metal check valve near the oil fill neck. I'll do this before I lift the engine out over the weekend.
With that, the engine should be ready to come out. I plan on pulling it with some family this weekend, when I can borrow an engine hoist.
What do people usually go to when their twins go out, and don't want to dedicate themselves to a single conversion? Like before, I really just want to get the car on the road, and I have just refreshed my fuel system and rats nest. It would be a shame to switch directions now.
I've already sent an email over to Brian at BNR, just because I've seen his name around on the forums.
Totally depends on personal preference and location. If you are in terrible places for cars like California, your options may be limited unless you register your car to another state. Most people these days go single just for simplicity. I personally will stay sequential twins just because with my car I'm keeping it OEM+ and love the balance and feel of a properly running sequential setup. I'll either go 99 spec, BnR or SP twins when mine fail. You have to ask yourself what your end goal is. You can easily get 350whp from BnRs reliably and many run around 400. In my opinion, this is the sweet spot for FDs.
Totally depends on personal preference and location. If you are in terrible places for cars like California, your options may be limited unless you register your car to another state. Most people these days go single just for simplicity. I personally will stay sequential twins just because with my car I'm keeping it OEM+ and love the balance and feel of a properly running sequential setup. I'll either go 99 spec, BnR or SP twins when mine fail. You have to ask yourself what your end goal is. You can easily get 350whp from BnRs reliably and many run around 400. In my opinion, this is the sweet spot for FDs.
Yea, after a lot of tossing and turning in bed, I think me of today still thinks these twins are part of this FD's identity. I'm either going BNRs or replacement twins.
Mazda motorsports sells '93 twins for around 3 grand, but don't sell '99s anymore. Weird.
Originally Posted by nmoffatt
Thanks for documenting this. I’m currently rebuilding the engine in my 8 and will move on to the FD at some point next year.
A few months ago I upgraded to stage 2 BNR’s and am very happy with them. The wait time was about 6 months.
I’m somewhat local to you so maybe we could meet up at some point if you are curious to see them. Just send me a PM.
Thanks for the offer - I might take you up on that, if not to see your BNRs, then definitely to see that paint job of yours.
6 months is a long time, but I've only heard good things about them, might be worth the wait. It could also just be tempting to put my old good (?) 93s in while I wait and just have Bryan work on my '99s, and swap them in when they get back. So much to think about!
How is life with an RX8 and an RX7? One of these days I'm going to lose access to my family's shared commuter car, and I've been dreaming about what 4 door accompanies the RX7 in the household for friend-hauling tasks. I don't know if the RX8/RX7 combo is irresponsible or not.
Wow, I'm subscribing purely because your documentation of everything is exceptional. I don't foresee ever actually getting an FD in my lifetime but I'll be paying attention to how your adventure goes
As for dailying an RX8, I think it would hold up, but it would be more of a case of whatever daily you choose surviving the bay area. I have a friend there that I had to talk out of having a stick car there as his only car. He wound up choosing a brand new Mazda 3 but it's already getting dinged up, assaulted by the weather, and thrashed by the potholes. He ended up taking my recommendation to step down from the stock 18" wheels to 16" Enkeis after his 2nd or 3rd flat tire that resulted in a bent rim. Probably preaching to the choir here though
Yea, after a lot of tossing and turning in bed, I think me of today still thinks these twins are part of this FD's identity. I'm either going BNRs or replacement twins.
Twins are king for the spirit of the car, keep them. If you want more power do the BNR's or the Bathurst SP twins.