
94 Build... GT35R, RE Vmount and a whole lot more............ NOW WITH PISTONS!!


Thread Starter
Eats, Sleeps, Dreams Rotary
iTrader: (52)
Joined: Oct 2001
Posts: 3,902
Likes: 10
From: NJ
Thanks Gordon! Definitely ready to get everything assembled and show it off. Much to do this winter but taking the time on the "details" will be worth it.


Thread Starter
Eats, Sleeps, Dreams Rotary
iTrader: (52)
Joined: Oct 2001
Posts: 3,902
Likes: 10
From: NJ
I have been doing a few small things as I have been planning for the larger. Updates will come slow over the next few months as I will be in CA for all of January.
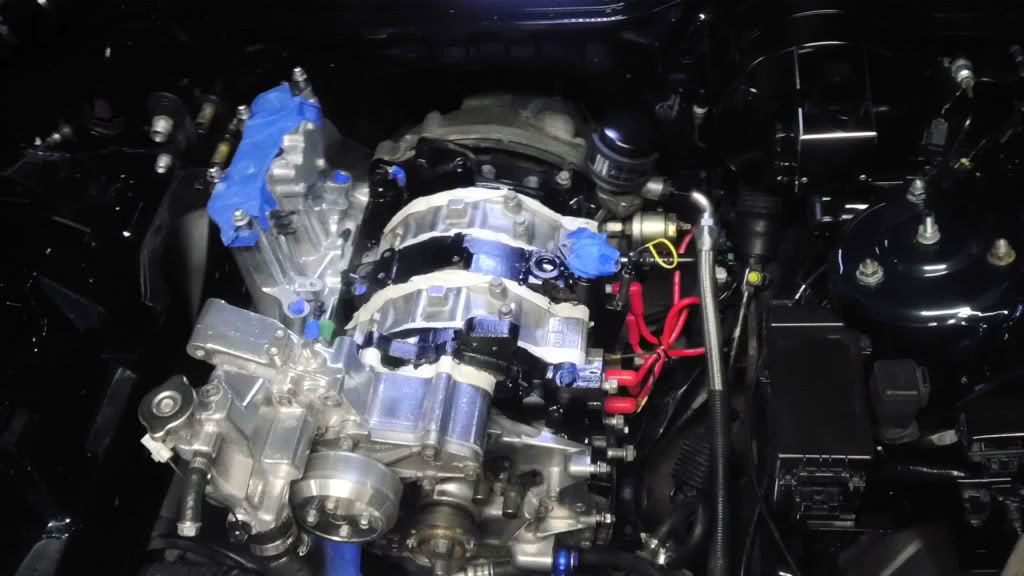
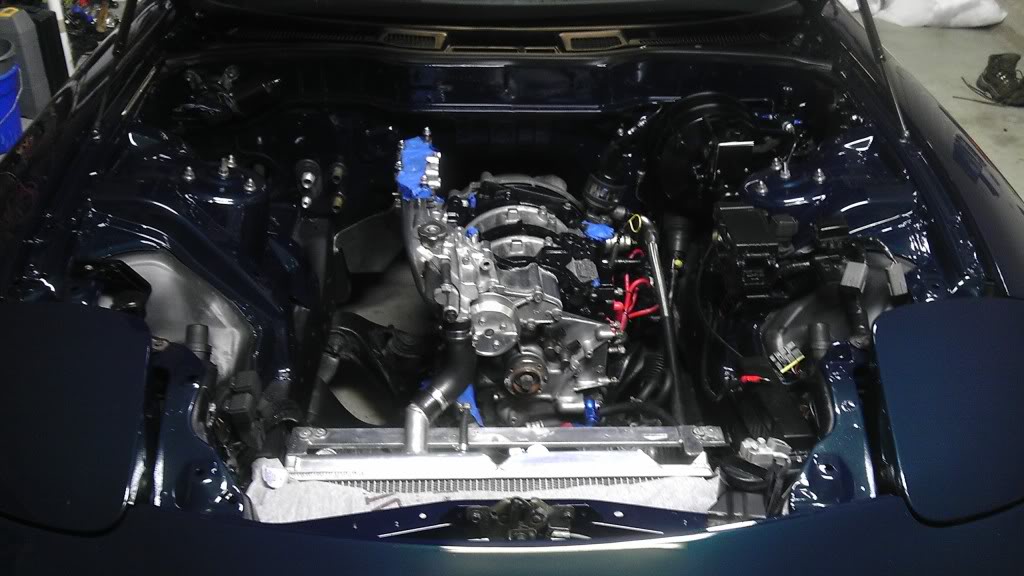
Painted Irons
With the bay and block cleaned back up from body dust, I wanted to take the time to paint my irons. I should have done this during the last engine swap, but I was on a time crunch. I definitely didn't want to spray inside the bay and masking everything back off just seemed like an unnecessary amount of work. So I used a cool little kit that I have seen on the shelf; the Dupicolor Ceramic Paint kit for Calipers. The paint from the kit just brushes on so it was pretty straight forward and easy to use.
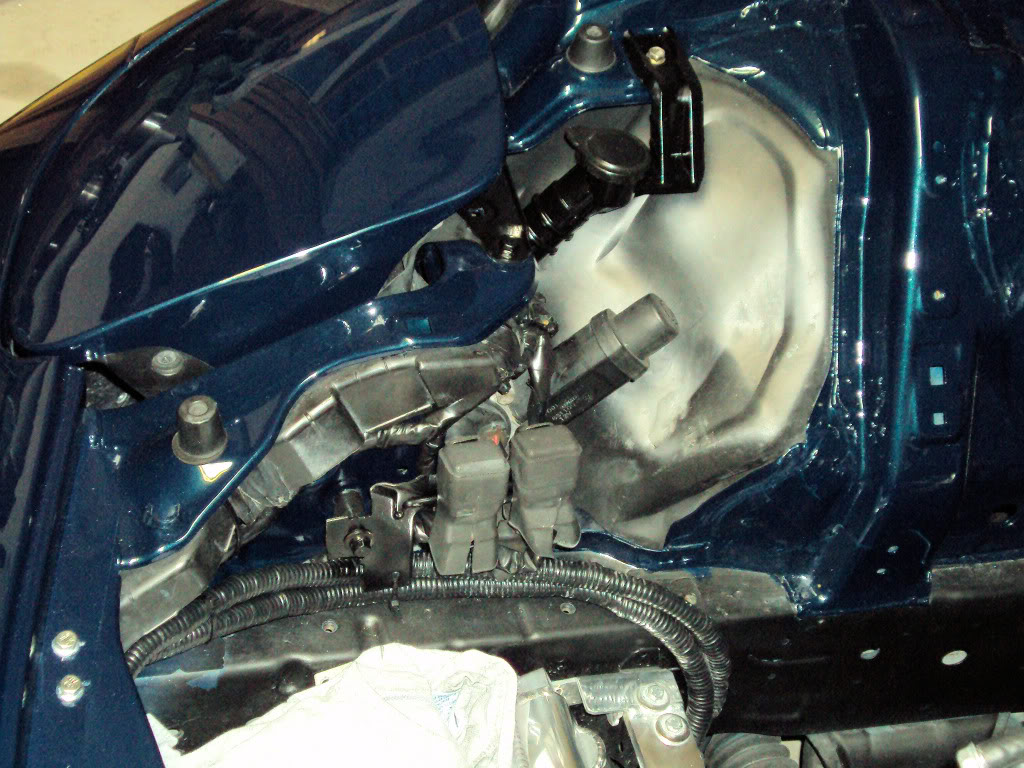
Relay Relocation
Well, I chickened out. After looking everything over, and doing some research, I began to realize a complete wire tuck was just beyond the scope of what I wanted to do. Many of hours of work to hide a few box's just didn't seem worth it. After all, I'm not really building a show car, but rather a car I like to enjoy and show off a little. On the passenger side however, the relays were easy to move down to a cleaner location. This will also give me more options as my water injection components are mounted on that side. Overall, I thought it turned out nice.
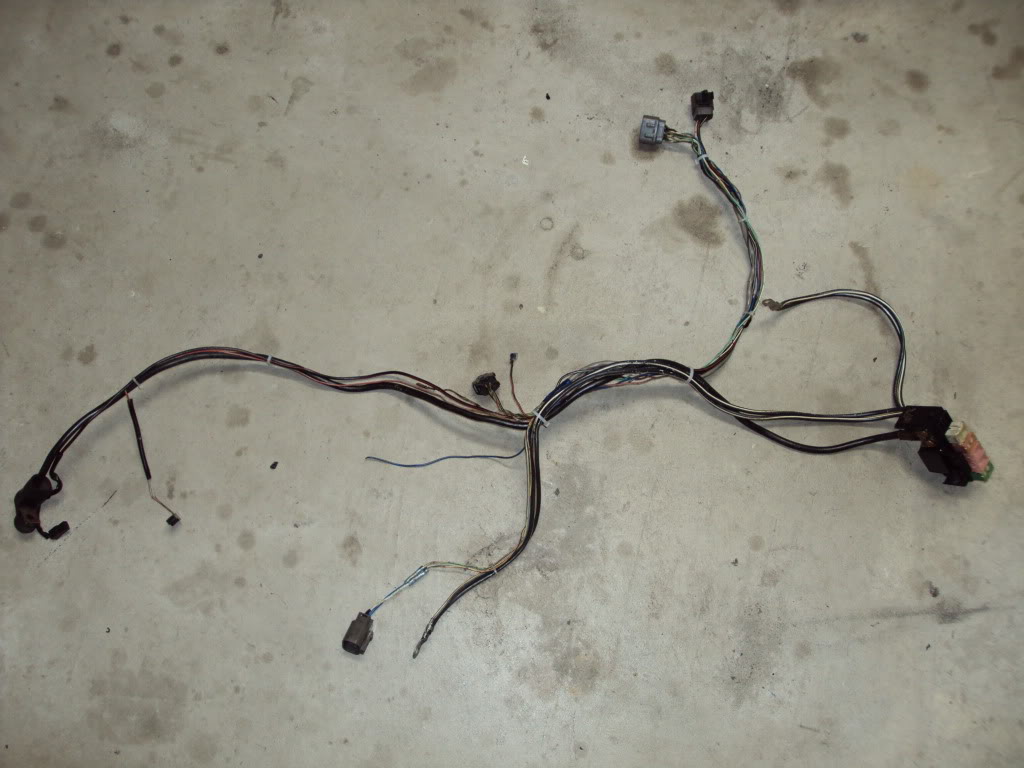
Engine Harness
I decided to strip the engine harness down and re-wrap it with proper heat tape. This also gave me the chance to shorten or extend certain pieces based on how I want to run it. It had a few wires left that I didn't need such as the power steering pressure sensor and the large ground that runs through it. I still need to finish it up.
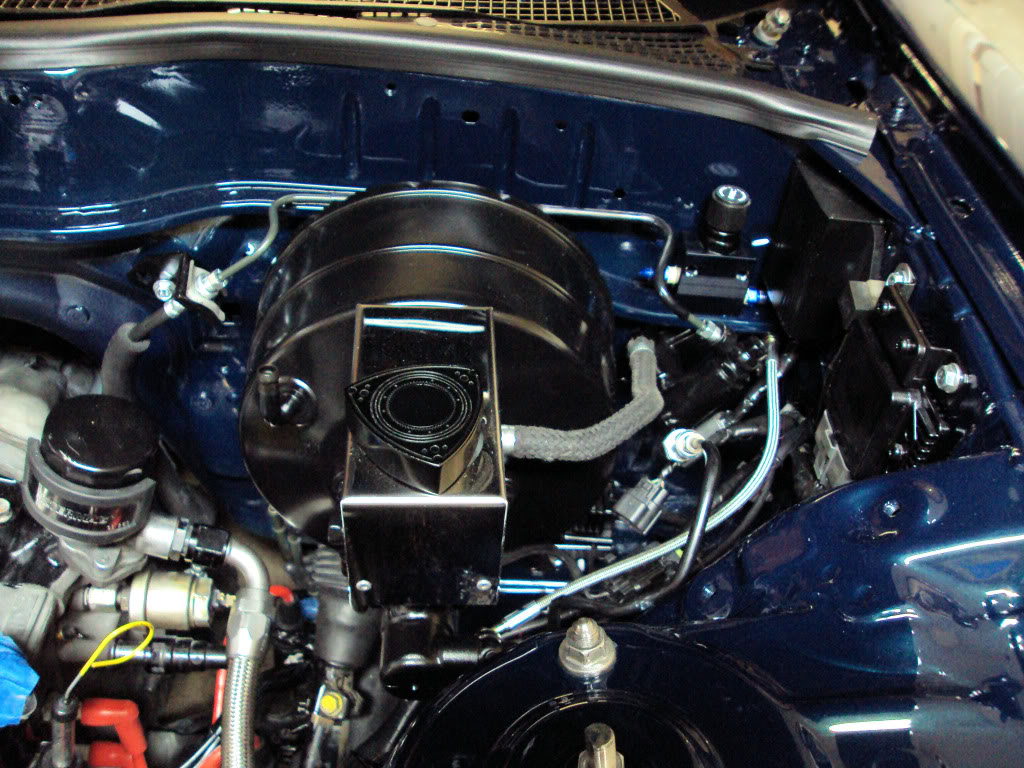
Black, Bling, and Brakes
I wanted to create a more complete color scheme this time around. My "polished & black" theme needed some work. As I started to assemble the brake and clutch components, I took the time to give them a nice coat of satin black engine enamel. I also found a nice place to tuck the Twin Power. You can also see my brake booster cover I picked up. I thought it was something neat and different.
With the brakes, I never liked my previous mounting location of the SBC Bias. It will now sit where it does in the pictures with steel fittings of course. I have yet to get it mounted up because I needed to have some more braided line made. This is Alex Rodriguez's ABS delete kit. Instead of running the long line across the firewall, I will be installing some bulk head fittings on each side of the firewall and putting the line through the interior. Again, trying to keep it clean. The rest of my fittings are on order, so I may get this done before I leave for CA.
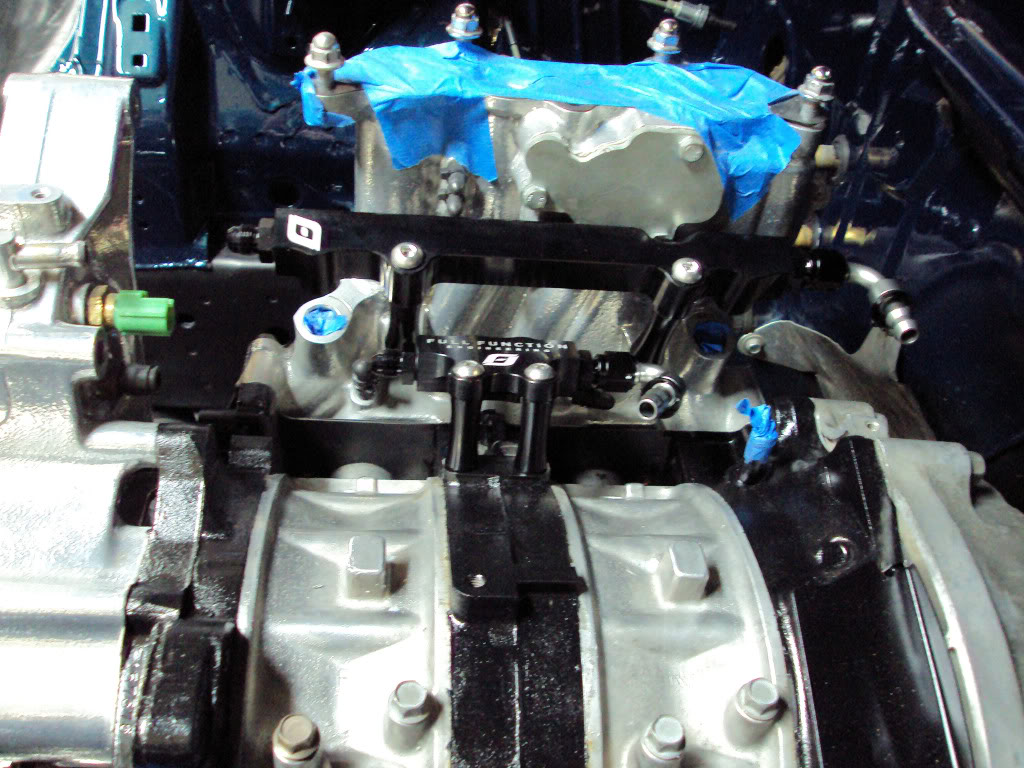
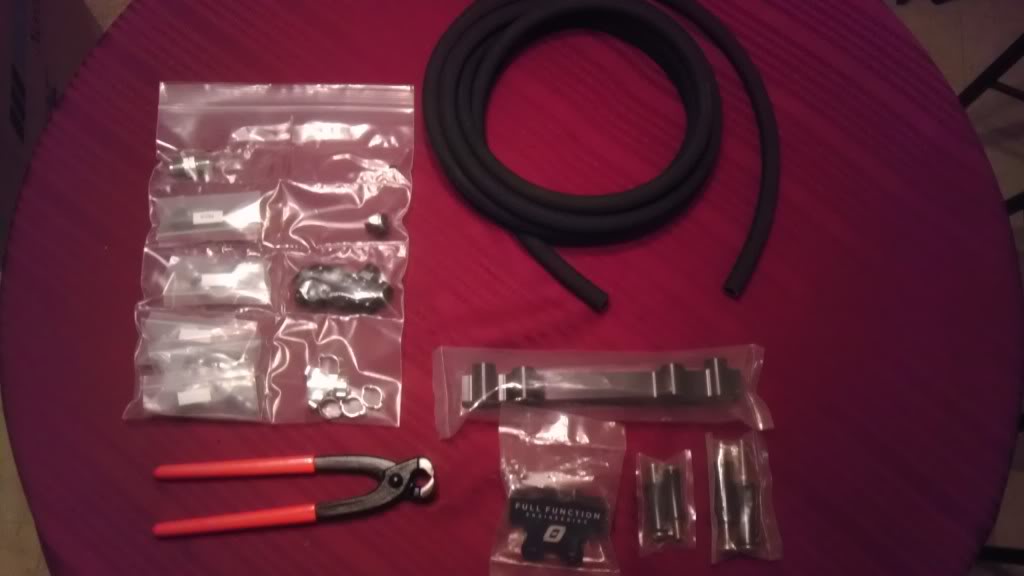
New Fuel System
I hopped the Full Function band wagon and got a set of their rails. I never had an issue with my KG rails, but I couldn't pass up such a great product. This also gave me a chance to use teflon braided line with Pushloc fittings. These are the same type of fittings I used with my water injection and I really like them. I will be utilizing Otiker clamps on the fuel lines. Again, still waiting for a few fittings to make it complete.
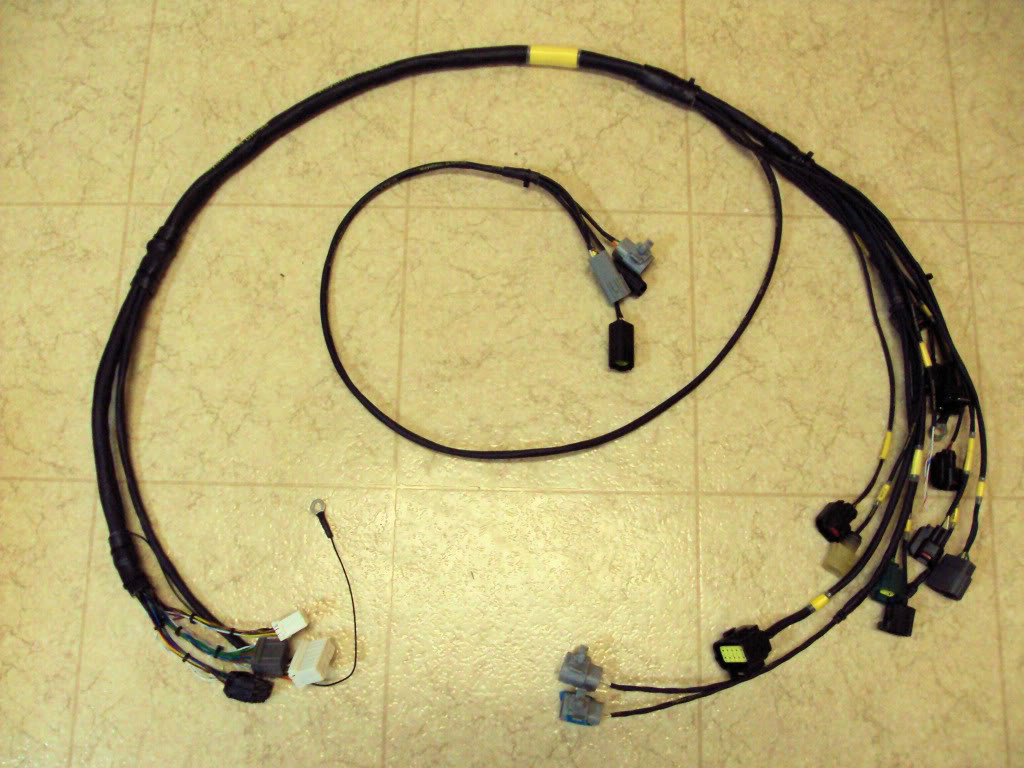
Rywire Milspec Harness
Once I spotted this harness from the thread started back in August, I knew I would be getting it. Whether I stay with the PFC or move to a Haltech, having a fresh harness is always a good thing. The fact that this harness is milspec wire is just icing on the cake. Ryan was really nice to work with and he tailored the harness for my needs. No more pigtails for my EV14 injectors or fast reacting IAT. It also included extra wires built into the harness that will be used for my water injection. It's a very well done harness!
That's it for now.... Much more coming soon! I pretty much have everything already planned out. Just keep chipping away.
Painted Irons
With the bay and block cleaned back up from body dust, I wanted to take the time to paint my irons. I should have done this during the last engine swap, but I was on a time crunch. I definitely didn't want to spray inside the bay and masking everything back off just seemed like an unnecessary amount of work. So I used a cool little kit that I have seen on the shelf; the Dupicolor Ceramic Paint kit for Calipers. The paint from the kit just brushes on so it was pretty straight forward and easy to use.
Relay Relocation
Well, I chickened out. After looking everything over, and doing some research, I began to realize a complete wire tuck was just beyond the scope of what I wanted to do. Many of hours of work to hide a few box's just didn't seem worth it. After all, I'm not really building a show car, but rather a car I like to enjoy and show off a little. On the passenger side however, the relays were easy to move down to a cleaner location. This will also give me more options as my water injection components are mounted on that side. Overall, I thought it turned out nice.
Engine Harness
I decided to strip the engine harness down and re-wrap it with proper heat tape. This also gave me the chance to shorten or extend certain pieces based on how I want to run it. It had a few wires left that I didn't need such as the power steering pressure sensor and the large ground that runs through it. I still need to finish it up.
Black, Bling, and Brakes
I wanted to create a more complete color scheme this time around. My "polished & black" theme needed some work. As I started to assemble the brake and clutch components, I took the time to give them a nice coat of satin black engine enamel. I also found a nice place to tuck the Twin Power. You can also see my brake booster cover I picked up. I thought it was something neat and different.
With the brakes, I never liked my previous mounting location of the SBC Bias. It will now sit where it does in the pictures with steel fittings of course. I have yet to get it mounted up because I needed to have some more braided line made. This is Alex Rodriguez's ABS delete kit. Instead of running the long line across the firewall, I will be installing some bulk head fittings on each side of the firewall and putting the line through the interior. Again, trying to keep it clean. The rest of my fittings are on order, so I may get this done before I leave for CA.
New Fuel System
I hopped the Full Function band wagon and got a set of their rails. I never had an issue with my KG rails, but I couldn't pass up such a great product. This also gave me a chance to use teflon braided line with Pushloc fittings. These are the same type of fittings I used with my water injection and I really like them. I will be utilizing Otiker clamps on the fuel lines. Again, still waiting for a few fittings to make it complete.
Rywire Milspec Harness
Once I spotted this harness from the thread started back in August, I knew I would be getting it. Whether I stay with the PFC or move to a Haltech, having a fresh harness is always a good thing. The fact that this harness is milspec wire is just icing on the cake. Ryan was really nice to work with and he tailored the harness for my needs. No more pigtails for my EV14 injectors or fast reacting IAT. It also included extra wires built into the harness that will be used for my water injection. It's a very well done harness!
That's it for now.... Much more coming soon! I pretty much have everything already planned out. Just keep chipping away.
Thread Starter
Eats, Sleeps, Dreams Rotary
iTrader: (52)
Joined: Oct 2001
Posts: 3,902
Likes: 10
From: NJ


love the new paint, and it looks to be coming to back together quickly. I agree on the wire tuck... pain in the ***. I was able to do something similar to you by moving the relays without cutting them. However I was also able to move the other fuse boxes as well and only had to extend 2 or 3 wires. They are covered by my radiator plate, wont work with your V-mount unfortunately.
I have to say though... not a fan of the brake reservoir cover. How do you know the fliud level, or if the fluid is clean? Thats one of the most important fluids that I check every time I pop the hood.
I have to say though... not a fan of the brake reservoir cover. How do you know the fliud level, or if the fluid is clean? Thats one of the most important fluids that I check every time I pop the hood.

Thread Starter
Eats, Sleeps, Dreams Rotary
iTrader: (52)
Joined: Oct 2001
Posts: 3,902
Likes: 10
From: NJ
love the new paint, and it looks to be coming to back together quickly. I agree on the wire tuck... pain in the ***. I was able to do something similar to you by moving the relays without cutting them. However I was also able to move the other fuse boxes as well and only had to extend 2 or 3 wires. They are covered by my radiator plate, wont work with your V-mount unfortunately.
I have to say though... not a fan of the brake reservoir cover. How do you know the fliud level, or if the fluid is clean? Thats one of the most important fluids that I check every time I pop the hood.
I have to say though... not a fan of the brake reservoir cover. How do you know the fliud level, or if the fluid is clean? Thats one of the most important fluids that I check every time I pop the hood.
On the reservoir cover, it is slotted on the side. Easy to see and check fluid level.
^ You know what happens when you ***ume  ....
....
OP, Dont be lazy, I expect a full wire tuck by april, "any job, big or small, do it right or not at all" (I am just jealous of your clean bay ).
).
....OP, Dont be lazy, I expect a full wire tuck by april, "any job, big or small, do it right or not at all" (I am just jealous of your clean bay
).
Thread Starter
Eats, Sleeps, Dreams Rotary
iTrader: (52)
Joined: Oct 2001
Posts: 3,902
Likes: 10
From: NJ
XLR8... I really like the factory-look you have achieved. As you know, I got so tired of seeing engine bays that look like Christmas trees all lit up with red and purple and green and red and polished aluminum all over the place. Basically keeping the engine bay to 3-4 colors that make some sense together, like black and silver and blue, really makes the engine bay look factory. So much nicer. Probably my favorite MB now. Why are you going to Cali?
Gordon
Gordon
I'm headed to Travis AFB, CA to teach a class. I'm an Air Force instructor and once a year I go to different bases for a mobile training team. I was fighting it hard this year, as I don't like leaving the wife AGAIN and I wanted to continue my project. But, it's only a month and the perdium is pretty substantial.
You're new turbine housing should arrive today...

Thread Starter
Eats, Sleeps, Dreams Rotary
iTrader: (52)
Joined: Oct 2001
Posts: 3,902
Likes: 10
From: NJ
Thread Starter
Eats, Sleeps, Dreams Rotary
iTrader: (52)
Joined: Oct 2001
Posts: 3,902
Likes: 10
From: NJ

Thread Starter
Eats, Sleeps, Dreams Rotary
iTrader: (52)
Joined: Oct 2001
Posts: 3,902
Likes: 10
From: NJ
Yeah yeah.... Hurt my shoulder lifting a month back and been in rest mode since. Thanks to all for not letting laziness bleed over..... Eye of The Tiger boys....
Thread Starter
Eats, Sleeps, Dreams Rotary
iTrader: (52)
Joined: Oct 2001
Posts: 3,902
Likes: 10
From: NJ
I've been in Fairfield, CA all this month so there are no real physical updates to the car. However, my temporary relocation did bring a nice surprise. I got to spend some time down at Rotary Extreme in Union City to observe and even participate in some of Ben's recent R&D for his newest designed Vmount kit.
Being a relative long time customer, when he told me he had some great ideas for what is to be his final redesign of the Vmount kit, I was all ears. My initial reaction was that the more slanted angle of the intercooler would help my obvious space issues. But, there was more sweetness that I didn't know. He has relocated the condenser to the backside of the radiator allowing the radiator to get full blast fresh air, while the condenser still gets pulled flow from the fans while the AC is on.
I got a chance to see the setup work on his R&D car, and I I gotta say, I was impressed. Overall fitment looked great. As our condensers get pretty grubby from use, it was nice to finally see those red and blue Koyo lettering, and the signature polished radiator core that RE provides. The condenser now remains completely hidden on the backside. Custom spacers allow the fans to mount in the OEM position. The overall drop of the system was no lower than the sway bar. Overall, a very slick design.
I even got a chance to drive his FD to feel the A/C efficiency. While driving, the change was invisible as the system was very efficient. The system only began to slightly heat soak as he let it sit and idle for 15+ minutes. Though still cool, it wasn't "as" cold. Granted, this is pretty much the nature of all AC systems. Additionally, his car is a 95 with the wonderful 134a we all love. I look forward to giving my system a charge of the renowned champ ES-12 with this design.
There were quite a few other upgrades including a powdercoated intercooler mounting frame, and included ducting. I'm sure Ben will chime in with more details as the kit comes to fruition.
Overall, it was a really cool experience getting to see the company first hand, and meeting the owner. I look forward to bolting on my new shiny parts .
.
Being a relative long time customer, when he told me he had some great ideas for what is to be his final redesign of the Vmount kit, I was all ears. My initial reaction was that the more slanted angle of the intercooler would help my obvious space issues. But, there was more sweetness that I didn't know. He has relocated the condenser to the backside of the radiator allowing the radiator to get full blast fresh air, while the condenser still gets pulled flow from the fans while the AC is on.
I got a chance to see the setup work on his R&D car, and I I gotta say, I was impressed. Overall fitment looked great. As our condensers get pretty grubby from use, it was nice to finally see those red and blue Koyo lettering, and the signature polished radiator core that RE provides. The condenser now remains completely hidden on the backside. Custom spacers allow the fans to mount in the OEM position. The overall drop of the system was no lower than the sway bar. Overall, a very slick design.
I even got a chance to drive his FD to feel the A/C efficiency. While driving, the change was invisible as the system was very efficient. The system only began to slightly heat soak as he let it sit and idle for 15+ minutes. Though still cool, it wasn't "as" cold. Granted, this is pretty much the nature of all AC systems. Additionally, his car is a 95 with the wonderful 134a we all love. I look forward to giving my system a charge of the renowned champ ES-12 with this design.
There were quite a few other upgrades including a powdercoated intercooler mounting frame, and included ducting. I'm sure Ben will chime in with more details as the kit comes to fruition.
Overall, it was a really cool experience getting to see the company first hand, and meeting the owner. I look forward to bolting on my new shiny parts
.