When you click on links to various merchants on this site and make a purchase, this can result in this site earning a commission. Affiliate programs and affiliations include, but are not limited to, the eBay Partner Network.
Holy instant gratification build thread from when I saw post #1 this morning to post #73 with the wheel slip
My heart spins around an eccentric shaft, but this EV build is so awesome! I am really excited to see where you land - might even get that update over lunch at the rate your filling out this story! Also enjoying seeing you and your two helpers pull it together - very cool!
I want to continue the rotary, but I would love to EV one of my RX-7s. The cars are simply too beautiful to let die, and the EV route is really cool. It still �rotates� right?
Maybe consider tying together the tops of your battery "cage" in the engine bay then tying it together with a bolt-on horizontal brace to tie to strut towers.
Maybe consider tying together the tops of your battery "cage" in the engine bay then tying it together with a bolt-on horizontal brace to tie to strut towers.
This is freaking brilliant. I'm planning to pull the battery box out one last time after some testing to finalize the fiberglass and get it looking nice. Adding custom pieces that connect to the strut towers should be relatively easy. I'll give it a look.
Sorry if I missed it, but what exactly is this for?
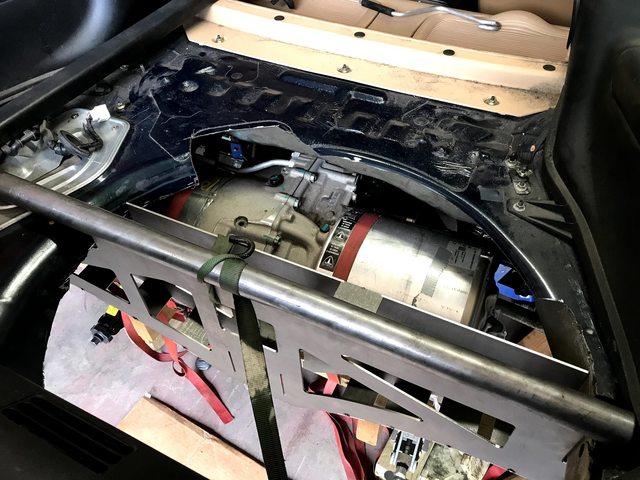
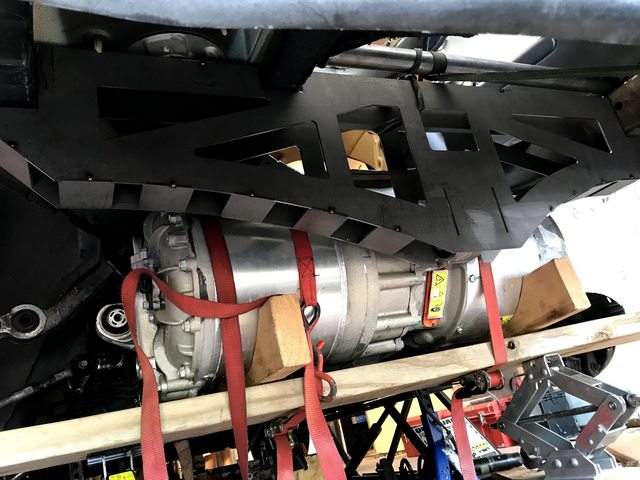
This is for the rear Tesla motor mount. It is welded onto the frame rails on each side and then the Tesla motor mount is suspended in the center. Here are a few more pictures:
The battery enclosure looks rather tight. How do you keep it cool?
In between the batteries are cooling plates that have coolant flowing through them at all times during charging and running. It's running through the stock Rx7 radiator with two SPAL puller fans mounted. Here is a pic of the cooling plate between two of the batteries. This chill plate is designed and made by ElectricGT specifically for these batteries.
AMAZING, I love this.
Alot of impressive engineering to make this work
Im really interested in seeing what the final weight is afterwards!
If it is anything around a couple hundred pounds lighter, this thing will be a rocket.
Because I hacked up the rear subframe I had to make new hardlines for the brakes. I've never done this before but now that I've been through it, it really is pretty easy. On my first go I bought longer lines at Autozone - bent them to shape, cut them to size, and then used the rented Autozone tool to flare them. When I finally bled the brakes for the first test drive they were leaking really bad. But I drove it anyway because hey I needed to see how it would go. It was a probably a combo of 1) the crappy Autozone tool 2) my lack of experience 3) trying to flare hard steel
For a second go, I just ordered brake lines the right length off Amazon and then bent them with my hands. Easy peasy. No leaks and no fuss. If I did it again I would go this route from the start and be done in 30 minutes.
Amazing - The only conversion I would do if Cali banned gas cars. (if I could afford it .. lol)
Thanks! At some point I'll add up all the receipts and give y'all an idea of where it landed... I think most professional conversions are at least $50k and most likely closer to $100k...
I did a longer test drive this morning and this thing will be a handful. Going 20, push the throttle down halfway and just light the tires up. I'm driving it easy still but dialing things in. I'm working on a new wheel/tire setup that will handle the power better. More on that later.
I've been doing test drives with a hole in the trunk and the 12v battery tie strapped down...
Time to clean that up, not going for perfect finish here since it will be under the carpet.
PSA!!! The insulation under our rear storage shelf is SUPER DUPER flammable!!! A spark while I was welding made its way onto the insulation and it went up like a match. Luckily I keep a fire extinguisher in the garage and put it out immediately but it was crazy how fast it took off. No damage, just tossing the piece of insulation that got some char.
I've always wanted to try a vinyl wrap to see how it looks and how hard it is. I don't have time to repaint the car right now and honestly the current paint is decent enough. I'm going to try a gloss white wrap because I think white will be the most forgiving. Starting with the sunroof panel because.... the paint on it was oddly toast and it should be the easiest panel to do.
First I needed to clean it up. The clear coat on only this part is coming off so it must have been painted separately and improperly. When I sanded it down I hit metal in several areas so I painted it with an epoxy primer reduced down so it would lay smoother like a seal coat. I then wet sanded it to smooth it out.
I've read that you can't/shouldn't vinyl over primer but I suspect they are referring to build primers and not epoxy. Epoxy doesn't have the gritty surface and gives a really stable foundation. Vinyl went on great.