When you click on links to various merchants on this site and make a purchase, this can result in this site earning a commission. Affiliate programs and affiliations include, but are not limited to, the eBay Partner Network.
Wow, you've got a full handful there. I'm parting out a '93 VR BTW and may have much of the parts you need (i frequent the NE corridor fairly often as well). However, **** adds up quick, even with used parts. I suggest you contact IRP sooner than later. At least to understand what you may be getting yourself into cost wise
Also, do you have an undertray? It's missing in your first picture and w/o one you are prone to overheating
I don't believe there's an undertray. I'd get one, not a problem.
I need to find a stock throttle body. I'm also considering the tucked harness from Rywire. So much of the wiring I find is frayed/damaged that I'd have no problem just redoing it. Their harness looks good and the price is fair enough, especially considering I'd need a lot of time to do it myself. Any thoughts on that harness? Other threads here seem to like it.
I also think both the power steering and the AC were removed.
Last edited by user 128358865; May 17, 2015 at 11:07 AM.
Strongly considering changing the way it's set up now (FMIC) to a V-mount config. Thoughts?
My reasoning is two-fold. First, installing the Koyo as a stock replacement will block the path to the FMIC. So I'd need to mount it as shown, and I haven't quite figured that out yet. Second, if v-mounting it is better for cooling performance anyway, why not.
The goal is to get fresh air to both heat exchangers irrespective of the "configuration". The problem with placing one heat exchangers in front of another is you sacrifice one for the other. Think about mounting them in a way where you can duct both of them. Another thing to consider which most people look at as an after thought. Getting nice cold ambient air to the intake, and getting a larger intake filter. The large intake filter reduces the pressure ratio the turbo runs at. Most people think about low back pressure from the exhaust, the same applies for the turbo on the intake end. You can run a velocity stack and air filter over it, but you then need to start thinking about how everything is situated and packaged to do this. What we have found here with our group, is that intercooler size is less important than getting cold air into the intake for air temps. It's easier to cool already cold air than taking hot air and trying to cool it through an exchangers. So most of us prioritize cold air into the filter, and size the intercooler smaller to do this. The radiator also gets priority as rotaries run hot. This is backwards to what a FMIC stuck in the opening does. Not saying you can't get a FMIC to work, but just trying to give you a vision for an end goal over time.
V-mount is the way to go, but you may want to get it running and sorted first before you start making improvements.
Dual oil coolers are also needed if you drive it hard
I was thinking I'd be better of tackling the v-mount now than waiting till later. Since everything is going to be apart anyway. I think I'd need to get the kit (maybe Rotaryworks) complete and replace what's on the car now. This is an R1 and has dual oil coolers. Are the factory ones good enough for this kind of build?
Originally Posted by lOOkatme
The goal is to get fresh air to both heat exchangers irrespective of the "configuration". The problem with placing one heat exchangers in front of another is you sacrifice one for the other. Think about mounting them in a way where you can duct both of them. Another thing to consider which most people look at as an after thought. Getting nice cold ambient air to the intake, and getting a larger intake filter. The large intake filter reduces the pressure ratio the turbo runs at. Most people think about low back pressure from the exhaust, the same applies for the turbo on the intake end. You can run a velocity stack and air filter over it, but you then need to start thinking about how everything is situated and packaged to do this. What we have found here with our group, is that intercooler size is less important than getting cold air into the intake for air temps. It's easier to cool already cold air than taking hot air and trying to cool it through an exchangers. So most of us prioritize cold air into the filter, and size the intercooler smaller to do this. The radiator also gets priority as rotaries run hot. This is backwards to what a FMIC stuck in the opening does. Not saying you can't get a FMIC to work, but just trying to give you a vision for an end goal over time.
I'm with you on that. The FMIC is just passing warmer air to the radiator. I don't like the idea of that. I wasn't sure how to deal with the intake though. Perhaps a way to route it to the front? I don't know but I'm willing to do it.
I was thinking I'd be better of tackling the v-mount now than waiting till later. Since everything is going to be apart anyway. I think I'd need to get the kit (maybe Rotaryworks) complete and replace what's on the car now. This is an R1 and has dual oil coolers. Are the factory ones good enough for this kind of build?
I'm with you on that. The FMIC is just passing warmer air to the radiator. I don't like the idea of that. I wasn't sure how to deal with the intake though. Perhaps a way to route it to the front? I don't know but I'm willing to do it.
I will get you a picture of How we route it with some of our cars. there are a couple of ways to do it. One is literally place the filter in the mouth of the bumper above the radiator. Second is to run the filter along the headlight and duct air to it. Both are highly effective.
You can run smaller intercooler sizes than most think. Too many prioritize big intercoolers for worse performance. We have someone running a 9" x 7" x 4" intercooler core. I suggest getting your intake and radiator figured out first. mount the radiator in the V-mount configuration. Develop an intake and install it. Now look at the size that is left. Find a intercooler that is smaller than that size and fit it. you will need to do some custom intercooler pipes but its not too tough if you have the tools or access to a bandsaw. You will also need someone to weld it. Of our group of 4 people and me tuning every single car I can say that size of intake filter and cold air into the intake is more important than intercooler size. We also duct everything well to maximize our heat exchangers and intake filters with ambient air.
Small intake filters with high pressure drops increases the pressure ratio of the turbo and produces higher intake air temps as the turbo needs to work harder. If you combine this with 150-160F temps, you have even more work the turbo must do to create PSI. With a large filter and cold air you cut the work of the turbo, so you get colder air to begin with and a lot less work from the turbo which means less heat, you then also benefit from a smaller intercooler with boost response. its a win-win-win situation.
Got the new pieces to the puzzle! Thanks to Ihor at IRP for getting me these ID FIs so quickly, Ray at Malloy hooked me up quickly with the hoses and bracket. Monday I'll have time to tackle these before I fly west for business.
Considering the Rotary Works V-mount kit and reselling the FMIC and Koyo that are on this car. Especially since I still haven't quite figured out how I'm going to mount the Koyo if I keep it. Thoughts?
EDIT: Doing some reading, I think I'll stay away from the RW V-mount. Step up to something better if I do it.
Last edited by user 128358865; May 23, 2015 at 10:24 AM.
I got the jack stands and got her off the ground now.
The RW throttle body has no gasket between it and the elbow. Are they always like that? I'd think that's the reason they leak...
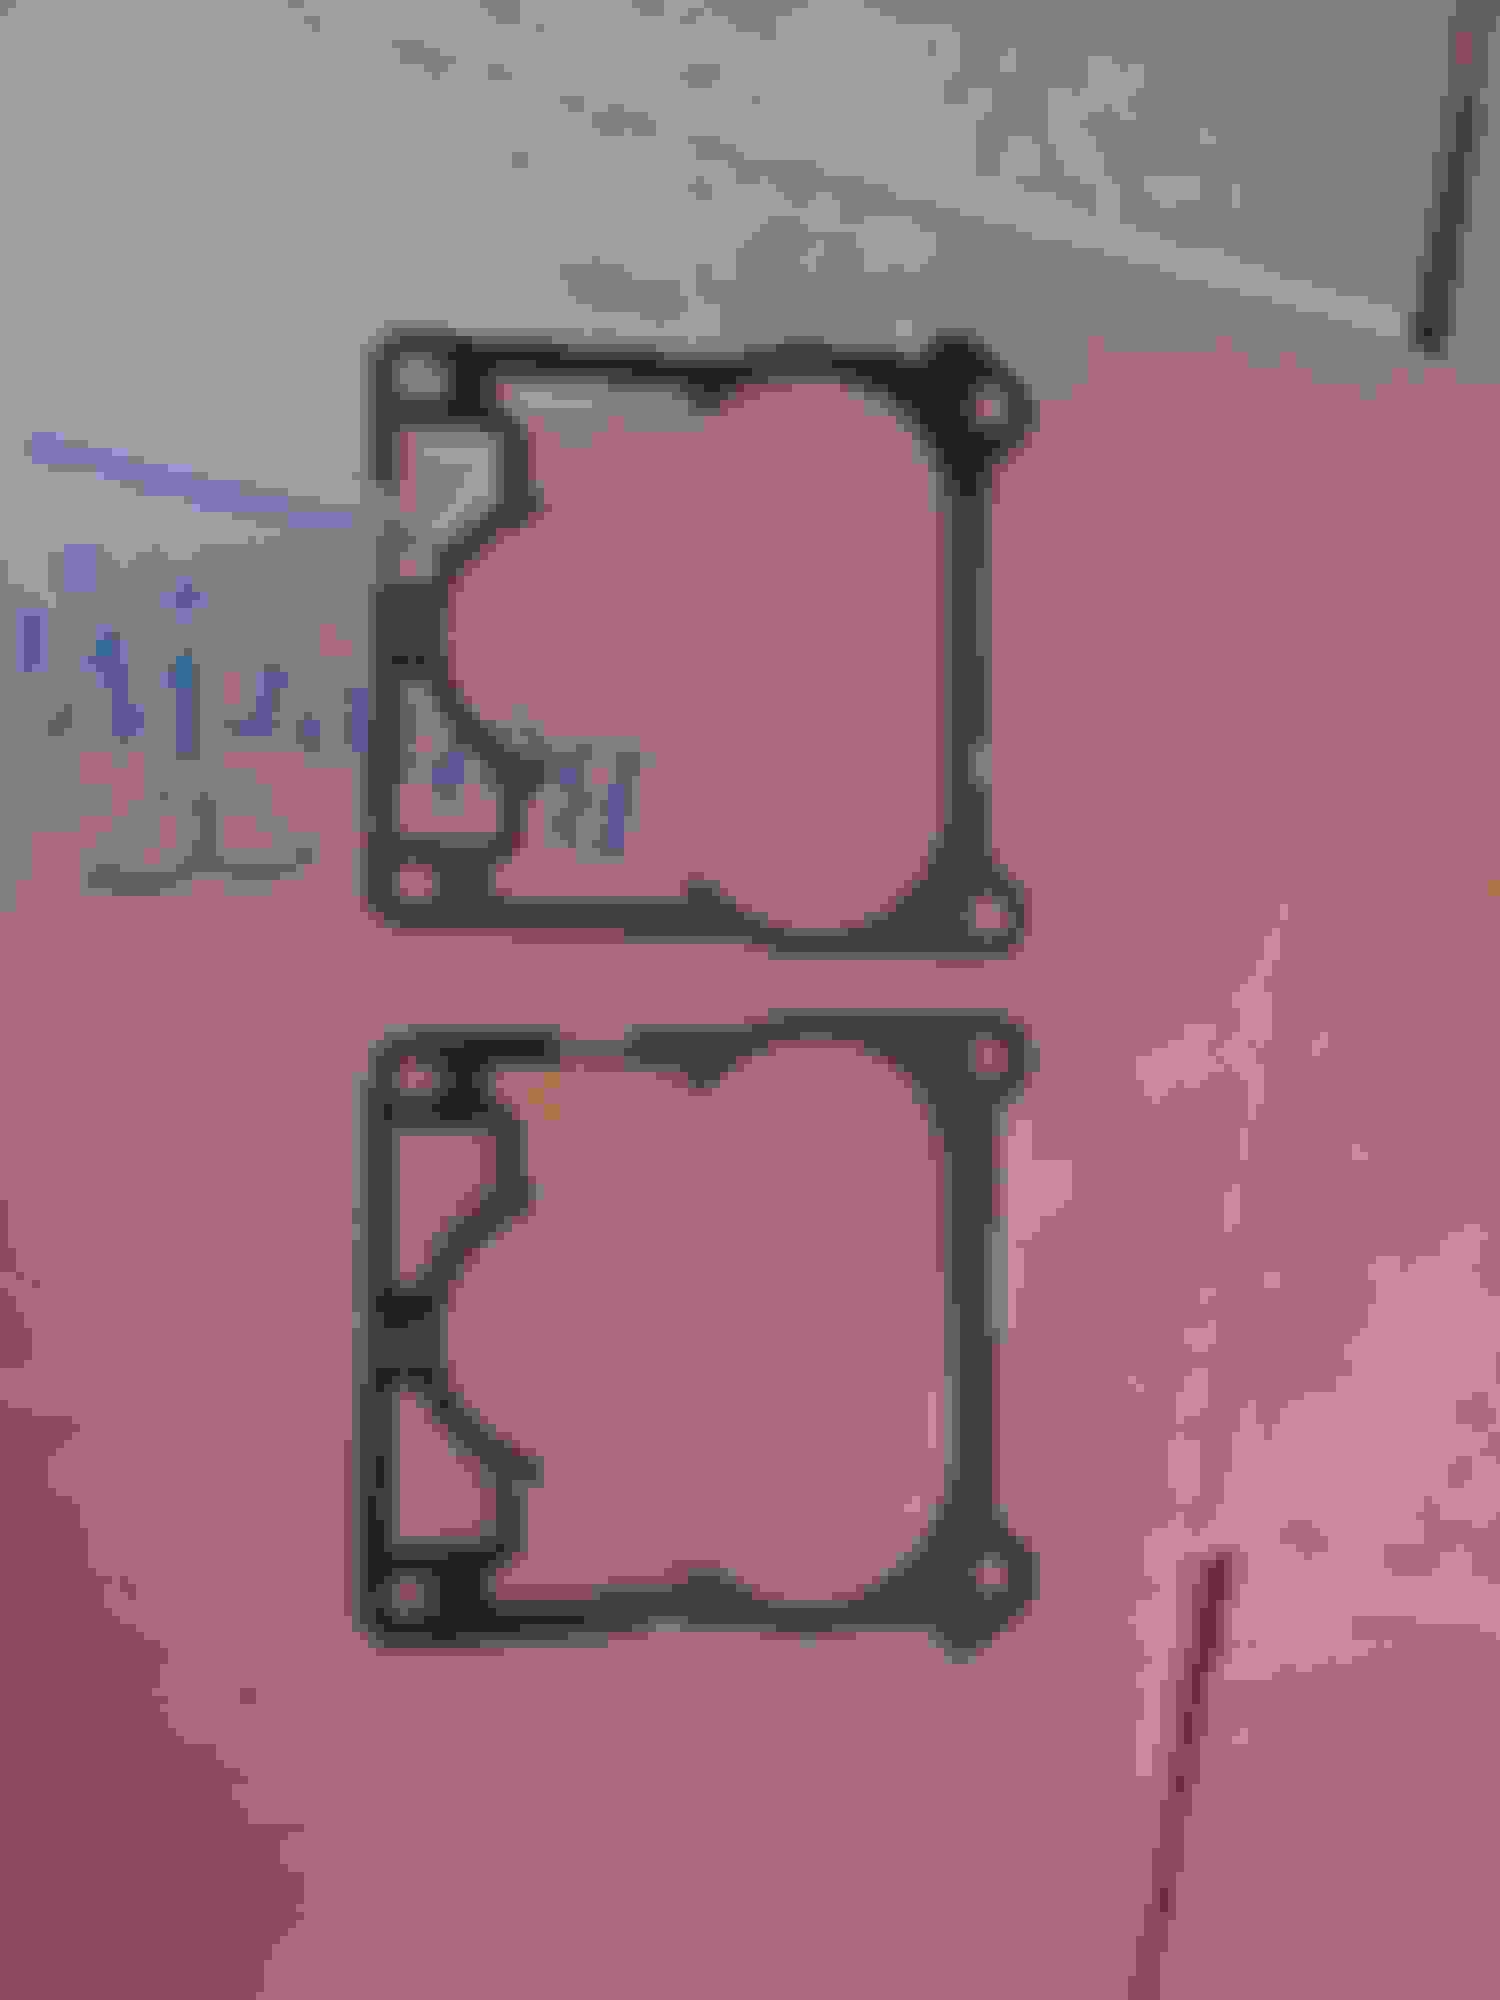
I took off the TB and found these two gaskets stacked up. Seemed strange to me.
Here's the UIM.
I removed the UIM. Should I replace this gasket? Looks like it's seen better days.
Lastly, I thought of draining out the fuel to swap the injectors finally and found these two couplers for it at the firewall. Simple enough really... but then I saw this pipe that's connected to nothing.
Haven't been able to find time to tinker since this day, but gonna read the manual and see what needs to be done here. Next day I find time, the injectors will be swapped and I should have my radiator brackets by then.
There is a rubber gasket that goes between the Rotary Works TB and intake elbow. I think Atkins Rotary or a Mazda dealer can get them for you. Your TB to UIM gasket was cut to allow for better flow from the Rotary works TB to the UIM, however your UIM wasn't ported so it wouldn't have had much benefit. You'll want to get it ported and matched with the TB. It wouldn't hurt to get new gaskets also as they are fairly cheap from the dealer.
The metal pipe that isn't used runs to the charcoal canister. Upgraded fuel systems usually don't use it.
Thanks! That helps a lot, I won't need to go nuts looking for an answer on that pipe. Also, I can pick up new gaskets for both. Stock parts direct from Ray at Malloy?
I found that I do have a stock TB in the pile of parts I got with the car. It's disgusting so I'm gonna try to clean it up and use that instead. I'll put the RW TB up for sale or something. Any recommendations for cleaning up the stock TB?
I got the jack stands and got her off the ground now.
Lastly, I thought of draining out the fuel to swap the injectors finally and found these two couplers for it at the firewall. Simple enough really... but then I saw this pipe that's connected to nothing.
Haven't been able to find time to tinker since this day, but gonna read the manual and see what needs to be done here. Next day I find time, the injectors will be swapped and I should have my radiator brackets by then.
Feel free to chime in.
that hard line with nothing connected to it is the fuel line vent. I think It should connect to the throttle body / charcoal canister. that sits under the intake eblow.
Those fuel lines look a bit suspect to me. I would at the very least swap those clamps out for some fuel line clips
that really ugly looking nipple thing, that is half assed capped off below the vent line should go to the firewall, its for the heater. If you are not reconnecting your heater, then you should remove the plastic thing that is over the metal nipple and cap it off straight from there.
oh and get some black spray paint and touch up your steering shaft! fixing small rust patches like that makes it look so much better as a whole.
good luck!
EDIT; im not sure if its just the image but your return hard line on the firewall (the one in the middle) looks like it may even be broken / have a big hole in it?
I would at the very least swap those clamps out for some fuel line clips
Any particular recommendation or whatever I can find at AutoZone?
Originally Posted by 96fd3s
If you are not reconnecting your heater, then you should remove the plastic thing that is over the metal nipple and cap it off straight from there.
Well color me stupid because I didn't even realize the heater was removed... I'll check this out soon, hopefully in the next couple weekends.
Originally Posted by 96fd3s
your return hard line on the firewall (the one in the middle) looks like it may even be broken / have a big hole in it?
I'm planning to look at that next time I can wrench. I noticed it in the pic too, so I need to take a look. I imagine if it's actually broken, that's not going to be a simple or cheap thing to deal with.
It looks like you are putting in some good work into this neglected FD. Keep it up! I am not sure if you have done this but one of the first things that I would do before spending money on the car is check the compression numbers to make sure it is worth buying new parts and upgrading parts. Judging from the sloppy work that the previous owner has done, I wouldn't be surprised, if the engine was rebuilt, it was not done by a high end reputable (most of the time pricey) shop. Most guys that do builds like that have a "friend" rebuild it or they try to do it themselves (not to say that sometimes they rebuild it better than some shops but more than likely they don't).
Not that you are asking lol but if the compression is not good, I would sell all of those aftermarket parts and put that money toward a rebuild and start with a stock twin turbo setup. You can get a good set of stock twins for under $300 now. convert it to non sequential since all of the necessary sequentials parts have been removed from the engine.
Any particular recommendation or whatever I can find at AutoZone?
Well color me stupid because I didn't even realize the heater was removed... I'll check this out soon, hopefully in the next couple weekends.
I'm planning to look at that next time I can wrench. I noticed it in the pic too, so I need to take a look. I imagine if it's actually broken, that's not going to be a simple or cheap thing to deal with.
this is what id call a "fuel line clip". They are like mini t-bolt clamps, are wider than normal hose clamps of similar size, and they wont dig into the hose.
In regards to the broken hard line. IMO that will prove to be a hassle more than anything. I don't think the parts will be too hard or expensive to find. But as with anything to do with fuel lines they will just be a pain to work with.
Thanks for the encouragement all. I'm trying to keep the motivation up so sharing the progress and getting your feedback helps a lot.
A few updates. First, the fuel lines. This is a shot from under the car so they are intact. It seems the row of clips that hold them distorted the previous image a bit, but they are intact all the way to the rear of the car.
Here's the rear.
No idea what that black canister is there, but I'll look into it. I disconnected those clips to get to the fuel rails.
I then heard and smelled gas and realized the fuel lines from the tank were dripping, so I took some pics and reconnected the fuel lines to stop the dripping for now. Here's the actual clamp used on the fuel lines. What do you think of these? These look similar to some Autozone stuff I saw but their quality/effectiveness is what I'd rather know.
I pulled off an existing injector and am concerned now.
I'm concerned that I actually needed the 10mm injectors and got the 14mm injectors. I don't have my caliper handy, but I think the difference is obvious. Lastly, I have been trying to figure out what to do about this.
I did see that the stock radiator has rubber bushings on the bottom (only one) and they do fit the Koyo. But I also wonder is that really enough to hold the bottom of the radiator.
I got some "custom" brackets to mount the radiator that I'm still working on. Need to go pick up a new metal blade for my miter saw since I can't find the one I had. Then I'll finish the cut I need to make and show what I came up with for the top brackets.
Feel free to provide feedback, good bad or otherwise. It all helps.
No idea what that black canister is there, but I'll look into it. I disconnected those clips to get to the fuel rails.
That's the charcoal canister. It collects and dissipates gas fumes to the atmosphere. You have it disconnected at the firewall (post 41). See FSM Chapter F on Fuel Evaporative System
Originally Posted by Nemo128
I then heard and smelled gas and realized the fuel lines from the tank were dripping, so I took some pics and reconnected the fuel lines to stop the dripping for now. Here's the actual clamp used on the fuel lines. What do you think of these? These look similar to some Autozone stuff I saw but their quality/effectiveness is what I'd rather know.
I'd be nervous that could hold 40 psi of fuel pressure. Stick with fuel pressure line and the correct connections where it attaches to your AN fittings
Originally Posted by Nemo128
I did see that the stock radiator has rubber bushings on the bottom (only one) and they do fit the Koyo. But I also wonder is that really enough to hold the bottom of the radiator.
I got some "custom" brackets to mount the radiator that I'm still working on. Need to go pick up a new metal blade for my miter saw since I can't find the one I had. Then I'll finish the cut I need to make and show what I came up with for the top brackets.
Feel free to provide feedback, good bad or otherwise. It all helps.
Get the stock rubber radiator bushings. The mount also looks very rusted. These usually fail so you may want to look at getting beefed up ones. I believe Mazdatrix sells them.
Here's the first look at the radiator top brackets.
I'm gonna do some more cutting but I think this is going to work. There's also a mirrored one just like it for the other side.
I'll look for the bottom brackets and get the rubber bushings. And pick up the right fuel line clamps, probably tomorrow.
Judging from the self-tapping screws on that lower mount... is that even stock? On Mazdatrix, it looks like the thing behind where the radiator is sitting is the original mount. That angle bracket with the hole, does that even come on the car?
Last edited by user 128358865; Jul 3, 2015 at 07:25 PM.
After measuring for the bottom radiator brackets, I tried to fit an injector. I took some measurements of that.
When fitted to the rail or the block, the new ones protrude 1/4" more than the ones already there. I think I'm screwed with these unless I'm somehow doing something wrong.
I also found two things with no connections on them.
I think I'm close to having someone else work on this, I'm running out of patience since I started out from "all it needs is a tune" and I'm well into "WTF was done to this car."
Last edited by user 128358865; Jul 4, 2015 at 01:55 PM.
The first is the OMP nozzle. There's a vacuum line that connects to the rats nest. The second is the AWS water return from the TB. It connects to transfer tube that runs under the rats nest
You defiantly have a lot on your plate. The question you need to answer is are you up for the effort and cost. You may be able to part out what you have now and get a better sorted FD for less than the cost it will take to get this one up to snuff.