
waterpump housing removal

Thread Starter
Senior Member
Joined: Jan 2003
Posts: 359
Likes: 1
From: nagano japan
waterpump housing removal
hi all
long story short
a) i needed to find my engine number so i removed my alternator
b) with the alternator off i found a minor coolant leak coming from the long waterpump bolt that also supports the alternator tensioning arm
c) i removed the airbox and then the waterpump to find that the waterpump gasket looks to have been replaced before and probably wasn't the cause of the leak
so now i suspect the waterpump housing gasket between the waterpump housing and the front of the engine
i started taking off the airpump but stopped when i saw the denso warning sticker saying, "never remove the airpump"
just checked the pdf manuals and on the parts diagram i can see the gasket i want to check and the waterpump housing but couldn't find any removal procedure
anyone want to give me pointers on waterpump housing removal?
( iknow to be very careful of the OML's)
Thread Starter
Senior Member
Joined: Jan 2003
Posts: 359
Likes: 1
From: nagano japan
after looking at the drawings again i went ahead and removed the airpump, then the rest of the coolant lines to the waterpump housing, (THAT'S what takes the time), and the 3 electrical connections, finally pulled the housing forward enough to see that housing to engine gasket
but had to stop there as the OML stopped further forward movement
the gasket looks ok
pondering.......
but had to stop there as the OML stopped further forward movement
the gasket looks ok
pondering.......
Thread Starter
Senior Member
Joined: Jan 2003
Posts: 359
Likes: 1
From: nagano japan
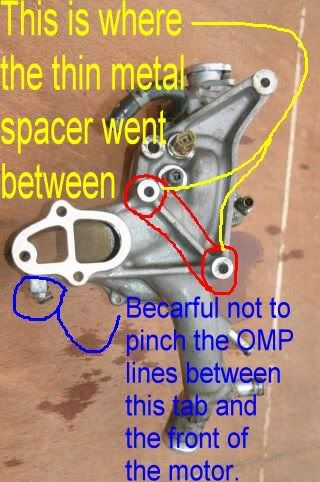
if you look closely at the bottom of the 1st pic you can see 2 oil metering lines terminating at small banjo bolts, much like a bike's hydraulic brake banjos
getting those 2 off looks to be pretty easy, but i am concerned about having to move them around enough to get them past the housing
not sure where the other 2 finish but it looks like they need to come off from below, so that means jacking and undertray removal
eric e
this had better solve that little leak!
Senior Member
Joined: Oct 2003
Posts: 452
Likes: 0
From: Lynnwood, WA
I've pulled my water pump off twice. I just loosened the OML bolts and had enough slack to slip the pump off the bolts. IMO, once you've pulled that thing you should replace the gasket to prevent any leaking. The airpump warning is stupid too. I've pulled it more than once too and haven't had any trouble. Just be sure the old gasket is completely cleaned off so your new one has a smooth clean surface to seal.
What's your point ?
Joined: Feb 2001
Posts: 3,573
Likes: 0
From: Gainesville, Fla.
Sticker isn't stoopid
Originally Posted by luizajeff
I've pulled my water pump off twice. I just loosened the OML bolts and had enough slack to slip the pump off the bolts. IMO, once you've pulled that thing you should replace the gasket to prevent any leaking. The airpump warning is stupid too. I've pulled it more than once too and haven't had any trouble. Just be sure the old gasket is completely cleaned off so your new one has a smooth clean surface to seal.
What's your point ?
Joined: Feb 2001
Posts: 3,573
Likes: 0
From: Gainesville, Fla.
You will also have to double nut the long studs and remove the studs from the front of the engine if you want a snowball's chance in _ell of getting it out . I made my own gaskets out of a rubberized papaer gasket material that worked really well. Jack
Trending Topics
The light bothers me.
Joined: Oct 2002
Posts: 468
Likes: 0
From: Manassas, VA, U.S.A
Now remove the IC, battery, air pump. Then disconnect the OMP lines. Take out the brace that ac lines run across and the battery is sitting on. Finally just slide the housing out. Once out sand down around and clean where the gasket would go. Do the same on the engine side. Put some CTV (water pump housing sealant) on it and slide it back together. Put it all back to together let it sit overnight to let the CTV set, then fill it up with coolant.
Thread Starter
Senior Member
Joined: Jan 2003
Posts: 359
Likes: 1
From: nagano japan
thanks for the info guys
double-nutting did the trick.
backed the studs out and then carefully moved the housing out around the OML. left the battery and Intercooler in as there seemed to be enough space
used 1000grit wet'n'dry and a sanding block to carefully clean up the alloy on the gasket surfaces
thinking about putting the FC fan thermoswitch in while i'm in there
got to go and buy all the parts now
eric e
What's your point ?
Joined: Feb 2001
Posts: 3,573
Likes: 0
From: Gainesville, Fla.
Things to look for and do
Originally Posted by eric e
thanks for the info guys
double-nutting did the trick.
double-nutting did the trick.
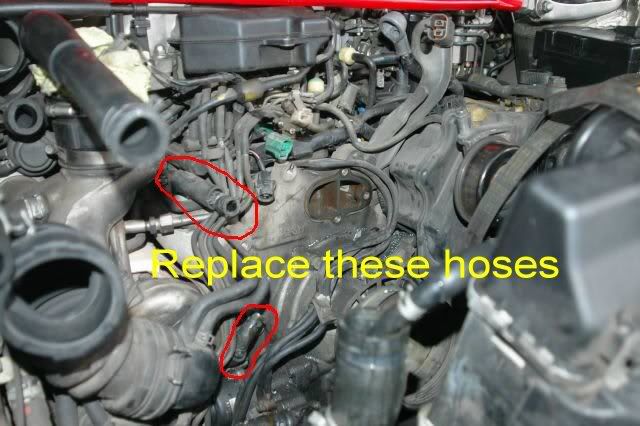
Replace these hoses now.
backed the studs out and then carefully moved the housing out around the OML. left the battery and Intercooler in as there seemed to be enough space
used 1000grit wet'n'dry and a sanding block to carefully clean up the alloy on the gasket surfaces
thinking about putting the FC fan thermoswitch in while i'm in there
Originally Posted by eric e
got to go and buy all the parts now
eric e
eric e
Thread Starter
Senior Member
Joined: Jan 2003
Posts: 359
Likes: 1
From: nagano japan
can't see your pics in the post, but guess you mean the weird looking thin plate that goes between the 2 holes directly behind the thermostat housing, wonder what it does other than space those studs out around half a mm
will post a pic of it next post
which hoses do you recommend changing?
eric e
will post a pic of it next post
which hoses do you recommend changing?
eric e
Junior Member
Joined: Apr 2004
Posts: 19
Likes: 0
From: G'ville Fla.
Techno glitch (-:
Originally Posted by eric e
can't see your pics in the post, but guess you mean the weird looking thin plate that goes between the 2 holes directly behind the thermostat housing, wonder what it does other than space those studs out around half a mm
will post a pic of it next post
which hoses do you recommend changing?
eric e
will post a pic of it next post
which hoses do you recommend changing?
eric e
Last edited by Rotor4play; Jul 15, 2005 at 09:22 PM. Reason: add text

Full Member
Joined: Jun 2003
Posts: 63
Likes: 0
From: SF bay
Just got the housing off using the double nut method and leaving the OML's in place. Now I need to find out what the 2 sensors on the housing are for. The lower sensor marked with the red circle I found that the wire was broken at the plug. The other one in green seems to be fine. If the one in red is for temp may look at just getting an aftermarket one.
thanks,
thanks,
What's your point ?
Joined: Feb 2001
Posts: 3,573
Likes: 0
From: Gainesville, Fla.
One is thermos sensor, the other is thermo switch. The black/brown connector single wire should be the sensor. the green connector with the teo wires should be your thermo switch. FSM will verify.
Originally Posted by CantGoStraight
One is thermos sensor, the other is thermo switch. The black/brown connector single wire should be the sensor. the green connector with the teo wires should be your thermo switch. FSM will verify.
This was the first thread I seen after searching to find out what the green connector sensor was for, and I didn't bother to check the FSM, I assumed you were correct and nobody said you were not, so I wasn't happy I have to wait another couple of days for the part I needed.
It is actually good that I got the FC thermoswitch, I did want it, I just thought I would be replacing the broken switch with a better FC switch and so it wasn't a bid deal that it was broke, but now I had to get both. Good thing the thermosensor (green connector) was only like $25 compared to about $50 for the FC thermoswitch that is a direct replacement so the fans will turn on sooner.
This post got long, but I wanted to clerify those parts so nobody else orders the wrong part.
What's your point ?
Joined: Feb 2001
Posts: 3,573
Likes: 0
From: Gainesville, Fla.
Originally Posted by tom94RX-7
Correction needed. The thermoswitch is the one wire black connector one in the picture, the thermo sensor for the ecu is the green connector with two wires. I now know this because I needed to replace the green connector two wire one because it broke into two peices, but you said it was "the green connector with the teo wires should be your thermo switch", so I called up Ray at Malloy mazda and told him I needed a new thermoswitch. The thermoswitch came today, I expected it to have the green two wire connector, but no it was the one wire black connector part, which I then found out is the FC thermoswitch after calling Ray and asking him. So today I had to order the thermosensor (green connector) to replace mine that is in two peices.
This was the first thread I seen after searching to find out what the green connector sensor was for, and I didn't bother to check the FSM, I assumed you were correct and nobody said you were not, so I wasn't happy I have to wait another couple of days for the part I needed.
It is actually good that I got the FC thermoswitch, I did want it, I just thought I would be replacing the broken switch with a better FC switch and so it wasn't a bid deal that it was broke, but now I had to get both. Good thing the thermosensor (green connector) was only like $25 compared to about $50 for the FC thermoswitch that is a direct replacement so the fans will turn on sooner.
This post got long, but I wanted to clerify those parts so nobody else orders the wrong part.

Now remove the IC, battery, air pump. Then disconnect the OMP lines. Take out the brace that ac lines run across and the battery is sitting on. Finally just slide the housing out. Once out sand down around and clean where the gasket would go. Do the same on the engine side. Put some CTV (water pump housing sealant) on it and slide it back together. Put it all back to together let it sit overnight to let the CTV set, then fill it up with coolant.
so you could use some silicone type of sealent or the gasket?
Hey sorry to bring an old thread back from the dead, but I am having the same problem trying to remove my water pump housing. I know I need to remove the studs from the front cover, but I am unfamiliar with the double nut method, what does that mean exactly?


