
Slow Wipers? Service your linkage


Thread Starter


Joined: Jul 2002
Posts: 4,256
Likes: 553
From: Northern Virginia
Slow Wipers? Service your linkage
I recently had my car painted and I had disassembled the cowl as part of the process. Prior to reassembling things I wanted to service my wiper linkage because, like most FD's, my wipers ran slowly. It was a fairly easy job which would have required fewer tools and probably only have taken about 30 minutes if my assembly wasn't as rough as it was.
Recommended tools/items (for servicing the loose assembly):
A good pick set with 90� and hook picks
Vise grips
Rags/towels
Multi-purpose bearing grease
Optional tools/Items:
Wire brushes
13 mm socket
Fine dental picks
A second pair of vise grips
C-clamp or bench vise
Sandpaper- coarse through fine grit
O-rings
Penetrating lube
The wiper pivot points on the assembly are pressed in polished shafts with a top "cap" which slips onto the shaft that is held in with a tiny spring retaining ring. There is a spring washer at the bottom of the cap that needs to be compressed to remove the retaining ring with a pick. Once the retaining ring is out, remove the small stainless washer under it, pull off the cap, and clean the shaft and cap, re-grease, and reassemble everything reverse of removal. It's that easy, unless you encounter some rust.
An interesting thing I found was that the center pivot had nylon bushings in the cap and one rubber o-ring at the top, the driver's side pivot was totally sealed with a top and bottom o-ring and used brass bushings.
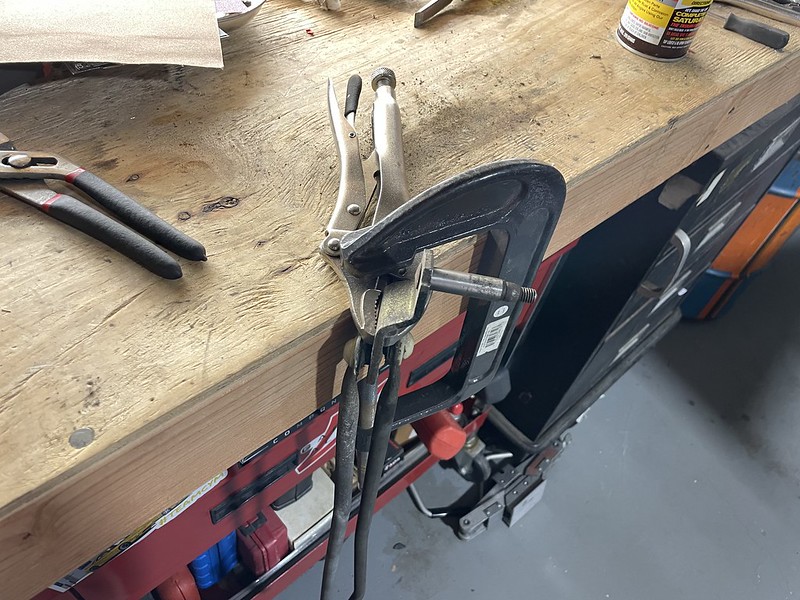
My car spent most of it's life outside so the retaining rings were locked in with rust and grime to start I soaked each pivot in penetrating lube and then wire brushed the post and ran a pick around the ring. After exposing the ring I used a pair of vise grips to lightly clamp the cap to the post base to allow for the retaining ring to be removed. You'll notice in this pic that the stainless washer under the retaining ring is held captive to it with rust.


Because the stainless washer was stuck my next step was to break it free from the retaining ring, I found a 13mm socket and some hammer taps did the job. After breaking the washer loose the ring was easier to see and I proceeded with trying to pick it out. It was still stuck so I ran a fine dental pick around it and then use a hook pick placed in the retaining ring's gap with a light hammer tap to break it free.


I walked the pick around and pulled the ring up to remove it.

After getting the ring off of the center post (I did the center first) I was met with a stuck cap, I had to twist and tap it to get it off and exposed a post swelled with rust. I clamps the post base with wise grips and then used a c-clamp to fasten it to my work bench so I could sand and polish the post. I used 120 grit, then 150 grit to remove the coarse rust and then switched to wet sanding with 1500, 2000, and 2500 respectively. The top of the post was also wire brushed and cleaned with fine picks to remove rust slag during this process, some rust craters were left but in order to remove it all I would have needed to punch out the post and cut off material in a lathe and then cut oversized nylon bushings which was not worth it at this time.
Note the Nylon bushing inside of the center pivot.


I finished up the center pivot with cleaning the rusty washers, cleaning the inside of the pivot cap, re-greasing the post and cap, and installing a new o-ring (don't ask me the size, I matched up one from an o-ring set I had).
The driver's side post was a breeze because it was clean and did not need to be sanded and polished, I just cleaned and greased it before moving on to pop all the ball and socket pivots to put new grease in the plastic bushings.
Recommended tools/items (for servicing the loose assembly):
A good pick set with 90� and hook picks
Vise grips
Rags/towels
Multi-purpose bearing grease
Optional tools/Items:
Wire brushes
13 mm socket
Fine dental picks
A second pair of vise grips
C-clamp or bench vise
Sandpaper- coarse through fine grit
O-rings
Penetrating lube
The wiper pivot points on the assembly are pressed in polished shafts with a top "cap" which slips onto the shaft that is held in with a tiny spring retaining ring. There is a spring washer at the bottom of the cap that needs to be compressed to remove the retaining ring with a pick. Once the retaining ring is out, remove the small stainless washer under it, pull off the cap, and clean the shaft and cap, re-grease, and reassemble everything reverse of removal. It's that easy, unless you encounter some rust.
An interesting thing I found was that the center pivot had nylon bushings in the cap and one rubber o-ring at the top, the driver's side pivot was totally sealed with a top and bottom o-ring and used brass bushings.
My car spent most of it's life outside so the retaining rings were locked in with rust and grime to start I soaked each pivot in penetrating lube and then wire brushed the post and ran a pick around the ring. After exposing the ring I used a pair of vise grips to lightly clamp the cap to the post base to allow for the retaining ring to be removed. You'll notice in this pic that the stainless washer under the retaining ring is held captive to it with rust.
Because the stainless washer was stuck my next step was to break it free from the retaining ring, I found a 13mm socket and some hammer taps did the job. After breaking the washer loose the ring was easier to see and I proceeded with trying to pick it out. It was still stuck so I ran a fine dental pick around it and then use a hook pick placed in the retaining ring's gap with a light hammer tap to break it free.
I walked the pick around and pulled the ring up to remove it.
After getting the ring off of the center post (I did the center first) I was met with a stuck cap, I had to twist and tap it to get it off and exposed a post swelled with rust. I clamps the post base with wise grips and then used a c-clamp to fasten it to my work bench so I could sand and polish the post. I used 120 grit, then 150 grit to remove the coarse rust and then switched to wet sanding with 1500, 2000, and 2500 respectively. The top of the post was also wire brushed and cleaned with fine picks to remove rust slag during this process, some rust craters were left but in order to remove it all I would have needed to punch out the post and cut off material in a lathe and then cut oversized nylon bushings which was not worth it at this time.
Note the Nylon bushing inside of the center pivot.
I finished up the center pivot with cleaning the rusty washers, cleaning the inside of the pivot cap, re-greasing the post and cap, and installing a new o-ring (don't ask me the size, I matched up one from an o-ring set I had).
The driver's side post was a breeze because it was clean and did not need to be sanded and polished, I just cleaned and greased it before moving on to pop all the ball and socket pivots to put new grease in the plastic bushings.
Last edited by Molotovman; Mar 3, 2023 at 07:40 AM.
Thread Starter
Joined: Jul 2002
Posts: 4,256
Likes: 553
From: Northern Virginia
I didn't go all out with painting and making this pretty because it's hidden in the cowl but here are the finished pics:


Bonus pic of the paint matched wiper motor stator.

Concluding thoughts:
This was a necessary service and my assembly moves more freely now. I still don't think they will compare to modern wipers but I do expect a significant increase in speed because the drag form the rusty post has been eliminated.
Bonus pic of the paint matched wiper motor stator.
Concluding thoughts:
This was a necessary service and my assembly moves more freely now. I still don't think they will compare to modern wipers but I do expect a significant increase in speed because the drag form the rusty post has been eliminated.
Nice write up and pics!
Much better than what this joker did a while back... https://www.rx7club.com/3rd-generati...101-a-1076965/

Added to FAQ
Much better than what this joker did a while back... https://www.rx7club.com/3rd-generati...101-a-1076965/
Added to FAQ

Junior Member
Joined: Feb 2008
Posts: 15
Likes: 0
From: Poitiers >>> [FRANCE]
Nice writing ! Thanks ! Good to know... my wipers are hardly moving so maybe I should try out this maintenance. 
@Molotovman Have you tested them since ? Did you get a clear improvement ?
@Molotovman Have you tested them since ? Did you get a clear improvement ?
Thread Starter
Joined: Jul 2002
Posts: 4,256
Likes: 553
From: Northern Virginia
Nice writing ! Thanks ! Good to know... my wipers are hardly moving so maybe I should try out this maintenance.
@Molotovman Have you tested them since ? Did you get a clear improvement ?
@Molotovman Have you tested them since ? Did you get a clear improvement ?
Trending Topics

I am about ready to put the linkage back in.
I read this post and Dales,
My question is: did you need to align the motor shaft and the linkage?
The 2 post say different things.
I did put alignment marks on the motor shaft and linkage,
but dont really see how they will help the alignment
I read this post and Dales,
My question is: did you need to align the motor shaft and the linkage?
The 2 post say different things.
I did put alignment marks on the motor shaft and linkage,
but dont really see how they will help the alignment

Thread
Thread Starter
Forum
Replies
Last Post