
rx7 FD Progress--aspec 500r turbo kit

Pure_Rotary,
In Texas you are going to NEED to add some additional ducting to that cooling setup to maintain adequate oil/coolant temps. Especially with keeping the a/c. I have a totally custom setup, but when I added the top panel to my radiator, my coolant temp dropped about 6 degrees C...just with the top panel! Having a front mount and a/c I would duct that radiator sot that it is completely sealed.
Best of luck moving forward!
thanks for the heads up, ill be sure to do that, cause i cant imagine the texas heat on it
development
Joined: Aug 2002
Posts: 5,714
Likes: 7
From: Lafayette, LA
fiberglass is heavy and not needed.
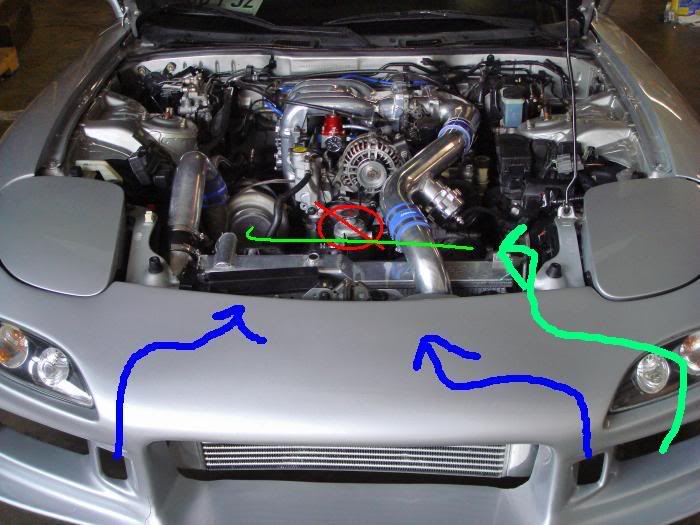
red = delete AST...not needed
blue = get some 4" neoprene ducting use the front bumper to channel fresh air in between the IC and radiator
Green = try to get your intake around and then use the oil cooler opening for fresh air...mount the biggest K&N possible. Maybe build a little aluminum sheet metal enclosure around the filter.
BUT the biggest help is going to be dual series oil coolers. Oil cools the engine from the inside out where coolant "tries" to cool from the outside in. With a proper oil cooling system, oil can account for up to 40% of total engine cooling.
 Classic!
at the moment im being easy on it, so im basically under 3 rpm everywhere i go, but i can hear it spooling around there+
fiberglass is heavy and not needed.
red = delete AST...not needed
blue = get some 4" neoprene ducting use the front bumper to channel fresh air in between the IC and radiator
Green = try to get your intake around and then use the oil cooler opening for fresh air...mount the biggest K&N possible. Maybe build a little aluminum sheet metal enclosure around the filter.
BUT the biggest help is going to be dual series oil coolers. Oil cools the engine from the inside out where coolant "tries" to cool from the outside in. With a proper oil cooling system, oil can account for up to 40% of total engine cooling.
development
Joined: Aug 2002
Posts: 5,714
Likes: 7
From: Lafayette, LA
For ducting, just get some cardboard pieces and mock something together with them. Then just cut the pieces out of sheetmetal. Just figure out where to attach them securely the car and each other, and add some insulation to the edges.
No sir, the 1.0 divided T4 that is used is the same frame as the 1.0 divided T4 on a T04Z That also happens to be with .5mm of the 500R compressor. It should have no issues with regards to size.(especially since the TO4Z runs a larger turbine wheel) Keep in mind also that as far as efficiency goes(turbine), it would all be relevant to the engine its on. i.e., big engine/rpm may need the bigger t/h but the same turbo could work as efficient with the smaller t/h on a smaller engine. The turbine housing is a nozzle that directs the exhaust to the wheel. The smaller the nozzle the faster the exhaust flows to the wheel, likewise with the larger t/h the slower. This is the balancing act that you do in changing the t/h for different engines to meet speed, pressure and spool ups needs.(I know you know all this, not trying to school you, just explaining for others) Some on here wish to run around and scream large A/rs are better. I have seen differently. I can get better overall power and response out of a smaller A/r wrapped around a larger wheel. Versus having the larger A/r wrapped around a smaller wheel. This has to do with the nozzle explanation partially, it also has to do with discharge diameter as well. Running 1.32 versus a 1.0 on a turbo with a 68mm discharge will still be stuck getting that air out of a 68mm discharge. I would rather run the 1.0 on a 75mm discharge. More air is diverted to moving the wheel directly and having the larger discharge helps get the air out of the t/h that much sooner. This is what I've noted playing around here. As with any of this there can be numerous variables(wheel profiles is another issue all-together) and because of such there are may ways to skin a cat.
 Wasn't aware of this till now. I know the DP originally sent you said was having a issue. So I sent out another. I'll be honest when we started switching everything over this year(killing me slowly) and I started buying my bends from another source. While the DP's did fit the fixture fine and shouldn't be a issue, I did have three(you being one) that apparently were not fitting correctly. The only solution I could come up with was that the bends were off just enough that I lost some wiggle room on the re-routes. My solution since I received yours back was to completely start over and make another fixture all together utilizing the new bends. As far as the mid-pipe fitment. That I have no idea, on occasion if it is a chinese made one from them DP/MP combos they sell. It can be way off since those were made together as a unit they didn't need to reference for stock placement. And as always please get back to me directly with any issue.
My 500R had an exhaust leak on the turbine housing to manifold flange, which was warped.
I had to remove the turbo from the manifold, remove the turbine housing from the CHRA, take the turbine housing to a machine shopped to be planed flat, then reassemble the turbo (this took many hours with the 1.0 hot side a/r). It was like putting a jigsaw puzzle together, with one hand, blind and drunk. Not fun.
I had to remove the turbo from the manifold, remove the turbine housing from the CHRA, take the turbine housing to a machine shopped to be planed flat, then reassemble the turbo (this took many hours with the 1.0 hot side a/r). It was like putting a jigsaw puzzle together, with one hand, blind and drunk. Not fun.
-S-
Wasn't aware of this till now. I know the DP originally sent you said was having a issue. So I sent out another. I'll be honest when we started switching everything over this year(killing me slowly) and I started buying my bends from another source. While the DP's did fit the fixture fine and shouldn't be a issue, I did have three(you being one) that apparently were not fitting correctly. The only solution I could come up with was that the bends were off just enough that I lost some wiggle room on the re-routes. My solution since I received yours back was to completely start over and make another fixture all together utilizing the new bends. As far as the mid-pipe fitment. That I have no idea, on occasion if it is a chinese made one from them DP/MP combos they sell. It can be way off since those were made together as a unit they didn't need to reference for stock placement. And as always please get back to me directly with any issue.everything fits together now though, the only problem im having now sean is an exhaust leak, i believe its to the block [not too sure if its where the mani bolts to the turbo also] i want to make sure that everything is tight first before taking anything off but if its warped or something ill just take it to a local machine shop to re-surface it. that should be alright, right?
once again, thanks for always helping me out
Doritos on a toothpick
Joined: Oct 2002
Posts: 1,120
Likes: 5
From: west palm beach, FL
probably manifold to turbo.....those are the bitch bolts....lol..i made a special wrench for mine.....hopefully the flange isnt warped.....did you use the crush type metal gasket??....
i know you didnt know about the second problem with the dp, i just didnt want to keep bothering you lol
everything fits together now though, the only problem im having now sean is an exhaust leak, i believe its to the block [not too sure if its where the mani bolts to the turbo also] i want to make sure that everything is tight first before taking anything off but if its warped or something ill just take it to a local machine shop to re-surface it. that should be alright, right?
once again, thanks for always helping me out

There are too many stories to tell of people thinking or demanding something is wrong with their stuff only to find out otherwise. I had someone pay I believe $300 once to get a wastegate flange welded on "correctly" by whatever shop was doing the install. He kept demanding I pay it. I told him the same thing I tell everyone. If you have a issue come to me me with it first, once someone has tampered with it I can not warranty it for numerous reasons. He finally got me pics I was asking for... and then finally explained that what they told him was because the WG flange wasn't welded on the inside as well. It would never hold up. They had to do this to make it work. I felt bad because now he was a perfect example of why you come to me first. I never welded the inside of my WG flanges. I never have had one fail. That is on serious track abuse and 450hp street cars with 50k miles.
It sucks because in trying to update and improve everything it is giving me a few headaches such as 45 degree bends being different from vendor to vendor. The biggest headache so far was getting all the flanges and machining I get made sent out to another machine shop. That put me way behind for awhile. But I did it because the shop I was using had too long of lead times and it was in my opinion making the customer wait for product too long.
If for some reason the edge of the base flange is leaking at the block it is minimal. usually they are faced off before they leave. Sometimes (maybe one out of 10) they aren't faced enough. All it should take is a wide enough belt sander if the shop your at has it and a few minutes of just setting it down level, checking it and repeat as necessary. I've done it here using a 60grit belt, works fine. A machine shop can do it but they will need to make a fixture to hold it and that can take more than a few minutes. Again please keep me informed and you or any other customer is definitely not a bother. If I didn't want to be bothered any more I would just close up shop and go ride my mountain bike into retirement

 lol jk.
yes, i used the metal gasket
ill check it hopefully sometime this week *crosses fingers* lets just hope it needs to be tighter.
i hope to god its just a bolt that needs to be tighter lol
cant wait to get it tuned and get some numbers on this baby, but i better stop getting ahead of myself, one step at a time lol
Doritos on a toothpick
Joined: Oct 2002
Posts: 1,120
Likes: 5
From: west palm beach, FL
1. buy the wrench
2. put the open end in a vise
3. beat the **** out of it till you get a nice 45 degree bend...
4. cut the bitch in half.
5. enjoy the magic.
6. thank me
7. drive car to lunch.
8. Buy something tasty.
9. brag about said magical tool to others..
10. ok....i'll shut up now.
11. bye.
12. --Jack

i too have a nasty exhaust leak with my 35r kit between the manifold and block. i replaced the 2 gaskets with new oem gaskets but it still leaks. i'm too lazy to remove it again and machine the flange flat.
i found the leak by running a shop vac in reverse(blower). i plugged the hose into the muffler pipe and duct taped it on. then i sprayed a soapy solution on all the joints and flanges. i found alot of bubbles between the block and manifold flange
i found the leak by running a shop vac in reverse(blower). i plugged the hose into the muffler pipe and duct taped it on. then i sprayed a soapy solution on all the joints and flanges. i found alot of bubbles between the block and manifold flange
lol...yea....i can give you a great tutorial on how to make one....
1. buy the wrench
2. put the open end in a vise
3. beat the **** out of it till you get a nice 45 degree bend...
4. cut the bitch in half.
5. enjoy the magic.
6. thank me
7. drive car to lunch.
8. Buy something tasty.
9. brag about said magical tool to others..
10. ok....i'll shut up now.
11. bye.
12. --Jack
--should i not use the metal gasket?
and the leak isnt to the block like i thought it was, its to the turbo.
i too have a nasty exhaust leak with my 35r kit between the manifold and block. i replaced the 2 gaskets with new oem gaskets but it still leaks. i'm too lazy to remove it again and machine the flange flat.
i found the leak by running a shop vac in reverse(blower). i plugged the hose into the muffler pipe and duct taped it on. then i sprayed a soapy solution on all the joints and flanges. i found alot of bubbles between the block and manifold flange
i found the leak by running a shop vac in reverse(blower). i plugged the hose into the muffler pipe and duct taped it on. then i sprayed a soapy solution on all the joints and flanges. i found alot of bubbles between the block and manifold flange
good luck with yours-

Doritos on a toothpick
Joined: Oct 2002
Posts: 1,120
Likes: 5
From: west palm beach, FL
-Jack