
revive your R1 lips *pix*

Thread Starter
Eats, Sleeps, Dreams Rotary
Joined: Nov 2003
Posts: 3,082
Likes: 0
From: kali
hey guys just thought id share something to ya i did today
well i know some of you guys have an r1 lip, and some are pretty banged up
well im one of them
heres ome before and after shots
before
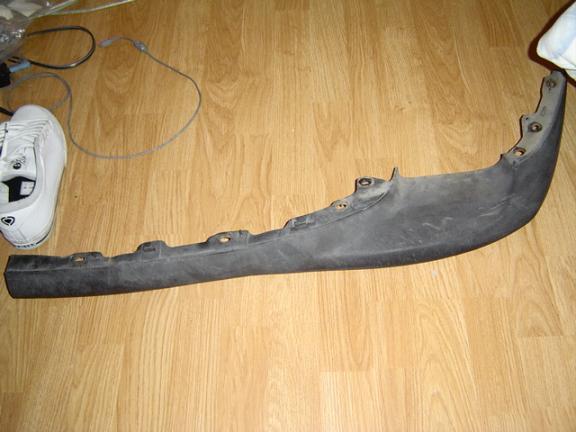
after
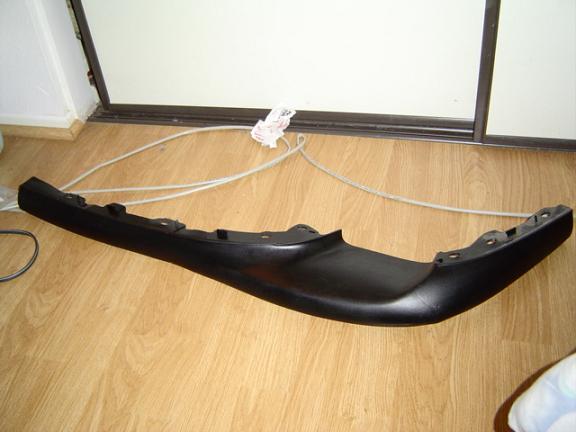
well as u can see 30 min worth of work made my lip looks good as new again
now time for the other side
now you guys do the same, and save money while your at it plus help your FD look stunning
will post more pics later
thanx
mike
well i know some of you guys have an r1 lip, and some are pretty banged up
well im one of them
heres ome before and after shots
before
after
well as u can see 30 min worth of work made my lip looks good as new again
now time for the other side
now you guys do the same, and save money while your at it plus help your FD look stunning
will post more pics later
thanx
mike
Last edited by rotoboy661; Jan 18, 2005 at 09:39 PM.

Trending Topics

Thread Starter
Eats, Sleeps, Dreams Rotary
Joined: Nov 2003
Posts: 3,082
Likes: 0
From: kali
Originally Posted by KaiFD3S
all I do is put black magic plastic shine and it looks as good as new....
wish it was that easy
took automotive sand paper (220) and worked the whole surface of the lip
take put all the rashes
then i used 400 grit to finish off
i did wet sanding and then dry in these 2 step process
after than, paint it with what ever color u want
i used flat black and used a clear coat
thanx for the complement guys
hoped i helped a lil and gave ya some insight in this small project

mike

Ive been pondering how to revive my scratch pieces. I tried a little sanding, some stain, etc. The problem is the texture. If you sand it smooth to remove scratches then it looks funny with smooth and textured areas. My next process is going to be sandblasting or glass peening. That way I keep the texture and get rid of scratches or at least get them to blend in more. The tire shine type products restore the shine fairly well but its not enough for the deep scratches. Was also thinking that there is probably some type of solvent based product that might "melt" the surface area where the scratches are. Some others have to at some point had to deal with this issue. Would be great to see some more ideas. glad you brought this one up rotoboy!
chuck
chuck
13B Rotary Turbo
Joined: Dec 2004
Posts: 649
Likes: 0
From: South California
Originally Posted by a3dcadman
Ive been pondering how to revive my scratch pieces. I tried a little sanding, some stain, etc. The problem is the texture. If you sand it smooth to remove scratches then it looks funny with smooth and textured areas. My next process is going to be sandblasting or glass peening. That way I keep the texture and get rid of scratches or at least get them to blend in more. The tire shine type products restore the shine fairly well but its not enough for the deep scratches. Was also thinking that there is probably some type of solvent based product that might "melt" the surface area where the scratches are. Some others have to at some point had to deal with this issue. Would be great to see some more ideas. glad you brought this one up rotoboy!
chuck
chuck
I like the shoe Mike.. lol too bad they didn't have my size when they were on sale..
Senior Member
Joined: Oct 2004
Posts: 349
Likes: 0
From: Perth, Australia
I spent a good few hours washing and waxing my car last night. Part of the process involved putting some Armor All Original Protectant on it.
Previously the lip was a greyish colour, now it's a glossy black again. Along with a freshly washed/waxed car, some Armor All Extreme Tyre Shine the result is awsome reward for a good 2 hours work
Previously the lip was a greyish colour, now it's a glossy black again. Along with a freshly washed/waxed car, some Armor All Extreme Tyre Shine the result is awsome reward for a good 2 hours work
Thread Starter
Eats, Sleeps, Dreams Rotary
Joined: Nov 2003
Posts: 3,082
Likes: 0
From: kali
Originally Posted by ROTORhead93
Hey mike, the lip looks awesome. There a great way to save spending 100 for a new lip. Good job.
just wanted to share my lil project ive got lotz more to do
theres a guy here in mojave that will make me a mold for the r1 or 99 lip for CF
but who knows
if u guys are interested let me know
lips usually go for 160-220 these CF might be in the 70-150 range
ill kep ya guys posted
mike
Rotary Freak
Joined: Sep 2004
Posts: 2,444
Likes: 0
From: Bay Area, CA
Originally Posted by KaiFD3S
all I do is put black magic plastic shine and it looks as good as new....
Originally Posted by BlueRex
Mothers Back to Black also works well, not just on the lip but on the black rubber seals too.

No it's not Turbo'd
Joined: Jun 2002
Posts: 2,511
Likes: 2
From: Los Angeles, Ca
My Problem is the Rubber's starting to give away, and there's no going back from that.... maybe gorilla glue ??  Won't last long.... but good work on parts that are still salveageable....
Won't last long.... but good work on parts that are still salveageable....