
Replaced my oil pressure and water temp gauges

Thread Starter
Schadenfreude...Ha Ha
Joined: Feb 2002
Posts: 1,202
Likes: 0
From: Austin, TX
Replaced my oil pressure and water temp gauges
Well, after the V8 swap I was left without functional gauges for both my oil pressure and water temp. After 2 months of driving around everyday without that information available to me I decided to do something about it.
Since the stock gauges never worked very well anyways, and because I didn't have the Mazda senders anymore I decided to go with aftermarket gauges. I went with the Defi D-Series because they're amber and the font is pretty close to the stock gagues.
And, since I'd seen Max Cooper's setup with his in dash SPA gauges, that's the route I took.
It turned out OK and reasonably clean. There are some details to it that still bug me a little, but by and large I am happy that I'll have some functional gauges, and I didn;t have to mount them on the A pillar or at the speaker channel. Those areas will be open for boost, EGT, and Fuel pressure when I get around to turboing the car.
Here's some pictures for those that are curious/want to criticize.
Thread Starter
Schadenfreude...Ha Ha
Joined: Feb 2002
Posts: 1,202
Likes: 0
From: Austin, TX
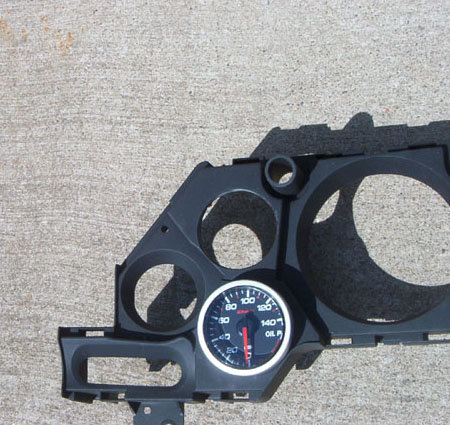
First step was to get everything apart and then dremel out the area to mount the gauges in. Basically the entire bevel had to go. I just kept grinding away until I could press the new gauge in. It's a really tight fit, so no real need to glue anything or bolt anything into place
Last edited by wingsfan; Apr 5, 2004 at 12:00 PM.
Thread Starter
Schadenfreude...Ha Ha
Joined: Feb 2002
Posts: 1,202
Likes: 0
From: Austin, TX
Next I had to cut out holes in the old covering so that the gauges could poke through. Just circled the area I needed to cut out and ground it out using a cutting bit on the dremel
Trending Topics
Thread Starter
Schadenfreude...Ha Ha
Joined: Feb 2002
Posts: 1,202
Likes: 0
From: Austin, TX
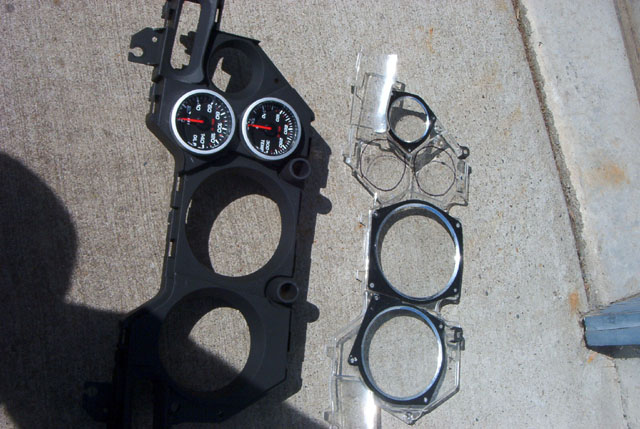
And finally pictures of the results. I had to grind away a bit of the hood to get the bezels to poke through cleanly. I'm not terribly thrilled with the angle the gauges are mounted at (the angle of the camera doesn't help), they're a little crooked for my tastes , but they are in and as soon as I get the block adapters for the sending units they'll be functional. Also, the silver on the bezel doesn't quite match the chrome ring around the other gauges. 
Thread Starter
Schadenfreude...Ha Ha
Joined: Feb 2002
Posts: 1,202
Likes: 0
From: Austin, TX
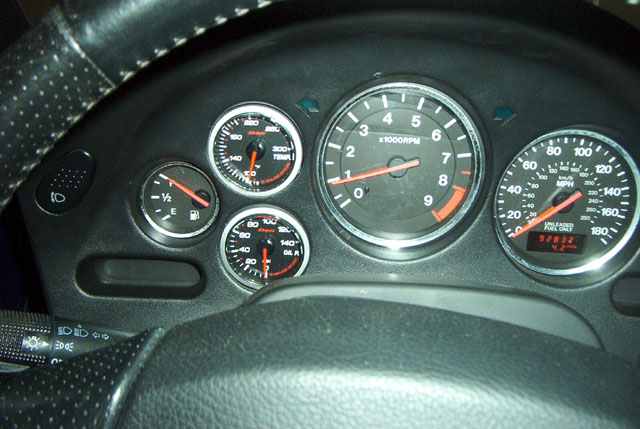
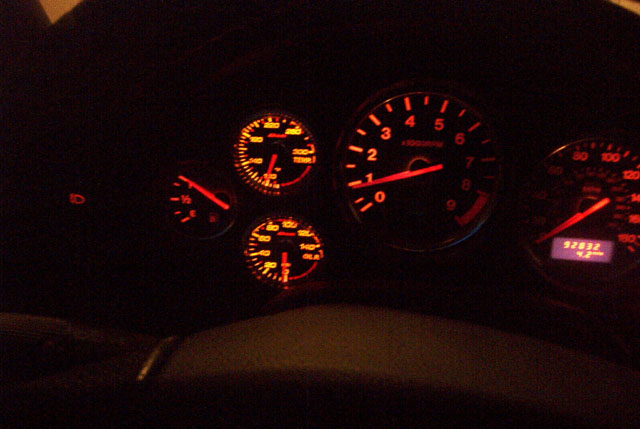
Here's a night shot. They're MUCH brighter than my other gauges and the color doesn't quite match.
And I realized as I got everything back together that one of my bulbs is burned out. So now I'm going to have to rip everything apart again and put some new bulbs in.
For those that are curious I routed the power and sending unit wires through the old light bulb holes, so I didn't have to cut my trace at all.
All in all though, not too bad. When I put the new bulbs in I'll see what I can do about correcting the little flaws it has now, but I'm not sure what I can do about the gauge angle as they're seated all the way against the back of the cluster. I'm marginally pleased at this point. I'll just be happy to have functional gauges again.
Very mice work! Could you just paint the bezels black? So they blend in with the hood better? ( Even the way they are it doesn't jump out toooo bad.) I'm glad you posted this as I was wondering about the possibility of doing this. ( Do to the fact that I can't stand the look of A-pillar gauges or the center speaker pods.)
Nice work again!
Nice work again!
Thread Starter
Schadenfreude...Ha Ha
Joined: Feb 2002
Posts: 1,202
Likes: 0
From: Austin, TX
Originally posted by BigIslandSevens
Very mice work! Could you just paint the bezels black? So they blend in with the hood better? ( Even the way they are it doesn't jump out toooo bad.) I'm glad you posted this as I was wondering about the possibility of doing this. ( Do to the fact that I can't stand the look of A-pillar gauges or the center speaker pods.)
Nice work again!

Also could you grind off/cut-out some of the white backing plate to relieve the pressure on the gauges?( Maybe helping in correcting the angle problem.) Or are the mounting tabs for the assembly back there?
Thread Starter
Schadenfreude...Ha Ha
Joined: Feb 2002
Posts: 1,202
Likes: 0
From: Austin, TX
Originally posted by Brad
I agree, looks prett good! Perhaps you are being too discerning?
I agree, looks prett good! Perhaps you are being too discerning?
Thread Starter
Schadenfreude...Ha Ha
Joined: Feb 2002
Posts: 1,202
Likes: 0
From: Austin, TX
Originally posted by BigIslandSevens
Also could you grind off/cut-out some of the white backing plate to relieve the pressure on the gauges?( Maybe helping in correcting the angle problem.) Or are the mounting tabs for the assembly back there?
Also could you grind off/cut-out some of the white backing plate to relieve the pressure on the gauges?( Maybe helping in correcting the angle problem.) Or are the mounting tabs for the assembly back there?
The crookedness/angle is actually being determined by the hood, and grinding that down is nervewracking since it's still visible when your're done.
Thread Starter
Schadenfreude...Ha Ha
Joined: Feb 2002
Posts: 1,202
Likes: 0
From: Austin, TX
Originally posted by areXseven
Why are you only getting 2psi of Oil Pressure at 900 rpm??
BTW, very nice set-up!
Why are you only getting 2psi of Oil Pressure at 900 rpm??
BTW, very nice set-up!
The temp reading is the ambient temp under the hood too because neither of them are in the block yet.
Thread Starter
Schadenfreude...Ha Ha
Joined: Feb 2002
Posts: 1,202
Likes: 0
From: Austin, TX
Originally posted by twinturboteddy
shoot, forget that gauges, i want more pics from the v8 swap
shoot, forget that gauges, i want more pics from the v8 swap
Joined: May 2003
Posts: 2,096
Likes: 1
From: Dove le cose sono fatte il vecchio moda il senso
Originally posted by wingsfan
No sender yet. The temp reading is the ambient temp under the hood too because neither of them are in the block yet.
No sender yet.
The temp reading is the ambient temp under the hood too because neither of them are in the block yet.
Good luck with your project!
Thread Starter
Schadenfreude...Ha Ha
Joined: Feb 2002
Posts: 1,202
Likes: 0
From: Austin, TX
Originally posted by areXseven
Well that explains that!..., But, what's wrong with your fuel gauge??. It's marking FULL. That HAS to be an error, or is your last name Gates?????
Good luck with your project!
Well that explains that!..., But, what's wrong with your fuel gauge??. It's marking FULL. That HAS to be an error, or is your last name Gates?????
Good luck with your project!
V8 = better mpg

Seriously though, notice I have 4 miles on it from the gas station.