Raceshop Street Rollbar preinstall pics
 02-05-06, 11:22 AM
#1
Eats, Sleeps, Dreams Rotary
Thread Starter
Raceshop Street Rollbar preinstall pics
Larry makes a great product. Period.
I really like the qaulity of the pieces. Really impressive.
I don't have the bar totally installed but I wanted to fit it in (without tightening the bolts) to be able to accurately drill the holes to mount it to the floor boards.
Just some tips:
1) when installing the harness bar, the bolts can only go one way or it interferes with bolts from the bar. That is to remove the bolts later.
2) mount the connecting bars from the harness bar to the main hoop first before attaching the main hoop.
3) cut the holes for the plastic covers that go over the strut towers and mount them BEFORE you finally attach all the bars in place.
4) you have to cut the carpet for the floor attachments.
Here are some pics:
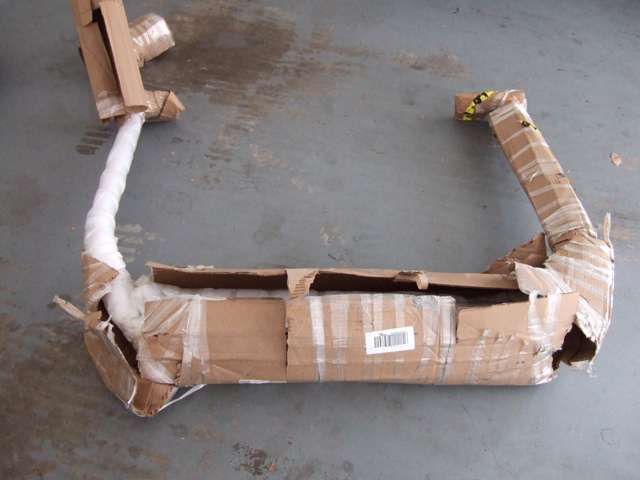
Here is how it arrived.
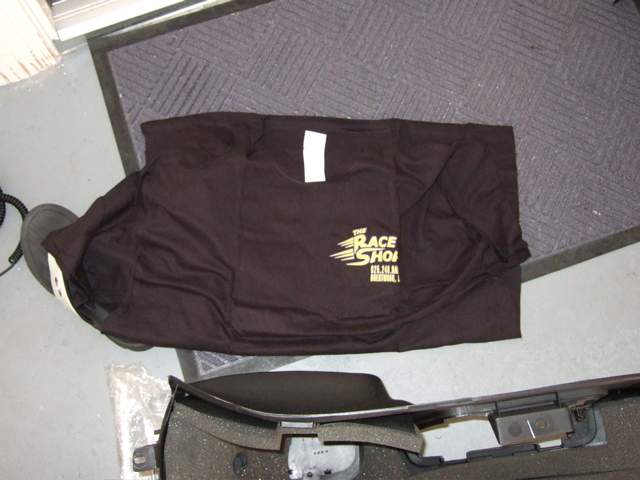
Thanks for the T-shirt Larry
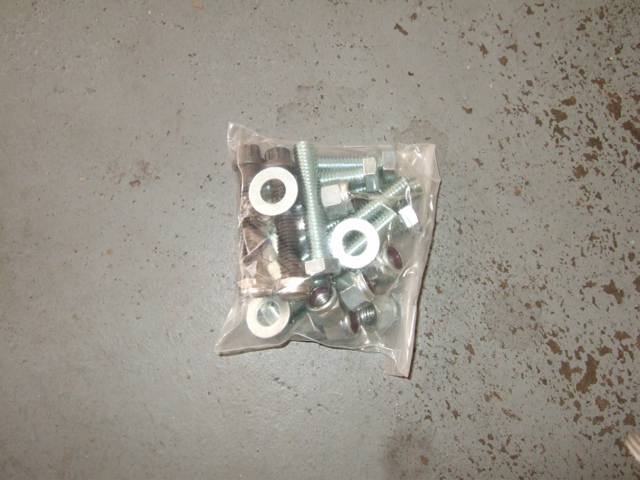
Included hardware:
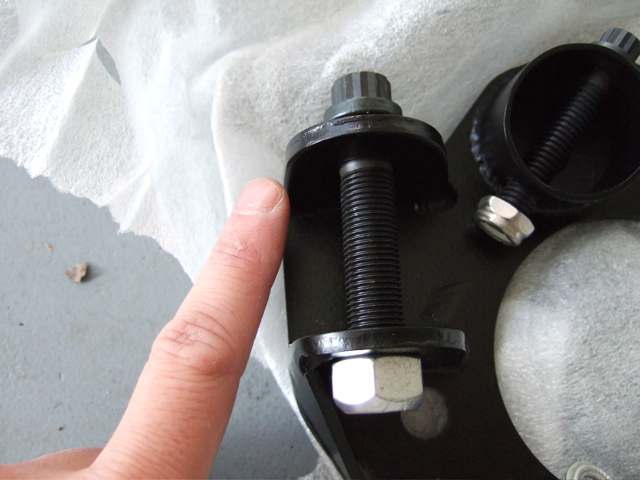
Harness bar attachment. Look how beafy this is. I wanted to post this due to the arguements on older post on the strength and safety of attaching belts to the stock harness or other bars that are out on the market.
Again. THICK bar with a nice touch of mounting points to attach the clips for the cargo cover:

I really like the qaulity of the pieces. Really impressive.
I don't have the bar totally installed but I wanted to fit it in (without tightening the bolts) to be able to accurately drill the holes to mount it to the floor boards.
Just some tips:
1) when installing the harness bar, the bolts can only go one way or it interferes with bolts from the bar. That is to remove the bolts later.
2) mount the connecting bars from the harness bar to the main hoop first before attaching the main hoop.
3) cut the holes for the plastic covers that go over the strut towers and mount them BEFORE you finally attach all the bars in place.
4) you have to cut the carpet for the floor attachments.
Here are some pics:
Here is how it arrived.
Thanks for the T-shirt Larry
Included hardware:
Harness bar attachment. Look how beafy this is. I wanted to post this due to the arguements on older post on the strength and safety of attaching belts to the stock harness or other bars that are out on the market.
Again. THICK bar with a nice touch of mounting points to attach the clips for the cargo cover:
Last edited by 7racer; 02-05-06 at 11:41 AM.
 02-05-06, 11:32 AM
#3
Eats, Sleeps, Dreams Rotary
Thread Starter
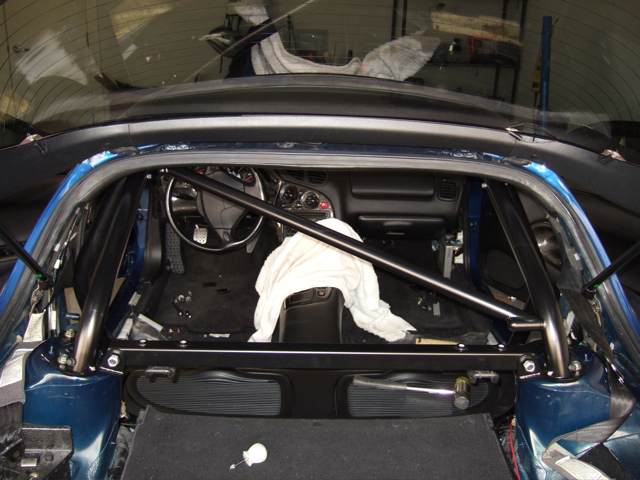
Some test fitting. The bolt clearance that was reported before is no longer an issue. VERY EASY to get the bolts on the harness bar plate:
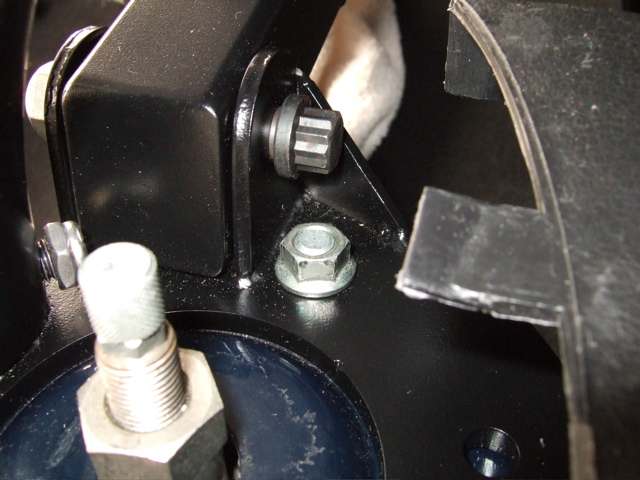
Test fit:
This is why you test fit You need to cut the carpet otherwise it too tight:
Test fit:
This is why you test fit
You need to cut the carpet otherwise it too tight:
02-05-06, 11:37 AM
#5
Eats, Sleeps, Dreams Rotary
Thread Starter
Thanks to Maxcooper for the tip on the carpet. Any other tips to make this go easier just add it to this post.
I know that rx7tuner and John Magneson will be doing write ups but I know some on the group buy wanted to see pics:
Finally, what kind of bolt head is that in the fourth pic???
I know that rx7tuner and John Magneson will be doing write ups but I know some on the group buy wanted to see pics:
Finally, what kind of bolt head is that in the fourth pic???


Trending Topics
02-05-06, 01:48 PM
#10
Eats, Sleeps, Dreams Rotary
Thread Starter
I just have the street version. There is a race version and a version with side bars....Rynberg customized his to get the set up he wanted.
There is/was a GB going...
https://www.rx7club.com/forum/showthread.php?t=492432
There is/was a GB going...
https://www.rx7club.com/forum/showthread.php?t=492432
02-05-06, 03:53 PM
#13
Eats, Sleeps, Dreams Rotary
Thread Starter
Originally Posted by iforged
Did you purchase the bar in the groupbuy? I thought there was suppose to be a rear diagonal part?
yes...it's just laying on the floor until I get the main hoop set properly. You can see it in the pic with the floor plates.
02-05-06, 04:19 PM
#14

do you have to remove the carpet, or just cut it?
i ordered the 6 point version (2 door bars at $75 each add'l). i also got the "seat back bar" ($135 add'l) to be NHRA legal, so i won't get that big harness bar you have; instead of that harness bar, mine will have lightweight rear strut tower brace. i'll attach my harnesses to the "seat back bar".
thanks for the pics. should get mine in 3 weeks or so.
02-05-06, 09:33 PM
#16
Full Member
iTrader: (1)

Join Date: Aug 2003
Location: OC
Posts: 210
Likes: 0
Received 0 Likes
on
0 Posts
Originally Posted by 2MCHPWR
do you have to remove the carpet, or just cut it?
i ordered the 6 point version (2 door bars at $75 each add'l). i also got the "seat back bar" ($135 add'l) to be NHRA legal, so i won't get that big harness bar you have; instead of that harness bar, mine will have lightweight rear strut tower brace. i'll attach my harnesses to the "seat back bar".
thanks for the pics. should get mine in 3 weeks or so.
i ordered the 6 point version (2 door bars at $75 each add'l). i also got the "seat back bar" ($135 add'l) to be NHRA legal, so i won't get that big harness bar you have; instead of that harness bar, mine will have lightweight rear strut tower brace. i'll attach my harnesses to the "seat back bar".
thanks for the pics. should get mine in 3 weeks or so.
02-06-06, 12:29 AM
#17
Full Member

Join Date: Jul 2004
Location: Brentwood, Ca
Posts: 113
Likes: 0
Received 0 Likes
on
0 Posts
Originally Posted by 7racer
Thanks to Maxcooper for the tip on the carpet. Any other tips to make this go easier just add it to this post.
I know that rx7tuner and John Magneson will be doing write ups but I know some on the group buy wanted to see pics:
Finally, what kind of bolt head is that in the fourth pic???
I know that rx7tuner and John Magneson will be doing write ups but I know some on the group buy wanted to see pics:
Finally, what kind of bolt head is that in the fourth pic???
By the looks of the box , They didn't handle it with care ? I'm going to increase the packing material, To make sure it holds up to tough guys at UPS

For those waiting for shippment . I am having trouble with UPS accepting the bars due to the size. May have to find another carrier.
02-06-06, 12:48 AM
#18
Eats, Sleeps, Dreams Rotary
Thread Starter
Originally Posted by Raceshop
By the looks of the box , They didn't handle it with care ? I'm going to increase the packing material, To make sure it holds up to tough guys at UPS
...
...
they did...I just opened it up a bit before i snapped the pic...I just mislabed the pic "as how it arrived"...meaning that it came well packaged but that was me trying to pry off all of that damn tape!!

It was well packed...especially for something that big and ackward.
02-06-06, 12:55 AM
#19
Full Member
Join Date: Jul 2004
Location: Brentwood, Ca
Posts: 113
Likes: 0
Received 0 Likes
on
0 Posts
Originally Posted by 7racer
they did...I just opened it up a bit before i snapped the pic...I just mislabed the pic "as how it arrived"...meaning that it came well packaged but that was me trying to pry off all of that damn tape!!
It was well packed...especially for something that big and ackward.
It was well packed...especially for something that big and ackward.
02-06-06, 02:03 PM
#20
Eats, Sleeps, Dreams Rotary
Thread Starter
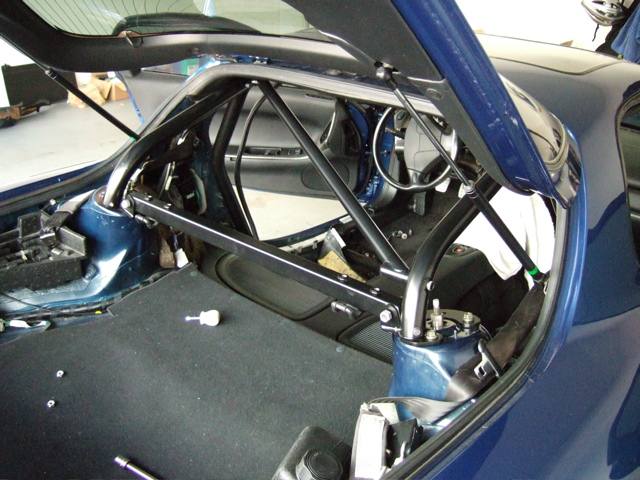
Here are some more pics and tips.
I pulled the side plastics off to turn the carpet over. You don't have to do this as you can slide the carpet out from the side plastic runners and unbolt the rear bins to lift the carpet out. My car is half apart anyways, so it was easy for me to remove the piece.
I tested fitted every part. Didn't fully tighten the bolts down for the harness bar plates until I got all of the bolts into place.
It's wierd how things vary from one car to the next. The passenger side part of the bar just clicked into place. I then EASILY slide the bolts into place and WOOT! I thought I was home free! The drivers side was a PITA. I couldn't get the bolt that attaches the main hoop to the connecting bar to the harness bar in. What I ended up doing was taking off the harness bar. Left the plate and connecting tube together and then bolted it to the main hoop. This left the plate hanging in the air above the strut bolts more toward the center of the car. This part was then easy. I just grabbed the whole assembly and pulled it until it was over the strut bolts and "popped" it down and in.
Now I just have to drill the holes for the floor plate and cut the carpet. I think I am going to do it like maxcooper by cutting a slit to let the carpet go around and then cut a hole to let the bar through.
I can already tell this is probably going to increase the road noise in my car...especially considering I have pillow ***** on the coilovers....
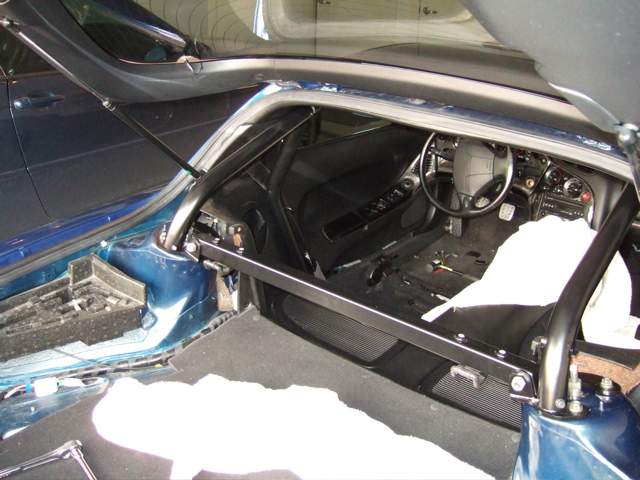
Here it is with it fitted and all bolts in except the floor board bolts.
Note the rear diagonal. THIS THING IS NICE
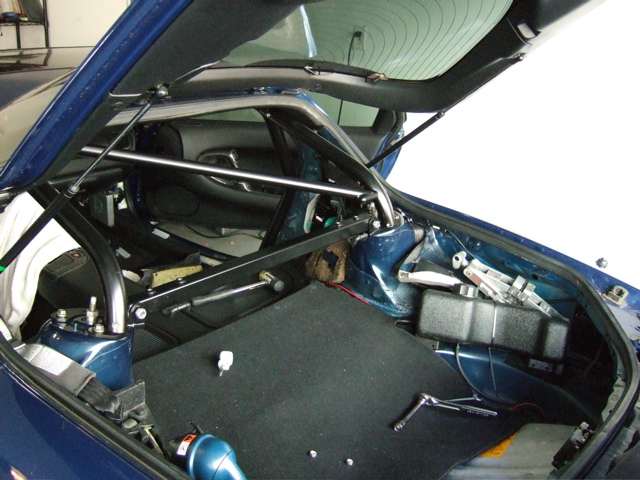
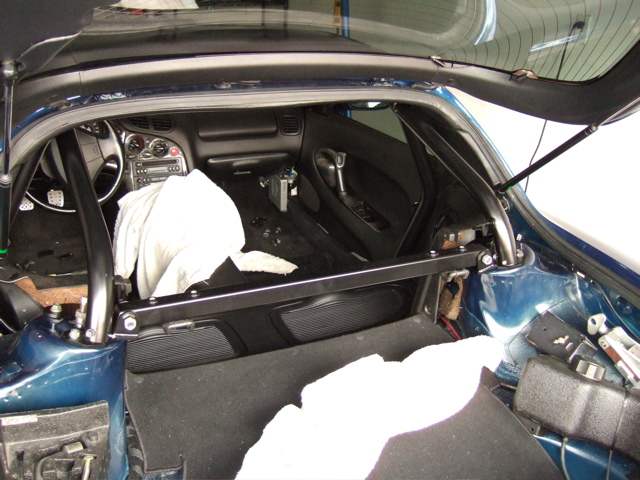
see got it all nice and aligned and bolted up:
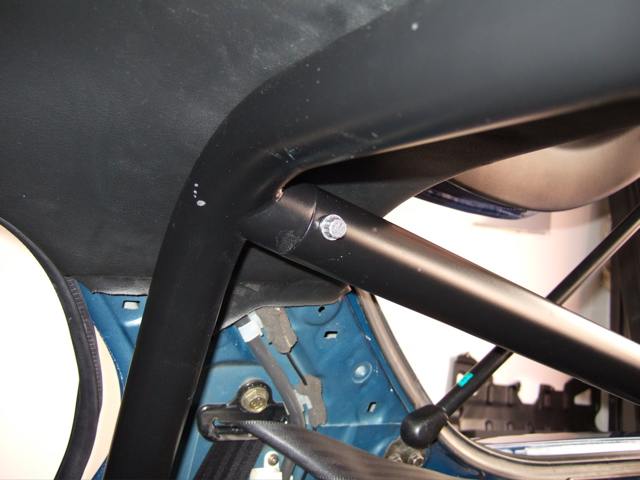
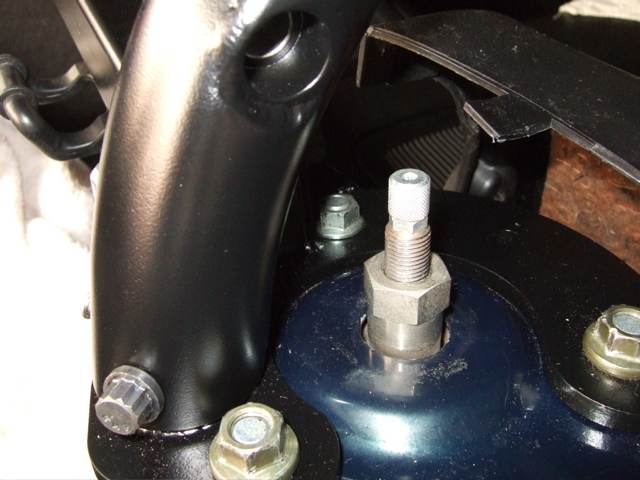
here is where the foot plates of the main hoop end up. You can drill three holes from the top. But will have to get the third from the bottom or after you've moved the hoop back out of the way.
I pulled the side plastics off to turn the carpet over. You don't have to do this as you can slide the carpet out from the side plastic runners and unbolt the rear bins to lift the carpet out. My car is half apart anyways, so it was easy for me to remove the piece.
I tested fitted every part. Didn't fully tighten the bolts down for the harness bar plates until I got all of the bolts into place.
It's wierd how things vary from one car to the next. The passenger side part of the bar just clicked into place. I then EASILY slide the bolts into place and WOOT! I thought I was home free! The drivers side was a PITA. I couldn't get the bolt that attaches the main hoop to the connecting bar to the harness bar in. What I ended up doing was taking off the harness bar. Left the plate and connecting tube together and then bolted it to the main hoop. This left the plate hanging in the air above the strut bolts more toward the center of the car. This part was then easy. I just grabbed the whole assembly and pulled it until it was over the strut bolts and "popped" it down and in.
Now I just have to drill the holes for the floor plate and cut the carpet. I think I am going to do it like maxcooper by cutting a slit to let the carpet go around and then cut a hole to let the bar through.
I can already tell this is probably going to increase the road noise in my car...especially considering I have pillow ***** on the coilovers....
Here it is with it fitted and all bolts in except the floor board bolts.
Note the rear diagonal. THIS THING IS NICE
see got it all nice and aligned and bolted up:
here is where the foot plates of the main hoop end up. You can drill three holes from the top. But will have to get the third from the bottom or after you've moved the hoop back out of the way.
Last edited by 7racer; 02-06-06 at 02:17 PM.
02-06-06, 04:39 PM
#22
Eats, Sleeps, Dreams Rotary
Thread Starter
I did...I just couldn't tell how much I needed to remove. You can also weld it like you said...but I don't have access to a welder. Also, not sure how good the welds have to be to be safe for this application. Maybe someone else can chime in?
02-06-06, 04:46 PM
#23
Eats, Sleeps, Dreams Rotary
Thread Starter
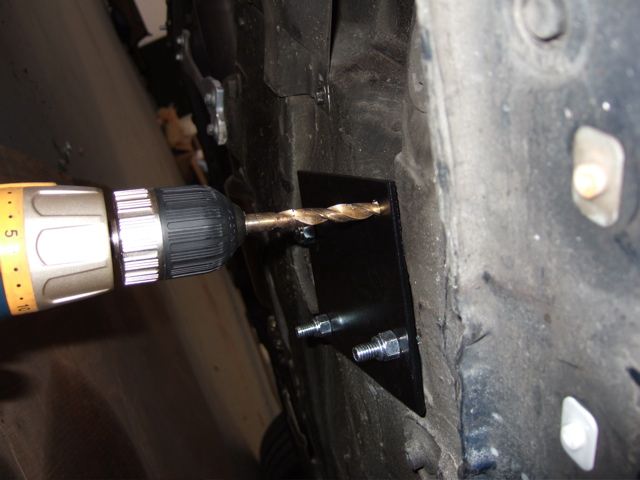
Just some more tips for the install.
I followed maxcoopers write up on drilling the holes for the floor plates. I drilled all three holes from the top. Then placed the two bolts where my fingers are pointing, and tighten the bolt with the outside plate to the two bolts.
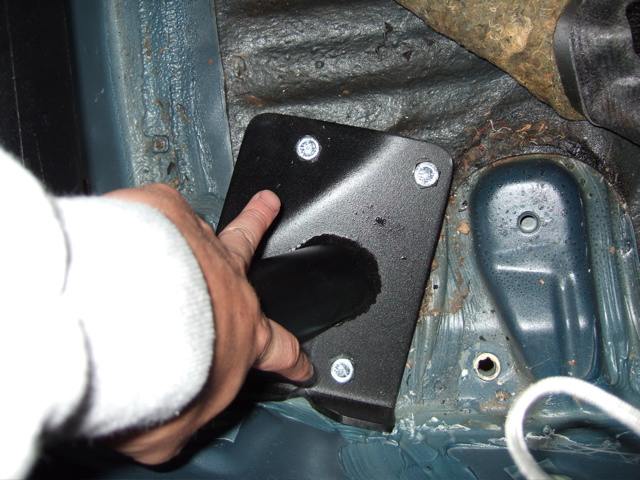
You will find the third bolt doesn't quiet line up anymore....I just then enlarged the hole to get the third bolt to fit and tightened that one down.
Once that is done, I jacked the rear end up and drilled the final hole from the bottom up. As max said, it aligns and hits the final hole each time! SWEET! **GOOD TIP MAX!
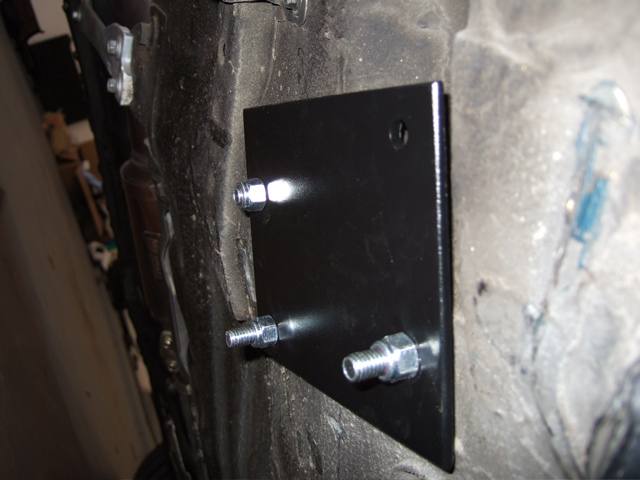
Now you can see all four bolts thru the bottom plate:
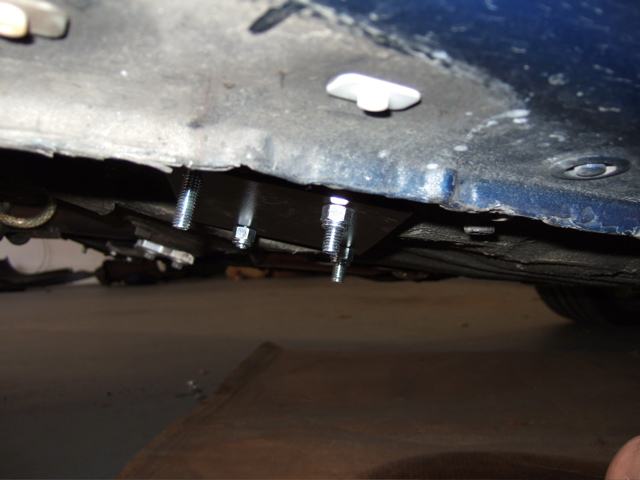
Maxcooper also commented how the bolts hung down low....I may run to the hardware store to see if there are some shorted bolts...maybe 1 1/2 "
I followed maxcoopers write up on drilling the holes for the floor plates. I drilled all three holes from the top. Then placed the two bolts where my fingers are pointing, and tighten the bolt with the outside plate to the two bolts.
You will find the third bolt doesn't quiet line up anymore....I just then enlarged the hole to get the third bolt to fit and tightened that one down.
Once that is done, I jacked the rear end up and drilled the final hole from the bottom up. As max said, it aligns and hits the final hole each time! SWEET! **GOOD TIP MAX!
Now you can see all four bolts thru the bottom plate:
Maxcooper also commented how the bolts hung down low....I may run to the hardware store to see if there are some shorted bolts...maybe 1 1/2 "
02-06-06, 04:49 PM
#24
Eats, Sleeps, Dreams Rotary
Thread Starter
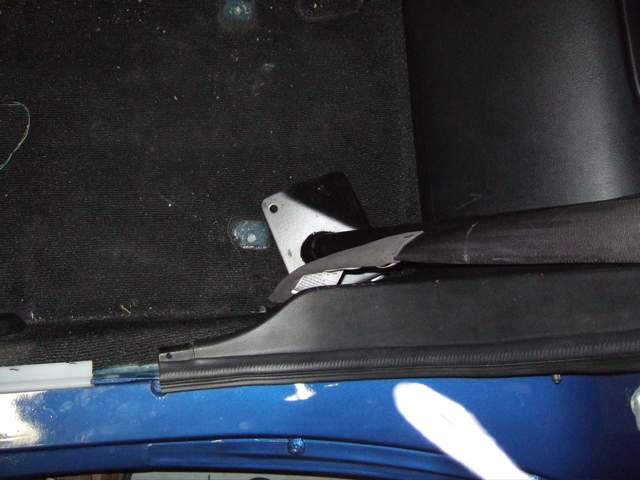
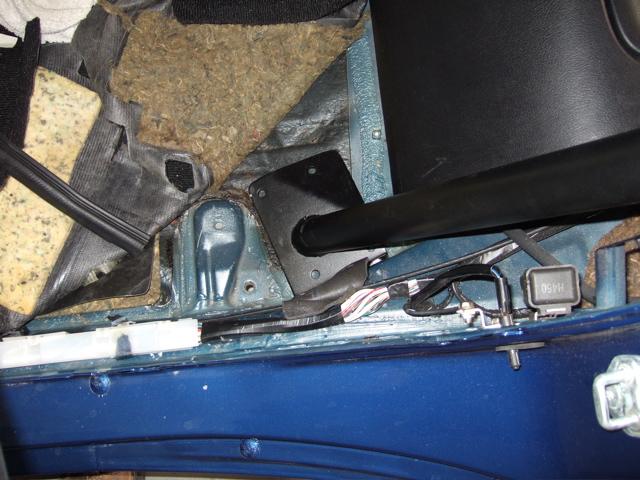
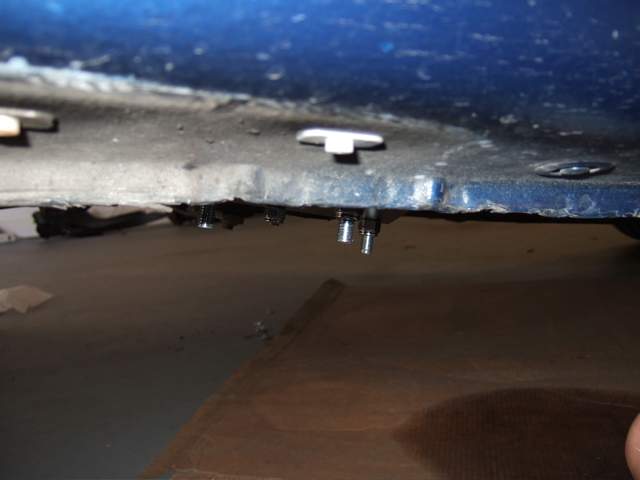
**Also note that one of the bolts FUBARS the attachment point for the rear plastic skid plates. It will make it almost impossible to attach these once the plate is in as the plate totally covers the attachment stud!
Some pics of carpet fitment:
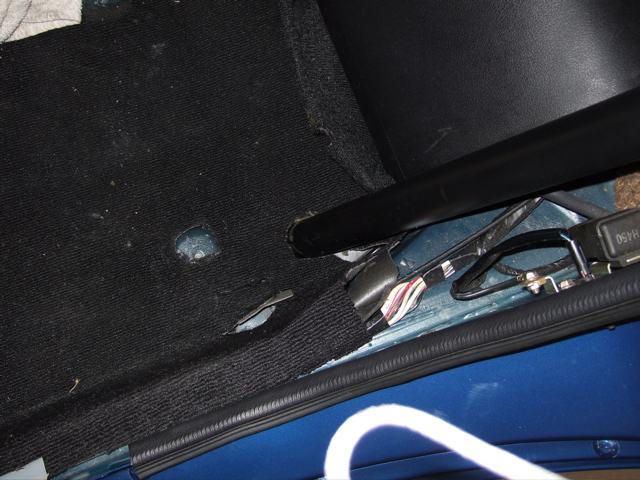
Some pics of carpet fitment:
02-06-06, 05:25 PM
#25
Originally Posted by 7racer
**Also note that one of the bolts FUBARS the attachment point for the rear plastic skid plates. It will make it almost impossible to attach these once the plate is in as the plate totally covers the attachment stud!