Raceshop Street Rollbar preinstall pics
 02-06-06, 05:34 PM
#26
Eats, Sleeps, Dreams Rotary
Thread Starter
Originally Posted by stokedxiv
when you say "rear plastic skid plates" are you talking about the plastic pieces under the car?
 02-06-06, 06:04 PM
#28
Full Member

Join Date: Jul 2004
Location: Brentwood, Ca
Posts: 113
Likes: 0
Received 0 Likes
on
0 Posts
Maxcooper also commented how the bolts hung down low....I may run to the hardware store to see if there are some shorted bolts...maybe 1 1/2 "
There should be at least two threads showing past the nut on the shorter bolts when tight.
Larry
02-06-06, 07:47 PM
#29
Eats, Sleeps, Dreams Rotary
Thread Starter
Originally Posted by Raceshop
I just ordered some shorter bolts, I will still include one longer bolt to draw the floor panel up and sandwich it tight to the bottom plate.
There should be at least two threads showing past the nut on the shorter bolts when tight.
Larry
There should be at least two threads showing past the nut on the shorter bolts when tight.
Larry
02-07-06, 03:00 AM
#32
Full Member
Join Date: Jul 2004
Location: Brentwood, Ca
Posts: 113
Likes: 0
Received 0 Likes
on
0 Posts
Originally Posted by rynberg
Hey Larry (or others who've completed the install), what's the word on remounting the plastic fairing that 7racer brought up?
Larry
02-07-06, 06:37 AM
#33
Junior Member
Join Date: May 2003
Location: Pasadena, CA
Posts: 47
Likes: 0
Received 0 Likes
on
0 Posts
Set the thing in place, take the car to a chassis shop and have them weld it in place. It'll be much stronger this way.
Should help to avoid then whole drilling/bolt/plastic thingy hangup.
Someone is bound to reply with "but I don't want the bar permanently in the car!".
You can still grind off the welds and take the bar out if you really want to.....
Should help to avoid then whole drilling/bolt/plastic thingy hangup.
Someone is bound to reply with "but I don't want the bar permanently in the car!".
You can still grind off the welds and take the bar out if you really want to.....
 02-07-06, 07:18 AM
#35
Quick question: Hard to tell from the pictures, but are you still able to keep the center divider? Also, how are you planning to cut the trim pieces where the 2 rear bars mount to the strut tower? It would seem to be difficult to know where the exact center would be.
02-07-06, 08:19 AM
#37
Eats, Sleeps, Dreams Rotary
Thread Starter
Originally Posted by Rxmfn7
Quick question: Hard to tell from the pictures, but are you still able to keep the center divider? Also, how are you planning to cut the trim pieces where the 2 rear bars mount to the strut tower? It would seem to be difficult to know where the exact center would be.
it turned out easier than I thought. I did it last night. Will post some pics when I get home. Basically I used a 2" diameter cutting blade to give me some room for error and eye balled it.
The center divider fits fine. That's what I liked about this bar. Minimal cutting and alterations of the interior for a rollbar...I will post pics as I get all my interior pieces back in.
02-07-06, 08:35 AM
#38
Eats, Sleeps, Dreams Rotary
Thread Starter
Originally Posted by Scrub
and another question from me....you can leave the bins in to do this install i hope right? There is no way I'm trying to take the bins back out with all that wiring going to it.
Yes. Maxcooper did it. All I did was take the plastics on the side off to test fit. You can unbolt the push fastener and one 10mm bolt (each side) and lift the edge of the bin up to move the carpet. If you don't want to do that you can just eye ball it and cut the carpet with out moving the bin.
You do have to remove the seats.
Last edited by 7racer; 02-07-06 at 09:05 AM.
02-07-06, 08:59 AM
#39
Eats, Sleeps, Dreams Rotary
Thread Starter
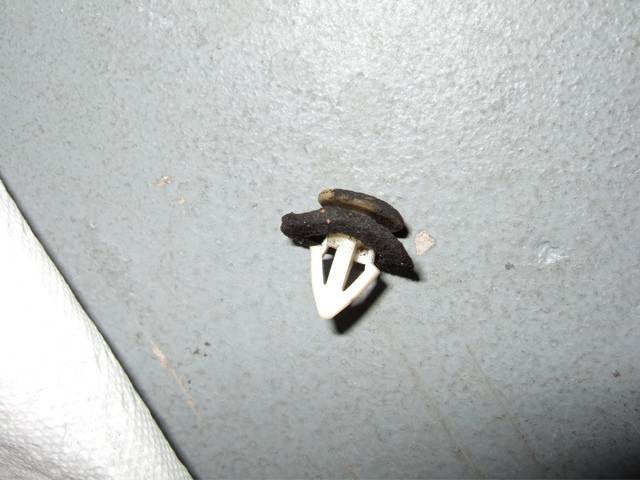
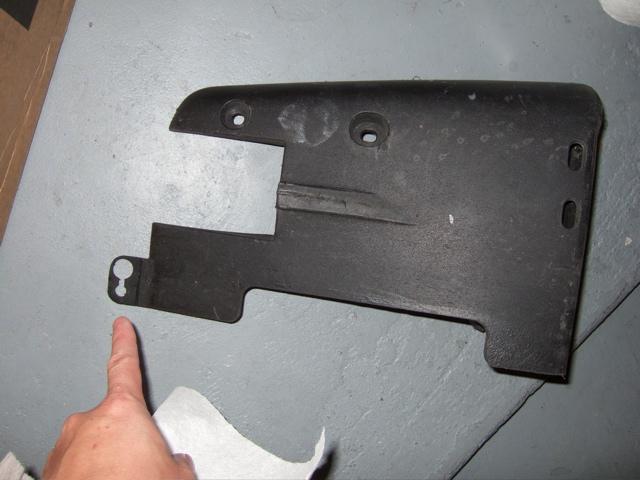
Here is the attachment site for the fastener for the skid plate.
The hole to the right of the one I am pointing at is where the fastener goes. So as you can see the bottom plate will cover the fastner.
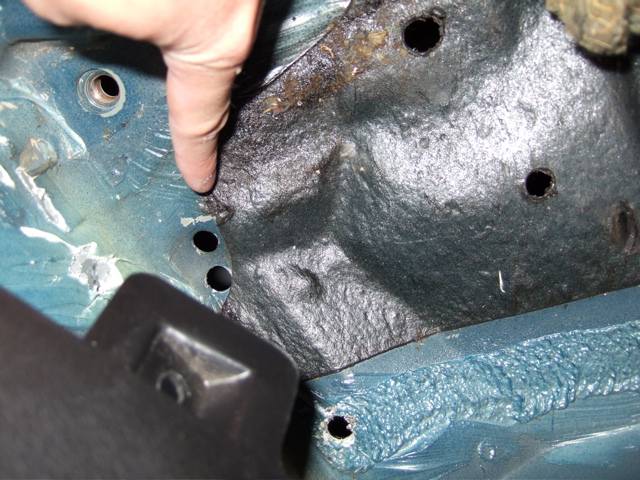
But the fastener is a simple button type of fastener, that attaches to this spot on the skid plate. It should be easy to mod a small hook or something to get that attached.
The hole to the right of the one I am pointing at is where the fastener goes. So as you can see the bottom plate will cover the fastner.
But the fastener is a simple button type of fastener, that attaches to this spot on the skid plate. It should be easy to mod a small hook or something to get that attached.
02-07-06, 01:19 PM
#40
Full Member
Join Date: Jul 2004
Location: Brentwood, Ca
Posts: 113
Likes: 0
Received 0 Likes
on
0 Posts
Originally Posted by Rxmfn7
Quick question: Hard to tell from the pictures, but are you still able to keep the center divider? Also, how are you planning to cut the trim pieces where the 2 rear bars mount to the strut tower? It would seem to be difficult to know where the exact center would be.
I'd like to use some of the info. and pictures from this thread.
Would you mind 7 racer ?
02-07-06, 01:39 PM
#41
Eats, Sleeps, Dreams Rotary
Thread Starter
NOPE!! Not at all...and thanks for the great customer service. I'll post the pics of the trim pieces and measurements to try to make a template.
 02-08-06, 09:41 AM
#45
Eats, Sleeps, Dreams Rotary
Thread Starter
Originally Posted by DucaT
Don't forget the bar padding.
But I don't want to cover up such a nice looking bar!!!!

Anyways, ran into a little snafu with the bar last night, otherwise it would be all done today.
When I went to bolt down the harness plates the driver side wouldn't get low enough down on the studs for the nut threads to grab. If you look at the nuts, the threads don't start until half way thru the nut. There is plenty of thread showing on the bolt but just one thread short of the start on the nut. I plan to goto the hardware store and find a full threaded nut just to start it and push the plate down further so I can tighten all the bolts down. The rear nut on the plate grabs and tightens. But even if I tighten that one down, I couldn't get it low enough to get the nut to grab. I also have coilovers so those bolts maybe shorter than stock.
Finally some additional pics:
When placing the harness bar plate down with the rear plastics, you will find that the plate doesn't quite clear. You just need to dremel them here:
And also dremel this area to let the bar clear:
02-08-06, 09:48 AM
#46
Eats, Sleeps, Dreams Rotary
Thread Starter
Here are the holes I drilled with a 2" diameter cutter. I just eyeballed it and surprising it cleared and fit!
If I had to do it over again I would move the holes 1/8" more toward the front. This is because the bar tilts to the front more as it attaches to the main hoop. Also, if I could have, I would have tried to cut the hole on a angle similar to the tube to get more of an oval hole giving more front and back clearance. I just didn't feel comfortable hold the drill to start cutting at that angle.
Regardless, this works and fits fine.
02-08-06, 05:48 PM
#49
Eats, Sleeps, Dreams Rotary
Thread Starter
Originally Posted by Scrub
I hope you don't have to do suspension work anytime soon. Will the holes you drilled be enough to slide it out of the way to unbolt the suspension?
Scrub,
I'm not sure what you mean. The holes I drilled are in the floor board by the seats. They are no where near any suspension components. The bolts for the shock towers are just like the ones found on the stock 3rd gen. That is, just remove three bolts. Take wheel off and unbolt the suspension. The rollbar in no way prevents access to the suspension pieces. If anything, it just prevents easily taking out any interior plastics.