When you click on links to various merchants on this site and make a purchase, this can result in this site earning a commission. Affiliate programs and affiliations include, but are not limited to, the eBay Partner Network.
This glosses over a LOT of points to this job. I think if you have done a good amount of work with electric motors this might not be a big deal. I haven't so I ran into a lot of questions on this process.
In a nutshell, the RX-8 got an upgraded starter to crank the engine more quickly. The original RX-8 starter would crank at 200-220 RPM and that's about what an FD starter cranks at as well. The upgraded starter is more like 260-280 RPM. If you crank the engine faster, the compression is higher and the engine is easier to start. Mazda did this to give engines that were low in compression some more life before needing replacement. On the FD it can serve the same purpose, it also just sounds "cooler" and the car will start and catch faster which is neat.
Before going down the DIY rabbit hole, I STRONGLY STRONGLY recommend to just get the starter from Banzai Racing -
For $225 it's a fantastic value. Doing a DIY with a used RX-8 starter will save you money SHORT TERM but there is a LOT of finesse involved with electrical motors. Will it leave you stranded in a few months? Year? Getting one with all new components, assembled by people that have done it many times and know how to do it right, is WELL worth the money, which is also a VERY reasonable price for a starter.
All that said, if you want to go down the DIY rabbit hole, here are some notes. You may want to read through the original thread to get familiar.
You will need -
- The aluminum nose of the FD starter. That's all you will use, everything else you use the RX-8 components.
- RX-8 high torque starter. There are 3 versions, the middle version N3H1 A (the A is important) is the one you want. There is also an even faster Series 2 RX-8 starter but I believe that's a bit more involved, at least I didn't see cases where someone got it to work on an FD.
- An impact screwdriver - this is the kind you hit with a hammer to loosen a screw. You WILL strip out screws if you try to use a plain screwdriver. This is an example -
They are commonly available at parts stores/Harbor Freight as well as Amazon.
- 8mm and 12mm sockets
First step is to break down the RX-8 starter. Use the impact screwdriver to remove the 2 screws that hold the solenoid on, this is the small "can" that the wires attach to. Also remove the power wire going from it to the starter motor. It has a plunger on the end that locks into a plastic lever inside but that should be pretty easy to disconnect.
Second step is to remove the motor itself from the starter body, this is the big black "can". On the end of it are 2 8mm bolts and 2 Phillips head screws. LEAVE THE SCREWS ON. This holds the cap onto the motor and that has the brushes inside. If the motor pulls away from the cap and the brushes pop in it's a PAIN to put back together. You want the whole thing as one piece - the black barrel and the shiny cap on the end.
Between the black motor can and the front aluminum nose is a little cutout. Remove the 2 long 8mm bolts and set aside. Pry into that cutout to remove the whole motor assembly.
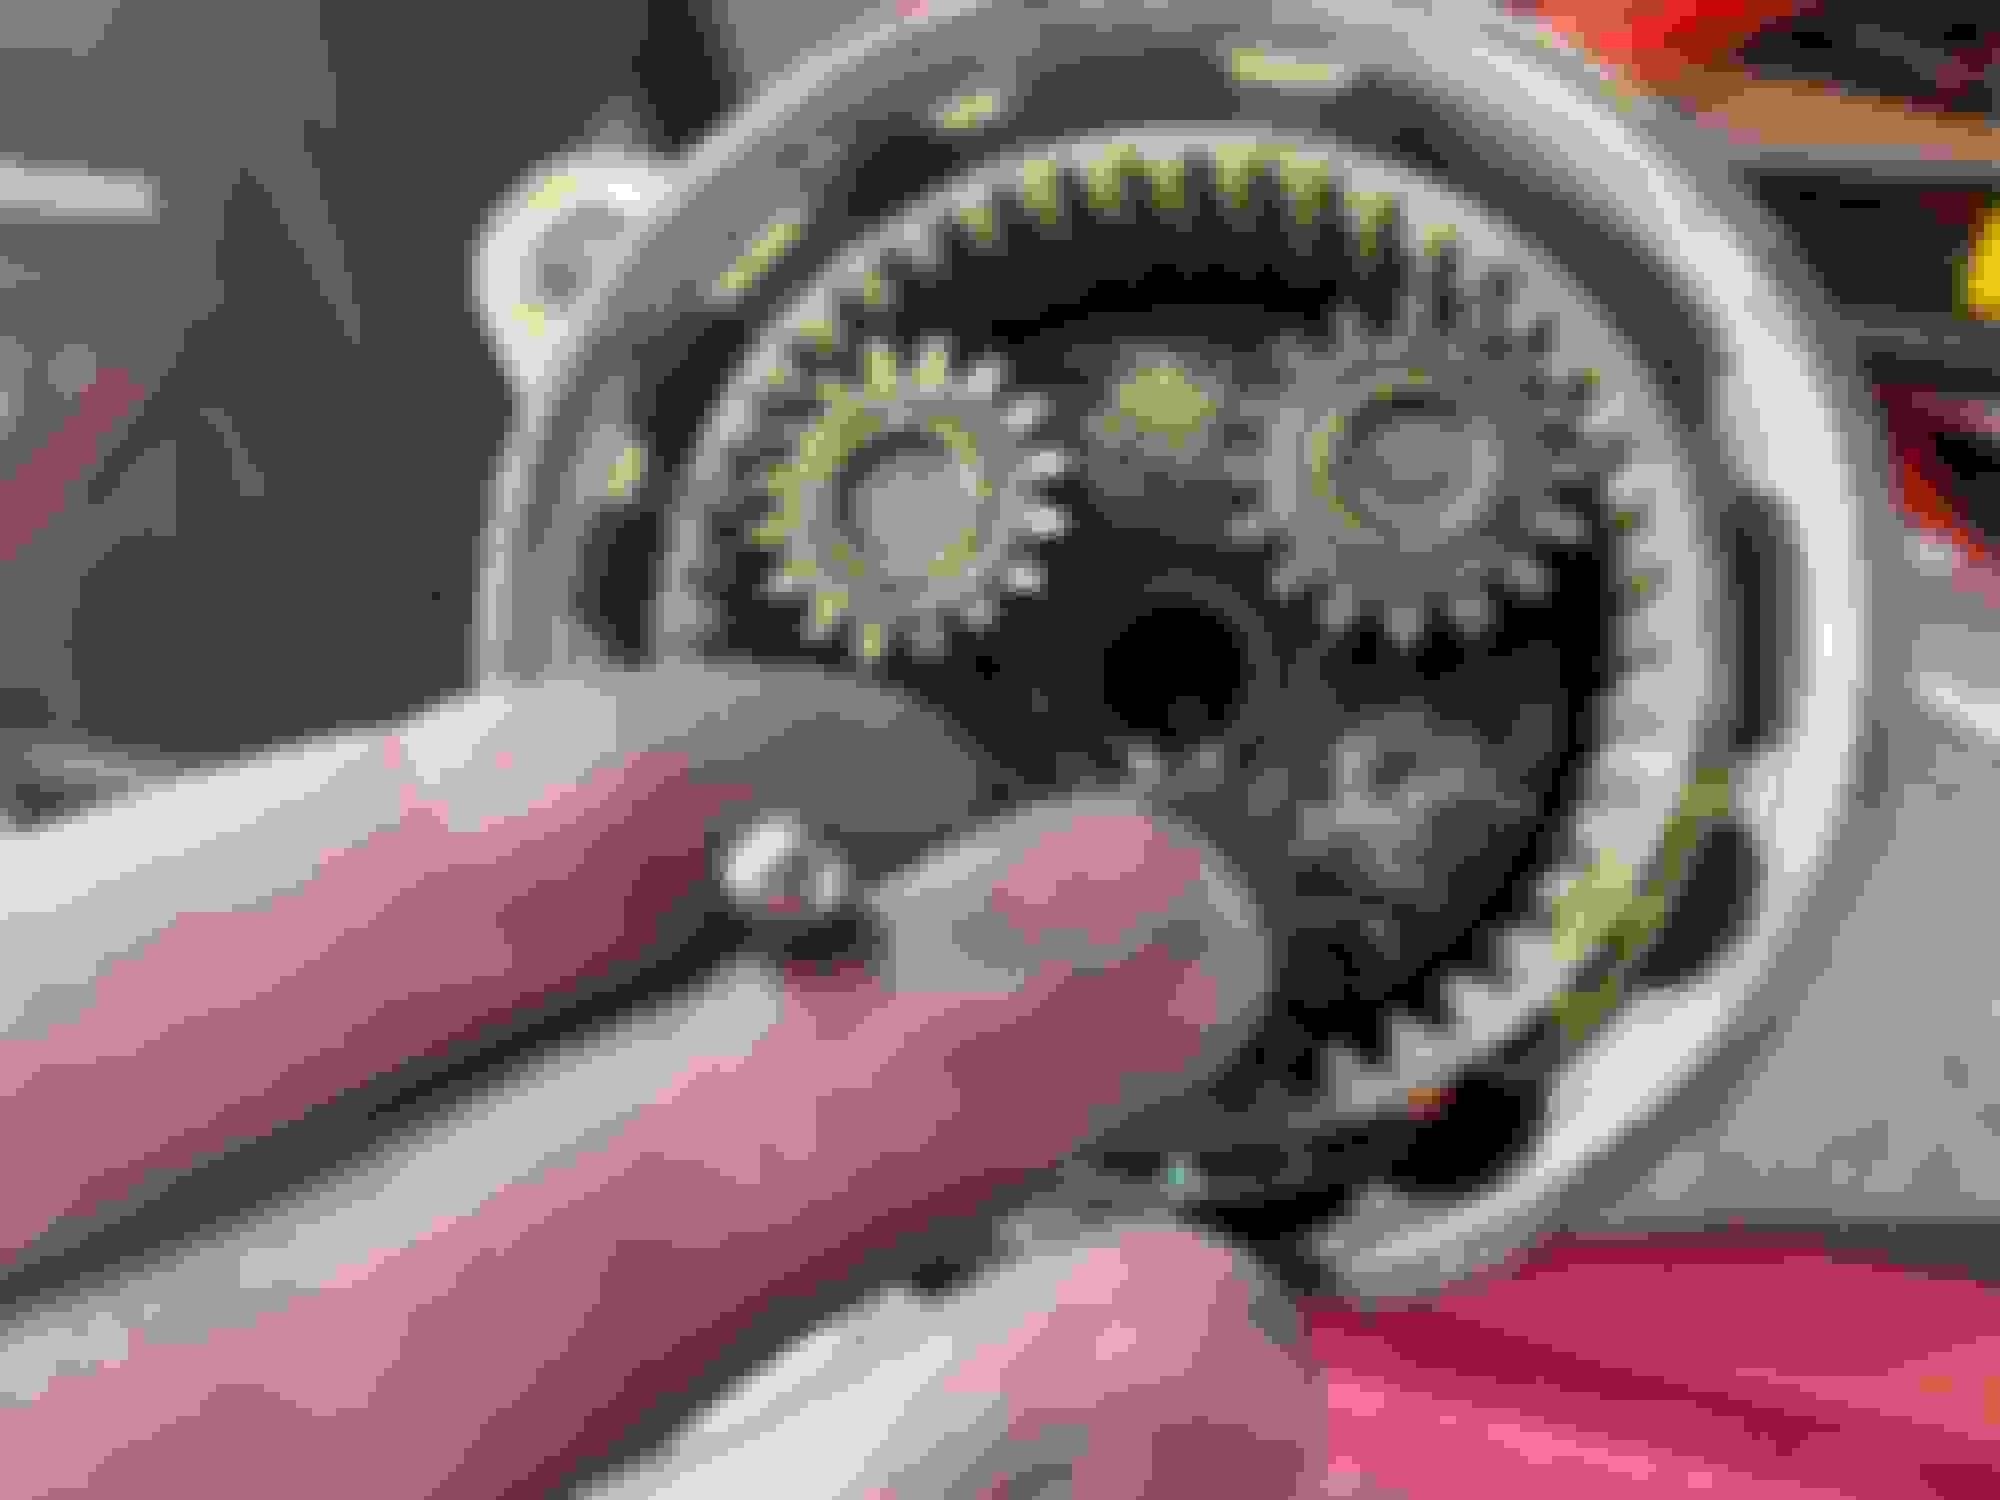
Next you have to remove the "guts" with the planetary gears from the front nose of the starter. This is a step I got stuck on - people just glossed over this completely. On my FD starter it just came out no big deal, the RX-8 starters I have were both totally stuck.
First, remove the ball bearing - it's in the middle of the 3 gears. DO NOT LOSE IT. Then remove the 3 gears, I set them down with the same side up as they were in the starter, don't know if it makes a difference but it didn't hurt doing.
There is also a black rubber cover that goes over that assembly, carefully remove it and set aside.
I put my starter in a vice with those guts pointing down and used a brass punch and a hammer to hit the gear that engages the flywheel to push the guts out. It shouldn't take a ton of force, just some good taps. This took me a while to figure out - I couldn't tell if there was another fastener that held it in place, or you had to rotate it to unlock, or something.
Once out, note the orientation of the plastic lever that goes to the starter solenoid -
If it's installed upside-down later you'll not have a good day.
All that done, put the guts of the starter/gear set into the FD nose. Replace the rubber seal, note the orientation -
MAKE SURE THE BALL BEARING GOES IN PLACE!
Carefully put the motor back on, you may want to thread the 2 long 8mm bolts to help orient it. Once it's in place, tighten the 2 bolts alternating between the two to push the motor onto the front housing.
Re-install the solenoid and there you go.
So, you were trying to be careful and the motor came out of the brushes. Yes, I did this myself. What to do at that point?
Remove the 2 screws holding the brush assembly into the cap. Remove the brush assembly.
Get 4 Dremel bits or something similar. Each carbon brush (it's a black square that touches the motor) needs to be pushed towards the outside. Once it's most of the way out the spring will have a bit of a loop that you can push the Dremel bit into to keep the spring held back. Do this for all 4 brushes -
With that done you can now put the brushes onto the end of the motor -
Not out of the woods yet. Take the black "can" and put the whole motor into it. There are magnets inside, when you get it past a certain point the magnets will suck the motor in. BE CAREFUL HERE. You can either have the brush assembly pop off so you have to start over or get your finger in the way which doesn't feel great.
With the black can in place, you can re-install the brush cap and use the 2 screws to hold the brushes to the inside of the cap. If you try and do this the other way (screw on cap then try to put motor assembly back in the housing) the motor will most likely pop out of the brushes once the magnets suck it in and you get to start all over. Ask me how I know this
Hope this fills in some gaps. I'm going to try out my homemade starter on my FD and see how it does, but long term I am going to buy the Banzai starter. I had an FD starter and 2 RX-8 starters lying around so I figured I would learn how to do it.
Also, bonus pic of the FD motor next to the RX-8. You can see the FD motor is shorter -
Hope this helps someone out! I spent WAY too much time on this.
A guy I follow on Instagram just made a post about the Banzai starter this morning too. This is definitely helpful and solidifies my decision to buy it. I'll likely purchase one tonight if they can give a partial refund if I send the core at a later date. If not I could just wait until I finally get my car to the shop.
A few years ago, I bought a reman 2Kw RX8 starter on ebay (~$100 cdn shipped). Then I switched the motor with the one from my FD starter (FD top/gears and 2KW RX8 motor). Everything was plug & play and took about 15 minutes to do. It's still working 100% to this day.