
Installation: Image Dynamic Injectors


Installation: Image Dynamic Injectors
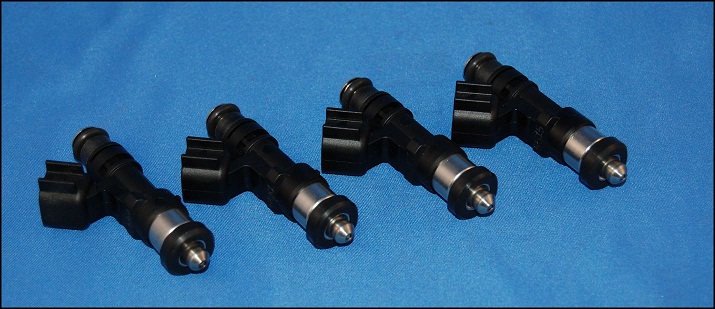
So I finally received my Image Dynamic injectors and I am going to start installing the fuel system tomorrow to finish up my build.
I guess the question is, is it just a simple drop in or are there other things that need to be done? Also, for the clips, how do I go about wiring those clips in for the wiring harness?
Any and all help would be appreciated to make things easy tomorrow.
I guess the question is, is it just a simple drop in or are there other things that need to be done? Also, for the clips, how do I go about wiring those clips in for the wiring harness?
Any and all help would be appreciated to make things easy tomorrow.
Made this video with a question about the O-rings and injectors
http://www.youtube.com/watch?v=62CAKzGDZvY
http://www.youtube.com/watch?v=62CAKzGDZvY
OK, your issue is that there is nothing stopping the injector from being pushed down to far or the aluminum spacer from ridding up. When this happens the injector O-ring is not sealing on anything.
The pictures I posted are of the secondary rail but the same idea applies. You need to place another thicker "O-ring/rubber spacer" above where the aluminum spacer would go. This will stop it from ridding up the injector body to far.
Also, I place the OEM secondary injector rubber stoppers under the aluminum spacers to make a rubber no leak seal. This is because the spacers themselves are usually not a tight fit and can leak. If installed the way I am telling you, the injector O-ring seals the inside of the spacer (as it should), the rubber stopper seals the between the housing and the spacer and is sandwiched in place and the rubber spacer on top of the aluminum one keeps the aluminum spacer from ridding up.
The size of said rubber spacer is dependent on your exact setup. But you want to be able to twist your injector from side to side with no binding but not so much up and down. Make sure that the up and down motion isn't to great but not so tight that the injector is bottoming out in the rail.
On the wiring:
Cut off the OEM injector plug and attatch the new ID connector to the two wires from the harness. There is no wrong way to hook up the two wires. In most Jap cars (as is the case with the FD) the ECU pulses the ground wire (front primary LG/R, rear primary LG/B) and suplies a constant 12v to the thicker B/Y. The injector doesn't care what side goes where.
-J
First off, I greatly appreciate your response. So if I were to sparknote what I need to do as far as my injectors, is to basically purchase another "O-ring" to fit above the aluminum spacer so it does not move up correct?
Should this be done for both the primary and secondary injectors? It looks as if we are running the same rails (KG Parts) so do you know where I can find the spacers as well as what size?
Thanks again!
Should this be done for both the primary and secondary injectors? It looks as if we are running the same rails (KG Parts) so do you know where I can find the spacers as well as what size?
Thanks again!


Joined: Oct 2001
Posts: 6,279
Likes: 728
From: Florence, Alabama
Brian,
i suggest you call whoever sold you the injectors and ask them what to use for rubber lower support/insulators. the injector needs to sit on rubber which makes a seal and insulates the injector from heat and vibration.
i run an approx 1/4 inch section of heater hose material that fits around the secondary injector body and butts between the LIM and the injector flange. on the primaries i use the factory diffuser. it has a rubber pad that supports the primary. in addition the primary has a rubber ring that fits near the top of the injector well and provides seal.
as to connecting the wires... i use a simple crimp butt connector. spend some time w a few practice runs so you are absolutely certain to get a good connection.
howard
it looks like it's designed to use the OEM rubber top seals but there is nothing that would keep them from blowing out under boost. i agree that you should contact the manufacturer or just come up with a solution on your own for the bottom of the aluminum rings to sit on a seal of some sort to keep pressure on the injector and seal them to the irons.
you should always solder/shrink wrap connections too, butt connectors are just asking for problems later on. especially with such essentials like fuel system components, butt connectors don't keep the weather out and will corrode eventually unless you get a specific type which has sealant inside and shrinks when heated.
you should always solder/shrink wrap connections too, butt connectors are just asking for problems later on. especially with such essentials like fuel system components, butt connectors don't keep the weather out and will corrode eventually unless you get a specific type which has sealant inside and shrinks when heated.
Trending Topics
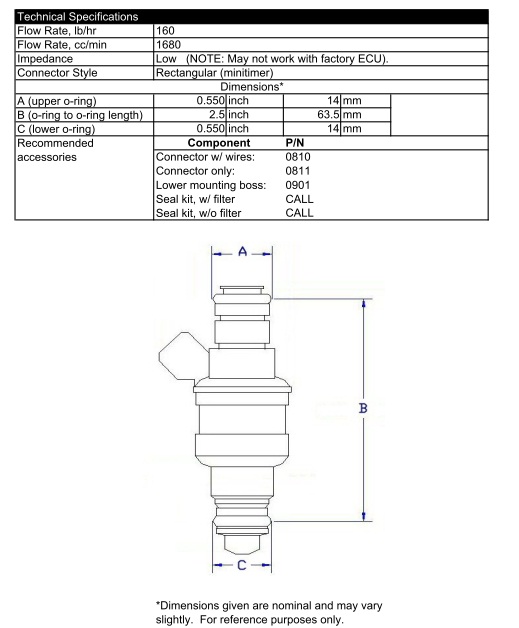
I think you should call up Injector Dynamics. They do offer custom fitment. The diagram of the purple ID's shows these dimensions:
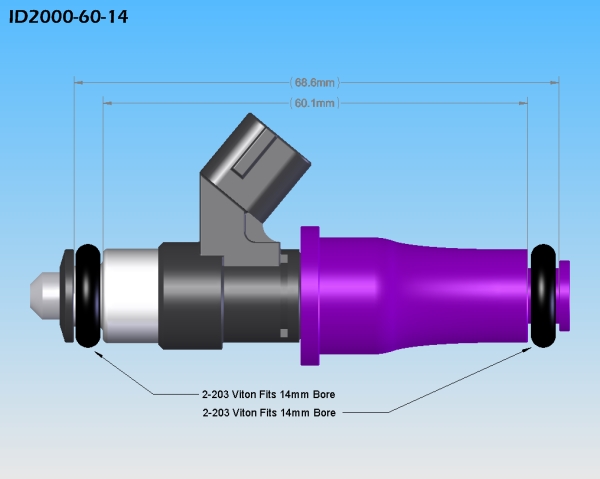
14mm o-ring on the bottom. This agrees with specs I have from Marren for the older style Bosch injectors:
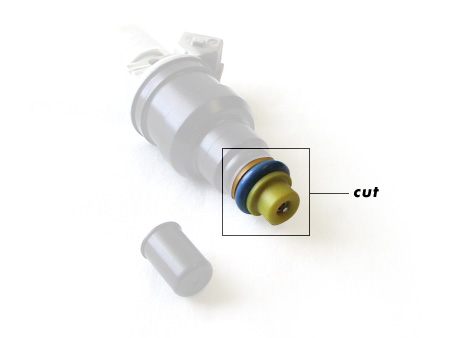
Now, on those old injectors you could actually pull off the lower o-ring and install a pintle cap off a series 5 FC injector to prevent a leak (credit rx7.com for these pics):
Now "Japanese" fitment top feeds are listed as 16mm for the bottom. If we are putting a 14mm Bosch injector into a 16mm hole... that would explain the problem.
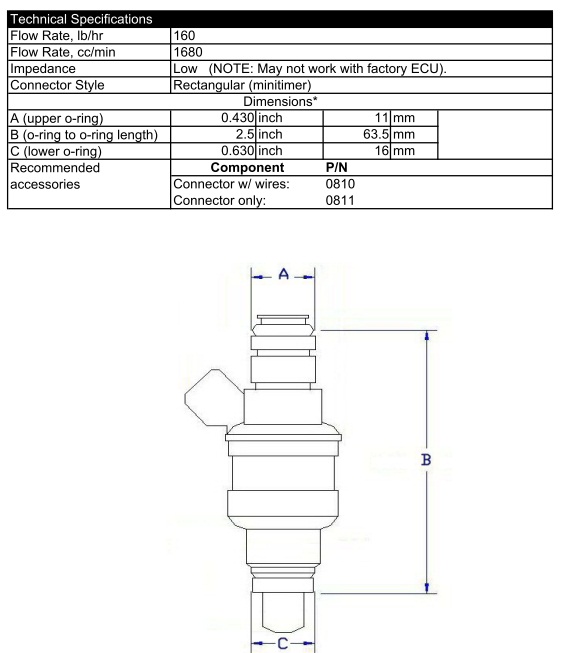
These dimensions look similar to those of the 2nd gen factory top feed injectors. Maybe Injector Dynamics can supply an injector with the correct dimensions and then there won't be anymore fitment hassles in the future. I know they do custom sizes.
14mm o-ring on the bottom. This agrees with specs I have from Marren for the older style Bosch injectors:
Now, on those old injectors you could actually pull off the lower o-ring and install a pintle cap off a series 5 FC injector to prevent a leak (credit rx7.com for these pics):
Now "Japanese" fitment top feeds are listed as 16mm for the bottom. If we are putting a 14mm Bosch injector into a 16mm hole... that would explain the problem.
These dimensions look similar to those of the 2nd gen factory top feed injectors. Maybe Injector Dynamics can supply an injector with the correct dimensions and then there won't be anymore fitment hassles in the future. I know they do custom sizes.
I think you should call up Injector Dynamics. They do offer custom fitment. The diagram of the purple ID's shows these dimensions:
14mm o-ring on the bottom. This agrees with specs I have from Marren for the older style Bosch injectors:
Now, on those old injectors you could actually pull off the lower o-ring and install a pintle cap off a series 5 FC injector to prevent a leak (credit rx7.com for these pics):
"Japanese" fitment top feeds are listed as 16mm for the bottom.
Maybe that's what's really needed here? Maybe Injector Dynamics can supply this type of injector and then there won't be anymore fitment hassles in the future.
The best and easiest way to fix this is to buy the aluminum spacers from CJ-motorsports.
-J
they do look quite generic, the FDs should have their own application instead of just tossing them out to work for "any" rotary car as it looks to be more suited to an FC LIM/irons. sounds like a friday experience where "this looks like it will work" then they put it on paper and toss it out as a kit everyday. nothing like spending a grip and still havng to do your own R+D.
http://www.cj-motorsports.com/catrx7injadp.htm

you're referring to these? So with the purple ID2000's and these spacers everything should work?
you're referring to these? So with the purple ID2000's and these spacers everything should work?
So, my main concern is trying to get the spacers out of the LIM. I really had to force the spacers into the LIM. How am I going to get them out if I want to take them out?
http://www.cj-motorsports.com/catrx7injadp.htm
you're referring to these? So with the purple ID2000's and these spacers everything should work?
you're referring to these? So with the purple ID2000's and these spacers everything should work?
Yes, they should work. The reason I say "should", is because the rail leg hight has a lot to do with it. And I've seen them to long or to short many times. This is why I make my own stuff for customers... But to answer your question, look in the pics I posted in the 3rd post, I still use a rubber ring-spacer above the CJ aluminum one, just so the injector has a snug fit.
-J
Hey guys I emailed the contact link on the ID website to see if they have something that will 100% drop right in with zero hassle (spacers etc). I explained all the fitment issues on both 2nd and 3rd gen engines and also linked them to this thread.
Yes sir, those are them! Do you see how the inside is stepped, this keeps it from ridding up the injector body. And the outside O-ring seals the intake air from leaking out.
Yes, they should work. The reason I say "should", is because the rail leg hight has a lot to do with it. And I've seen them to long or to short many times. This is why I make my own stuff for customers... But to answer your question, look in the pics I posted in the 3rd post, I still use a rubber ring-spacer above the CJ aluminum one, just so the injector has a snug fit.
-J
Ok guys I have already exchanged multiple emails with them. They are quick at responding. When all is said and done you should hopefully be able to order injectors that drop right in and plug right up to the factory connectors using a supplied adapter harness. Technically you should be able to do that already. They have a "direct fitment" page on the website but the descriptions and instructions are limited so I was concerned that maybe they didn't have all the proper fitment information on their end. I am asking them to add some more details so that people will order the correct parts the first time.
Basically for FD applications with Bosch style rails you want the purple tops but instead of the normal 14mm o-ring on the bottom you use the Denso cushion they sell.

http://www.t1racedevelopment.com/en/...o-cushion.html
This should completely eliminate the need for inserting spacers into the manifold.
The ID2000 uses a Denso connector like those found on many Hondas.

The ID725/1000 use a Bosch EV6 connector (also labeled as "USCAR" connector)

Basically for FD applications with Bosch style rails you want the purple tops but instead of the normal 14mm o-ring on the bottom you use the Denso cushion they sell.
http://www.t1racedevelopment.com/en/...o-cushion.html
This should completely eliminate the need for inserting spacers into the manifold.
The ID2000 uses a Denso connector like those found on many Hondas.
The ID725/1000 use a Bosch EV6 connector (also labeled as "USCAR" connector)
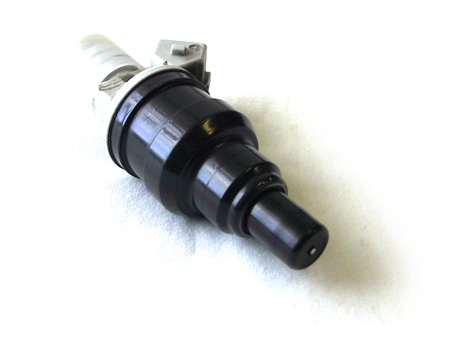
Here is a pic they provided me of the cushions installed on the bottom of some of their injectors (most of you will be using the purple ones)
If you happen to buy aftermarket rails that are not using the larger Bosch 14mm bore on top, you will probably want the light blue injectors which are 11mm bore at the top:
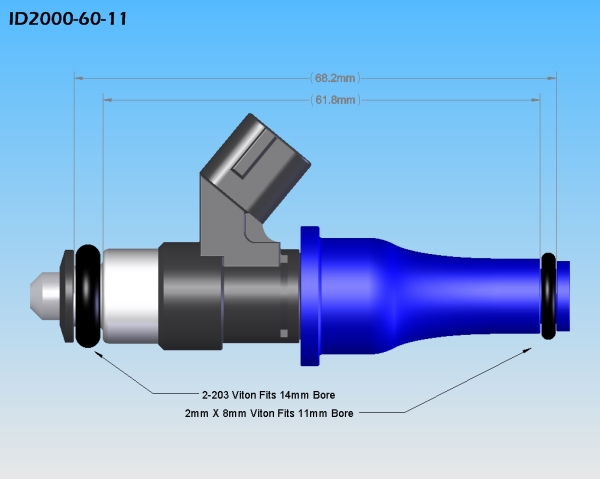
The 11mm bore is the same diameter as the OEM top feed injectors used on 2nd generation cars. The cushion should still used on the bottom of the injector, just like with the purple injectors.
Ok guys I have already exchanged multiple emails with them. They are quick at responding. When all is said and done you should hopefully be able to order injectors that drop right in and plug right up to the factory connectors using a supplied adapter harness. Technically you should be able to do that already. They have a "direct fitment" page on the website but the descriptions and instructions are limited so I was concerned that maybe they didn't have all the proper fitment information on their end. I am asking them to add some more details so that people will order the correct parts the first time.
Basically for FD applications with Bosch style rails you want the purple tops but instead of the normal 14mm o-ring on the bottom you use the Denso cushion they sell.
http://www.t1racedevelopment.com/en/...o-cushion.html
This should completely eliminate the need for inserting spacers into the manifold.
The ID2000 uses a Denso connector like those found on many Hondas.
The ID725/1000 use a Bosch EV6 connector (also labeled as "USCAR" connector)
So what exactly happens if I already have the aluminum spacers into my manifold? I know I can get the primary ones out easily since they are around the injectors and I can just pull them off, but the ones for the secondaries took some force to get into the LIM and I have no idea how I'm going to get those out.
Thank you for all your help!
So what exactly happens if I already have the aluminum spacers into my manifold? I know I can get the primary ones out easily since they are around the injectors and I can just pull them off, but the ones for the secondaries took some force to get into the LIM and I have no idea how I'm going to get those out.
So what exactly happens if I already have the aluminum spacers into my manifold? I know I can get the primary ones out easily since they are around the injectors and I can just pull them off, but the ones for the secondaries took some force to get into the LIM and I have no idea how I'm going to get those out.
-J
I've removed aluminum LIM spacers using a tap to cut into the spacer and then pull the tap and spacer out as one assembly. Cutting into the spacers prevented them from being re-used after removal, but the LIM was not damaged.
Regarding soldering, I'm not convinced it's a good idea to solder anything critical that lives under the hood, especially something attached to the engine because of vibration concerns. Solder joints can fail in a few ways:
New joints sometimes failed because the installer left a 'sharp point' of solder which cut or rubbed through the heat shrink and eventually created a short circuit into nearby wiring or chassis.
Recent joints sometimes failed due to vibration near the solder joint, the heat and flux weakens the wire near the joint. The failure was intermittent at first because sometimes the broken wire strands were close enough to conduct and other times they were not. It would be a bad thing for an injector to be intermittent.
Older joints eventually corroded away into powder, this took a few years. Flux is useful for soldering, not so nice when left in contact with wire for extended periods.
I agree that insulated butt splices from the local auto-parts store are far from ideal; it would be better to use an uninsulated splice and then cover that with heat shrink sleeving (dual wall aka epoxy-lined heat shrink is good because it offers more vibration protection and usually makes a decent seal so the joint is moisture resistant).
Most crimps fail because the person doing the crimping wasn't experienced enough to crimp correctly, or wasn't using the proper tool. Do a few practice crimps with spare splices and spare wire, I'm no wiring pro but I have made literally hundreds (if not thousands) of crimps and the first few crimps each day are not as good as the next few. Unfortunately wiring is difficult to do and not easy to explain online. Then on top of that the proper tools and supplies can be pricey and are not usually easy to find.
Last edited by scotty305; Aug 31, 2010 at 12:29 AM.
Injector Dynamics says they have plug-and-play injector harnesses on their website, specifically for Rx-7 applications. Try calling them up about it though. In my email correspondence with them I pointed out that Mazda used four different factory injector connectors from 86-2002 model years and I asked what years their plug-and-play harnesses would work for. I didn't get a direct response on that point.
I don't mind the need to cut my old wiring harness and adding on the new clips for the injectors.
I'm trying to figure out if I need to rush order these spacers that were linked above or not. I'm trying to get the car started this weekend, but if I don't have the parts then, well that's not going to happen.
I'm trying to figure out if I need to rush order these spacers that were linked above or not. I'm trying to get the car started this weekend, but if I don't have the parts then, well that's not going to happen.