
Install of Kaixen HID Kit in FD w/stock pop-ups


Zoom, Zoom...Redifined
Joined: Jul 2005
Posts: 347
Likes: 0
From: NC
Ok here are some of the pictures guys. Its not completely dark yet outside and i know i didnt do the cleanest install but once you put the headlight shroud and cover on thats impossible to tell.
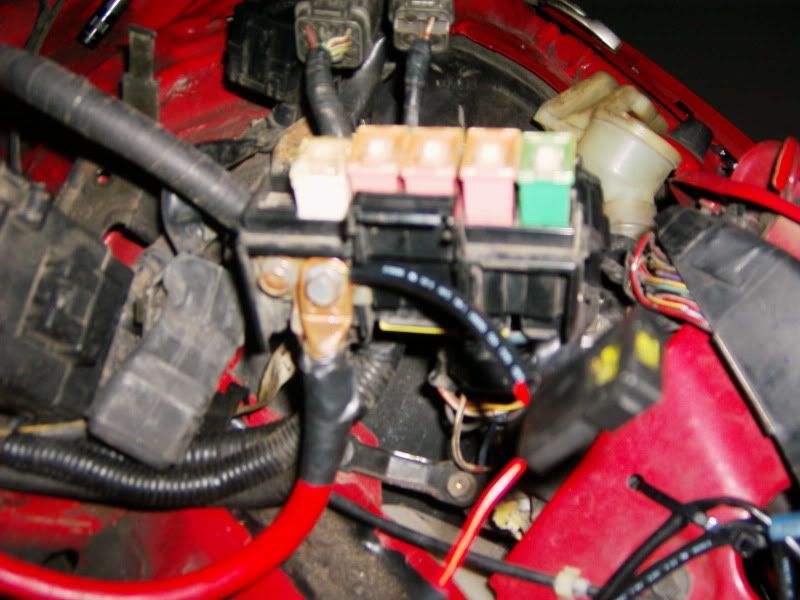
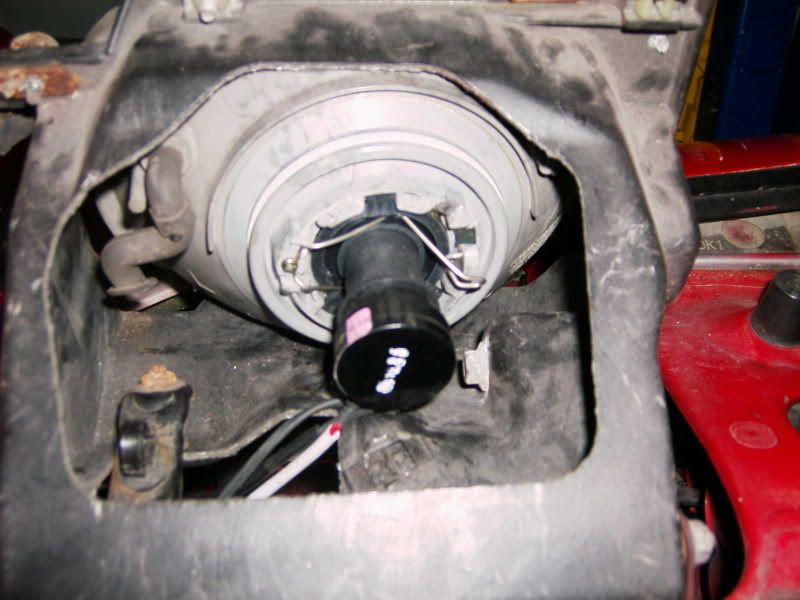
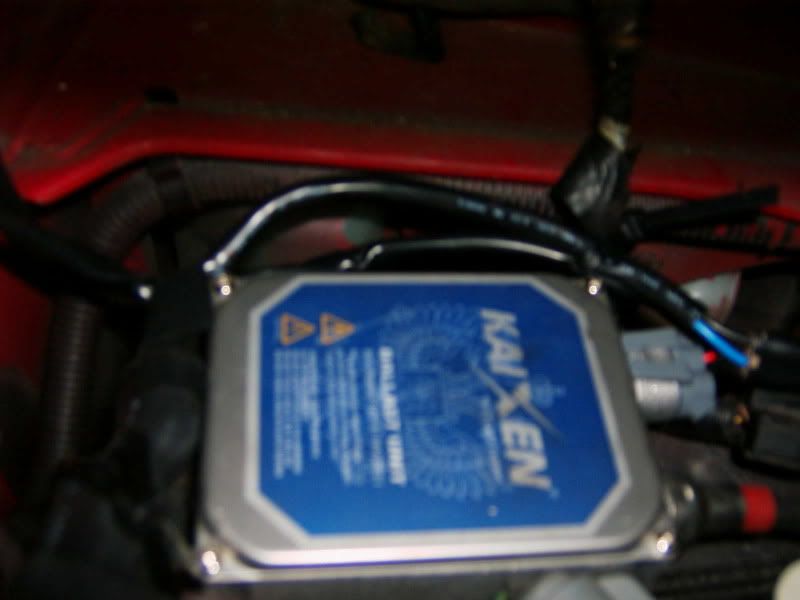
First off this is how i connected the headlight. The big red cable you see is the + to my battery which has been relocated to the trunk. The thin red line w/ a fuse inline is the + to the headlight.
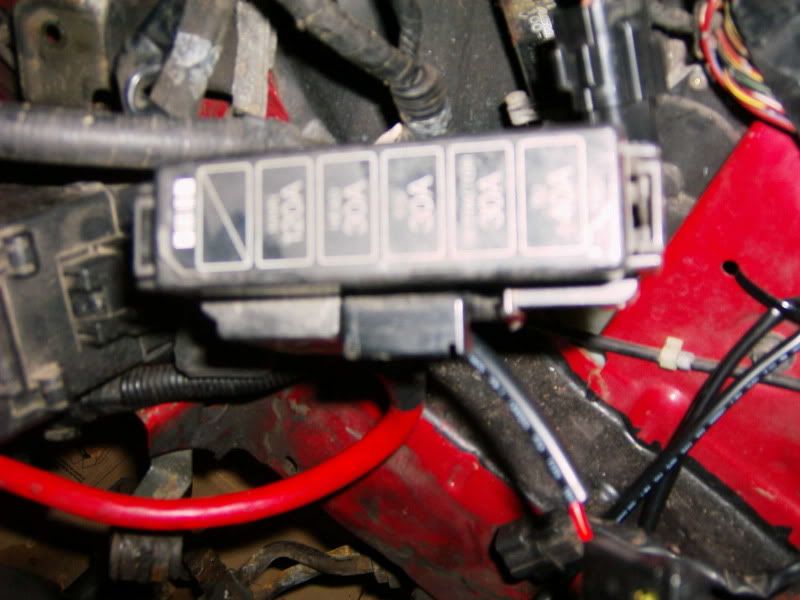
This next one is so everyone knows which fuse box i am talking about
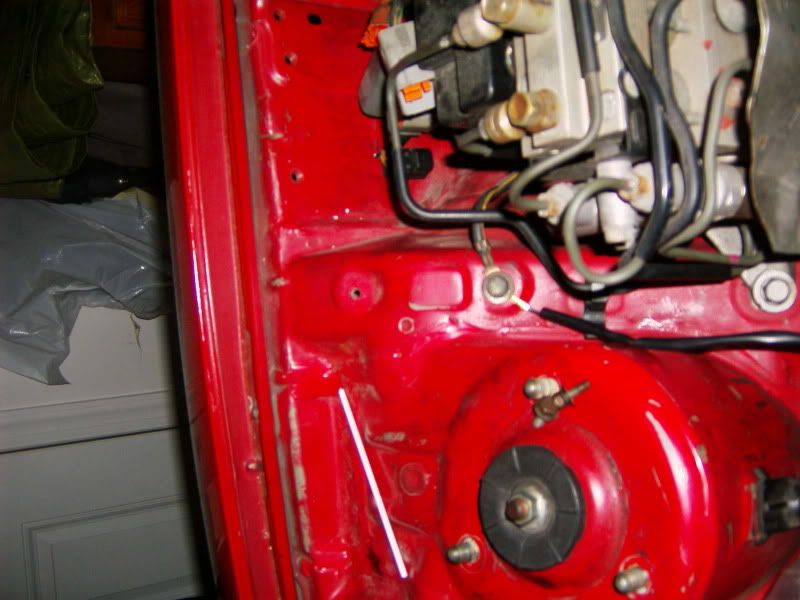
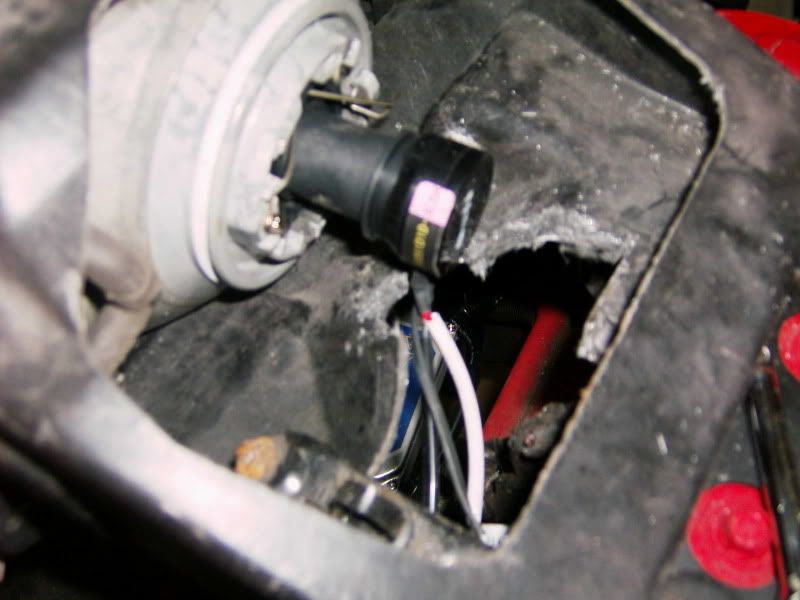
This one is where i connected the - to. It is over by the ABS system on the rear side of the Front Right Wheel Well
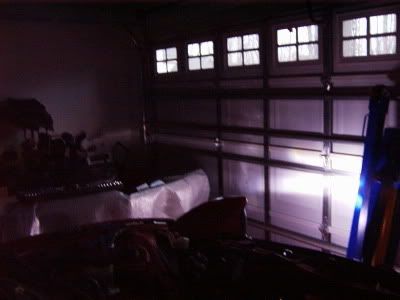
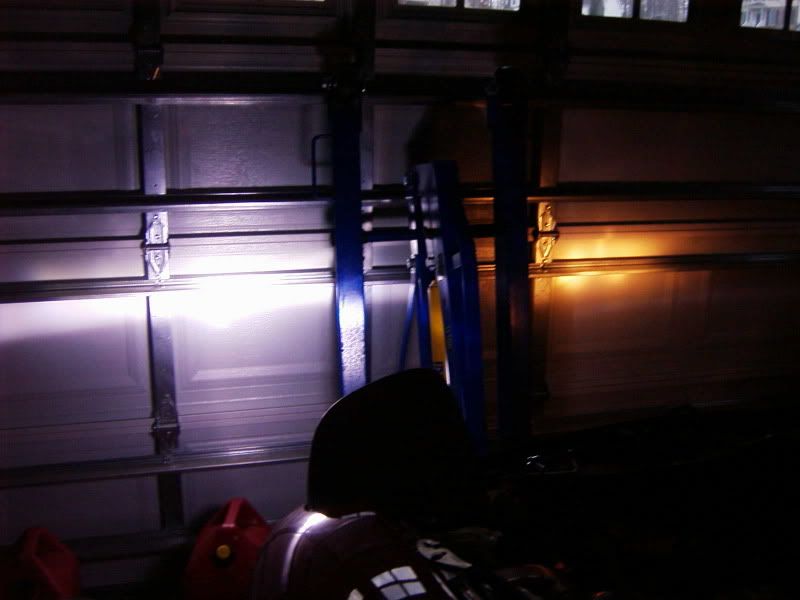
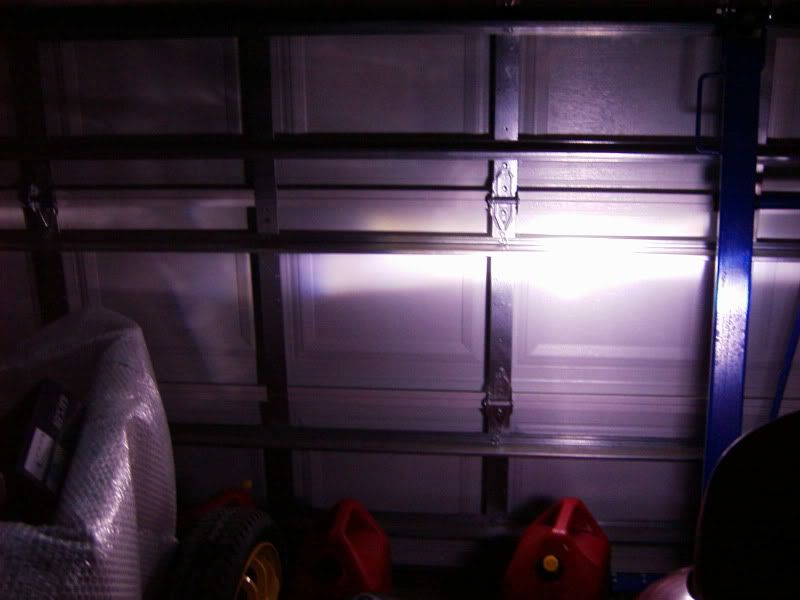
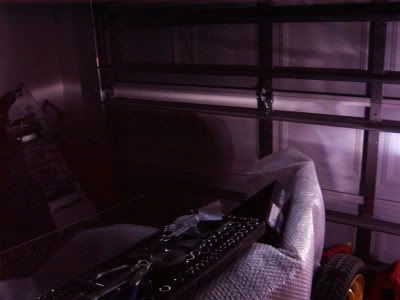
Now what you have all been waiting for the light output pictures. Sorry they arent very good my car is a mess, i have stuff everywhere and its not really very dark outside yet. Please note my garage door is apprx. 4 feet from the front bumper of the car. Once it stops gets really dark ill open the garage door and take some more pictures.
Lowbeams
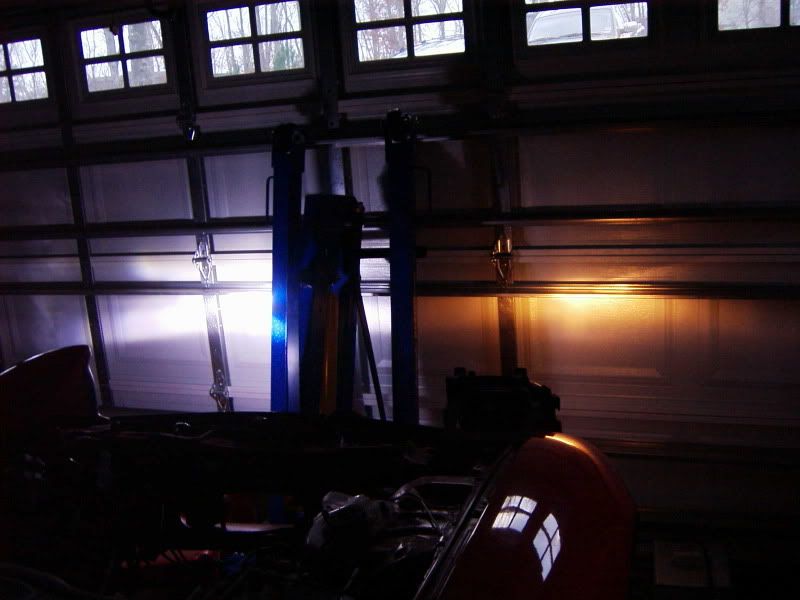
High Beams
First off this is how i connected the headlight. The big red cable you see is the + to my battery which has been relocated to the trunk. The thin red line w/ a fuse inline is the + to the headlight.
This next one is so everyone knows which fuse box i am talking about
This one is where i connected the - to. It is over by the ABS system on the rear side of the Front Right Wheel Well
Now what you have all been waiting for the light output pictures. Sorry they arent very good my car is a mess, i have stuff everywhere and its not really very dark outside yet. Please note my garage door is apprx. 4 feet from the front bumper of the car. Once it stops gets really dark ill open the garage door and take some more pictures.
Lowbeams
High Beams
Last edited by canadaisintexas; Feb 18, 2006 at 05:08 PM.

Zoom, Zoom...Redifined
Joined: Jul 2005
Posts: 347
Likes: 0
From: NC
I cut the factory zip ties that held the Hi/Low/Ground 3 prong fitting in place and pulled everything except for the light out of the housing and mechanism area.
Be VERY careful when installing this kit. When you want to test that you are not pinching anything remove battery connections and use the Red ****. Its a much safer way to do it.
Also go nuts with the zip ties I did. On one headlight i used 20
Rob
(autodoodad if you want to use my pics feel free even though they are rather sh&tty)
Be VERY careful when installing this kit. When you want to test that you are not pinching anything remove battery connections and use the Red ****. Its a much safer way to do it.
Also go nuts with the zip ties
I did. On one headlight i used 20Rob
(autodoodad if you want to use my pics feel free even though they are rather sh&tty)
Last edited by canadaisintexas; Feb 18, 2006 at 05:16 PM.
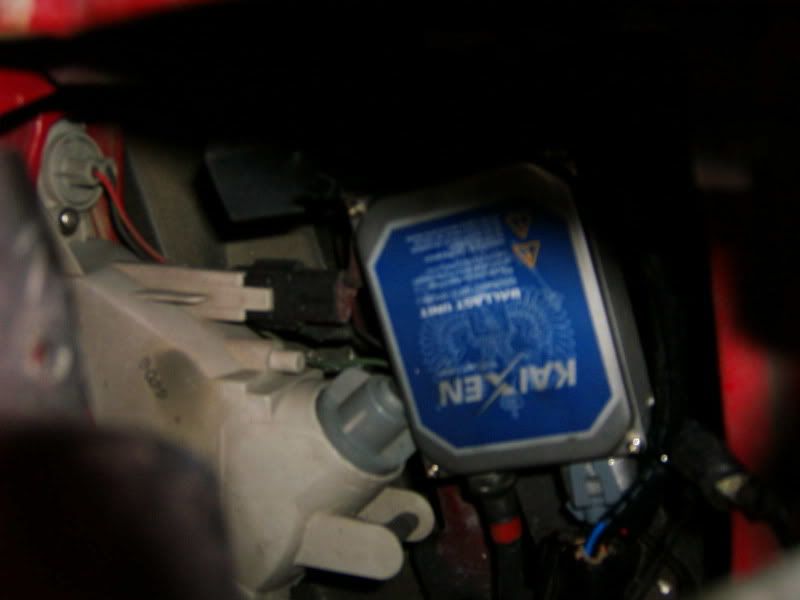
Looks good Rob! That is the same place I wound up connecting my + for the lights. Are you going to keep the ballast on top of the oil coolers? I tucked mine under the turn lamp, it fit just perfect. I also got some more of the double sided foam tape and attached my controller to the sidewall of the car so it would not rattle around. The mounting tabs for the zip ties would also probably work.
The cut out was the only real road block in installing the bulbs into the stock housing and it only took about 10mins to cut both out and clean up.
I didn't even think to leave a stock bulb in to take a pic of the difference. BTW - did you go with 4300k or 6000k?
The cut out was the only real road block in installing the bulbs into the stock housing and it only took about 10mins to cut both out and clean up.
I didn't even think to leave a stock bulb in to take a pic of the difference. BTW - did you go with 4300k or 6000k?
Zoom, Zoom...Redifined
Joined: Jul 2005
Posts: 347
Likes: 0
From: NC
That was the 6500K. I wont have an oil cooler there in a couple of months (LS1) but im not sure yet whether i will leave it on top of the mounting bracket or not. I did the other side in about 20 minutes compared to the couple of hours i spent on the 1st and it looks much nicer. I may redo the 1st one and just tidy it up a little. Also the 2nd one i did put under/slightly to the side of the turn signal but it did not require me to remove the turn signal.
Also i just realized i never put the rubber weather seal thing back on my drivers side headlight oops.
Also i just realized i never put the rubber weather seal thing back on my drivers side headlight oops.


Zoom, Zoom...Redifined
Joined: Jul 2005
Posts: 347
Likes: 0
From: NC
Originally Posted by snkydvl
That is a picture of the high beam on one and the low on the other.
Rob
Originally Posted by canadaisintexas
You mean like the HID is on high beam and the halogen is on low (and vice versa). I was thinking something along those lines because the low beam seemed brighter than the high and i was like wtf. Im not quite sure why it would be doing that though?
Rob
Rob
Rob, when you installed your bulb in the lens is the sheild inside open on the top or the bottom? I am wondering if one of us has it reversed??? Cause if your low beams are on then it should match my first pic of the light pattern.
Originally Posted by SomeGuy_sg
Mm...so how did the ebay lens work out ?
~Damari
Zoom, Zoom...Redifined
Joined: Jul 2005
Posts: 347
Likes: 0
From: NC
Originally Posted by snkydvl
Actually I was referring to Tim Benton's post. If you look at the first set of pics I took of the light output you can see the pics are different. One shows the low beam with the straight cutoff line on the bottom and the other shows the hi beam with the straight cut off line on the top.
Rob, when you installed your bulb in the lens is the sheild inside open on the top or the bottom? I am wondering if one of us has it reversed??? Cause if your low beams are on then it should match my first pic of the light pattern.
~Damari
Rob, when you installed your bulb in the lens is the sheild inside open on the top or the bottom? I am wondering if one of us has it reversed??? Cause if your low beams are on then it should match my first pic of the light pattern.
~Damari
I would imagine you would want the cut-off to be on the top for the low beam though it is early morning and i may not be thinking straight.
I assume by the shield you are referring to the shiny metal piece (lol) that came as part of the kit and goes around the bulb. If so mine covers the bottom half of the bulb.
Also did you leave the metallic hoop that was inside the light housing or remove it? I've left mine in for now but i cant decide whether i could just take it out.
Rob
Didn't I already tell you guys the E-Bay ones are a waste of $ because they don't have any damn mounting tabs? Yes, they look EXACTLY like the Wise Sport ones, but no way to mount them. Ask me how I know......I bought a pair 2 years ago, still sitting in my garage.
$25 shipped for anyone who thinks they can use them on another car.
$25 shipped for anyone who thinks they can use them on another car.
http://cgi.ebay.com/ebaymotors/ws/eB...RK%3AMEWA%3AIT
you talking about the same pair as these? I've seen the ones you might be talking about with no tabs, but these atleast make you think they do.
Here's the ones with no tabs in the pics even though they say 87-97 RX-7's.
http://cgi.ebay.com/ebaymotors/1987-...QQcmdZViewItem
Tim
you talking about the same pair as these? I've seen the ones you might be talking about with no tabs, but these atleast make you think they do.
Here's the ones with no tabs in the pics even though they say 87-97 RX-7's.
http://cgi.ebay.com/ebaymotors/1987-...QQcmdZViewItem
Tim
Last edited by Tim Benton; Feb 24, 2006 at 07:39 PM.
The ones I am warning people about is the ones W/OUT the tabs. My $30 ones look just like those $100 ones, just no tabs and they said "93+".
These new ones ($100) do seem feasible.
Raj
These new ones ($100) do seem feasible.
Raj

Originally Posted by s0jan
Any updated pics of the entire car and finshed product? I got my kit and just waiting for the wise sport lenses to install.
Zoom, Zoom...Redifined
Joined: Jul 2005
Posts: 347
Likes: 0
From: NC
Originally Posted by herblenny
Did you mount your blaster on the oil cooler??

 . I imagine it would also get incredibly hot when the car was running the rotary motor. Oh well ive moved it to the same place as i mounted my pass. side.
Rob
Hey guys neit_jnf posted pics of the ebay lenses.
https://www.rx7club.com/showthread.p...=1#post5373888
I cannot wait to get mine so I can finish this and get my car back together this week!
https://www.rx7club.com/showthread.p...=1#post5373888
I cannot wait to get mine so I can finish this and get my car back together this week!
My review
Well I got my kit installed and absolutely love these. I think this is one of the best mods as they greatly improve night visibility and also help to update the overall 'look' of the car. Autodoodad was also great to deal with.
Install was a breeze, all plug and play wiring. I did have to cut the plastic(fiberglass?) a little directly behind the headlight housing in order to give a little more room for the wiring. I highly recommend the 6000K kit, these are perfect, great lighting with a slight hint of blue to them... the others(6500+ all look a little too wild IMHO).
Some of my complaints about the kit.
1) I ordered the high/low kit and dont really think the high beam is all I thought it was going to be. Don't get me wrong though, the low beam is probably bright enough to get you by unless you drive on a lot of dark, back country roads in the middle of the night.
2) On one of the bulbs, the tabs that help position the bulb into the housing(three little tabs)... well these are usually metal but on this kit they are plastic. One of the little tabs looked like it was molded wrong from the factory and was very thin, so I had to be extremely careful not to break it off during install. It is fine for now but I think I will call this in under warranty and get a replacement or something.
3) Most critical was one of the inline fuses that comes with the kit appears to faulty. I found this out while driving down the road and having one of the headlights completely shut off! I pulled over and double checked all the connections/wiring and the same thing happened to me again later down the road. Got out again and started messing with each individual wire and traced it down to one of the two inline fuses. These again are a little lacking in quality(loose wires/contacts). I just bought some better ones from Radio Shack and soldered them in place. Working great now.
Pic of new fuses
Pic of the light pattern in original '93 housings... pattern is ok, only thing is the little light reflection/glare above the drivers side light. Not sure what the deal is there. Overall I do recommend these lights.

If anyone needs more info on my install please feel free to PM me.
-Mike
Install was a breeze, all plug and play wiring. I did have to cut the plastic(fiberglass?) a little directly behind the headlight housing in order to give a little more room for the wiring. I highly recommend the 6000K kit, these are perfect, great lighting with a slight hint of blue to them... the others(6500+ all look a little too wild IMHO).
Some of my complaints about the kit.
1) I ordered the high/low kit and dont really think the high beam is all I thought it was going to be. Don't get me wrong though, the low beam is probably bright enough to get you by unless you drive on a lot of dark, back country roads in the middle of the night.
2) On one of the bulbs, the tabs that help position the bulb into the housing(three little tabs)... well these are usually metal but on this kit they are plastic. One of the little tabs looked like it was molded wrong from the factory and was very thin, so I had to be extremely careful not to break it off during install. It is fine for now but I think I will call this in under warranty and get a replacement or something.
3) Most critical was one of the inline fuses that comes with the kit appears to faulty. I found this out while driving down the road and having one of the headlights completely shut off! I pulled over and double checked all the connections/wiring and the same thing happened to me again later down the road. Got out again and started messing with each individual wire and traced it down to one of the two inline fuses. These again are a little lacking in quality(loose wires/contacts). I just bought some better ones from Radio Shack and soldered them in place. Working great now.
Pic of new fuses
Pic of the light pattern in original '93 housings... pattern is ok, only thing is the little light reflection/glare above the drivers side light. Not sure what the deal is there. Overall I do recommend these lights.
If anyone needs more info on my install please feel free to PM me.
-Mike
Last edited by wReX; May 29, 2006 at 12:21 AM.
Great write-up Mike. 
I agree that the low beam is definately enough on normal roads but I found that when on suburban back roads the high beams come in handy especially if they are roads that are windy and you aren't familiar with them. Also, I like the fact I can still flash oncoming traffic if I need to. But for those closer to the city I would save the money and just go with the low beam.
I don't know if you noticed but the cut-off shield actually comes right off the bulb itself by twisting. I would just let Sam know and they should replace it since this holds the bulb in place in the housing under tension from the lever on the back.
I also had a problem with the lights flickering on and off during my install but very quickly found out it was just my grounding, not the fuses, as in your case. Once I grounded it staright to the battery terminal it hasn't happened since.
Are you using the ebay housing or stock lenses? I am asking cause I took out the shield the ebay housing came with and it actually showed this glare more over the lights so I put it back in cause it clears away the reflection/glare above the lights.
~Damari
Originally Posted by wReX
1) I ordered the high/low kit and dont really think the high beam is all I thought it was going to be. Don't get me wrong though, the low beam is probably bright enough to get you by unless you drive on a lot of dark, back country roads in the middle of the night.
Originally Posted by wReX
2) On one of the bulbs, the tabs that help position the bulb into the housing(three little tabs)... well these are usually metal but on this kit they are plastic. One of the little tabs looked like it was molded wrong from the factory and was very thin, so I had to be extremely careful not to break it off during install. It is fine for now but I think I will call this in under warranty and get a replacement or something.
Originally Posted by wReX
3) Most critical was one of the inline fuses that comes with the kit appears to faulty. I found this out while driving down the road and having one of the headlights completely shut off! I pulled over and double checked all the connections/wiring and the same thing happened to me again later down the road. Got out again and started messing with each individual wire and traced it down to one of the two inline fuses. These again are a little lacking in quality(loose wires/contacts). I just bought some better ones from Radio Shack and soldered them in place. Working great now.
Originally Posted by wReX
Pic of the light pattern in original '93 housings... pattern is ok, only thing is the little light reflection/glare above the drivers side light. Not sure what the deal is there. Overall I do recommend these lights.
~Damari

Thread
Thread Starter
Forum
Replies
Last Post