
How to replace AC expansion valve (illustrated)

Thread Starter
Eats, Sleeps, Dreams Rotary
Joined: Apr 2001
Posts: 3,736
Likes: 10
From: Dallas, Texas
How to replace AC expansion valve (illustrated)
On a scale of 1-10 this rated "B" for BITCH 
*note this is for a 94 with airbag so 93's maybe slightly different*
*part numbers reference are for a MANA system!!!*
it was easier to remove the compressor than change the expansion valve. But like anything, once you do it, it really isn't that hard.
The hardest part was getting a wrench to the AC lines in the engine bay. One is a 28mm or so and the other a 19mm.
SO...
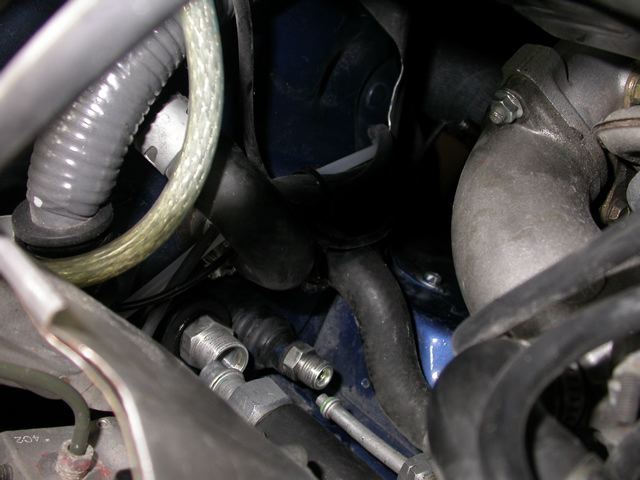
Step 1. Undo AC lines going into evaporator. They are on the passenger side of the heater/coolant lines and behind the ABS. I wasn't willing to move the ABS to get space as I didn't want to FUBAR the hardlines. I can remove the windshield wiper motor but I don't think it would give you significantly more access. What I ended up doing was unbolting the intake pipe for the secondary turbo (two 10mm bolts). I have a downpipe so access was easy. Once its out of the way I unbolted the two lines. The smaller is 19mm and the larger is around 28mm.
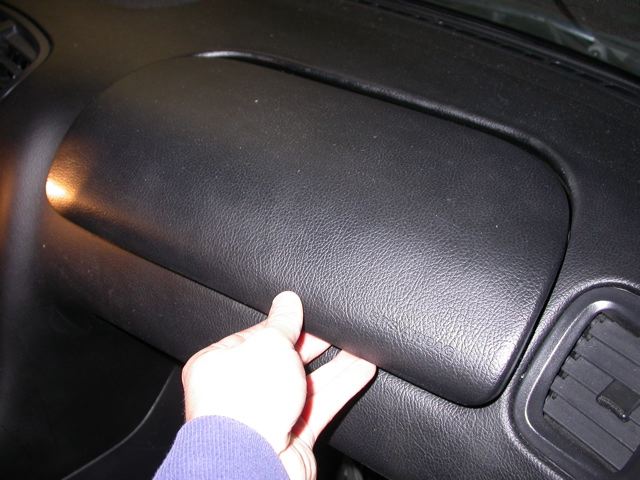
Step 2. Now it gets much easier. Next remove the glove box by removing the two philips screws and unlatching the plastic support latch. This should expose the evaporator.
*note this is for a 94 with airbag so 93's maybe slightly different*
*part numbers reference are for a MANA system!!!*
it was easier to remove the compressor than change the expansion valve. But like anything, once you do it, it really isn't that hard.
The hardest part was getting a wrench to the AC lines in the engine bay. One is a 28mm or so and the other a 19mm.
SO...
Step 1. Undo AC lines going into evaporator. They are on the passenger side of the heater/coolant lines and behind the ABS. I wasn't willing to move the ABS to get space as I didn't want to FUBAR the hardlines. I can remove the windshield wiper motor but I don't think it would give you significantly more access. What I ended up doing was unbolting the intake pipe for the secondary turbo (two 10mm bolts). I have a downpipe so access was easy. Once its out of the way I unbolted the two lines. The smaller is 19mm and the larger is around 28mm.
Step 2. Now it gets much easier. Next remove the glove box by removing the two philips screws and unlatching the plastic support latch. This should expose the evaporator.
Last edited by 7racer; Apr 6, 2005 at 11:41 PM.
Thread Starter
Eats, Sleeps, Dreams Rotary
Joined: Apr 2001
Posts: 3,736
Likes: 10
From: Dallas, Texas
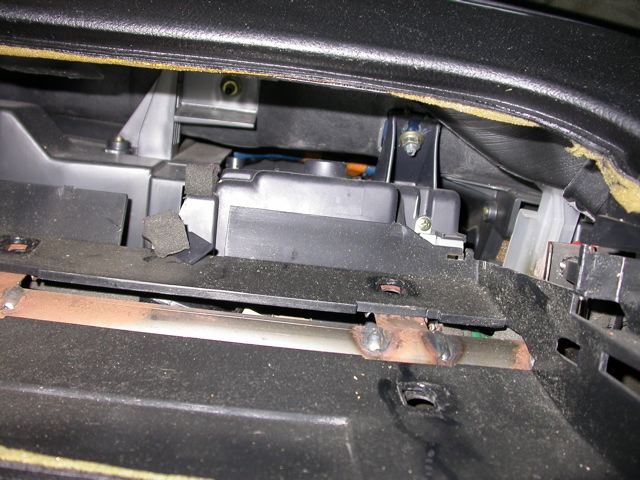
Step 3. Unbolt the 10mm bolt that is holding the lower portion of the evaporator. Also, undo the condensed water drain tube located right next to it.

Step 4. *94-95 specific* you need to remove the airbag. MAKE SURE THAT YOUR BATTERY IS UNPLUGGED!!! Looking underneath the exposed dash remove the four 12 mm bolts.
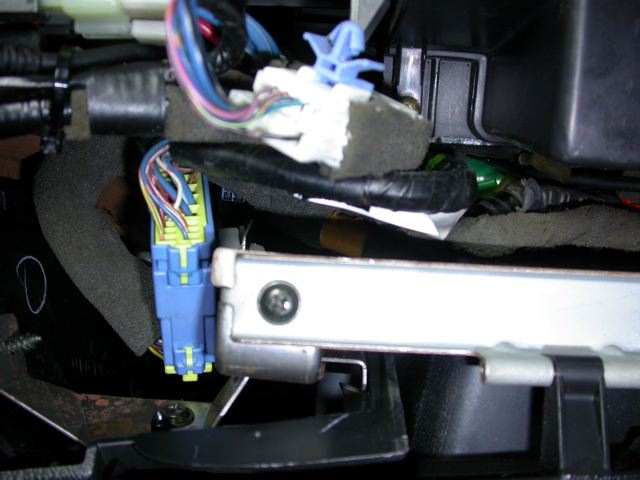
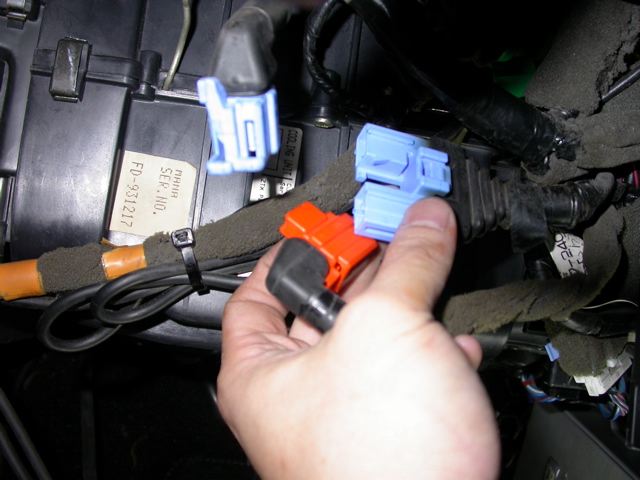
Step 5. Unplug the airbag harness. This is one of those "keyed" type of plugs. You need to pull back the cover of the orange plug first. This lets you "push down" on the release lever. Remove the orange plug. Then the blue one (this is the airbag plug).
Step 4. *94-95 specific* you need to remove the airbag. MAKE SURE THAT YOUR BATTERY IS UNPLUGGED!!! Looking underneath the exposed dash remove the four 12 mm bolts.
Step 5. Unplug the airbag harness. This is one of those "keyed" type of plugs. You need to pull back the cover of the orange plug first. This lets you "push down" on the release lever. Remove the orange plug. Then the blue one (this is the airbag plug).
Last edited by 7racer; Apr 6, 2005 at 11:45 PM.
Thread Starter
Eats, Sleeps, Dreams Rotary
Joined: Apr 2001
Posts: 3,736
Likes: 10
From: Dallas, Texas
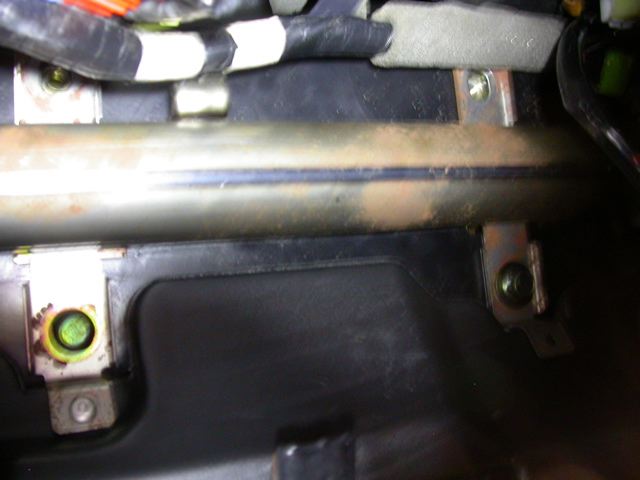
Step 6. Pull the airbag out while feeding the wiring harness up through the inner opening.
Step 7. The reason that you need to remove the airbag is to get at the last bolt that is holding the evaporator. While doing a search, most people said it was easy to remove the evaporator...I couldn't figure out why mine was so tough until after looking over and over again at the service manual that I realized there was one more bolt!!!
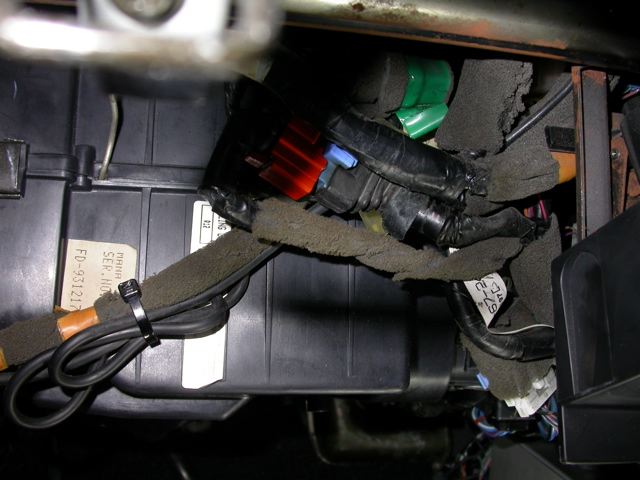
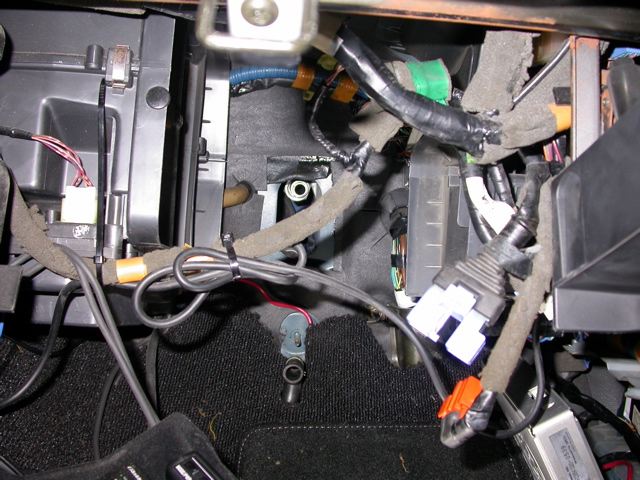
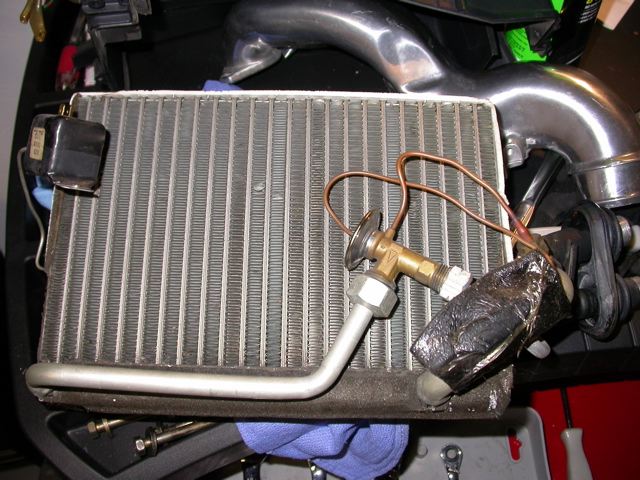
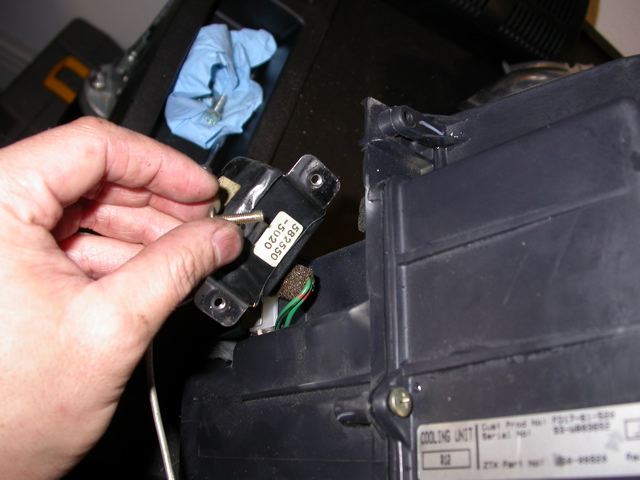
Step 8. Remove the evaporator. Those two bolts and the hardlines in the engine bay are the only things holding the evaporator. Keep the wiring in front out of the way and pull the evaporator down and toward you. This is what it should look like after you get it out of the way.
Step 7. The reason that you need to remove the airbag is to get at the last bolt that is holding the evaporator. While doing a search, most people said it was easy to remove the evaporator...I couldn't figure out why mine was so tough until after looking over and over again at the service manual that I realized there was one more bolt!!!
Step 8. Remove the evaporator. Those two bolts and the hardlines in the engine bay are the only things holding the evaporator. Keep the wiring in front out of the way and pull the evaporator down and toward you. This is what it should look like after you get it out of the way.
Last edited by 7racer; Apr 6, 2005 at 11:59 PM.
Thread Starter
Eats, Sleeps, Dreams Rotary
Joined: Apr 2001
Posts: 3,736
Likes: 10
From: Dallas, Texas
Step 9. Open the evaporator by removing the screws and two spring clips. The evaporator is encased in styrofoam. One you get it out you should see the evaporator and expansion valve.
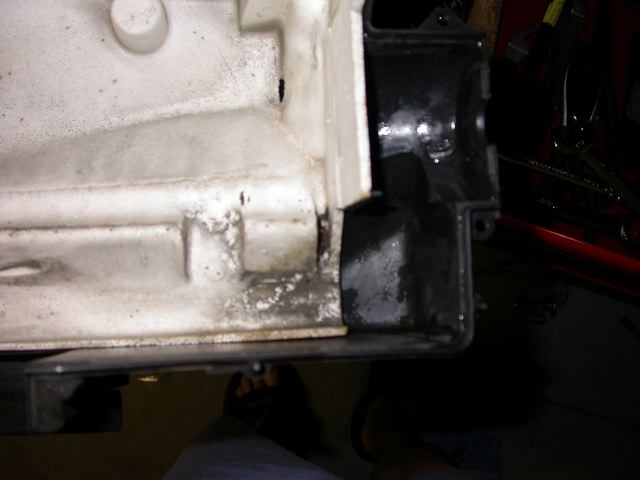
Step 10. CLEAN THE EVAPORATOR! I think the musty smell we get is due to the leaves that get stuck here....I cleaned it out and sprayed the evaporator with one of those DIY oder eliminator cans that you can purchase from Pepboys.
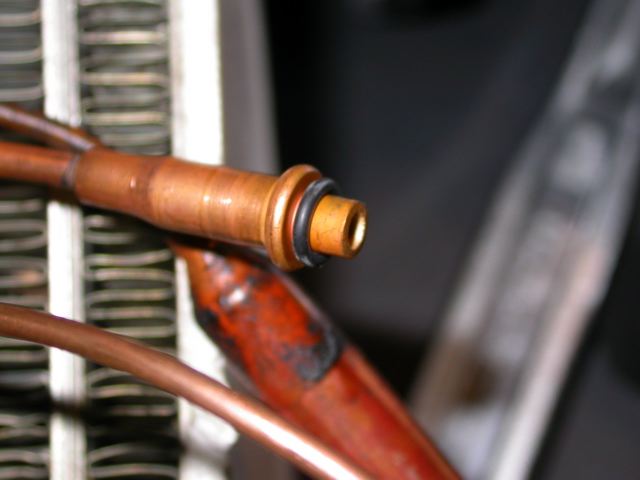
Step 11. Remove the expansion valve. You need a 24mm, 19mm and 14mm wrench. I would remove the two smaller ones first as loosing the larger one first seems to place tension on the other 90degrees away. The replacement expansion valve has this rubber O-ring on the smallest tube. I purchase another O-ring for the larger tube (H261-61-J17). The parts fische didn't show an O-ring for the middle sized tube. I just reused the existing one.
Step 10. CLEAN THE EVAPORATOR! I think the musty smell we get is due to the leaves that get stuck here....I cleaned it out and sprayed the evaporator with one of those DIY oder eliminator cans that you can purchase from Pepboys.
Step 11. Remove the expansion valve. You need a 24mm, 19mm and 14mm wrench. I would remove the two smaller ones first as loosing the larger one first seems to place tension on the other 90degrees away. The replacement expansion valve has this rubber O-ring on the smallest tube. I purchase another O-ring for the larger tube (H261-61-J17). The parts fische didn't show an O-ring for the middle sized tube. I just reused the existing one.

Thread Starter
Eats, Sleeps, Dreams Rotary
Joined: Apr 2001
Posts: 3,736
Likes: 10
From: Dallas, Texas
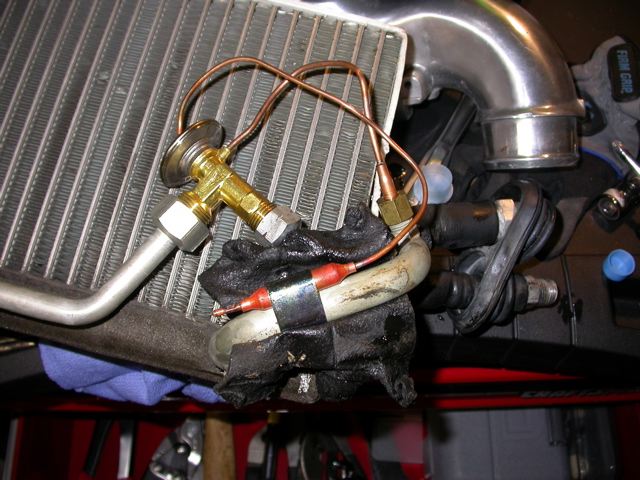
Step 12. Also I plan to recharge the system with R12, so they suggest that you lube the O-rings with R12 oil (mineral oil) if your using R134a you need ester oil. Open the rubber insulation cover and unscrew and loosen the bracket holding the sensor (temperature?) Attached the exansion valve. The nerve racking thing is that the hard lines are bent the wrong way. To prevent overly bending the hard lines, first loosely attach the three fittings (14, 19 then 24) then bend the sensor in place first then the other two lines. Place the oiled O-rings in place, tighten, and recover the sensor.
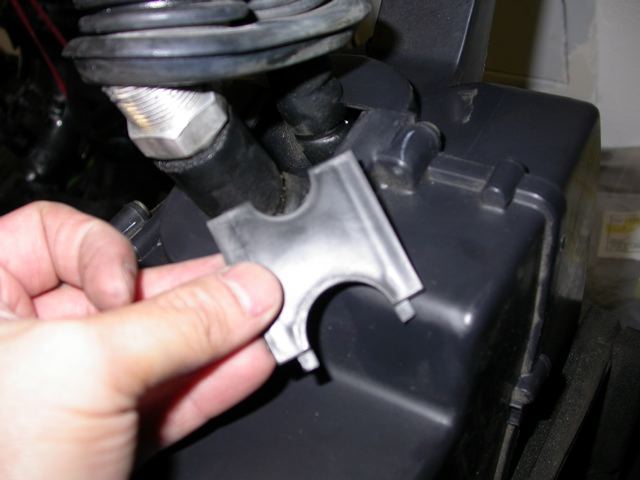
Step 13. Reverse the order to reinstall the parts. Just some notes on the reinstall. When you get the evaporator back in place, go back into the engine bay and adjust the rubber grommet seal before tightening it in place. Also, I replace the two O-rings for the hardlines. Part number W329-61-J17 and W326-61-J17 Also, the screw that is a metal screw versus the taping screws on the evaporator goes here....
Step 13. Reverse the order to reinstall the parts. Just some notes on the reinstall. When you get the evaporator back in place, go back into the engine bay and adjust the rubber grommet seal before tightening it in place. Also, I replace the two O-rings for the hardlines. Part number W329-61-J17 and W326-61-J17 Also, the screw that is a metal screw versus the taping screws on the evaporator goes here....
Last edited by 7racer; Apr 7, 2005 at 12:01 AM.
Thread Starter
Eats, Sleeps, Dreams Rotary
Joined: Apr 2001
Posts: 3,736
Likes: 10
From: Dallas, Texas
*after doing all of this I found a part that I forgot to put on the freaking evaporator!
I was able to pull it back out and replace the piece and evaporator in 15 mins
I was able to pull it back out and replace the piece and evaporator in 15 mins
Trending Topics
Thread Starter
Eats, Sleeps, Dreams Rotary
Joined: Apr 2001
Posts: 3,736
Likes: 10
From: Dallas, Texas
Originally Posted by jeremyb
LOL you arent even done yet... OOPS! I'll just subscribe to it 
Jeremy
Jeremy

Anyways, I didn't have this section in the FSM so if anyone has any corrections please let me know before I get the rest of the parts on my car. Also, If anyone has a trick to tighten the high pressure line (larger one) in the engine bay please let me know. There is just no access there.
Thread Starter
Eats, Sleeps, Dreams Rotary
Joined: Apr 2001
Posts: 3,736
Likes: 10
From: Dallas, Texas
oh here is my other thread with the part numbers for the valve and compressor.
https://www.rx7club.com/forum/showth...ight=expansion
https://www.rx7club.com/forum/showth...ight=expansion
Lives on the Forum
Joined: Feb 2001
Posts: 9,617
Likes: 8
From: Dallas
I take it this means you got the evaporator out That will make it easier when I do it.
I have had the hardlines at the firewall disconnected so I could replace the o-rings in there. I don't remember what I removed exactly but it was most likely the ABS pump. If you remove its mounting bolts you can move the pump back a couple inches without hurting anything. I may have removed the secondary intake as well but I don't think so.
The large nuts on all the hardlines are not incredibly tight since it is an o-ring that makes the seal. If you don't have wrenches large enough a crescent wrench will normally do it without hurting the fitting as long as you're a little careful.
That will make it easier when I do it.I have had the hardlines at the firewall disconnected so I could replace the o-rings in there. I don't remember what I removed exactly but it was most likely the ABS pump. If you remove its mounting bolts you can move the pump back a couple inches without hurting anything. I may have removed the secondary intake as well but I don't think so.
The large nuts on all the hardlines are not incredibly tight since it is an o-ring that makes the seal. If you don't have wrenches large enough a crescent wrench will normally do it without hurting the fitting as long as you're a little careful.


Good stuff! I like seeing more AC stuff documented.
IMHO if you're doing major service to the AC system, a new expansion valve is a VERY good idea. It's a small orifice that can easily get clogged with bits of debris from the system, and a malfunctioning expansion valve will cause a LOT of problems with the performance of the AC system. Not to mention it's actually relatively inexpensive.
I'm hesitant about you re-using an O-ring - it's typically not a good idea to reuse ANY o-rings in the AC system, this is a primary failure point for leaks.
Anyhow, keep up the good work and keep us posted!
Dale
Lives on the Forum
Joined: Feb 2001
Posts: 9,617
Likes: 8
From: Dallas
7racer, be interested to know if your expansion valve had any debris in it. A normally functioning system will usually have some oil and grit in it. A compressor that blows up will fill it full of bigger chunks 

sounds lika Jet
Joined: Feb 2005
Posts: 51
Likes: 1
From: San Diego, CA
My ac stopped working, I cant even blow cold outside air out of the vents. I keep getting hot engine air coming out of the defroster. What do u guys think the malfunction is. Oh, I also heard that If u put a Power FC it can stop your ac from working. MY ac was working for a while when after I put he Power FC but I left somewhere for two weeks and when I came back and turned my car on the ac climate control and all that stuff was not working. what do u guys think it is?
Thread Starter
Eats, Sleeps, Dreams Rotary
Joined: Apr 2001
Posts: 3,736
Likes: 10
From: Dallas, Texas
Originally Posted by Str8Down
Great writeup, but why did you need to replace that valve? What symptoms were you having?
Thread Starter
Eats, Sleeps, Dreams Rotary
Joined: Apr 2001
Posts: 3,736
Likes: 10
From: Dallas, Texas
Dale!
you killing me!! I couldn't find the part number for that pipe. I'm too **** retentive so if you can find it, I'll change it in a second 
you killing me!!
I couldn't find the part number for that pipe. I'm too **** retentive so if you can find it, I'll change it in a second
Originally Posted by DaleClark
Good stuff! I like seeing more AC stuff documented.
IMHO if you're doing major service to the AC system, a new expansion valve is a VERY good idea. It's a small orifice that can easily get clogged with bits of debris from the system, and a malfunctioning expansion valve will cause a LOT of problems with the performance of the AC system. Not to mention it's actually relatively inexpensive.
I'm hesitant about you re-using an O-ring - it's typically not a good idea to reuse ANY o-rings in the AC system, this is a primary failure point for leaks.
Anyhow, keep up the good work and keep us posted!
Dale
IMHO if you're doing major service to the AC system, a new expansion valve is a VERY good idea. It's a small orifice that can easily get clogged with bits of debris from the system, and a malfunctioning expansion valve will cause a LOT of problems with the performance of the AC system. Not to mention it's actually relatively inexpensive.
I'm hesitant about you re-using an O-ring - it's typically not a good idea to reuse ANY o-rings in the AC system, this is a primary failure point for leaks.
Anyhow, keep up the good work and keep us posted!
Dale
Thread Starter
Eats, Sleeps, Dreams Rotary
Joined: Apr 2001
Posts: 3,736
Likes: 10
From: Dallas, Texas
Originally Posted by DamonB
7racer, be interested to know if your expansion valve had any debris in it. A normally functioning system will usually have some oil and grit in it. A compressor that blows up will fill it full of bigger chunks
Thread Starter
Eats, Sleeps, Dreams Rotary
Joined: Apr 2001
Posts: 3,736
Likes: 10
From: Dallas, Texas
Originally Posted by silver-rex-7
My ac stopped working, I cant even blow cold outside air out of the vents. I keep getting hot engine air coming out of the defroster. What do u guys think the malfunction is. Oh, I also heard that If u put a Power FC it can stop your ac from working. MY ac was working for a while when after I put he Power FC but I left somewhere for two weeks and when I came back and turned my car on the ac climate control and all that stuff was not working. what do u guys think it is?
sounds lika Jet
Joined: Feb 2005
Posts: 51
Likes: 1
From: San Diego, CA
I checked the ac fuse and everything, no joy. I checke the relays too. It still didnt work. I'm going to try to check behind the glovebox and all that stuff to see if I can at least shut off the hot air coming from the windshield defroster vents. I tried to put the factory ecu back on and switched the climate control panel to see if anything else happened and still hot air still venting out of the defroster vents. The only thing that I notice is that when I push the recycle air button in the flow of hot air coming out of the vents is reduced. If I push it back out and I put the fan on any of the four speeds the flow of hot air does not change but a great flow of hot air comes out. I need some help on this. I'm not good with ac stuff everything else I'm pretty descent on but this ac crap is something that I have to do moreresearch.
Thread Starter
Eats, Sleeps, Dreams Rotary
Joined: Apr 2001
Posts: 3,736
Likes: 10
From: Dallas, Texas
I'll post a follow-up after I install the new compressor and get the system charged. I also ordered a new drier as mine has been open to atmosphere for more than a year.
Hopefully, the re-used O-ring won't give me problems.
Hopefully, the re-used O-ring won't give me problems.
Last edited by 7racer; Apr 8, 2005 at 11:29 AM.
Originally Posted by 7racer
Dale!
you killing me!! I couldn't find the part number for that pipe. I'm too **** retentive so if you can find it, I'll change it in a second
you killing me!!
I couldn't find the part number for that pipe. I'm too **** retentive so if you can find it, I'll change it in a second If nothing else, compare that O-ring to other ones in the system and see which one it matches and get one of those.
Dale