
How to install new weatherstripping in the doors?

Thread Starter


Joined: Mar 2006
Posts: 9,770
Likes: 797
From: Bay Area CA
So I started this yesterday and got it mostly done but really struggled with one particular part so posting up what I've done and where I'm stuck.
I bought a new OEM weatherstripping from Ray Crowe (crowe.ray@aol.com). Before attempting to install this, I spent a few minutes comparing it to the old one so that I could figure out how to install it and what color clips went where.
The color of the clips on the new weatherstripping are slightly different from the old, original weatherstripping. The old, original weather stripping had 2 black clips a bunch of orange clips and 3-4 blue clips. The new one has the 2 black clips and the rest are orange.
by https://www.flickr.com/photos/26005589@N06/, on Flickr
Here at the back of the door near the handle is where the black clips attach on both the old and new weatherstripping:
by https://www.flickr.com/photos/26005589@N06/, on Flickr
This is where the orange clips start on both the old and new weatherstripping:
by https://www.flickr.com/photos/26005589@N06/, on Flickr
Here at the front of the door is where the blue clips attach on the old weatherstripping. They are orange on the new one.
by https://www.flickr.com/photos/26005589@N06/, on Flickr
Once I had that figured out, I pulled the old weatherstrip off. Unfortunately, most of the clips would not come off when pulling the weatherstrip so I had to go back with plyers to try and pry them out. I had the most success twisting the plyers rather than pulling for whatever reason. They were fiddly little bitches. The blue ones were particularly difficult to remove. A few of them, the 'heads' broke off so I poked the remaining stub of the broken clips back into the door. That took longer than expected...
Install
You have to remove the door pin to install the new one. Technically, you kinda have to remove the ping to get the old one off too but I cut it with a carpet knife instead. I banged the pin out with a hammer. It went flying off to some remote corner of the garage so I might have to order a new one...
by https://www.flickr.com/photos/26005589@N06/, on Flickr
The weather strip attaches in a couple of different ways.
1. It has the different colored clips as previously mentioned. These clip in at the back, bottom and front of the door.
2. It has a channel that wedges into a rail at the top of the door.
Both are kind of fiddly.
The back and bottom of the door were easy. The clips slipped in and you push until you hear a little click. Here at the top of the door is where you squeeze into the channel:
by https://www.flickr.com/photos/26005589@N06/, on Flickr
Problems
Having two problems
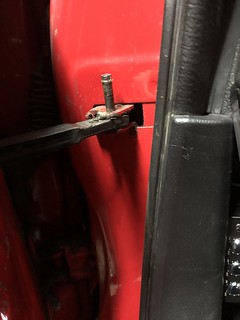
1. I'm having difficulty at the front of the door getting the orange clips of the new weatherstripping to clip into and hold in the holes where the blue clips from the old weatherstripping used to attach. Specifically these two top clips in the photo:
After fiddling with those two for a long time, I taped the weatherstripping in place where those two attach and closed the door hoping some pressure would work. Need to go and check on it...
2. It was a lot more difficult to close the door with the new, fluffy weatherstripping! I had to slam the door closed.
Has anyone else experienced this?
Thanks.
I bought a new OEM weatherstripping from Ray Crowe (crowe.ray@aol.com). Before attempting to install this, I spent a few minutes comparing it to the old one so that I could figure out how to install it and what color clips went where.
The color of the clips on the new weatherstripping are slightly different from the old, original weatherstripping. The old, original weather stripping had 2 black clips a bunch of orange clips and 3-4 blue clips. The new one has the 2 black clips and the rest are orange.

Here at the back of the door near the handle is where the black clips attach on both the old and new weatherstripping:

This is where the orange clips start on both the old and new weatherstripping:

Here at the front of the door is where the blue clips attach on the old weatherstripping. They are orange on the new one.

Once I had that figured out, I pulled the old weatherstrip off. Unfortunately, most of the clips would not come off when pulling the weatherstrip so I had to go back with plyers to try and pry them out. I had the most success twisting the plyers rather than pulling for whatever reason. They were fiddly little bitches. The blue ones were particularly difficult to remove. A few of them, the 'heads' broke off so I poked the remaining stub of the broken clips back into the door. That took longer than expected...
Install
You have to remove the door pin to install the new one. Technically, you kinda have to remove the ping to get the old one off too but I cut it with a carpet knife instead. I banged the pin out with a hammer. It went flying off to some remote corner of the garage so I might have to order a new one...
The weather strip attaches in a couple of different ways.
1. It has the different colored clips as previously mentioned. These clip in at the back, bottom and front of the door.
2. It has a channel that wedges into a rail at the top of the door.
Both are kind of fiddly.
The back and bottom of the door were easy. The clips slipped in and you push until you hear a little click. Here at the top of the door is where you squeeze into the channel:

Problems
Having two problems
1. I'm having difficulty at the front of the door getting the orange clips of the new weatherstripping to clip into and hold in the holes where the blue clips from the old weatherstripping used to attach. Specifically these two top clips in the photo:
2. It was a lot more difficult to close the door with the new, fluffy weatherstripping! I had to slam the door closed.
Has anyone else experienced this?
Thanks.
Joined: Nov 2011
Posts: 3,425
Likes: 489
From: okinawa to tampa
i found that pushing all the old clips into the door and fishing them out is much easier and better than trying to pull them out. theyre soft enough plastic that majority of them arent damaged at all by doing this.
as far as your problem goes, im trying to understand exactly what it is lol. if you cant get the new clips to clip in then just use the blue ones. problem solved?
and for having to slam the door, thats normal. its aggressively rare that i ever seen an fd where you DONT have to mac truck the door closed.
Thread Starter
Joined: Mar 2006
Posts: 9,770
Likes: 797
From: Bay Area CA
I tore the blue ones to pieces trying to pull them out... Didn't think to push them out from the inside...
So, the problem is that 2 of the clips don't clip in. Not sure why...
So, the problem is that 2 of the clips don't clip in. Not sure why...
Joined: Nov 2011
Posts: 3,425
Likes: 489
From: okinawa to tampa
spread the wings out on the "insert" part a little more. give it more surface area to latch. i think the clips are 2 different sizes. you might have a couple big ones in some small holes

Thread
Thread Starter
Forum
Replies
Last Post
DaleClark
3rd Generation Specific (1993-2002)
31
Mar 28, 2018 05:12 PM
mbaha
1st Generation Specific (1979-1985)
15
Mar 29, 2006 03:02 PM