
Has anyone ported their UIM and remove the butterflies?


to be effecting, a spacer needs to be about 1/4 inch thick. Putting one between the UIM and LIM will result in the UIM being that same 1/4 higher than the throttle body .
They had some made for the Probe gt on their forum. Although the PGT doesn't run as hot as the 7, they needed to use 1/4 to see heat soak issues be less of an issue, Less thick wasn't apparently enough to make a discernible difference.
Tim
They had some made for the Probe gt on their forum. Although the PGT doesn't run as hot as the 7, they needed to use 1/4 to see heat soak issues be less of an issue, Less thick wasn't apparently enough to make a discernible difference.
Tim
A couple of people have expressed interest in my porting/polishing methods, so I will expound a bit.
I had to do a bit of grinding to port match the 3rd gen UIM to my 89 TII LIM and so went to town on the manifolds.
After the rough shape was done w/ a carbide mill bit and then abrasive "flapper" wheels in a pneumatic die grinder I made a split mandrel out of 1/4" by 12" long (or so) stainless rod so I could polish the whole length of the runners.
I discovered that if I used a long strip of 80 grit emery cloth inserted into and wrapped around the split mandrel and submerged one end of the intake piece I was working on in a bucket of water it removed material very quickly once I found the right speed. The movement of the emery strip creates a low pressure area and wicks water up the sides of the runners- you have to keep moving up and down the runner because you can accidentally (or not) hog out the runner w/ this grit in the water.
Once I had the size, the lack of casting intrusions or lack of porosity that I wanted I went through the grits of emery cloth. For the finer grits where I couldn't find emery cloth I glued fine grit sandpaper to a cloth backing and cut that into strips. You can really step up the rpm w/ the finer grits for a smooth finish, but you must be carefull not to go TOO fast or the cloth in the emery/sandpaper backing will fray and actually cut the aluminum.
As for shaping the pieces-
TB-
I rounded out the front of the TB and relieved some of the area to the sides of the primary port on the TB face (but you must be careful not to cut into the coolant passage on the right side doing this) and then gasket matched the rear while giving the area between the 2ndary ports a sharp trailing edge.
UIM-
I cut the bridge out of the UIM and gasket matched this face, filled in the deep AWS? **I think** (hey, I'm a 2nd gen guy) hole w/ the Haltech air temp sensor, plugged the stock air temp sensor hole w/ alum pipe thread so I could shape it, and enlarged the primary runners while relieving the angle of the bend radius (this works well w/ the larger TII LIM primary runners, but probably not w/ 3rd gen LIM), removed the casting intrusions (cylindrical sprue like bumps) in the runners and matched the UIM to TII LIM and vice versa.
LIM-
I'm not sure how much the TII LIM shaping reflects what you can do w/ the 3rd gen LIM, but-
I cut out the EGR/ACV intrusion in the rear primary runner (after having the backside fill welded, of course), welded in all the unused vacuum passages, cut out/shaped where the middle manifold to engine mounting bolt boss intrudes into the lower primary ports, and cut off/welded up the EGR passage -don't want carbon sooting up all that polishing . After polishing everything I roughed up below the 2ndary injectors w/ perpendicular serrations of 80 grit to thicken the boundry layer and prevent manifold whetting.
The outside was cleaned up as well by grinding off all the emmissions stuff. http://www.rx7club.com/forum/attachm...&postid=908472
TB elbow-
For the Greddy TB elbow I cut about ~30 deg out of the bend where the "tube" meets the flange for smoother flow and getting rid of that dorky 3rd gen IC piping "double back". For the TB elbow and thick intake piping I knife edged it so that they met the silicone couplings smoothly before polishing their interiors.
IC piping-
for the thin IC piping I flared and knife edged their ends instead of rolling a bead there to retain the couplings AND have them meet the sil. couplings at a smooth angle.
Turbo-
I polished and knife edged the compressor outlet and as far into the scroll as I could. For the exhaust manifold and housing I used a dremel and a sanding roll to portmatch and polish every bit (I have had it apart since and only a light dusting of carbon sticks to the polished surface- much smoother!).
I eliminated as much length and bends in the IC piping as I could while stepping the diameter up incrementally from 2" turbo comp. outlet- to 2.5" IC inlet- to 2.75" IC outlet and 2.75" up to the TB elbow.
Pics of the system- not done w/ finishing touches yet, but getting there-
http://www.rx7club.com/forum/attachm...postid=1367967
http://www.rx7club.com/forum/attachm...postid=1367970
http://www.rx7club.com/forum/attachm...postid=1367976
Sorry to be so long winded, Ian
-edited for late night spelling corrections...-
I had to do a bit of grinding to port match the 3rd gen UIM to my 89 TII LIM and so went to town on the manifolds.
After the rough shape was done w/ a carbide mill bit and then abrasive "flapper" wheels in a pneumatic die grinder I made a split mandrel out of 1/4" by 12" long (or so) stainless rod so I could polish the whole length of the runners.
I discovered that if I used a long strip of 80 grit emery cloth inserted into and wrapped around the split mandrel and submerged one end of the intake piece I was working on in a bucket of water it removed material very quickly once I found the right speed. The movement of the emery strip creates a low pressure area and wicks water up the sides of the runners- you have to keep moving up and down the runner because you can accidentally (or not) hog out the runner w/ this grit in the water.
Once I had the size, the lack of casting intrusions or lack of porosity that I wanted I went through the grits of emery cloth. For the finer grits where I couldn't find emery cloth I glued fine grit sandpaper to a cloth backing and cut that into strips. You can really step up the rpm w/ the finer grits for a smooth finish, but you must be carefull not to go TOO fast or the cloth in the emery/sandpaper backing will fray and actually cut the aluminum.
As for shaping the pieces-
TB-
I rounded out the front of the TB and relieved some of the area to the sides of the primary port on the TB face (but you must be careful not to cut into the coolant passage on the right side doing this) and then gasket matched the rear while giving the area between the 2ndary ports a sharp trailing edge.
UIM-
I cut the bridge out of the UIM and gasket matched this face, filled in the deep AWS? **I think** (hey, I'm a 2nd gen guy) hole w/ the Haltech air temp sensor, plugged the stock air temp sensor hole w/ alum pipe thread so I could shape it, and enlarged the primary runners while relieving the angle of the bend radius (this works well w/ the larger TII LIM primary runners, but probably not w/ 3rd gen LIM), removed the casting intrusions (cylindrical sprue like bumps) in the runners and matched the UIM to TII LIM and vice versa.
LIM-
I'm not sure how much the TII LIM shaping reflects what you can do w/ the 3rd gen LIM, but-
I cut out the EGR/ACV intrusion in the rear primary runner (after having the backside fill welded, of course), welded in all the unused vacuum passages, cut out/shaped where the middle manifold to engine mounting bolt boss intrudes into the lower primary ports, and cut off/welded up the EGR passage -don't want carbon sooting up all that polishing
. After polishing everything I roughed up below the 2ndary injectors w/ perpendicular serrations of 80 grit to thicken the boundry layer and prevent manifold whetting.The outside was cleaned up as well by grinding off all the emmissions stuff. http://www.rx7club.com/forum/attachm...&postid=908472
TB elbow-
For the Greddy TB elbow I cut about ~30 deg out of the bend where the "tube" meets the flange for smoother flow and getting rid of that dorky 3rd gen IC piping "double back". For the TB elbow and thick intake piping I knife edged it so that they met the silicone couplings smoothly before polishing their interiors.
IC piping-
for the thin IC piping I flared and knife edged their ends instead of rolling a bead there to retain the couplings AND have them meet the sil. couplings at a smooth angle.
Turbo-
I polished and knife edged the compressor outlet and as far into the scroll as I could. For the exhaust manifold and housing I used a dremel and a sanding roll to portmatch and polish every bit (I have had it apart since and only a light dusting of carbon sticks to the polished surface- much smoother!).
I eliminated as much length and bends in the IC piping as I could while stepping the diameter up incrementally from 2" turbo comp. outlet- to 2.5" IC inlet- to 2.75" IC outlet and 2.75" up to the TB elbow.
Pics of the system- not done w/ finishing touches yet, but getting there-
http://www.rx7club.com/forum/attachm...postid=1367967
http://www.rx7club.com/forum/attachm...postid=1367970
http://www.rx7club.com/forum/attachm...postid=1367976
Sorry to be so long winded, Ian
-edited for late night spelling corrections...-
Last edited by BLUE TII; Jan 31, 2003 at 04:05 AM.
Thread Starter
Banned. I got OWNED!!!
Joined: Feb 2001
Posts: 102
Likes: 0
From: Silicon Valley Bay Area
Sorry Tim,
The guy that did my UIM got injured on a BIKE accident.
He messed up his knee pretty bad and I am waiting for his response.......... hopefully sometimes next week...
Not sure if u noticed.......... removal of the butterflies and taping it is part of the package........
What is ur time frame to get it done?
I thought that Blue II was the guy you were talking about posting his process for polishing the UIM and was asking him his price. I'm not in a hurry, I have a few other things to take care of to get the car near completion (CF driveshaft with new tranny, injectors and pfc tuned, etc, the never ending list of things bought).
When ever you get a price, shoot me a PM and I'll see if I have the UIM in yet.
Tim
When ever you get a price, shoot me a PM and I'll see if I have the UIM in yet.
Tim
I will find some pics again,.
I re-did my throttle body to include countersinking/half-shafting the primary shaft and countersinking/contouring the 2ndary shaft as well as rounding the backside of the leading edges of the throttle plates.
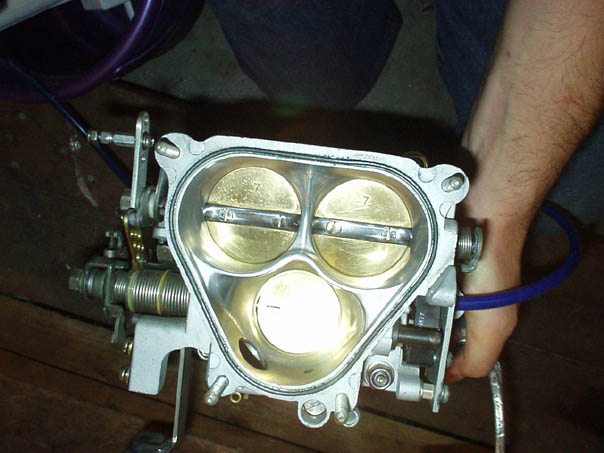
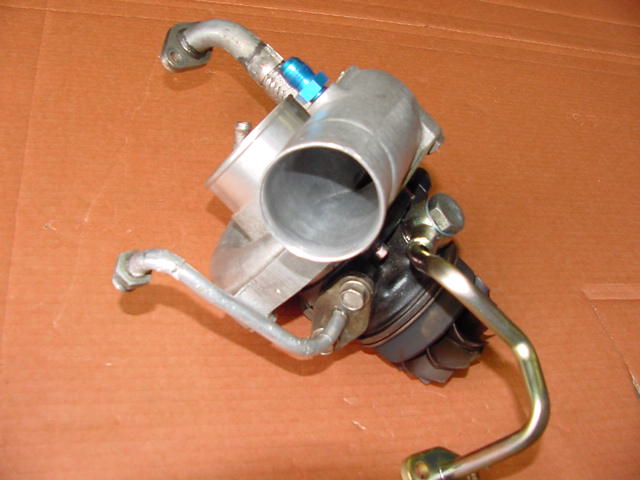
This shows the modded Greddy elbow. I did all my intake and exhaust like that- match ported/polished/knife edged and some doweling to keep it lined up. I will find more pics.
I re-did my throttle body to include countersinking/half-shafting the primary shaft and countersinking/contouring the 2ndary shaft as well as rounding the backside of the leading edges of the throttle plates.
This shows the modded Greddy elbow. I did all my intake and exhaust like that- match ported/polished/knife edged and some doweling to keep it lined up. I will find more pics.
Found them, I put the old pics back up for another member earlier.


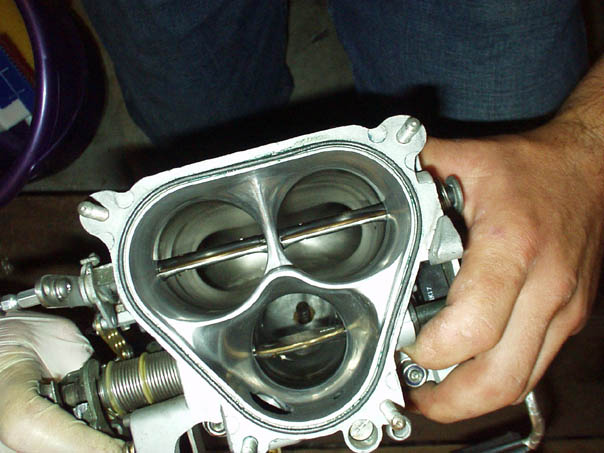
Old pic of the TB back before shaft/plate mods to show the blending between 2ndary bores. I am considering going back and extending the knife edge all the way to top and bottom now that I have proper porting burrs.

Old pic of the TB back before shaft/plate mods to show the blending between 2ndary bores. I am considering going back and extending the knife edge all the way to top and bottom now that I have proper porting burrs.
I had to match port UIM to '89 TII LIM for my application, so the primary runners in the UIM are larger.


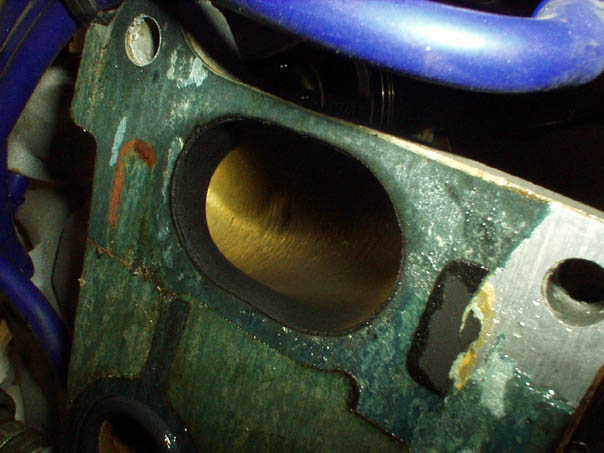
The LIM. I have since added little dowel pins to make it easy to line UIM and LIM up perfectly.


The LIM. I have since added little dowel pins to make it easy to line UIM and LIM up perfectly.
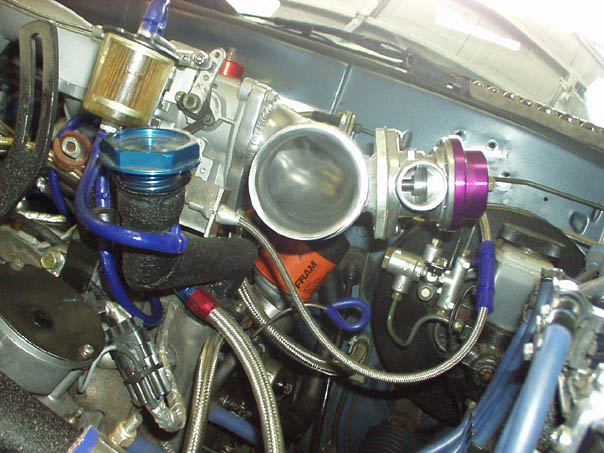
IC end tank. I used an NPR IC, but relocated the inlet/outlet to minmize bends and cut out the casting intrusions in the endtanks. intake tract has a 45 deg bend entering the turbo, an 8" radius 90 deg bend leaving the turbo and a 15 deg bend leaving the IC pipe to the reduced radius Greddy TB elbow.
Turbo

LIM after ~9,000 miles.
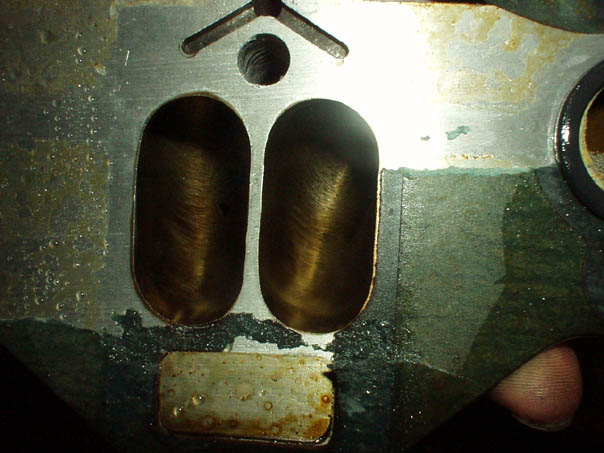
The UIM at same time. The black goop built up at the UIM face is excess Hylomar. I cut WAY back on how much of that I used and the next time I took it apart it was nice and clean.

The UIM at same time. The black goop built up at the UIM face is excess Hylomar. I cut WAY back on how much of that I used and the next time I took it apart it was nice and clean.

Everyone removes the secondary throttle and welds the hole. It is only used for warm up purposes. Along with TB coolant mod and e-shaft front bolt mod as well.

modest beginnings
Joined: Jan 2012
Posts: 50
Likes: 0
From: springfield

Engine must be in idle zone OR coolant temperature below 80 deg C, unless it�s an A/T which adds an AND of below 3000 rpm. And F-137/8 of the '94 FSM only mentions temperature. So again no function use except as an extra restriction for those that let engine warm up before flooring it.
modest beginnings
Joined: Jan 2012
Posts: 50
Likes: 0
From: springfield

Thread
Thread Starter
Forum
Replies
Last Post
risingsunroof82
1st Generation Specific (1979-1985)
8
Sep 7, 2015 01:11 PM