
Even Cheaper Bastard Cold Air Intake

Thread Starter
Magnet Boy
Joined: Jan 2007
Posts: 251
Likes: 1
From: NorCal
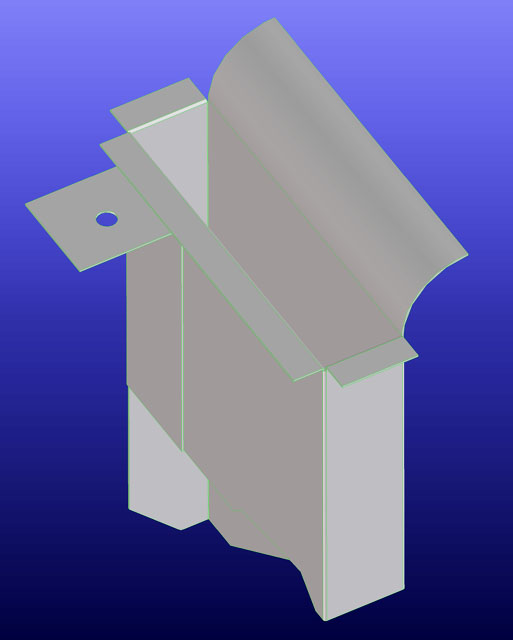
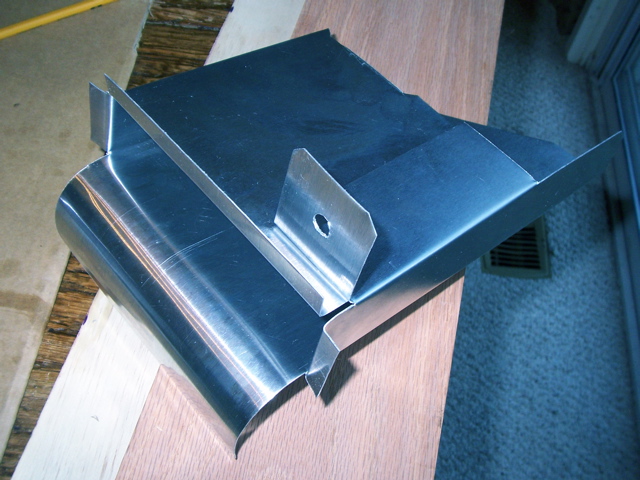
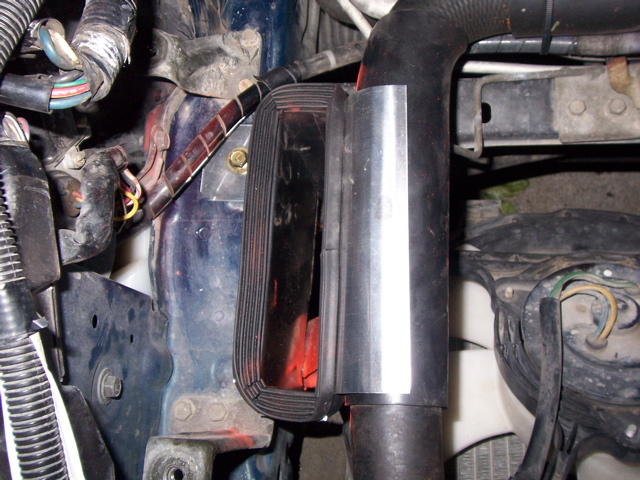
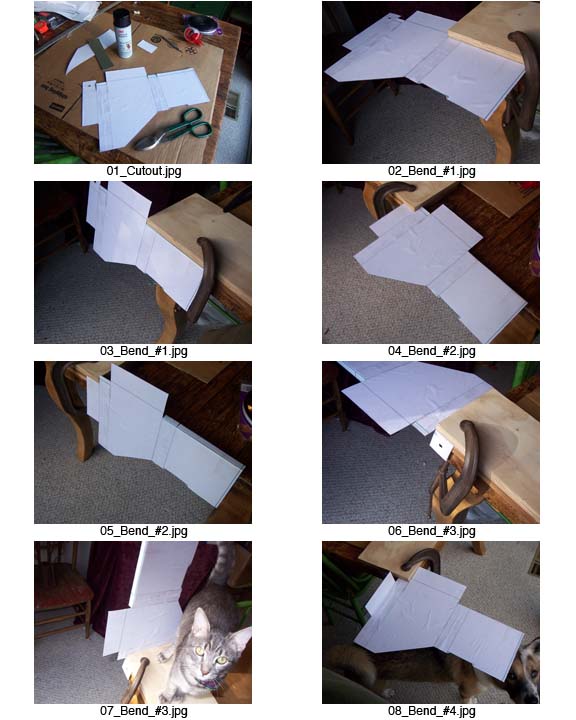
Decided to whip up my own cold air intake modification to my OEM air box. It is even cheaper in that I didn't pay the original Cheap Bastard for his pre-made version. After mocking up with cardboard, I designed the sheet metal in CAD. Then printed out the template, secured to my sheet (light mist of spray adhesive on the template), cut and bent. I used some spray paint to transfer the shape of the opening to the bottom of my air box so I knew exactly where to cut the hole. Then installed with heavy duty weatherstrip and a K&N filter. See pics below. If there is further interest, I will show details on bending up the sheet without special tools and provide the template.

Thread Starter
Magnet Boy
Joined: Jan 2007
Posts: 251
Likes: 1
From: NorCal
Originally Posted by Vlad
looks good man, quality work there. I wonder how it compares to the original cheap bastard intake mod...


The other person (CBI) wont tell people what he did for his intake or what it looks like, cause its a patened secret so i cant compare. You can only know if you buy it, instead of just showing the idea and helping the comunity. But you did a great, clean job!!
Thread Starter
Magnet Boy
Joined: Jan 2007
Posts: 251
Likes: 1
From: NorCal
Thanks for all the positive feedback guys. It really is NOT a lot of work to do this modification once you have this template. I enjoyed the process and I think it is great others might benefit from my efforts. So find attached a PDF with full size template including a pictorial view and some notes on construction. This is an ANSI D Size print which measures 22x34 inches (landscape orientation). If you don't have access to a large format printer, you can take it to a copy shop and have it printed out. The actual template fits on a 12 x 18 inch piece of sheet. There is one small difference to the template versus the way you see it in my photos - a groove in the last face which allows it to be captured by the face that gets bolted down. This is an improvement over having to somehow fasten the two faces together, though you can do that if you want (epoxy, poprivet, snip & fold tabs, etc.)
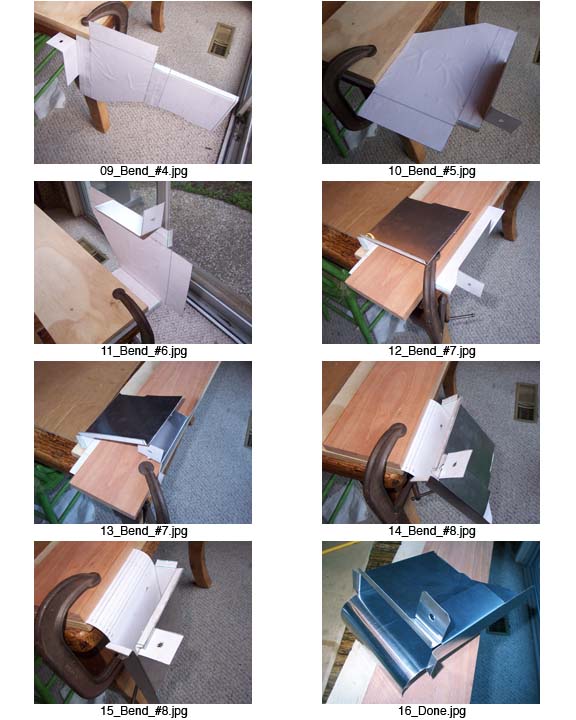
Below are some more photos showing the bend squence as well as the air box cutout and weatherstrip seal. I used a couple pieces of wood, a large C-clamp and my dining room table to do the bending - low tech but very effective for mild Aluminum sheet. For the box cut out, I just drilled 3/8 inch diameter holes at the corners, buzzed through the plastic between holes with a jigsaw and then cleaned up the edges with a rotary rasp in my dremel tool. I also removed 1/2 inch wide strip of the ribs on the bottom of the box around the opening so that the seal would be tight. Finally there is a spot on the bottom of the box which is not flat like the rest of it - you can see I cut a few wedges of strip to fill this gap on the bottom of the box.
The PDF template itself is linked as an attachement only (scroll past the photos and click on it). Enjoy!! -- James

Below are some more photos showing the bend squence as well as the air box cutout and weatherstrip seal. I used a couple pieces of wood, a large C-clamp and my dining room table to do the bending - low tech but very effective for mild Aluminum sheet. For the box cut out, I just drilled 3/8 inch diameter holes at the corners, buzzed through the plastic between holes with a jigsaw and then cleaned up the edges with a rotary rasp in my dremel tool. I also removed 1/2 inch wide strip of the ribs on the bottom of the box around the opening so that the seal would be tight. Finally there is a spot on the bottom of the box which is not flat like the rest of it - you can see I cut a few wedges of strip to fill this gap on the bottom of the box.
The PDF template itself is linked as an attachement only (scroll past the photos and click on it). Enjoy!!
-- James
Trending Topics
still 1.3 liter v8 eater
Joined: Sep 2006
Posts: 546
Likes: 0
From: San Diego, CA
Originally Posted by rxcited2
Thanks for all the positive feedback guys. It really is NOT a lot of work to do this modification once you have this template. I enjoyed the process and I think it is great others might benefit from my efforts. So find attached a PDF with full size template including a pictorial view and some notes on construction. This is an ANSI D Size print which measures 22x34 inches (landscape orientation). If you don't have access to a large format printer, you can take it to a copy shop and have it printed out. The actual template fits on a 12 x 18 inch piece of sheet. There is one small difference to the template versus the way you see it in my photos - a groove in the last face which allows it to be captured by the face that gets bolted down. This is an improvement over having to somehow fasten the two faces together, though you can do that if you want (epoxy, poprivet, snip & fold tabs, etc.)
Below are some more photos showing the bend squence as well as the air box cutout and weatherstrip seal. I used a couple pieces of wood, a large C-clamp and my dining room table to do the bending - low tech but very effective for mild Aluminum sheet. For the box cut out, I just drilled 3/8 inch diameter holes at the corners, buzzed through the plastic between holes with a jigsaw and then cleaned up the edges with a rotary rasp in my dremel tool. I also removed 1/2 inch wide strip of the ribs on the bottom of the box around the opening so that the seal would be tight. Finally there is a spot on the bottom of the box which is not flat like the rest of it - you can see I cut a few wedges of strip to fill this gap on the bottom of the box.
The PDF template itself is linked as an attachement only (scroll past the photos and click on it). Enjoy!! -- James
Below are some more photos showing the bend squence as well as the air box cutout and weatherstrip seal. I used a couple pieces of wood, a large C-clamp and my dining room table to do the bending - low tech but very effective for mild Aluminum sheet. For the box cut out, I just drilled 3/8 inch diameter holes at the corners, buzzed through the plastic between holes with a jigsaw and then cleaned up the edges with a rotary rasp in my dremel tool. I also removed 1/2 inch wide strip of the ribs on the bottom of the box around the opening so that the seal would be tight. Finally there is a spot on the bottom of the box which is not flat like the rest of it - you can see I cut a few wedges of strip to fill this gap on the bottom of the box.
The PDF template itself is linked as an attachement only (scroll past the photos and click on it). Enjoy!!
-- James


still 1.3 liter v8 eater
Joined: Sep 2006
Posts: 546
Likes: 0
From: San Diego, CA
Originally Posted by montego
damn dude. Impressive.
Certainly not cheap.
Certainly not cheap.


Thread Starter
Magnet Boy
Joined: Jan 2007
Posts: 251
Likes: 1
From: NorCal
0.025 Inch sheet, not 0.040
In case somebody is trying this, the sheet I used (which I purchased at Orchard Supply Hardware, also available at ACE Hardware) is actually 0.025 Inch thick Aluminum sheet, not 0.040 Inch thick as I previously stated. It cut VERY easily with simple tin-snips and also bent VERY easily using the scrap-wood & C-clamp technique.
You may see a 1 to 1-1/2 psi increase in boost pressure with this modification and a K &N performance filter. This is very significant! If you have other modifications, make sure you are paying attention to your boost level. Hopefully you have a PFC or other ECU upgrade to allow you to keep your air fuel ratio safe.
You will also notice some increase in blow off valve noise. The OEM setup routes the output of the BOV's into the air-box. In order to do this upgrade, you need to remove your rock guard (if you use the spray paint air-box cutout marking technique). With this modification and particularly with the rock guard off, the PSSSSSHHHHHT sound from the BOV's operating when you boost then let off the accelerator is much more apparent than before the modification. This is nothing to worry about, but I thought I would mention it so you will know what to expect.
FYI, I bought my K&N filter from this outfit: http://www.cardomain.com/item/KNN332017 Best price I found $47.95, no CA sales tax, and free shipping! Got my filter very promptly. Doing this modification with the OEM filter will probably help, but for maximum increase in free flow, you need this K&N filter upgrade too.
-- James
Originally Posted by 1.3 liter V8 eater
well... certainly not expensive though either. with the exception of the CAD software, that intake shouldnt take up more than a few dollars and some elbow grease...
I meant that it wasn't cheap as in quality not price....

Banned. I got OWNED!!!
Joined: Sep 2006
Posts: 680
Likes: 0
From: NC
Originally Posted by SRGT-7
good thinking.......! we need more do it yourself post here
OH HELL!LOOKY LOOKY I SEE YOUR SORRY *** IS STILL COMEING AROUND
tell us who you are! scammer shane willis
GUYS CAUTION WITH THIS GUY!AS I MYSELF HAVE BEEN WARNED BY SOMEONE WHO HARDLY MISSES

RX7 lover
Joined: Jun 2005
Posts: 1,160
Likes: 3
From: UK
Looks very good! I will surely be trying this myself, i am just in the process of making my own system for the car, ducting for the radiator, new battery box etc all out of 0.7mm sheet stainless. The only thing i have left to work out how to do is my cold air intake and you just did it for me!
Great job!
Great job!
Thread Starter
Magnet Boy
Joined: Jan 2007
Posts: 251
Likes: 1
From: NorCal
Hi BobfisH.
I hope the template is of some help to you. I too need to fabricate some radiator and intercooler ducting. I would love to see some pics of what you have done so I can get some ideas!
Since that original template, I have put in a Koyo racing radiator. The fitment seems to be tighter than it was originally. For now, I tweaked my existing duct to fit. Basically I squeezed it at front and aft ends so at the front it looks like < and at the back, it looks like > which makes it thin enough to slip between the radiator/fan assembly and the chassis like it did originally. I'll post a pic tonight.
I am thinking I would like to redesign it to have a longer thinner opening next to the radiator, instead of the simple rectangle going straight down. And maybe a bit larger opening to the air-box. Will post back here if/when I get around to it.
-- James
RX7 lover
Joined: Jun 2005
Posts: 1,160
Likes: 3
From: UK
cool, your very lucky to have CAD facilities. The metal i am using is quite difficult to bend so i am being forced to use a hammer on it to get a small radius bend. I was too lazy to get a piece of wood so the install looks a little shabby, plus i havent used a tape measure once, since i started building it. I will go and take some pictures now for you since im bored and i dont have any yet!
back in 15 with pictures.
back in 15 with pictures.