Electron Manipulation
 10-20-04, 03:27 PM
#51
Rotor DEMON !
Join Date: Nov 2002
Location: alberta canada/soon to be cape coral FL:D
Posts: 1,074
Likes: 0
Received 0 Likes
on
0 Posts
Originally Posted by dubulup
Not my car...you can still guess if you like 

 10-20-04, 03:29 PM
#53
development
Thread Starter
Originally Posted by SurgeMonster
coming from someone that has a thousand hours of labor into their car I'll say that I'm very impressed.
not sure that makes sense to anyone else
I'd also remove the 2 brackets for pulling the engine once you get it in there
not sure that makes sense to anyone else
I'd also remove the 2 brackets for pulling the engine once you get it in there
Hey man, that means a lot...I've spent a lot of time on this project, since everything was done myself and mostly by myself.
I did remove one of the pulling brackets (torque brace) the other looks like too much trouble to get to with everything in there...thanks for the tip.
(probably next picture you see, it'll be gone, LOL!)
10-20-04, 03:59 PM
#54
Lawn Ornament
Originally Posted by dubulup
Hey man, that means a lot...I've spent a lot of time on this project, since everything was done myself and mostly by myself.
I did remove one of the pulling brackets (torque brace) the other looks like too much trouble to get to with everything in there...thanks for the tip.
(probably next picture you see, it'll be gone, LOL!)
I did remove one of the pulling brackets (torque brace) the other looks like too much trouble to get to with everything in there...thanks for the tip.
(probably next picture you see, it'll be gone, LOL!)
 10-20-04, 04:25 PM
#55
Hey, where did my $$$ go?

Join Date: Feb 2001
Location: Bimingham, AL
Posts: 4,413
Likes: 0
Received 0 Likes
on
0 Posts
Looks good man. Nice to see some more people that take thier time and do things right. I like the quick disconnect you did for your harness.
Stephen
Stephen
10-20-04, 05:00 PM
#56
development
Thread Starter
Thanks guys!! It is a real treat driving her around! I've learned from reading the forums...and most of the names responding in this thread have been around since I started reading this forum and didn't know ****. The forum has gone down hill a bit...but still good to see some veteran names!
I remember when I thought it was impressive that I got the fuel filter replaced and the car didn't leak fuel when I was done, LOL!!
replaced diff & tranny fluids...what a PITA.
Then on to the start button, **** I pulled the dash out and the car started after adding components and cutting wires...AND the gauges STILL WORKED?!?!?!
Got bored and went FULL non-seq (with a perfect seq set-up)...FAWK, that took awhile (mainly ordering part after part), but did it right (with accompaning mods cooling etc) and layed down 300rwhp @ 10psi and passed emissions with all bolt ons (minus midpipe)!
Listened to bad advice and blew the motor. My own fault but it happened. (or maybe it was the bad batch of Mazda 2 piece seals???)
Then built my own engine, did a radical harness job, then decided I'd spent too much time on this motor to slap the twins back on...did a custom single jobber. Took even longer but I was confident enough in my work that the next day (after putting 120mi on her in the city) followed my buddy on his bike into the MTNs (and shifted mad quick, yo cuz I only got til 3k; tuned for break-in and that�s a lot of hills, haha)...on the way home, I realized I didn't even have a 10mm socket or any tool for that matter.
There is probably a lot of people to thank so I guess this is a good time to mention some...in no particular order.
Sung Kong - A great friend who gave the space I needed and motivation to continue (BIG THANKS)
Phil Sohn - a great housing at a great price (and my 99 rims the week before she blew )
Bryan Nickell - a rotor I needed and ported my housings, then ended up suppling better parts for the turbo that was pulled off some truck!
Rick Engman - balanced my frankenstein motor parts, lapped my irons, pressed some bearings, and some e-shaft work...when he talked, I listened, very carefully
The Mad Fabricator - helped with my manifold and ceramic coats a very pretty satin black
Daniel Johnson and Brian Thompson - these fools can pull more motors quicker than anyone I know, great wrenchin' buddies to have around.
Judge Ito - never talked to the guy, but followed his forum advice and have a running FD powered by a motor I put together..
Arthur Mulder - Always glad to help with welding and piping work and charge me for tuning time
Frank Kim and John Ra - two monkey's that'd keep me focused and let me know my turbo wasn't big enough
And thanks to the RX7club board owner for showing me where to spend my money...I think
I remember when I thought it was impressive that I got the fuel filter replaced and the car didn't leak fuel when I was done, LOL!!
replaced diff & tranny fluids...what a PITA.
Then on to the start button, **** I pulled the dash out and the car started after adding components and cutting wires...AND the gauges STILL WORKED?!?!?!
Got bored and went FULL non-seq (with a perfect seq set-up)...FAWK, that took awhile (mainly ordering part after part), but did it right (with accompaning mods cooling etc) and layed down 300rwhp @ 10psi and passed emissions with all bolt ons (minus midpipe)!
Listened to bad advice and blew the motor. My own fault but it happened. (or maybe it was the bad batch of Mazda 2 piece seals???)
Then built my own engine, did a radical harness job, then decided I'd spent too much time on this motor to slap the twins back on...did a custom single jobber. Took even longer but I was confident enough in my work that the next day (after putting 120mi on her in the city) followed my buddy on his bike into the MTNs (and shifted mad quick, yo cuz I only got til 3k; tuned for break-in and that�s a lot of hills, haha)...on the way home, I realized I didn't even have a 10mm socket or any tool for that matter.
There is probably a lot of people to thank so I guess this is a good time to mention some...in no particular order.
Sung Kong - A great friend who gave the space I needed and motivation to continue (BIG THANKS)
Phil Sohn - a great housing at a great price (and my 99 rims the week before she blew
)Bryan Nickell - a rotor I needed and ported my housings, then ended up suppling better parts for the turbo that was pulled off some truck!
Rick Engman - balanced my frankenstein motor parts, lapped my irons, pressed some bearings, and some e-shaft work...when he talked, I listened, very carefully
The Mad Fabricator - helped with my manifold and ceramic coats a very pretty satin black
Daniel Johnson and Brian Thompson - these fools can pull more motors quicker than anyone I know, great wrenchin' buddies to have around.
Judge Ito - never talked to the guy, but followed his forum advice and have a running FD powered by a motor I put together..
Arthur Mulder - Always glad to help with welding and piping work and charge me for tuning time
Frank Kim and John Ra - two monkey's that'd keep me focused and let me know my turbo wasn't big enough
And thanks to the RX7club board owner for showing me where to spend my money...I think
10-21-04, 10:51 PM
#57

I am in the process of doing this also. I have had it with my 11 year old harness. even after pulling it apart and stripping it back to the bear minimum, I am still having issues.
The rear secondary injector seems like it is working intermintantly and I think it is harness related. In you travels, did you find any crimp pins that will work with the factory connectors. I am about to shell out the bread for an all new harness, but the thought of hacking out all the unused stuff makes my stomach turn. If I cut it back at the firewall/abs location, I am sure the wiring will be decent. I can then use the pins that come with the QD to mate the wires that I plan to rerun with new wire. My concern is at the sensor end. I would relly like to have fresh pins in the factory connectors or new connectors all together. Any ideas on the sensor end. I have the PFC and will be keeping the following:
TPS, ISC, AWS(maybe), PRI INJs(2), Sec Injs(2) Fuel Temp, IAT, WT(ecu), Wt(miata fan switch), Boost control (2x), Kock sensor, Ign (2x), fuel evap solenoid, o2,
also, any idea for the new wire?
Mike
 10-22-04, 11:44 AM
#59
development
Thread Starter
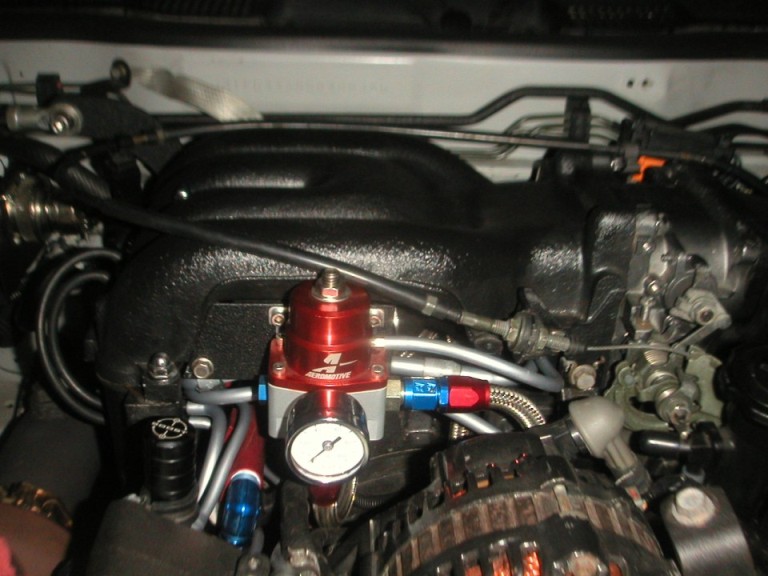
Mike - I'll try to answer your questions...but first I'll share a reliability secret/tip that I did to beef up the 9 year old sensor connectors.
(you can only do this 1st step if you are wiring the stock connectors to a custom harness, i.e. they are cut off the stock harness...see 1st pic in this thread)
First I cut ~1" of heat shrink and slide it down as far down to the rubber boot on the back side of the connector where the wire goes in and shrink it down. Then I used Permatex the "Right Stuff" and filled in the backside, sort of enviroment proofing the connector...I don't have any pics at the moment, but might be able to find some by Monday. In doing this, the wire jacket is less likely to crack at the boot and with the sealing, corrosion won't be a factor. I noticed one of my CAS connectors had a small crack in the jacket (no conductors were damaged...if any conductors are broken, I recommend finding replacement connectors) so I decided to beef up all the stock connectors.
Why do you think this? I recommend checking continuity of these wires (with a ohms meter) to isolate the issue. Inspect for what I stated above about cracked wire jackets.
No, I never had to de-pin any connectors...I believe AMP is the vendor that supplies Mazda with the connectors, there logo is on the oil pressure sender...turns out thats who I got the QD from...ALL STOCK
Yes a new harness is $$$, but I recently "hacked" a brand new harness for a single, PFC install and it came out very clean...I'm willing to do the same for anyone interested (send PM). If, you plan to so this yourself...It's extremely important to use some sort of "dead head" sleeve or crimp, with an approved dielectric strength, as pretty much all the seq solenoids have a 12V B/W wire that needs to be properly terminated.
Wiring should be fine, what QD are you planning on using?
As stated above if continuity checks out and none of the conductors are broken, the pins themselves should be fine, what mainly fails is the bending of baked 11 year old wire at the connector.
I'd block off the AWS...IMO, it's cruel to do that to a cold motor (but mazda does have more R&D budget than anyone on this forum...even Jimlab )
as far as wire...haltech supplied a general automotive grade wire, nothing impressive, you can pick some up at any local automotive store...just try to get as many colors/patterns to keep things straight and be very methodical (sp?) in labeling; make detailed diagrams. ECU pin, to QD pin (and color)...QD pin, to sensor (and color)...this will make your life easier. Check every sensor before final wrap.
On the other hand Motec uses M22759/34 wire, which is rated at 150C and is used on every aircraft built, and charge $2600 for a QD setup similar to the one I've built.
Feel free to ask any question you are unsure about, I'm glad to help.
(you can only do this 1st step if you are wiring the stock connectors to a custom harness, i.e. they are cut off the stock harness...see 1st pic in this thread)
First I cut ~1" of heat shrink and slide it down as far down to the rubber boot on the back side of the connector where the wire goes in and shrink it down. Then I used Permatex the "Right Stuff" and filled in the backside, sort of enviroment proofing the connector...I don't have any pics at the moment, but might be able to find some by Monday. In doing this, the wire jacket is less likely to crack at the boot and with the sealing, corrosion won't be a factor. I noticed one of my CAS connectors had a small crack in the jacket (no conductors were damaged...if any conductors are broken, I recommend finding replacement connectors) so I decided to beef up all the stock connectors.
Originally Posted by MFilippello
I am in the process of doing this also. I have had it with my 11 year old harness. even after pulling it apart and stripping it back to the bear minimum, I am still having issues.
The rear secondary injector seems like it is working intermintantly and I think it is harness related.
The rear secondary injector seems like it is working intermintantly and I think it is harness related.
In you travels, did you find any crimp pins that will work with the factory connectors. I am about to shell out the bread for an all new harness, but the thought of hacking out all the unused stuff makes my stomach turn.
Yes a new harness is $$$, but I recently "hacked" a brand new harness for a single, PFC install and it came out very clean...I'm willing to do the same for anyone interested (send PM). If, you plan to so this yourself...It's extremely important to use some sort of "dead head" sleeve or crimp, with an approved dielectric strength, as pretty much all the seq solenoids have a 12V B/W wire that needs to be properly terminated.
If I cut it back at the firewall/abs location, I am sure the wiring will be decent. I can then use the pins that come with the QD to mate the wires that I plan to rerun with new wire.
My concern is at the sensor end. I would relly like to have fresh pins in the factory connectors or new connectors all together. Any ideas on the sensor end.
I have the PFC and will be keeping the following:
TPS, ISC, AWS(maybe), PRI INJs(2), Sec Injs(2) Fuel Temp, IAT, WT(ecu), Wt(miata fan switch), Boost control (2x), Kock sensor, Ign (2x), fuel evap solenoid, o2,
also, any idea for the new wire?
Mike
TPS, ISC, AWS(maybe), PRI INJs(2), Sec Injs(2) Fuel Temp, IAT, WT(ecu), Wt(miata fan switch), Boost control (2x), Kock sensor, Ign (2x), fuel evap solenoid, o2,
also, any idea for the new wire?
Mike
)as far as wire...haltech supplied a general automotive grade wire, nothing impressive, you can pick some up at any local automotive store...just try to get as many colors/patterns to keep things straight and be very methodical (sp?) in labeling; make detailed diagrams. ECU pin, to QD pin (and color)...QD pin, to sensor (and color)...this will make your life easier. Check every sensor before final wrap.
On the other hand Motec uses M22759/34 wire, which is rated at 150C and is used on every aircraft built, and charge $2600 for a QD setup similar to the one I've built.
Feel free to ask any question you are unsure about, I'm glad to help.
Last edited by dubulup; 10-22-04 at 11:48 AM.
10-22-04, 10:30 PM
#60
thanks for the info. I was not so much worried about the pins themselves but wanted a way to put fresh wire all the way to the connector. If I can not pull the pins and get the old wire out then the only other option was to put new wire into new pins. Or, do like you did, and reuse the connector and splice the new wire to the pig tales provided the wire coming out of the connector isn't breaking right there.
I have disabled the aws but figured I would still include the connection.
I drove it today after going through the ignition and fuel system. Everything seems to be working now. I am up to 10psi and rich. All is good to start tuning. Do you have any idea what the lowest duty cycle the pfc allows. I have 775 primary injectors and cannot pull any more fuel out at idle. I am at 3.4%. If I go to the test screen and pull fuel across the board, I still get no lower than 3.4%. just thought i'd ask.
mike
10-23-04, 10:45 PM
#61
I live in a Museum
Join Date: Apr 2004
Location: NY, 10992
Posts: 930
Likes: 0
Received 0 Likes
on
0 Posts
I just took my harness out and stripped it down to just the wires, and since i removed the aws and some solenoids i removed the wires all the way from the plug to the harness. The guy i work with has a parts car e30 bimmer and those cars came stock with the 50 pin connector (around 50) and hes gonna give me that with some 1 foot leads on either side, then solder and heat-shrink them to the harness, also im putting the QD before the tranny and using a honda connector that i saved from a motor swap on my friends car, this way i can pull either the tranny and the engine together and just disconnect the qd or i can just unplug the qd and the honda plug and remove the engine seperately. vice verse if replacing a clutch.. just one plug to undo. I still want to think of a bomb proof solution to wrap the harness in to prevent cracking and weather abuse. I want to know how i can re-size some pictures so i can post them on here but i dont know how. And as for the wiring to use, i know it's only a single color but check this link out:
http://www.route66supply.com/store/page16.html
http://www.nema.org/index_nema.cfm/1203/ (probably have to call)
Heat-tape:
http://www.mmrusa.com/HScolorsleeving.htm
http://www.route66supply.com/store/page16.html
http://www.nema.org/index_nema.cfm/1203/ (probably have to call)
Heat-tape:
http://www.mmrusa.com/HScolorsleeving.htm
10-24-04, 10:06 AM
#62
The tape I used is found in the plumbing section of home depot. (don't laugh) It is high temp silicone tape. It is rated to like 500 deg or something. It has no adhesive backing like regular electrical tape so it doesn't gum everything up. It adhears to itself and is very plyable and smooth. Great ****. I wrapped everything with this and then used some DEI heat sheathing to cover the main trunk of the harness. I sheiled it from the abs location all the way down to the Ignition pick ups.
mike
mike
10-31-04, 11:21 AM
#63
development
Thread Starter
Originally Posted by iluvmy3rdgen
I just took my harness out and stripped it down to just the wires, and since i removed the aws and some solenoids i removed the wires all the way from the plug to the harness. The guy i work with has a parts car e30 bimmer and those cars came stock with the 50 pin connector (around 50) and hes gonna give me that with some 1 foot leads on either side, then solder and heat-shrink them to the harness, also im putting the QD before the tranny and using a honda connector that i saved from a motor swap on my friends car, this way i can pull either the tranny and the engine together and just disconnect the qd or i can just unplug the qd and the honda plug and remove the engine seperately. vice verse if replacing a clutch.. just one plug to undo. I still want to think of a bomb proof solution to wrap the harness in to prevent cracking and weather abuse. I want to know how i can re-size some pictures so i can post them on here but i dont know how. And as for the wiring to use, i know it's only a single color but check this link out:
http://www.route66supply.com/store/page16.html
http://www.nema.org/index_nema.cfm/1203/ (probably have to call)
Heat-tape:
http://www.mmrusa.com/HScolorsleeving.htm
http://www.route66supply.com/store/page16.html
http://www.nema.org/index_nema.cfm/1203/ (probably have to call)
Heat-tape:
http://www.mmrusa.com/HScolorsleeving.htm
Any progress on this?? I'd like to see some pics.
10-31-04, 01:22 PM
#64
I live in a Museum
Join Date: Apr 2004
Location: NY, 10992
Posts: 930
Likes: 0
Received 0 Likes
on
0 Posts
Well i just got finished removing everything from the harness now im just waiting to get that QD from my friend, the honda connector is on, ill try and take some pics soon, i went to home depot and im gonna try that silicone wrap and see how that works out. I ordered the nylon wireloom from mccmaster carr since it has a high heat rating and im gonna use that over everything.
11-16-04, 10:20 AM
#65
Eats, Sleeps, Dreams Rotary
Holy BuJesus!!! How did I miss this thread? Must have all happend when my car was down for 7 months and I was pissed and didn't want to read the forum...Damn, Dub! you Da Man!
11-16-04, 11:12 AM
#66
Lawn Ornament
Originally Posted by apneablue
Holy BuJesus!!! How did I miss this thread? Must have all happend when my car was down for 7 months and I was pissed and didn't want to read the forum...Damn, Dub! you Da Man!
 11-16-04, 11:42 AM
#67
Originally Posted by MFilippello
The tape I used is found in the plumbing section of home depot. (don't laugh) It is high temp silicone tape. It is rated to like 500 deg or something. It has no adhesive backing like regular electrical tape so it doesn't gum everything up. It adhears to itself and is very plyable and smooth. Great ****. I wrapped everything with this and then used some DEI heat sheathing to cover the main trunk of the harness. I sheiled it from the abs location all the way down to the Ignition pick ups.
mike
mike
And more than the original vinyl tape, it's thick enough to actually insulate against engine temps. The vinyl ends up being paper thin.
Dave
11-16-04, 04:01 PM
#68
development
Thread Starter
Originally Posted by apneablue
Damn, Dub! you Da Man!
Well, I lost my camera in the move, so I don't have any recent photo's to share...things are coming together for tuning, so we'll see how she does.
11-16-04, 04:39 PM
#72
development
Thread Starter
Originally Posted by apneablue
I'll do it for you!
The turbo probably isn't quite in it's sweet spot at 10psi...maybe 15psi?!?!
who knows.
I run around with fuel cut at 7psi, and once I get into boost, I can hold it around 3-4psi...but with the slightist throttle movement, the gauge slams to 7psi and, well you know.
I can say this turbo is moving some freakin' air! should have went single from day one.
shifting a 4k, ~10inhg BOV sounds off.
the SMIC will be the bottle neck in the system as far as flow...I wanted everything under the hood, and the only solution was V-mount, but I also want my AC. Didn't want the car to be down for too much longer so, I decided to work with what I got...until next time...
01-17-05, 09:03 AM
#73
development
Thread Starter
UPDATE: Emissions
Purge Solenoid...oil smelled of fuel (too extreme for normal rotary dilution smell) after removing the solenoid and having it vent straight into the UIM with the metal check valve. Fumes would saturate the motor while off...at least that was my best guess.
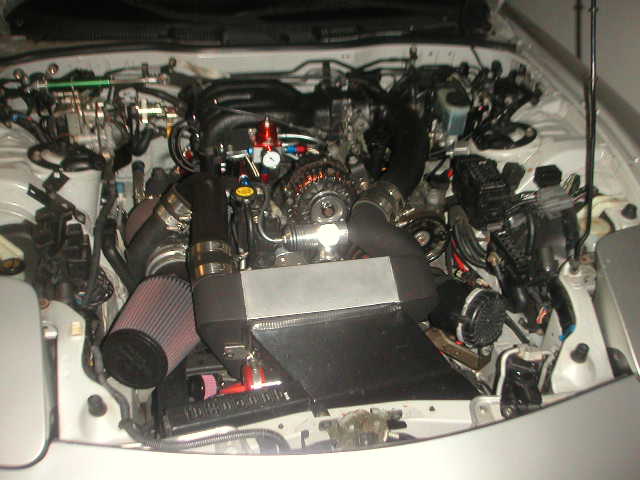
conclusion: Working on a single turbo FD is sooo simple, a hand full of tools to totally remove the UIM and entire electrical system
since I didn't think the modding would stop...you can see the pigtail loops I added into the harness for "room to grow" splicing in new wires was simple.
No more fuel smell after adding the solenoid back in. I could have vented it to atmosphere, but then my car smelled of gasoline after a fill up. The solenoid is open at idle to 3k, this allows the vacuum of the motor to draw fumes out of the fuel tank�once in boost the check valve prevents the charcoal canister from pressurizing and venting fumes to atmosphere while boosting.
01-17-05, 09:23 AM
#74
development
Thread Starter
Air pump.
This is an electric air pump off a C4 Vette. With some help from Wargasm and the Vette forum, I was able to find out this pump runs at 9V and burns up at 12V. Since I rewired my fuel system with the Haltech, I was able to use the fuel pump resistor to run the pump at the "proper" (lower than 12V) voltage. I spliced the Haltech output wire into the stock ECU (still two yellow connectors I'm hiding) trigger wire to the fuel pump (SPEED) relay to send the switching ON/OFF signal to the air pump relay. Sent the output from the relay into the resistor and then to the pump. The inlet on the pump has a breather filter on it, located to the right of the turbo filter. The outlet runs down under the AC compressor lines and straight to the split air check valve on the cat. Also running from idle to 3k.
Conclusion: the air pump hasn't burned up in the 80 hard miles I drove yesterday (lots of idling in traffic also)�and the resistor didn't catch fire. Once the motor is warm, the exhaust fumes smell somewhat cleaner (neighbors, probably think I'm a crack head junky�always smelling my exhaust ). The extra O2 in the cat, helps with the oxidation process. Will it be enough to pass ATL emissions??? I don't know�
Still need to coat the bracket and the resistor (man that thing is ugly)...I'll end up putting a relay socket on the relay, but the spade connectors work for testing.
This is an electric air pump off a C4 Vette. With some help from Wargasm and the Vette forum, I was able to find out this pump runs at 9V and burns up at 12V. Since I rewired my fuel system with the Haltech, I was able to use the fuel pump resistor to run the pump at the "proper" (lower than 12V) voltage. I spliced the Haltech output wire into the stock ECU (still two yellow connectors I'm hiding) trigger wire to the fuel pump (SPEED) relay to send the switching ON/OFF signal to the air pump relay. Sent the output from the relay into the resistor and then to the pump. The inlet on the pump has a breather filter on it, located to the right of the turbo filter. The outlet runs down under the AC compressor lines and straight to the split air check valve on the cat. Also running from idle to 3k.
Conclusion: the air pump hasn't burned up in the 80 hard miles I drove yesterday (lots of idling in traffic also)�and the resistor didn't catch fire. Once the motor is warm, the exhaust fumes smell somewhat cleaner (neighbors, probably think I'm a crack head junky�always smelling my exhaust
). The extra O2 in the cat, helps with the oxidation process. Will it be enough to pass ATL emissions??? I don't know�Still need to coat the bracket and the resistor (man that thing is ugly)...I'll end up putting a relay socket on the relay, but the spade connectors work for testing.